panda3d加载模型复习和python面向对象编程属性学习
运行一个python示例;然后去除一些代码,只剩下加载模型相关,如下;
from panda3d.core import loadPrcFileData
# Configure the parallax mapping settings (these are just the defaults)
loadPrcFileData("", "parallax-mapping-samples 3")
loadPrcFileData("", "parallax-mapping-scale 0.1")
import direct.directbase.DirectStart
from panda3d.core import WindowProperties
from panda3d.core import Filename,Shader
from panda3d.core import AmbientLight,PointLight
from panda3d.core import TextNode
from panda3d.core import Point3,Vec3,Vec4
from direct.task.Task import Task
from direct.actor.Actor import Actor
from direct.gui.OnscreenText import OnscreenText
from direct.showbase.DirectObject import DirectObject
from direct.filter.CommonFilters import *
import sys,os
# Function to put instructions on the screen.
def addInstructions(pos, msg):
return OnscreenText(text=msg, style=1, fg=(1,1,1,1),
pos=(-1.3, pos), align=TextNode.ALeft, scale = .05)
# Function to put title on the screen.
def addTitle(text):
return OnscreenText(text=text, style=1, fg=(1,1,1,1),
pos=(1.3,-0.95), align=TextNode.ARight, scale = .07)
class BumpMapDemo(DirectObject):
def __init__(self):
# Check video card capabilities.
if (base.win.getGsg().getSupportsBasicShaders() == 0):
addTitle("Bump Mapping: Video driver reports that shaders are not supported.")
return
# Post the instructions
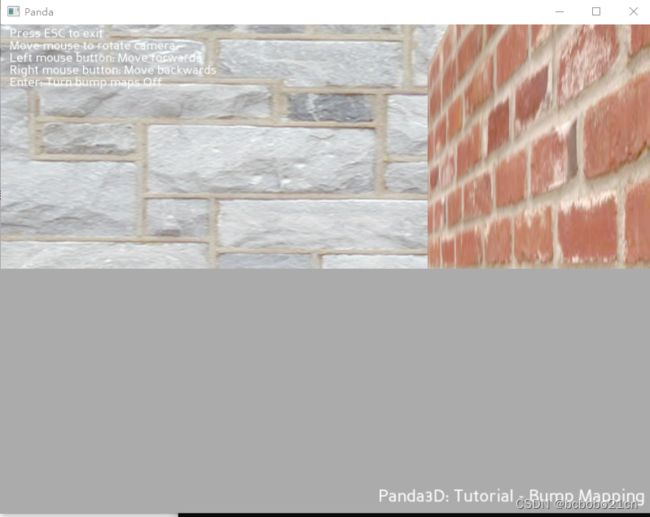
self.title = addTitle("Panda3D: Tutorial - Bump Mapping")
self.inst1 = addInstructions(0.95, "Press ESC to exit")
self.inst2 = addInstructions(0.90, "Move mouse to rotate camera")
self.inst3 = addInstructions(0.85, "Left mouse button: Move forwards")
self.inst4 = addInstructions(0.80, "Right mouse button: Move backwards")
self.inst5 = addInstructions(0.75, "Enter: Turn bump maps Off")
self.room = loader.loadModel("models/abstractroom")
self.room.reparentTo(render)
# Make the mouse invisible, turn off normal mouse controls
base.disableMouse()
props = WindowProperties()
props.setCursorHidden(True)
base.win.requestProperties(props)
# Set the current viewing target
self.focus = Vec3(55,-55,20)
self.heading = 180
self.pitch = 0
self.mousex = 0
self.mousey = 0
self.last = 0
self.mousebtn = [0,0,0]
self.room.setShaderAuto()
self.shaderenable = 1
t = BumpMapDemo()
run()运行如下;
先看一下在python面向对象编程中,__init__()相当于构造函数,self代表类的实例;
还不太了解,看上去它的属性都是不须声明直接可以用,像下面这些,
self.title = xxx
self.inst1 = xxx
self.inst2 = xxx
......
self.inst5 = xxx
self.room = xxx
看一下把self.title改为self.biaoti是不是一样;是一样,程序跑起来都一样;
它的模型加载了之后是赋值给 self.room,看一下把全部的room都改为house,运行一下,也是一样;
模型是调用 loader.loadModel()方法加载,加载之后赋值给 self.room;
之后还有一句 self.room.reparentTo(render),模型才会显示;
对于 reparentTo(render) 方法,手册说明如下;
Placing the Model in the Scene Graph
The most important manipulation is to change the parent of a node. A model is by default loaded without a parent, but it needs to be placed into an active scene graph so that Panda3D will be able to find the model’s geometry and render it to the screen.
The default 3D scene graph is called render, and this is how to reparent the model to this scene graph:
myModel.reparentTo(render)
It is possible to reparent the model to any node (even to another model, or to a sub-part of a different model), not just to render! What’s important is that it is parented to a node that is itself parented to a scene graph, so that Panda3D can find it. Otherwise, the model will remain invisible.
The converse is to remove a model from the scene graph, which can be done as follows:
myModel.detachNode()
大致是说,模型载入后默认没有父对象,需要放入一个激活的场景图,这样panda3d可以发现模型的几何然后把它渲染到屏幕;reparentTo(render) 方法放置模型进场景图;
Scene Graph,先翻译为场景图;
如果把模型从场景图移除,调用detachNode();