Android进阶之路 - 去除EditText内边距
正如题名,在Android中的EditText是自带内边距的,常规而言设置背景为null即可,但是因为使用了并不熟悉的声明式框架,本是几分钟解决的事儿,却花费了小半天~
简单的需求,相关blog
- Android进阶之路 - 去除EditText内边距
- Android进阶之路 - EditText输入字体自适应
其实这只是一个很简单的小需求,不想却遇到了一些小问题,索性花一些时间去打牢一下基础
-
- 引发场景
- 常见场景
-
- 原始场景
- 设置 background 场景
-
- background = null
- background = 色值
- background = drawable
- 设置 padding
-
- 仅设置 padding
- 设置 padding + background
- Demo测试
-
- 效果
- xml
引发场景
此场景正是我目前开发中需要适配的一个UI效果,也因由此我又写了个Demo,经过测试了一番后,总结记录于此
我的思考
针对于整体布局而言,以下俩种方式都可以使用(初始出问题的时候我也都试过,但当时没找到问题的关键)
- 线性垂直布局+帧布局(EditText+TextView)
- 线性垂直布局+线性水平布局(EditText+TextView)
总体布局方案搞定后,主要就是针对于EditText常规处理;
- 按理我仅需设置
background = null即可,但是设置过后仅仅只是去除了底部线条,上下边距依旧存在; - 我给
EditText设置了固定高度,但导致EditText显示不全(被遮挡),内边距依旧存在且覆盖在输入内容之上
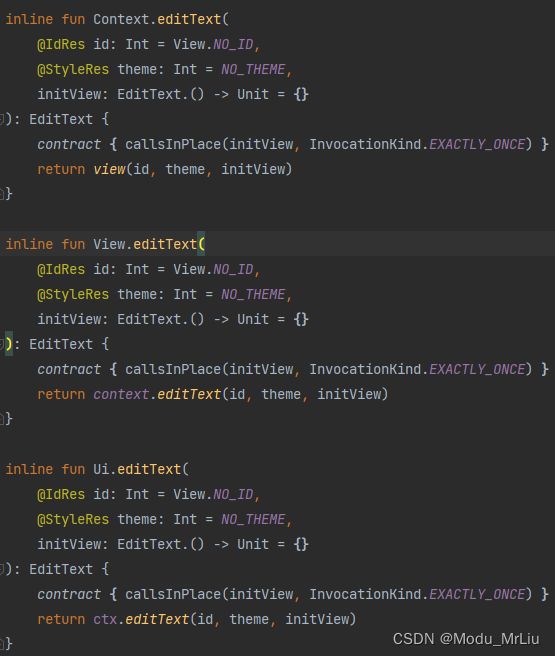
因为我使用的是 声明式布局+splitties框架 ,所以我就在想会不会是框架中有进行特殊设置?为了排除问题,我先拿同等处理方式在xml试了一下,发现可以达到预期效果;所以 background = null 的方式是可行的,但还不足够实现我们需求,然后我睡了一觉后想:“既然是上下边距的问题,那去除内边距应该可以”,经过尝试最终采用了 设置 padding + background 的方式
我想现在采用这种布局方式的朋友应该还不是很多,故此留一份伪代码,用于各位了解我所遇场景和解决方式
关于在排错时,我查看了框架是否内部有做设置,但是简单看来好像并未设置 theme 之类的
然后我想着看看EditText的源码,但是追的可能不太对,等以后有时间在专研一下
搜索之后,有人说
EditText默认的background是一个InsetDrawable,关于InsetDrawable可自行查找学习一下,我以下仅做简单记录
常见场景
以下场景仅是我个人经验而已,从原始的EditText效果 -> 去除原始默认效果 的处理方式和对应场景
原始场景
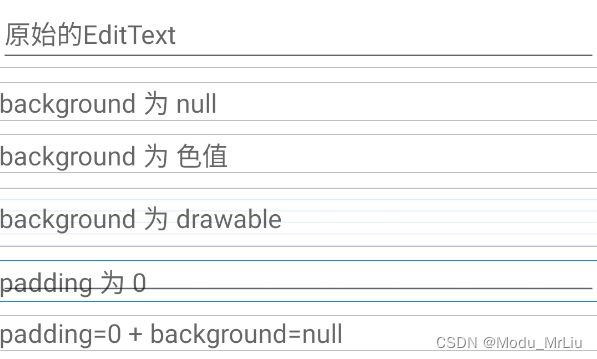
未经过任何设置的原始EditText,默认会有底部线条+上下内边距
    <EditText
        android:layout_width="match_parent"
        android:layout_height="wrap_content"
        android:hint="原始的EditText" />
设置 background 场景
通过设置 EditText 的 background ,可以去除其默认效果(边距和底部横线),我已知常见的有三种
- null (较常用)
- 色值
- drawable(可以是shape,也可以是图片)
background = null
    <EditText
        android:layout_width="match_parent"
        android:layout_height="wrap_content"
        android:layout_marginTop="10dp"
        android:background="@null"
        android:hint="background 为 null" />
background = 色值
    <EditText
        android:layout_width="match_parent"
        android:layout_height="wrap_content"
        android:layout_marginTop="10dp"
        android:background="#00000000"
        android:hint="background 为 色值" />
background = drawable
如不设置背景图,默认会采用背景图高度
    <EditText
        android:layout_width="match_parent"
        android:layout_height="40dp"
        android:layout_marginTop="10dp"
        android:background="@drawable/icon_font_bg"
        android:hint="background 为 drawable" />
设置 padding
因为默认效果有上下边距,所以我们也可以通过设置 padding,达到基本效果
仅设置 padding
当仅设置 padding 的话,默认的底部线条并不会消失
    <EditText
        android:layout_width="match_parent"
        android:layout_height="wrap_content"
        android:layout_marginTop="10dp"
        android:hint="padding 为 0"
        android:padding="0dp" />
设置 padding + background
我所遇到的问题,就是通过这种方式达到理想效果的
    <EditText
        android:layout_width="match_parent"
        android:layout_height="wrap_content"
        android:background="@null"
        android:hint="padding=0 + background=null"
        android:padding="0dp" />
Demo测试
这就是我用于测试 EditText 显示场景的Demo,备忘于此
效果
xml
<androidx.appcompat.widget.LinearLayoutCompat xmlns:android="http://schemas.android.com/apk/res/android"
    xmlns:app="http://schemas.android.com/apk/res-auto"
    xmlns:tools="http://schemas.android.com/tools"
    android:layout_width="match_parent"
    android:layout_height="match_parent"
    android:orientation="vertical"
    tools:context=".MainActivity">

    <EditText
        android:layout_width="match_parent"
        android:layout_height="wrap_content"
        android:hint="原始的EditText" />

    <EditText
        android:layout_width="match_parent"
        android:layout_height="wrap_content"
        android:layout_marginTop="10dp"
        android:background="@null"
        android:hint="background 为 null" />

    <EditText
        android:layout_width="match_parent"
        android:layout_height="wrap_content"
        android:layout_marginTop="10dp"
        android:background="#00000000"
        android:hint="background 为 色值" />

    <EditText
        android:layout_width="match_parent"
        android:layout_height="40dp"
        android:layout_marginTop="10dp"
        android:background="@drawable/icon_font_bg"
        android:hint="background 为 drawable" />

    <EditText
        android:layout_width="match_parent"
        android:layout_height="wrap_content"
        android:layout_marginTop="10dp"
        android:hint="padding 为 0"
        android:padding="0dp" />

    <EditText
        android:layout_width="match_parent"
        android:layout_height="wrap_content"
        android:layout_marginTop="10dp"
        android:background="null"
        android:hint="padding=0 + background=null"
        android:padding="0dp" />

androidx.appcompat.widget.LinearLayoutCompat>


