防火墙之SNAT和DNAT
文章目录
- 1 SNAT 原理与应用
-
- 1.1 SNAT 应用环境和策略的原理
- 1.2 SNAT 工作原理
- 1.3 SNAT 转换前提条件
- 1.4 路由转发开启方式
- 1.5 SNAT转换
- 1.6 小知识扩展
- 2 SNAT 案例
-
- 2.1 配置网关服务器
- 2.2 配置内外网网卡ens33和ens37
- 2.3 配置外网服务端
- 2.4 配置虚拟机 win7
- 2.5 测试连通性
- 2.6 网关服务器开启 SNAT
- 2.7 客户端访问服务端
- 2.8 服务端查看访问记录
- 2.9 配置网关服务器的 iptables 规则
- 2.10 内网访问服务端
- 2.11 服务端查看日志
- 3 DNAT 原理与应用
-
- 3.1 DNAT 应用环境
- 3.2 DNAT 策略原理
- 3.3 DNAT 转换前提条件
- 3.4 DNAT转换
- 4 DNAT 案例
-
- 4.1 配置网关服务器
- 4.2 配置内外网网卡ens33和ens37
- 4.3 配置内网服务端
- 4.4 配置虚拟机 win7
- 4.5 测试连通性
- 4.6 网关服务器开启 SNAT
- 4.7 配置网关服务器的 iptables 规则
- 4.8 外网客户端访问内网服务端
- 4.9 服务端查看日志
- 5 小知识扩展
-
- 5.1 防火墙规则的备份和还原
-
- 5.1.1 备份
- 5.1.2 还原
- 5.2 tcpdump---Linux抓包 监听网络流量命令
1 SNAT 原理与应用
1.1 SNAT 应用环境和策略的原理
SNAT 应用环境
- 局域网主机共享单个公网 IP 地址接入 Internet(私有 IP 不能在 Internet 中正常路由)
SNAT策略的原理
- 源地址转换,Source Network Address Translation
- 修改数据包的源地址
1.2 SNAT 工作原理
- 数据包从内网发送到公网时,SNAT会把数据包的源IP由私网IP转换成公网IP
- 当响应的数据包从公网发送到内网时,会把数据包的目的IP由公网IP转换为私网IP
1.3 SNAT 转换前提条件
- 局域网各主机已正确设置 IP 地址、子网掩码、默认网关地址
- Linux 网关开启 IP 路由转发
1.4 路由转发开启方式
临时打开
echo 1 > /proc/sys/net/ipv4/ip_forward
或
sysctl -w net.ipv4.ip_forward=1
永久打开
vim /etc/sysctl.conf
net.ipv4.ip_forward =1  #将此行写入配置文件
sysct1 -p    #读取修改后的配置
1.5 SNAT转换
SNAT转换1:固定的公网IP地址
iptables -t nat -A POSTROUTING -s 192.168.16.0/24 -o ens33 -j SNAT --to 12.0.0.1
或
iptables -t nat -A POSTROUTING -s 192.168.16.0/24 -o ens33 -j SNAT --to-source 12.0.0.1-12.0.0.10
                                     内网IP       出站 外网网卡                       外网IP或地址池
SNAT转换2:非固定的公网IP地址(共享动态IP地址)
iptables -t nat -A POSTROUTING -s 192.168.16.0/24 -o ens33 -j MASQUERADE
1.6 小知识扩展
一个IP地址做 SNAT 转换,一般可以让内网 100到200 台主机实现上网
2 SNAT 案例
2.1 配置网关服务器
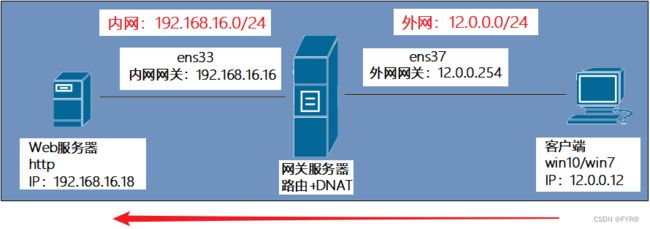
第一步:添加一张外网网卡网段为12.0.0.0/24

第二步:查看真机的网段与虚拟机所设网段是否一致,不一致要修改一致
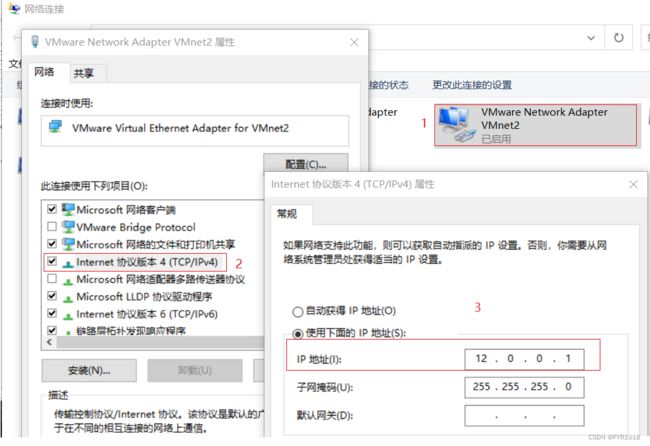
第三步:添加一张网卡
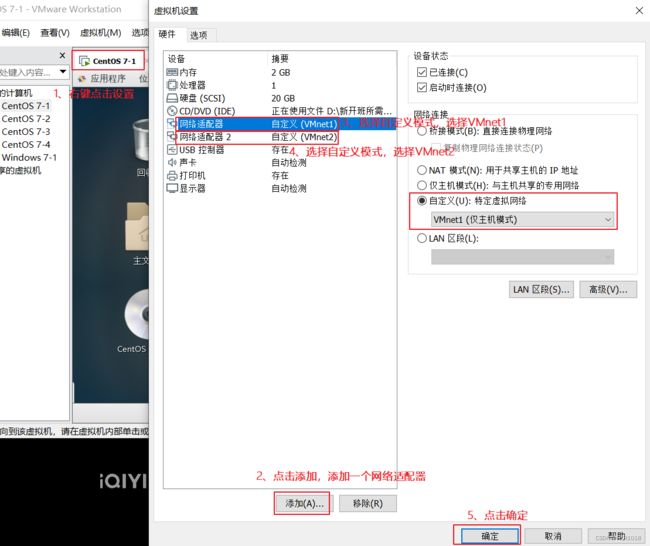

2.2 配置内外网网卡ens33和ens37
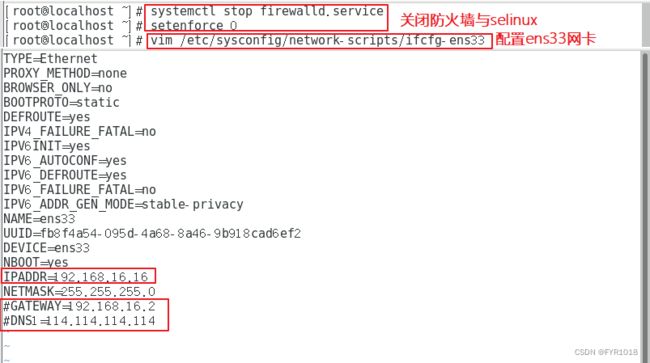
第一步:配置内网网卡ens33
[root@localhost ~]# systemctl stop firewalld.service
[root@localhost ~]# setenforce 0
[root@localhost ~]# vim /etc/sysconfig/network-scripts/ifcfg-ens33
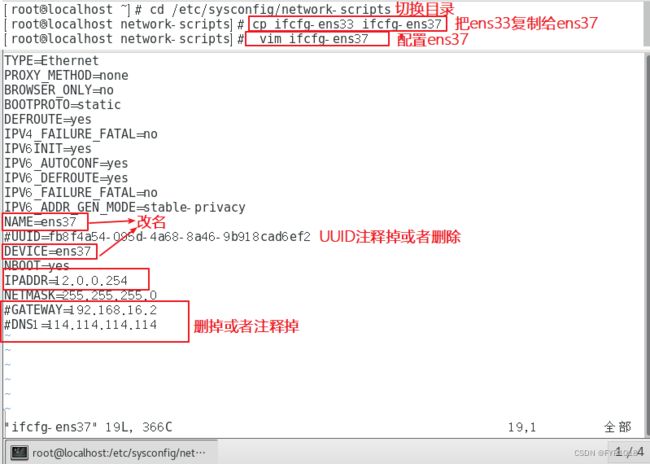
[root@localhost ~]# cd /etc/sysconfig/network-scripts
[root@localhost network-scripts]# ifconfig          #查看网卡
[root@localhost network-scripts]# cp ifcfg-ens33 ifcfg-ens37
[root@localhost network-scripts]# vim ifcfg-ens37
[root@localhost network-scripts]# systemctl restart network
[root@localhost network-scripts]# ifconfig
2.3 配置外网服务端
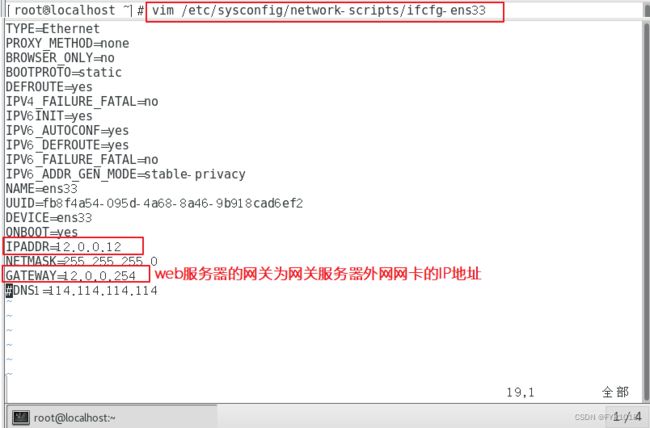
[root@localhost ~]# vim /etc/sysconfig/network-scripts/ifcfg-ens33
[root@localhost ~]# systemctl stop firewalld.service
[root@localhost ~]# setenforce 0
[root@localhost ~]# ifdown ens33 ; ifup ens33
由于是内网环境仅主机模式下 所以要安装一个本地yum仓库
#安装http服务
[root@localhost ~]# mount /dev/sr0 /mnt
[root@localhost ~]# cd /etc/yum.repos.d/
[root@localhost yum.repos.d]# ls
CentOS-Base.repo  CentOS-CR.repo  CentOS-Debuginfo.repo  CentOS-fasttrack.repo  CentOS-Media.repo  CentOS-Sources.repo  CentOS-Vault.repo
[root@localhost yum.repos.d]# mkdir repos.bak
[root@localhost yum.repos.d]# mv *.repo repos.bak
[root@localhost yum.repos.d]# touch local.repo
[root@localhost yum.repos.d]# vim local.repo
[local]
name=local
baseurl=file:///mnt
enabled=1
gpgcheck=0
[root@localhost yum.repos.d]# yum clean all && yum makecache
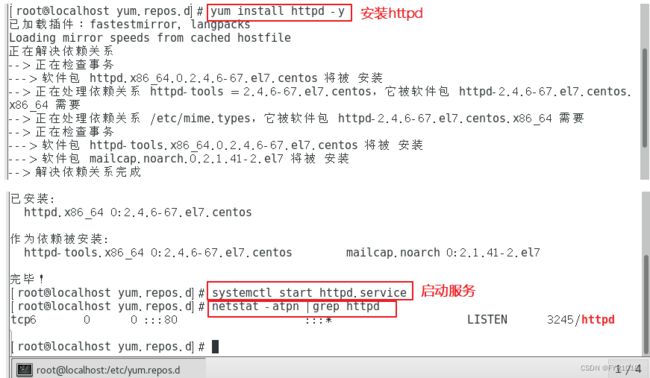
[root@localhost yum.repos.d]# yum install httpd -y

#启动httpd服务
[root@localhost ~]# systemctl start httpd.service
[root@localhost ~]# netstat -atpn |grep httpd     #查看服务是否启动
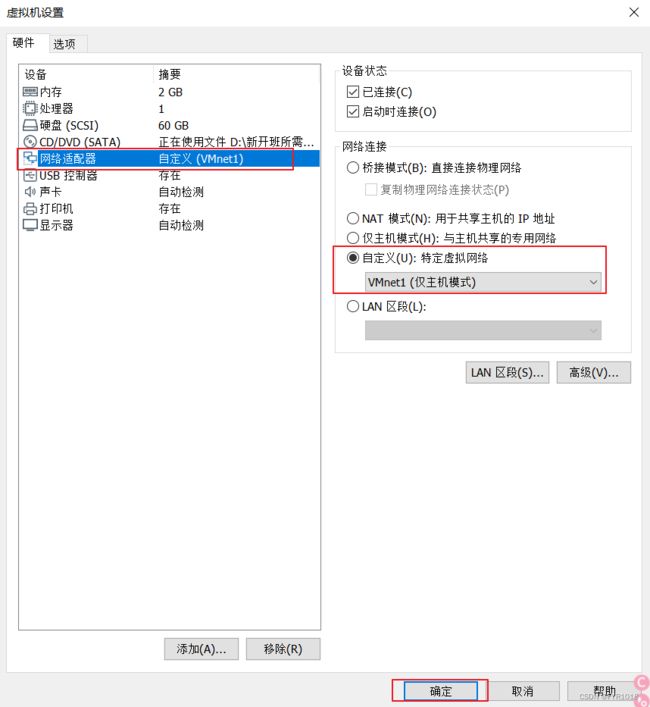
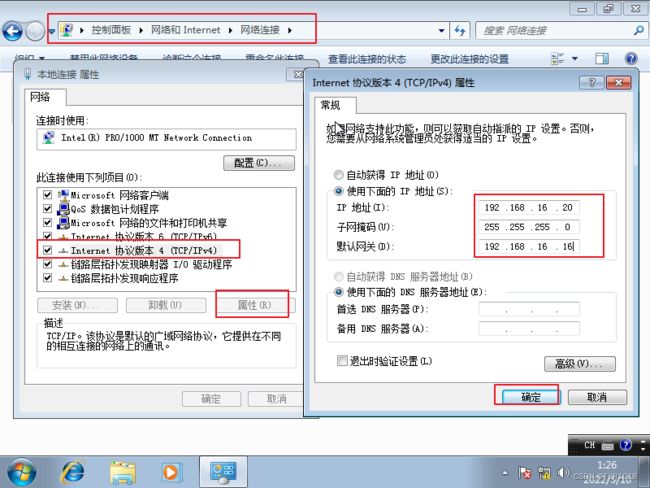
2.4 配置虚拟机 win7
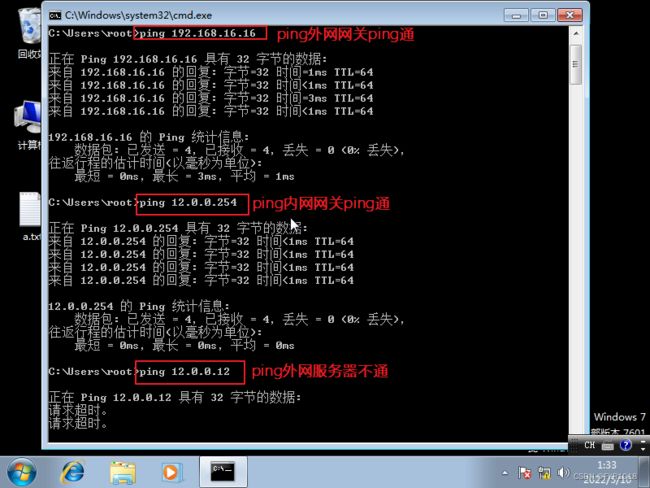
2.5 测试连通性
2.6 网关服务器开启 SNAT
[root@localhost ~]# vim /etc/sysctl.conf

net.ipv4.ip_forward = 1

[root@localhost ~]# sysctl -p
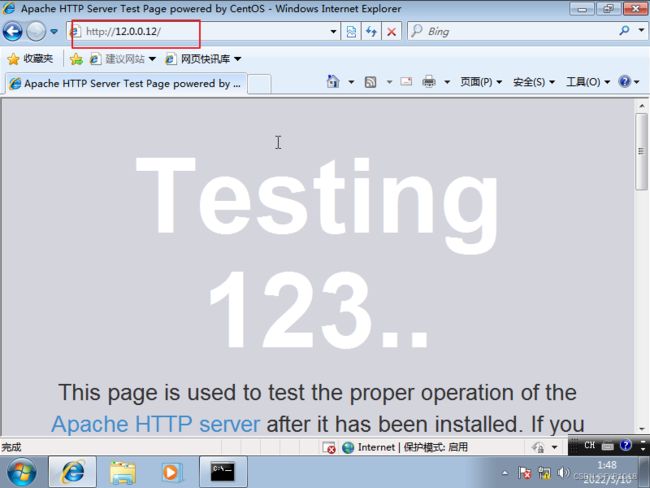
2.7 客户端访问服务端
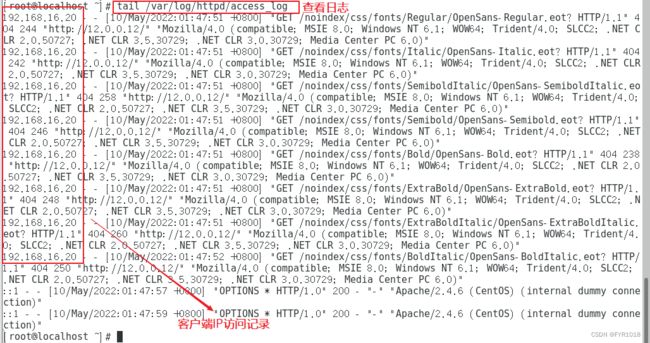
2.8 服务端查看访问记录
[root@localhost ~]# tail /var/log/httpd/access_log
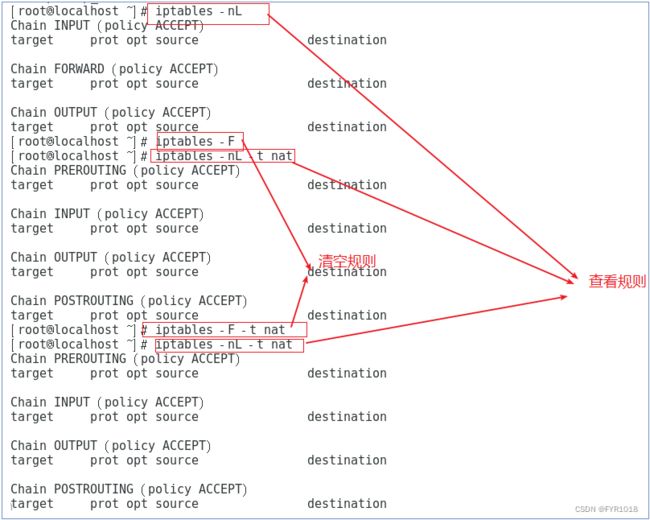
2.9 配置网关服务器的 iptables 规则
1、查看网关服务器的iptables规则并清除
iptables -nL			#查看规则
iptables -nL -t nat		#查看规则
iptables -F				#清除iptables的规则
iptables -F -t nat		#清除iptables的规则
[root@localhost ~]# iptables -t nat -A POSTROUTING -s 192.168.80.0/24 -o ens37 -j SNAT --to 12.0.0.254                                       源地址(内网网段)      出站网卡
  外网网关
[root@localhost ~]# iptables -nL -t nat
Chain PREROUTING (policy ACCEPT)
target     prot opt source               destination
Chain INPUT (policy ACCEPT)
target     prot opt source               destination
Chain OUTPUT (policy ACCEPT)
target     prot opt source               destination
Chain POSTROUTING (policy ACCEPT)
target     prot opt source               destination
SNAT       all  --  192.168.16.0/24      0.0.0.0/0            to:12.0.0.254
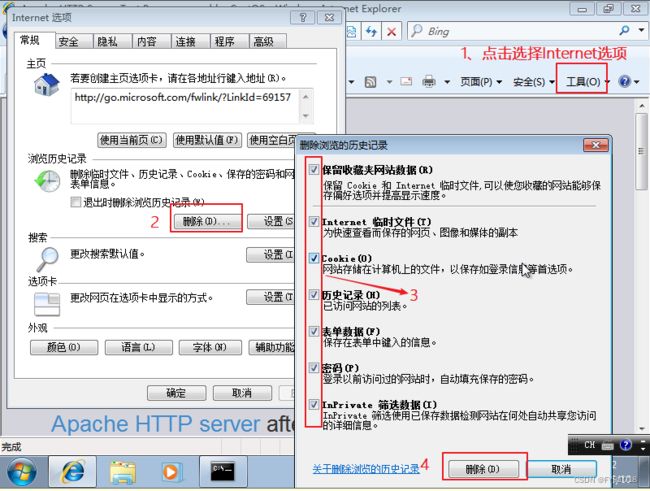
2.10 内网访问服务端
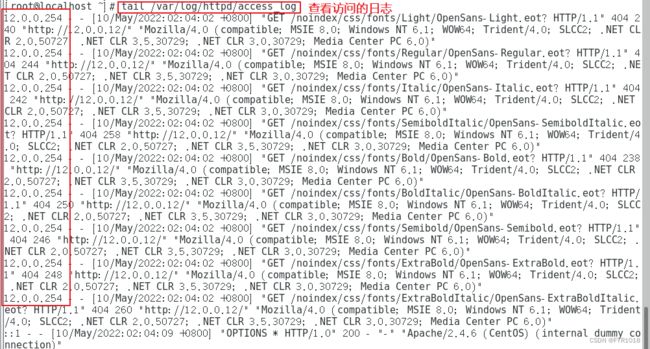
2.11 服务端查看日志
IP地址由内网本身的IP地址转变为设定的IP 12.0.0.254
[root@localhost ~]# tail /var/log/httpd/access_log
3 DNAT 原理与应用
3.1 DNAT 应用环境
在Internet中发布位于局域网内的服务器
3.2 DNAT 策略原理
- 目标地址转换,Destination Network Address Translation
- 修改数据包的目的地址
3.3 DNAT 转换前提条件
- 局域网的服务器能够访问 Internet
- 网关的外网地址有正确的 DNS 解析记录
- Linux 网关开启 IP 路由转发
vim /etc/sysctl.conf
net.ipv4.ip_forward = 1
sysct1 -p
3.4 DNAT转换
DNAT转换1:发布内网的Web服务
#把从ens33进来的要访问web服务的数据包目的地址转换为 192.168.16.11
iptables -t nat -A PREROUTING -i ens33 -d 12.0.0.1 -p tcp --dport 80 -j DNAT --to 192.168.16.11
             表        链       出站网卡   外网来的数据包的目的IP和目的端口    通过DNAT转换为内网的IP和端口

外网2.0.0.1:80 ----DNAT-—->192.168.16.11:8080
或
iptables -t nat -A PREROUTING -i ens33 -d 12.0.0.1 -p tcp --dport 80 -j DNAT --to-destination 192.168.16.11
                            入站 外网网卡      外网IP                                              内网服务器IP
iptables -t nat -A PREROUTING -i ens33 -p tcp --dport 80 -j DNAT --to 192.168.16.11-192.168.16.20
DNAT转换2:发布时修改目标端口
#发布局域网内部的OpenSSH服务器,外网主机需使用250端口进行连接
iptables -t nat -A PREROUTING -i ens33 -d 12.0.0.1 -p tcp --dport 250 -j DNAT --to 192.168.16.11:22(内网IP+端口)

#在外网环境中使用SSH测试
ssh -p 250 [email protected]

yum -y install net-tools #若没有 ifconfig 命令可提前使用 yum 进行安装
ifconfig ens33
4 DNAT 案例
4.1 配置网关服务器
第一步:添加一张外网网卡网段为12.0.0.0/24

第二步:查看真机的网段与虚拟机所设网段是否一致,不一致要修改一致

第三步:添加一张网卡


4.2 配置内外网网卡ens33和ens37
第一步:配置内网网卡ens33
[root@localhost ~]# systemctl stop firewalld.service
[root@localhost ~]# setenforce 0
[root@localhost ~]# vim /etc/sysconfig/network-scripts/ifcfg-ens33
[root@localhost ~]# cd /etc/sysconfig/network-scripts
[root@localhost network-scripts]# ifconfig          #查看网卡
[root@localhost network-scripts]# cp ifcfg-ens33 ifcfg-ens37
[root@localhost network-scripts]# vim ifcfg-ens37
[root@localhost network-scripts]# systemctl restart network
[root@localhost network-scripts]# ifconfig
4.3 配置内网服务端
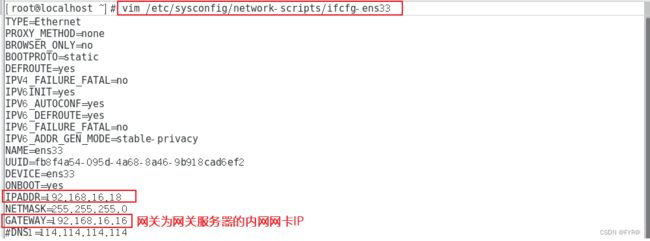
[root@localhost ~]# vim /etc/sysconfig/network-scripts/ifcfg-ens33
[root@localhost ~]# systemctl stop firewalld.service   #关闭防火墙
[root@localhost ~]# setenforce 0   #关闭selinux
[root@localhost ~]# ifdown ens33 ; ifup ens33
由于是内网环境仅主机模式下 所以要安装一个本地yum仓库
#安装http服务
[root@localhost ~]# mount /dev/sr0 /mnt
[root@localhost ~]# cd /etc/yum.repos.d/
[root@localhost yum.repos.d]# ls
CentOS-Base.repo  CentOS-CR.repo  CentOS-Debuginfo.repo  CentOS-fasttrack.repo  CentOS-Media.repo  CentOS-Sources.repo  CentOS-Vault.repo
[root@localhost yum.repos.d]# mkdir repos.bak
[root@localhost yum.repos.d]# mv *.repo repos.bak
[root@localhost yum.repos.d]# touch local.repo
[root@localhost yum.repos.d]# vim local.repo
[local]
name=local
baseurl=file:///mnt
enabled=1
gpgcheck=0
[root@localhost yum.repos.d]# yum clean all && yum makecache
[root@localhost yum.repos.d]# yum install httpd -y

#启动httpd服务
[root@localhost ~]# systemctl start httpd.service
[root@localhost ~]# netstat -atpn |grep httpd     #查看服务是否启动
4.4 配置虚拟机 win7
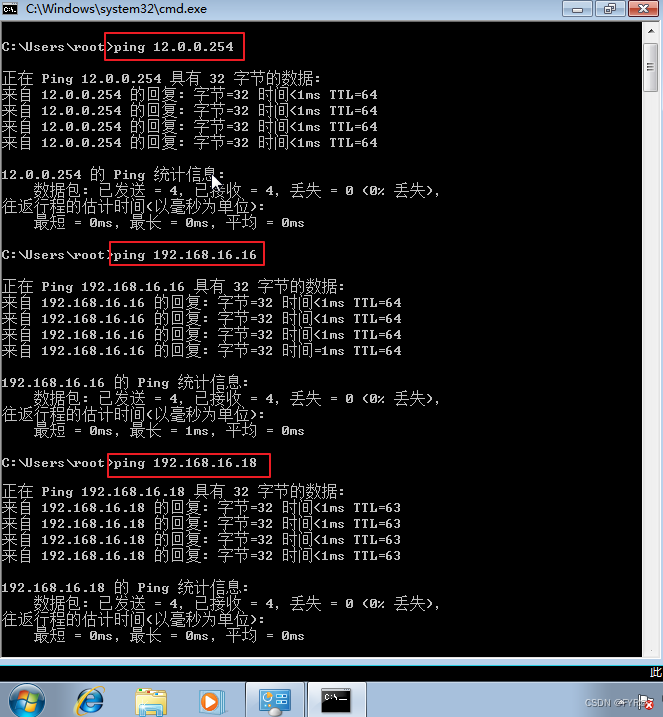
4.5 测试连通性
4.6 网关服务器开启 SNAT
[root@localhost ~]# vim /etc/sysctl.conf

net.ipv4.ip_forward = 1

[root@localhost ~]# sysctl -p
4.7 配置网关服务器的 iptables 规则
1、查看网关服务器的iptables规则并清除
iptables -nL			#查看规则
iptables -nL -t nat		#查看规则
iptables -F				#清除iptables的规则
iptables -F -t nat		#清除iptables的规则
[root@localhost ~]# iptables -F -t nat
[root@localhost ~]# iptables -nL -t nat

[root@localhost ~]# iptables -t nat -A POSTROUTING -s 192.168.16.0/24 -o ens37 -j SNAT --to 12.0.0.254
[root@localhost ~]# iptables -t nat -A PREROUTING -i ens37 -d 12.0.0.254 -p tcp --dport 8080 -j DNAT --to 192.168.16.18:80

[root@localhost ~]# iptables -nL -t nat
4.8 外网客户端访问内网服务端
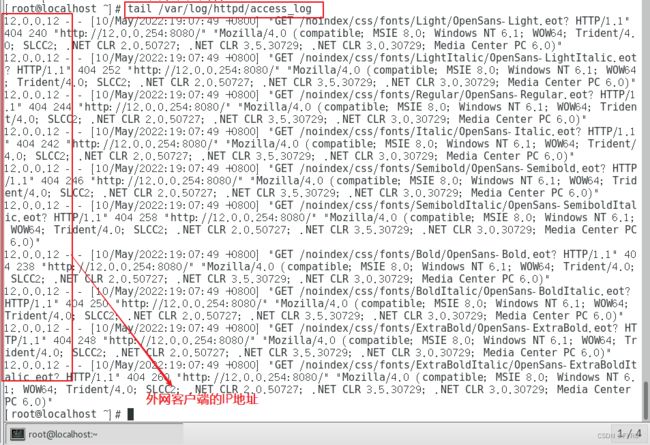
4.9 服务端查看日志
IP地址由内网本身的IP地址转变为设定的IP 12.0.0.254
[root@localhost ~]# tail /var/log/httpd/access_log
5 小知识扩展
- 主机型防火墙:主要使用 INPUT、OUTPUT 链,设置规则时一般要详细的指定到端口
- 网络型防火墙:主要使用 FORWARD 链,设置规则时很少去指定到端口,一般指定到 IP地址或者到网段即可
5.1 防火墙规则的备份和还原
5.1.1 备份
默认备份文件 /etc/sysconfig/iptables
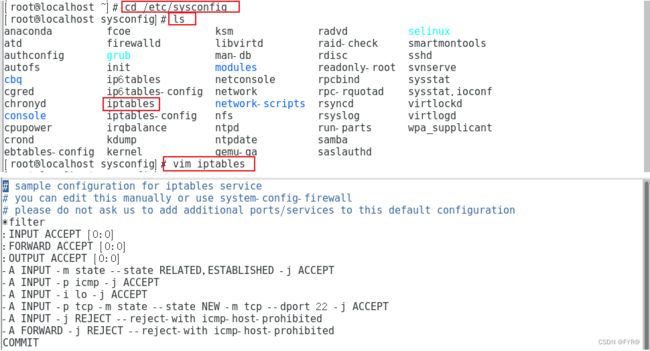
备份
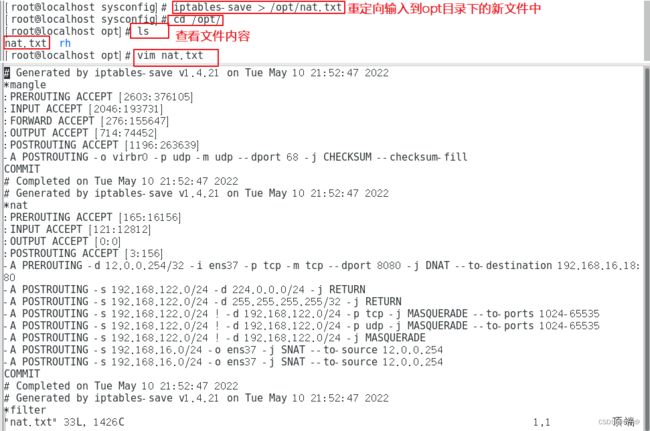
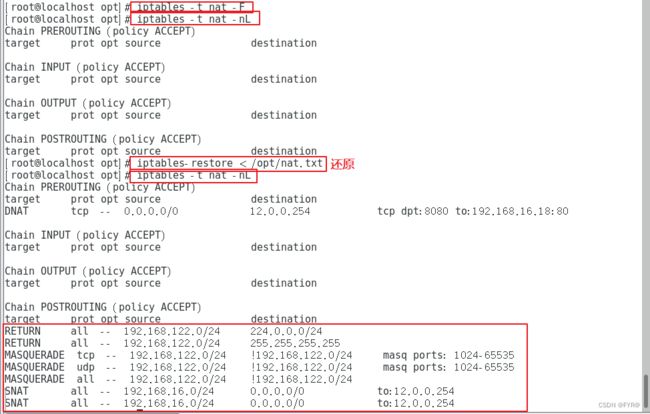
5.1.2 还原
iptables-restore < /opt/nat.txt
#重定向输入到默认配置文件当中
#将iptables规则文件保存在 /etc/sysconfig/iptables 中,iptables服务启动时会自动还原规则
[root@localhost sysconfig]# iptables-save > /etc/sysconfig/iptables

#重启防火墙
[root@localhost sysconfig]# systemctl stop iptables   #停止iptables服务会清空掉所有表的规则
[root@localhost sysconfig]# systemctl start iptables  #启动iptables服务会自动还原/etc/sysconfig/iptables 中的规则

#查看规则
[root@localhost sysconfig]# iptables -nL
[root@localhost sysconfig]# iptables -nL -t nat
5.2 tcpdump—Linux抓包 监听网络流量命令
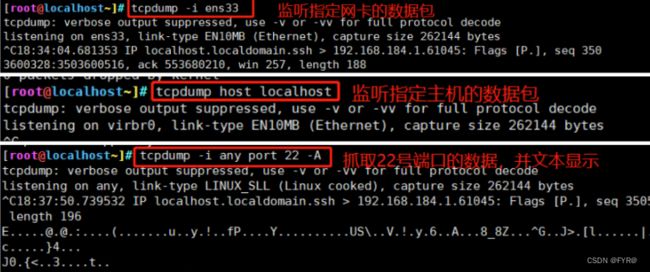
- tcpdump 命令是一款 sniffer 工具,是 linux 上的抓包工具,嗅探器;它可以打印出所有经过网络接口的数据包的头信息
- tcpdump 命令工作时先要把网卡的工作模式切换到混杂模式。所以 tcpdump 命令需要以root身份运行。tcpdump 命令是 linux 下使用最广泛的网络协议分析工具。使用 tcpdump 命令时,必须精通 TCP/IP 协议工作原理
格式
tcpdump tcp -i ens33 -t -s 0 -c 100 and dst port ! 22 and src net 192.168.1.0/24 -w ./target.cap
常用参数
| tcp | ip icmp arp rarp 和 tcp、udp、icmp这些选项等都要放到第一个参数的位置,用来过滤数据报的类型 |
|---|---|
| -i ens33 | 只抓经过接口ens33的包 |
| -t | 不显示时间戳 |
| -s 0 | 抓取数据包时默认抓取长度为68字节。加上-s 0 后可以抓到完整的数据包 |
| -c 100 | 只抓取100个数据包 |
| dst port ! 22 | 不抓取目标端口是22的数据包 |
| src net 192.168.1.0/24 | 数据包的源网络地址为192.168.1.0/24。Net:网段,host:主机 |
| -w ./target.cap | 保存成cap文件,方便用ethereal (即wireshark)分析 |

