SpringCloud学习笔记(一)_快速入门
SpringCloud简介
Spring Cloud为开发人员提供了快速构建分布式系统中一些常见模式的工具(例如配置管理,服务发现,断路器,智能路由,微代理,控制总线)。分布式系统的协调导致了样板模式, 使用Spring Cloud开发人员可以快速地支持实现这些模式的服务和应用程序。他们将在任何分布式环境中运行良好,包括开发人员自己的笔记本电脑,裸机数据中心,以及Cloud Foundry等托管平台。
官网:https://spring.io/projects/spring-cloud
特点
Spring Cloud专注于为典型的用例和可扩展性机制(包括其他用例)提供良好的开箱即用体验。
-
分布式/版本化配置
-
服务注册和发现
-
路由
-
服务到服务的呼叫
-
负载均衡
-
断路器
-
全局锁
-
领导选举和集群状态
-
分布式消息传递
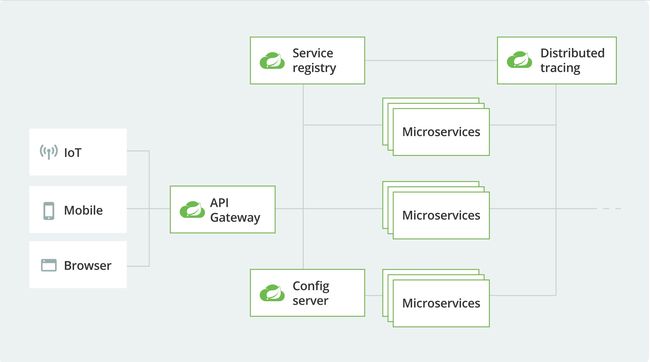
Spring Cloud 架构图
SpringCloud项目搭建
学习SpringCloud先要有,SpringBoot的相关知识,参考【SpringBoot】SpringBoot快速入门(一)
SpringBoot 是基于 SpringFramework 来构建的,SpringFramework 是一种 J2EE 的框架,SpringBoot 是一种快速构建 Spring 应用,SpringCloud 是构建 Spring Boot 分布式环境,也就是常说的云应用,SpringBoot 中流砥柱,承上启下
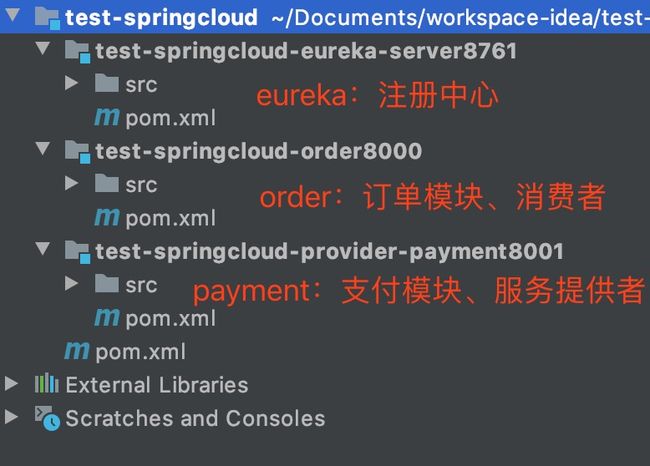
本例项目架构
环境准备
**** 1)JDK 环境必须是 1.8 及以上,本例使用版本:1.8.0_181
2)Maven 项目管理工具,3.6.0及以上版本,本例使用版本:3.6.3
3)开发工具使用 IDEA
搭建项目父工程
1、新建一个maven空工程test-springcloud
2、编写pom文件,引入项目所需要依赖的包
本例使用的SpringBoot版本是2.2.5.RELEASE,SpringCloud版本是Hoxton.SR3
使用其他版本,需要注意SpringBoot和SpringCloud版本的兼容问题
 1
 2
 3     org.springframework.boot
 4     spring-boot-dependencies
 5     2.2.5.RELEASE
 6     pom
 7     import
 8
 9
10
11     org.springframework.cloud
12     spring-cloud-dependencies
13     Hoxton.SR3
14     pom
15     import
16
完整pom文件如下:
![]()
![]()
  1
  2
  5     4.0.0
  6
  7     com.test
  8     test-springcloud
  9     1.0-SNAPSHOT
 10     pom
 11
 12
 13
 14         test-springcloud-eureka-server8761
 15         test-springcloud-order8000
 16         test-springcloud-provider-payment8001
 17
 18
 19
 20
 21
 22         2.2.5.RELEASE
 23         Hoxton.SR3
 24
 25         2.1.2
 26         8.0.12
 27         1.1.21
 28         1.18.12
 29         UTF-8
 30         UTF-8
 31         1.8
 32
 33
 34
 35
 36
 37
 38
 39
 40                 org.springframework.boot
 41                 spring-boot-dependencies
 42                 ${spring-boot.version}
 43                 pom
 44                 import
 45
 46
 47
 48                 org.springframework.cloud
 49                 spring-cloud-dependencies
 50                 ${spring-cloud.version}
 51                 pom
 52                 import
 53
 54
 55
 56
 57
 58
 59
 60
 61
 62
 63
 64
 65                 org.mybatis.spring.boot
 66                 mybatis-spring-boot-starter
 67                 ${mybatis-spring-boot.version}
 68
 69
 70
 71
 72                 mysql
 73                 mysql-connector-java
 74                 ${mysql.version}
 75
 76
 77
 78
 79                 com.alibaba
 80                 druid-spring-boot-starter
 81                 ${druid.version}
 82
 83
 84
 85
 86                 org.projectlombok
 87                 lombok
 88                 ${lombok.version}
 89
 90
 91
 92
 93                 org.springframework.boot
 94                 spring-boot-starter-test
 95                 ${spring-boot.version}
 96                 test
 97
 98
 99                         org.junit.vintage
100                         junit-vintage-engine
101
102
103
104
105
106
107
108
109         ${project.artifactId}
110
111
112                 org.apache.maven.plugins
113                 maven-compiler-plugin
114
115                     ${java.version}
116                     ${java.version}
117
118
119
120                 org.springframework.boot
121                 spring-boot-maven-plugin
122                 ${spring-boot.version}
123
124                     true
125                     true
126
127
128
129
130
131
132 pom.xml
pom.xml
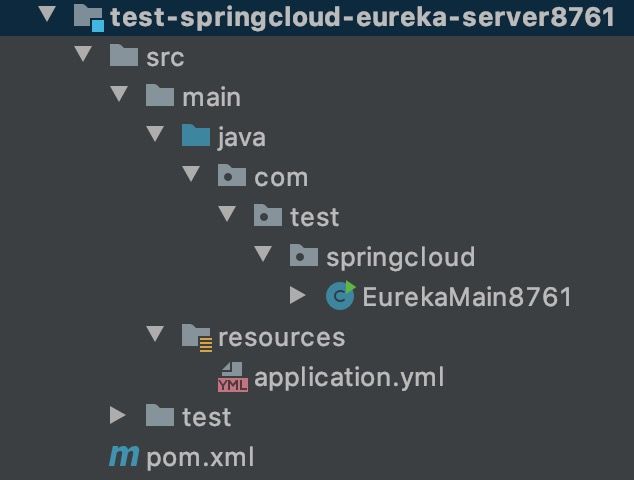
3、项目结构图如下:
搭建Eureka注册中心
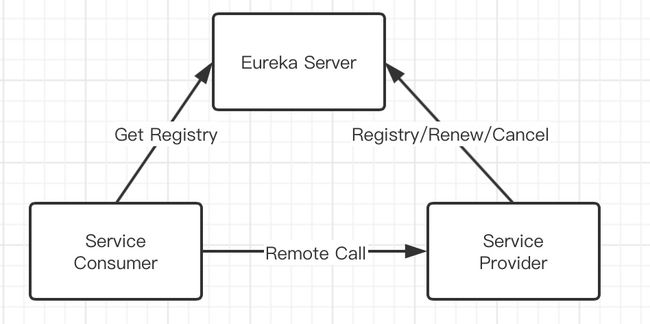
即Eureka的服务端
1、在父项目上,new module 新建一个模块Eureka注册中心,及Eureka服务端 test-springboot-eureka-server8761
2、编写pom.xml文件
Eureka服务端依赖如下:
1
2
3     org.springframework.cloud
4     spring-cloud-starter-netflix-eureka-server
5
完整pom.xml文件如下:
![]()
![]()
 1
 2
 5
 6         test-springcloud
 7         com.test
 8         1.0-SNAPSHOT
 9
10     4.0.0
11
12     test-springcloud-eureka-server8761
13
14
15
16
17             org.springframework.cloud
18             spring-cloud-starter-netflix-eureka-server
19
20
21
22
23             org.springframework.boot
24             spring-boot-starter-web
25
26
27             org.springframework.boot
28             spring-boot-starter-actuator
29
30
31             org.springframework.boot
32             spring-boot-devtools
33             runtime
34             true
35
36
37
38             org.springframework.boot
39             spring-boot-starter-test
40             test
41
42
43
44
45
46         test-springcloud-eureka-server8761
47
48
pom.xml
3、编写application.yml配置文件
 1 # 端口
 2 server:
 3   port: 8761
 4
 5 spring:
 6   application:
 7     name: cloud-eureka-server
 8
 9 # Eureka配置
10 eureka:
11   instance:
12     # eureka服务端的实例名称
13     hostname: localhost
14   client:
15     # false表示不向注册中心注册自己
16     register-with-eureka: false
17     # false表示自己端就是注册中心,职责就是维护服务实例,并不需要去检查服务
18     fetch-registry: false
19     # 设置与Eureka Server交互的地址查询服务和注册服务都需要依赖这个地址
20     service-url:
21       defaultZone: http://localhost:8761/eureka
4、编辑SpringBoot启动类EurekaMain8761.java,并使用@EnableEurekaServer
1 // Eureka服务端
2 @EnableEurekaServer
3 @SpringBootApplication
4 public class EurekaMain8761 {
5     public static void main(String[] args) {
6         SpringApplication.run(EurekaMain8761.class, args);
7     }
8 }
5、启动test-springboot-eureka-server8761项目,使用地址:http://localhost:8761/,进行访问
搭建支付模块、服务提供者
即Eureka客户端
需要准备一个test_springcloud的mysql数据库,新建一张表payment,内容如下:
![]()
![]()
 1 SET NAMES utf8mb4;
 2 SET FOREIGN_KEY_CHECKS = 0;
 3
 4 -- ----------------------------
 5 -- Table structure for payment
 6 -- ----------------------------
 7 DROP TABLE IF EXISTS `payment`;
 8 CREATE TABLE `payment` (
 9   `id` bigint(20) NOT NULL AUTO_INCREMENT COMMENT 'ID',
10   `serial` varchar(255) DEFAULT '' COMMENT '流水号',
11   PRIMARY KEY (`id`)
12 ) ENGINE=InnoDB AUTO_INCREMENT=5 DEFAULT CHARSET=utf8;
13
14 -- ----------------------------
15 -- Records of payment
16 -- ----------------------------
17 BEGIN;
18 INSERT INTO `payment` VALUES (1, 'No.1');
19 INSERT INTO `payment` VALUES (2, 'No.2');
20 INSERT INTO `payment` VALUES (3, 'No.3');
21 COMMIT;
22
23 SET FOREIGN_KEY_CHECKS = 1;
View Code
1、在父项目上,new module 新建一个模块支付模块,即Eureka客户端 test-springcloud-provider-payment8001
2、编写payment模块的pom.xml文件,引入Eureka 客户端依赖
1
2
3     org.springframework.cloud
4     spring-cloud-starter-netflix-eureka-client
5
完整pom.xml文件如下:
![]()
![]()
 1
 2
 5
 6         test-springcloud
 7         com.test
 8         1.0-SNAPSHOT
 9
10     4.0.0
11
12     test-springcloud-provider-payment8001
13
14
15
16
17
18             org.springframework.cloud
19             spring-cloud-starter-netflix-eureka-client
20
21
22
23
24             org.springframework.boot
25             spring-boot-starter-web
26
27
28             org.springframework.boot
29             spring-boot-starter-actuator
30
31
32             org.springframework.boot
33             spring-boot-starter-jdbc
34
35
36             org.springframework.boot
37             spring-boot-devtools
38             runtime
39             true
40
41
42             org.mybatis.spring.boot
43             mybatis-spring-boot-starter
44
45
46             org.projectlombok
47             lombok
48             true
49
50
51
52             mysql
53             mysql-connector-java
54
55
56
57             com.alibaba
58             druid-spring-boot-starter
59
60
61             org.springframework.boot
62             spring-boot-starter-test
63             test
64
65
66
67
68
69         test-springcloud-provider-payment8001
70
71
View Code
3、编辑application.yml配置文件
 1 # 端口
 2 server:
 3   port: 8001
 4
 5 spring:
 6   application:
 7     name: cloud-payment-service
 8   #   数据源基本配置
 9   datasource:
10     driver-class-name: com.mysql.cj.jdbc.Driver
11     url: jdbc:mysql://localhost:3306/test_springcloud?allowPublicKeyRetrieval=true&useSSL=true
12     username: admin
13     password: 123456
14
15 eureka:
16   client:
17     # 表示将自己注册进Eureka Server默认为true
18     register-with-eureka: true
19     # 是否从Eureka Server抓去已有的注册信息,默认是true
20     fetch-registry: true
21     # 设置与Eureka Server交互的地址查询服务和注册服务都需要依赖这个地址
22     service-url:
23       defaultZone: http://localhost:8761/eureka
24
25 mybatis:
26   mapperLocations: classpath:mapper/*Mapper.xml
27   # 所有entity别名类所在的包
28   type-aliases-pachage: com.test.springcloud.entities
4、编写启动类
1 // Eureka客户端
2 @EnableEurekaClient
3 @SpringBootApplication
4 public class PaymentMain8001 {
5     public static void main(String[] args) {
6         SpringApplication.run(PaymentMain8001.class, args);
7     }
8 }
5、新建一个实体类Payment.java
![]()
![]()
1 @Data
2 @AllArgsConstructor
3 @NoArgsConstructor
4 public class Payment {
5     private Long id;
6     private String serial;
7 }
View Code
6、新建一个实体类映射文件 src/main/resources/mapper/PaymentMapper.xml
![]()
![]()
1
2
3
4
5
6
7
10
11
12 INSERT INTO payment(serial) values(#{serial})
13
14
15
18
View Code
7、新建一个dao接口
![]()
![]()
1 @Mapper
2 public interface PaymentDao {
3     // 插入
4     public int insert(Payment payment);
5     // 获取
6     public Payment getPaymentById(@Param("id") Long id);
7 }
View Code
8、新建一个service接口
![]()
![]()
1 public interface PaymentService {
2     // 插入
3     public int insert(Payment payment);
4     // 获取
5     public Payment getPaymentById(Long id);
6 }
View Code
9、编写一个接口实现类
![]()
![]()
 1 @Service
 2 public class PaymentServiceImpl implements PaymentService {
 3
 4     @Autowired
 5     private PaymentDao paymentDao;
 6
 7     public int insert(Payment payment) {
 8         return paymentDao.insert(payment);
 9     }
10
11     public Payment getPaymentById(Long id) {
12         return paymentDao.getPaymentById(id);
13     }
14 }
View Code
10、编辑一个通用结果类CommonResult.java
![]()
![]()
 1 /**
 2  * 通用结果
 3  * @param
 4  */
 5 @Data
 6 @AllArgsConstructor
 7 @NoArgsConstructor
 8 public class CommonResult {
 9
10     private int code;
11     private String msg;
12     private T data;
13
14     public CommonResult(int code, String msg) {
15         this.code = code;
16         this.msg = msg;
17     }
18 }
View Code
11、新增一个Controller
![]()
![]()
 1 @Slf4j
 2 @RestController
 3 public class PaymentController {
 4
 5
 6     @Autowired
 7     private PaymentService paymentService;
 8
 9     @Value("${server.port}")
10     private String serverPort;
11
12     @PostMapping("/payment/insert")
13     public CommonResult insert(@RequestBody Payment payment) {
14         int result = paymentService.insert(payment);
15         log.info("====== 插入结果:" + result);
16         if(result > 0) {
17             return new CommonResult(200, "插入数据成功,服务端口:" + serverPort);
18         }else {
19             return new CommonResult(500, "插入数据失败");
20         }
21
22     }
23
24     @GetMapping("/payment/get/{id}")
25     public CommonResult getPaymentById(@PathVariable("id") Long id) {
26         Payment result = paymentService.getPaymentById(id);
27
28         log.info("====== 查询结果:" + result);
29         if(result != null) {
30             return new CommonResult(200, "查询成功,服务端口:" + serverPort, result);
31         }else {
32             return new CommonResult(500, "查询失败");
33         }
34
35     }
36 }
View Code
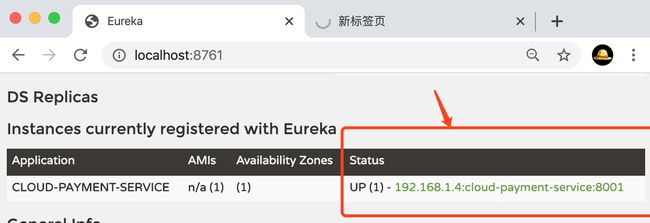
12、启动payment模块,查看Eureka注册中心
访问地址:http://localhost:8001/payment/get/1
搭建订单模块、服务消费
1、在父项目上,new module 新建一个模块订单模块,即Eureka客户端 test-springcloud-order8000
2、编写order模块的pom.xml文件,引入Eureka 客户端依赖
![]()
![]()
 1
 2
 5
 6         test-springcloud
 7         com.test
 8         1.0-SNAPSHOT
 9
10     4.0.0
11
12     test-springcloud-order8000
13
14
15
16
17
18
19             org.springframework.cloud
20             spring-cloud-starter-netflix-eureka-client
21
22
23
24
25             org.springframework.boot
26             spring-boot-starter-web
27
28
29             org.springframework.boot
30             spring-boot-starter-actuator
31
32
33             org.springframework.boot
34             spring-boot-devtools
35             runtime
36             true
37
38
39
40             org.projectlombok
41             lombok
42             true
43
44
45             org.springframework.boot
46             spring-boot-starter-test
47             test
48
49
50
51
52
53         test-springcloud-order8000
54
55
56
View Code
3、编写application.yml配置文件
 1 # 端口
 2 server:
 3   port: 8000
 4
 5 spring:
 6   application:
 7     name: cloud-order
 8
 9 eureka:
10   client:
11     # 表示将自己注册进Eureka Server默认为true
12     register-with-eureka: true
13     # 是否从Eureka Server抓去已有的注册信息,默认是true
14     fetch-registry: true
15     # 设置与Eureka Server交互的地址查询服务和注册服务都需要依赖这个地址
16     service-url:
17       defaultZone: http://localhost:8761/eureka
4、编写启动类
1 @EnableEurekaClient
2 @SpringBootApplication
3 public class OrderMain80 {
4     public static void main(String[] args) {
5         SpringApplication.run(OrderMain80.class, args);
6     }
7 }
5、编写一个服务调用配置类,注入RestTemplate,调用服务
 1 @Configuration
 2 public class AppConfig {
 3
 4     /**
 5      * 注入restTemplate,请用请求rest接口
 6      * @return
 7      */
 8     @Bean
 9     // 标注此注解后,RestTemplate就具有了客户端负载均衡能力
10     // 负载均衡技术依赖于的是Ribbon组件~
11     // RestTemplate都塞入一个loadBalancerInterceptor 让其具备有负载均衡的能力
12     @LoadBalanced
13     public RestTemplate restTemplate(){
14         return new RestTemplate();
15     }
16 }
6、编写实体类Payment.java
![]()
![]()
1 @Data
2 @AllArgsConstructor
3 @NoArgsConstructor
4 public class Payment {
5     private Long id;
6     private String serial;
7 }
View Code
7、编写通用返回类
![]()
![]()
 1 @Data
 2 @AllArgsConstructor
 3 @NoArgsConstructor
 4 public class CommonResult {
 5
 6     private int code;
 7     private String msg;
 8     private T data;
 9
10     public CommonResult(int code, String msg) {
11         this.code = code;
12         this.msg = msg;
13     }
14 }
View Code
8、编写Controller,使用RestTemplate调用服务
 1 @RestController
 2 @Slf4j
 3 public class OrderController {
 4
 5 //    public static final String PAYMENT_URL = "http://localhost:8001";
 6     public static final String PAYMENT_URL = "http://CLOUD-PAYMENT-SERVICE";
 7
 8
 9     @Autowired
10     private RestTemplate restTemplate;
11
12     @PostMapping("/consumer/payment/insert")
13     public CommonResult insert(Payment payment){
14         log.info("====== 请求插入:" + payment);
15         return restTemplate.postForObject(PAYMENT_URL + "/payment/insert", payment, CommonResult.class);
16     }
17
18     @GetMapping("/consumer/payment/get/{id}")
19     public CommonResult getPayment(@PathVariable("id") Long id){
20         return restTemplate.getForObject(PAYMENT_URL + "/payment/get/" + id, CommonResult.class);
21     }
22 }
9、启动order模块,查看Eureka注册中心
访问地址:http://localhost:8000/consumer/payment/get/1
