opencv 案例实战01-停车场车牌识别实战
需求分析:
车牌识别技术主要应用领域有停车场收费管理,交通流量控制指标测量,车辆定位,汽车防盗,高速公路超速自动化监管、闯红灯电子警察、公路收费站等等功能。对于维护交通安全和城市治安,防止交通堵塞,实现交通自动化管理有着现实的意义。
车牌自动识别系统应用的主要技术
- 图像处理相关技术
- 一维条形码相关技术
- 二维数字识别码相关技术
- 三维立体识别码相关技术以及IC卡识别相关技术
车牌识别的技术难点
误定位一直是汽车牌照定位方面的研究重点。汽车牌照分割方面的研究方向一直是如何获得良好的汽车牌照分割,以及如何快速地实现汽车牌照倾斜度校正的基础。
车牌定位技术点分析
车牌特征概述
- 字符特征
- 形状特征
- 颜色特征
- 灰度变化特征
车牌定位方法
- 基于边缘检测的车牌定位方法
- 基于遗传算法的车牌定位方法
- 基于纹理特征的车牌定位方法
- 基于形态学的车牌定义方法
- 基于小波分析和变换的车牌定位方法
- 基于神经网络的车牌定位方法
车牌图像预处理
之所以要进行预处理,主要是为了得到一个比较准确清晰的图像,以便于后期相关分析工作在图像中进行。
车牌图像的灰度化
- 分量法
- 最大值法
- 平均值法
- 加权平均法
生成的灰度图

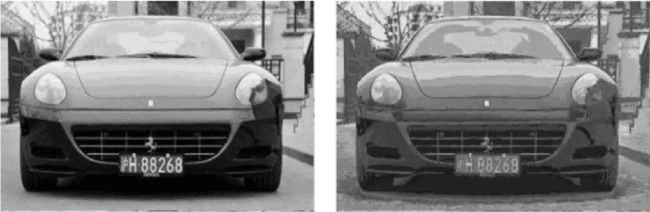
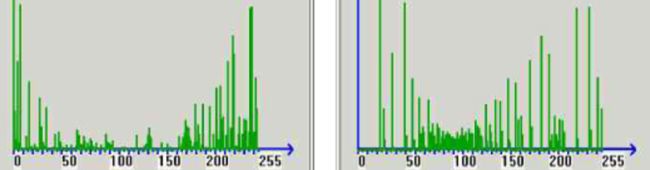
车牌图像的直方图均衡化
在汽车牌照定位之前,可以通过采用直方图均衡化的方法来实现车牌图像亮度接近化的转换处理。
车牌定位技术
车牌图像的滤波
通常情况下,首先,图像会因为采集时大气湍流、相对运动以及光学系统失真等因素的影响而变得模糊。
图像增强处理的一种常见的方法是图像滤波。
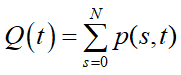
操作模板的形式为:

车牌图像的二值化
确定一个合适阈值,是对图像进行二值化处理的主要目的,待研究的区域经过二值化处理后将被分为背景以及前景两个部分。
车牌图像的边缘检测
两个灰度值不同的相邻区域之间总会存在边缘,也就是图像中亮度函数发生急剧变化的位置,边缘检测是图像分割、纹理和形状特征提取等图像分析的基础。
车牌图像的灰度映射
灰度映射是一种对像素点的操作,即根据原始图像中每个像素的灰度值,按照某种映射规则将其转化为另外一个灰度值,通过对原始图像中每个像素点赋予一个新的灰度值,来达到增强图像的目的。
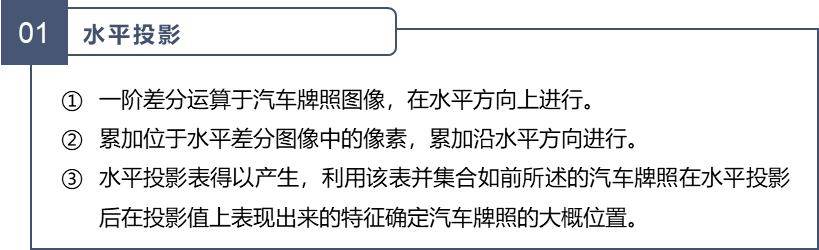
车牌图像的改进型投影法定位


车牌字符分割技术
车牌字符切割方法
基于识别基础的车牌字符分割法
垂直投影分割方法
自适应分割线聚类法
车牌倾斜问题
通常汽车牌照图像的倾斜校正主要分为垂直倾斜校正和水平倾斜校正两种,如此划分的依据是汽车牌照图像倾斜的类型。
车牌倾斜度检测方法
我们采用基于行扫描的灰度值跳变点数目变化率来判断车牌是否水平。

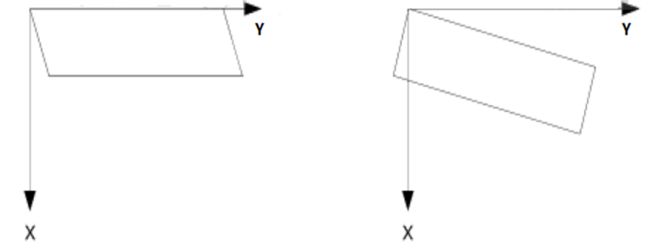
车牌倾斜的矫正方法
该方法主要是运用两个坐标系之间的变换来实现的;对于倾斜角度在整幅图像上的设定,该方法主要是通过对图像中直线的倾斜角度进行判断来实现的。
车牌边框和铆钉的去除
对车牌图像进行逐行扫描,当扫描到某一行白色像素点宽度大于某一个阈值时,可以认为是字符边沿处,去除这一行以下或以上的所有行就可以消除铆钉和边框的干扰。
车牌字符分割技术
整个字符分割过程需要考虑如下问题:
- 初步垂直切分后的切分结果和字符尺寸应该基本一致。
- 字符拆分
- 字符合并
- 估计字间距、字符中心距离等信息
基于垂直投影和先验知识的车牌字符分割
-
计算垂直投影
-
初步垂直切分
在初步垂直切分中,字符的断裂和粘连现象先不被考虑,进行提取的只是在投影图中已经分离的那些区域。
粘连车牌字符的分割
在低质量车牌图像中,二值化处理后出现的字符粘连现象有时无法被任何一种分割方法所消除,有时利用垂直投影也无法分割那些粘连的字符,造成这种状况的主要原因是有时存在大量的噪声。
断裂车牌字符的合并
先将每两个相邻块之间的距离计算出来,在一定的阈值大于这个距离的情况下,可以认为这两个块属于同一个字符并执行块合并过程。

对车牌字符的切分结果进行确认
字符结果确认机制的具体实现步骤:
- 搜索连通字符区域
- 对字符的垂直切分进行更新和确认
车牌字符识别技术
模式识别
影响并导致汽车牌照内字符出现缺损、污染、模糊等情况的常见因素有照相机的性能、采集车辆图像时光照的差异、汽车牌照的清洁度。
模式识别流程
模式就是一种对某种对象(一些敏感的客体)结构或者定量的描述,是一种集合(由具有某些共同特定性质的模式构成)。
模式识别方法
目前模式识别主要有4种方法:
- 基于神经网络的识别方法、
- 基于句法模式的识别方法、
- 基于统计模式的识别方法和
- 基于模糊模式的识别方法。
字符识别
- 基本原理:对字符图像进行预处理、模式表达、判别和字典学习
- 阶段:初级阶段、对基础理论进行相关研究的阶段、发展阶段
字符识别方法:
基于神经网络的识别方法
基于特征分析的匹配方法
基于模版的匹配方法
目前,小波识别法、模板匹配法与神经网络法等常被作为汽车牌照字符识别的主要方法。
汉字识别
相较于数字和英文字符的识别,汽车牌照中的汉字字符识别的难度更大,主要原因有以下4个方面:
字符笔画因切分误差导致非笔画或笔画流失。
汽车牌照被污染导致字符上出现污垢。
采集所得车辆图像分辨率低下导致多笔画的汉字较难分辨。
车辆图像采集时所受光照影响的差异导致笔画较淡。
代码示例:车牌定位
import cv2
import numpy as np


def stretch(img):
    '''
    图像拉伸函数
    '''
    maxi = float(img.max())
    mini = float(img.min())

    for i in range(img.shape[0]):
        for j in range(img.shape[1]):
            img[i, j] = (255 / (maxi - mini) * img[i, j] - (255 * mini) / (maxi - mini))

    return img


def dobinaryzation(img):
    '''
    二值化处理函数
    '''
    maxi = float(img.max())
    mini = float(img.min())

    x = maxi - ((maxi - mini) / 2)
    # 二值化,返回阈值ret  和  二值化操作后的图像thresh
    ret, thresh = cv2.threshold(img, x, 255, cv2.THRESH_BINARY)
    # 返回二值化后的黑白图像
    return thresh


def find_rectangle(contour):
    '''
    寻找矩形轮廓
    '''
    y, x = [], []

    for p in contour:
        y.append(p[0][0])
        x.append(p[0][1])

    return [min(y), min(x), max(y), max(x)]


def locate_license(img, afterimg):
    '''
    定位车牌号
    '''
    contours, hierarchy = cv2.findContours(img, cv2.RETR_EXTERNAL, cv2.CHAIN_APPROX_SIMPLE)

    # 找出最大的三个区域
    block = []
    for c in contours:
        # 找出轮廓的左上点和右下点,由此计算它的面积和长度比
        r = find_rectangle(c)
        a = (r[2] - r[0]) * (r[3] - r[1])  # 面积
        s = (r[2] - r[0]) * (r[3] - r[1])  # 长度比

        block.append([r, a, s])
    # 选出面积最大的3个区域
    block = sorted(block, key=lambda b: b[1])[-3:]

    # 使用颜色识别判断找出最像车牌的区域
    maxweight, maxindex = 0, -1
    for i in range(len(block)):
        b = afterimg[block[i][0][1]:block[i][0][3], block[i][0][0]:block[i][0][2]]
        # BGR转HSV
        hsv = cv2.cvtColor(b, cv2.COLOR_BGR2HSV)
        # 蓝色车牌的范围
        lower = np.array([100, 50, 50])
        upper = np.array([140, 255, 255])
        # 根据阈值构建掩膜
        mask = cv2.inRange(hsv, lower, upper)
        # 统计权值
        w1 = 0
        for m in mask:
            w1 += m / 255

        w2 = 0
        for n in w1:
            w2 += n

        # 选出最大权值的区域
        if w2 > maxweight:
            maxindex = i
            maxweight = w2

    return block[maxindex][0]


def find_license(img):
    '''
    预处理函数
    '''
    m = 400 * img.shape[0] / img.shape[1]

    # 压缩图像
    img = cv2.resize(img, (400, int(m)), interpolation=cv2.INTER_CUBIC)

    # BGR转换为灰度图像
    gray_img = cv2.cvtColor(img, cv2.COLOR_BGR2GRAY)

    # 灰度拉伸
    stretchedimg = stretch(gray_img)

    '''进行开运算,用来去除噪声'''
    r = 16
    h = w = r * 2 + 1
    kernel = np.zeros((h, w), np.uint8)
    cv2.circle(kernel, (r, r), r, 1, -1)
    # 开运算
    openingimg = cv2.morphologyEx(stretchedimg, cv2.MORPH_OPEN, kernel)
    # 获取差分图,两幅图像做差  cv2.absdiff('图像1','图像2')
    strtimg = cv2.absdiff(stretchedimg, openingimg)

    # 图像二值化
    binaryimg = dobinaryzation(strtimg)

    # canny边缘检测
    canny = cv2.Canny(binaryimg, binaryimg.shape[0], binaryimg.shape[1])

    '''消除小的区域,保留大块的区域,从而定位车牌'''
    # 进行闭运算
    kernel = np.ones((5, 19), np.uint8)
    closingimg = cv2.morphologyEx(canny, cv2.MORPH_CLOSE, kernel)

    # 进行开运算
    openingimg = cv2.morphologyEx(closingimg, cv2.MORPH_OPEN, kernel)

    # 再次进行开运算
    kernel = np.ones((11, 5), np.uint8)
    openingimg = cv2.morphologyEx(openingimg, cv2.MORPH_OPEN, kernel)

    # 消除小区域,定位车牌位置
    rect = locate_license(openingimg, img)

    return rect, img


def cut_license(afterimg, rect):
    '''
    图像分割函数
    '''
    # 转换为宽度和高度
    rect[2] = rect[2] - rect[0]
    rect[3] = rect[3] - rect[1]
    rect_copy = tuple(rect.copy())
    rect = [0, 0, 0, 0]
    # 创建掩膜
    mask = np.zeros(afterimg.shape[:2], np.uint8)
    # 创建背景模型  大小只能为13*5,行数只能为1,单通道浮点型
    bgdModel = np.zeros((1, 65), np.float64)
    # 创建前景模型
    fgdModel = np.zeros((1, 65), np.float64)
    # 分割图像
    cv2.grabCut(afterimg, mask, rect_copy, bgdModel, fgdModel, 5, cv2.GC_INIT_WITH_RECT)
    mask2 = np.where((mask == 2) | (mask == 0), 0, 1).astype('uint8')
    img_show = afterimg * mask2[:, :, np.newaxis]

    return img_show


def deal_license(licenseimg):
    '''
    车牌图片二值化
    '''
    # 车牌变为灰度图像
    gray_img = cv2.cvtColor(licenseimg, cv2.COLOR_BGR2GRAY)

    # 均值滤波  去除噪声
    kernel = np.ones((3, 3), np.float32) / 9
    gray_img = cv2.filter2D(gray_img, -1, kernel)

    # 二值化处理
    ret, thresh = cv2.threshold(gray_img, 120, 255, cv2.THRESH_BINARY)

    return thresh


def find_end(start, arg, black, white, width, black_max, white_max):
    end = start + 1
    for m in range(start + 1, width - 1):
        if (black[m] if arg else white[m]) > (0.98 * black_max if arg else 0.98 * white_max):
            end = m
            break
    return end


if __name__ == '__main__':
    img = cv2.imread('car.jpg', cv2.IMREAD_COLOR)
    # 预处理图像
    rect, afterimg = find_license(img)

    # 框出车牌号
    cv2.rectangle(afterimg, (rect[0], rect[1]), (rect[2], rect[3]), (0, 255, 0), 2)
    cv2.imshow('afterimg', afterimg)

    # 分割车牌与背景
    cutimg = cut_license(afterimg, rect)
    cv2.imshow('cutimg', cutimg)

    # 二值化生成黑白图
    thresh = deal_license(cutimg)
    cv2.imshow('thresh', thresh)
    cv2.imwrite("cp.jpg", thresh)
    cv2.waitKey(0)

    # 分割字符
    '''
    判断底色和字色
    '''
    # 记录黑白像素总和
    white = []
    black = []
    height = thresh.shape[0]  # 263
    width = thresh.shape[1]  # 400
    # print('height',height)
    # print('width',width)
    white_max = 0
    black_max = 0
    # 计算每一列的黑白像素总和
    for i in range(width):
        line_white = 0
        line_black = 0
        for j in range(height):
            if thresh[j][i] == 255:
                line_white += 1
            if thresh[j][i] == 0:
                line_black += 1
        white_max = max(white_max, line_white)
        black_max = max(black_max, line_black)
        white.append(line_white)
        black.append(line_black)
        print('white', white)
        print('black', black)
    # arg为true表示黑底白字,False为白底黑字
    arg = True
    if black_max < white_max:
        arg = False

    n = 1
    start = 1
    end = 2
    while n < width - 2:
        n += 1
        # 判断是白底黑字还是黑底白字  0.05参数对应上面的0.95 可作调整
        if (white[n] if arg else black[n]) > (0.02 * white_max if arg else 0.02 * black_max):
            start = n
            end = find_end(start, arg, black, white, width, black_max, white_max)
            n = end
            if end - start > 5:
                cj = thresh[1:height, start:end]
                cv2.imshow('cutlicense', cj)
                cv2.waitKey(0)

    cv2.waitKey(0)
    cv2.destroyAllWindows()
运行效果:

可见车牌定位成功,下一步是识别字符。
代码示例:基于tesseract 识别车牌字符
-
安装步骤:
Tesseract Ocr 工具安装,下面是下载地址,下载后 用管理员安装,安装的时候注意 记住自己的安装路径。
https://www.aliyundrive.com/s/xHi1Y28LGjv -
安装python pytesseract 库包
pip install pytesseract
pytesseract 配置。
找到pytesseract 刚才的安装路径,如下

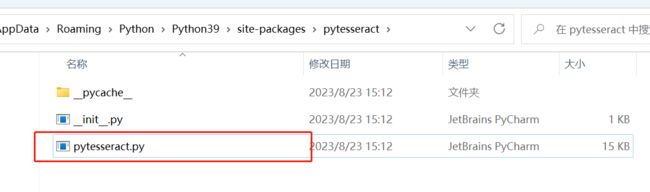
然后打开这个文件,

这里填上你自己的安装路径地址,至此,字符识别开发环境就准备好了。
import cv2 as cv
from PIL import Image
import pytesseract as tess


def recoginse_text(image):
    """
    步骤:
    1、灰度,二值化处理
    2、形态学操作去噪
    3、识别
    :param image:
    :return:
    """

    # 灰度 二值化
    gray = cv.cvtColor(image, cv.COLOR_BGR2GRAY)
    # 如果是白底黑字 建议 _INV
    ret, binary = cv.threshold(gray, 0, 255, cv.THRESH_BINARY_INV | cv.THRESH_OTSU)

    # 形态学操作 (根据需要设置参数(1,2))
    kernel = cv.getStructuringElement(cv.MORPH_RECT, (1, 2))  # 去除横向细线
    morph1 = cv.morphologyEx(binary, cv.MORPH_OPEN, kernel)
    kernel = cv.getStructuringElement(cv.MORPH_RECT, (2, 1))  # 去除纵向细线
    morph2 = cv.morphologyEx(morph1, cv.MORPH_OPEN, kernel)
    cv.imshow("Morph", morph2)

    # 黑底白字取非,变为白底黑字(便于pytesseract 识别)
    cv.bitwise_not(morph2, morph2)
    textImage = Image.fromarray(morph2)

    # 图片转文字
    text = tess.image_to_string(textImage)
    n = 10  # 根据不同国家车牌固定数目进行设置
    print("识别结果:")
    print(text[1:n])


def main():
    # 读取需要识别的数字字母图片,并显示读到的原图
    src = cv.imread("cp.jpg")
    cv.imshow("src", src)

    # 识别
    recoginse_text(src)

    cv.waitKey(0)
    cv.destroyAllWindows()


if __name__ == "__main__":
    main()
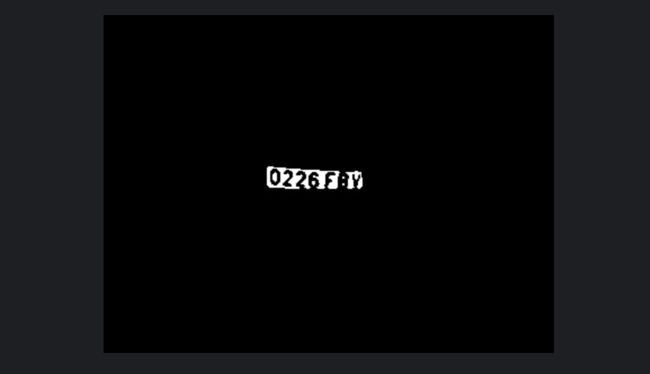
运行结果:
识别结果:
0226 F By
汉字识别
向校于数字和英文字符的识别,汽车车牌中的汉子字符识别的 难度更大。
- 预处理原始图像
- 对字符的原始特征进行提取
- 读取获取所得的最终特征
代码示例:中文车牌的识别
import tkinter as tk
from tkinter.filedialog import *
from tkinter import ttk
import tkinter.messagebox as mBox
#代码在下一个文件中
import predict
import cv2
from PIL import Image, ImageTk
import threading
import time


class Surface(ttk.Frame):
    pic_path = ""
    viewhigh = 600
    viewwide = 600
    update_time = 0
    thread = None
    thread_run = False
    camera = None
    color_transform = {"green": ("绿牌", "#55FF55"), "yello": ("黄牌", "#FFFF00"), "blue": ("蓝牌", "#6666FF")}

    def __init__(self, win):
        ttk.Frame.__init__(self, win)
        frame_left = ttk.Frame(self)
        frame_right1 = ttk.Frame(self)
        frame_right2 = ttk.Frame(self)
        win.title("车牌识别")
        win.state("zoomed")
        self.pack(fill=tk.BOTH, expand=tk.YES, padx="5", pady="5")
        frame_left.pack(side=tk.LEFT, expand=1, fill=tk.BOTH)
        frame_right1.pack(side=tk.TOP, expand=1, fill=tk.Y)
        frame_right2.pack(side=tk.RIGHT, expand=0)
        ttk.Label(frame_left, text='原图:').pack(anchor="nw")
        ttk.Label(frame_right1, text='车牌位置:').grid(column=0, row=0, sticky=tk.W)

        from_pic_ctl = ttk.Button(frame_right2, text="来自图片", width=20, command=self.from_pic)
        from_vedio_ctl = ttk.Button(frame_right2, text="来自摄像头", width=20, command=self.from_vedio)
        self.image_ctl = ttk.Label(frame_left)
        self.image_ctl.pack(anchor="nw")

        self.roi_ctl = ttk.Label(frame_right1)
        self.roi_ctl.grid(column=0, row=1, sticky=tk.W)
        ttk.Label(frame_right1, text='识别结果:').grid(column=0, row=2, sticky=tk.W)
        self.r_ctl = ttk.Label(frame_right1, text="")
        self.r_ctl.grid(column=0, row=3, sticky=tk.W)
        self.color_ctl = ttk.Label(frame_right1, text="", width="20")
        self.color_ctl.grid(column=0, row=4, sticky=tk.W)
        from_vedio_ctl.pack(anchor="se", pady="5")
        from_pic_ctl.pack(anchor="se", pady="5")
        self.predictor = predict.CardPredictor()
        self.predictor.train_svm()

    def get_imgtk(self, img_bgr):
        img = cv2.cvtColor(img_bgr, cv2.COLOR_BGR2RGB)
        im = Image.fromarray(img)
        imgtk = ImageTk.PhotoImage(image=im)
        wide = imgtk.width()
        high = imgtk.height()
        if wide > self.viewwide or high > self.viewhigh:
            wide_factor = self.viewwide / wide
            high_factor = self.viewhigh / high
            factor = min(wide_factor, high_factor)

            wide = int(wide * factor)
            if wide <= 0: wide = 1
            high = int(high * factor)
            if high <= 0: high = 1
            im = im.resize((wide, high), Image.LANCZOS)  # 在pillow的10.0.0版本中,ANTIALIAS方法被删除了,使用新的方法即可:
            imgtk = ImageTk.PhotoImage(image=im)
        return imgtk

    def show_roi(self, r, roi, color):
        if r:
            roi = cv2.cvtColor(roi, cv2.COLOR_BGR2RGB)
            roi = Image.fromarray(roi)
            self.imgtk_roi = ImageTk.PhotoImage(image=roi)
            self.roi_ctl.configure(image=self.imgtk_roi, state='enable')
            self.r_ctl.configure(text=str(r))
            self.update_time = time.time()
            try:
                c = self.color_transform[color]
                self.color_ctl.configure(text=c[0], background=c[1], state='enable')
            except:
                self.color_ctl.configure(state='disabled')
        elif self.update_time + 8 < time.time():
            self.roi_ctl.configure(state='disabled')
            self.r_ctl.configure(text="")
            self.color_ctl.configure(state='disabled')

    def from_vedio(self):
        if self.thread_run:
            return
        if self.camera is None:
            self.camera = cv2.VideoCapture(0)
            if not self.camera.isOpened():
                mBox.showwarning('警告', '摄像头打开失败!')
                self.camera = None
                return
        self.thread = threading.Thread(target=self.vedio_thread, args=(self,))
        self.thread.setDaemon(True)
        self.thread.start()
        self.thread_run = True

    def from_pic(self):
        self.thread_run = False
        self.pic_path = askopenfilename(title="选择识别图片", filetypes=[("jpg图片", "*.jpg")])
        if self.pic_path:
            img_bgr = predict.imreadex(self.pic_path)
            self.imgtk = self.get_imgtk(img_bgr)
            self.image_ctl.configure(image=self.imgtk)
            resize_rates = (1, 0.9, 0.8, 0.7, 0.6, 0.5, 0.4)
            for resize_rate in resize_rates:
                print("resize_rate:", resize_rate)
                try:
                    r, roi, color = self.predictor.predict(img_bgr, resize_rate)
                except:
                    continue
                if r:
                    break
            # r, roi, color = self.predictor.predict(img_bgr, 1)
            self.show_roi(r, roi, color)

    @staticmethod
    def vedio_thread(self):
        self.thread_run = True
        predict_time = time.time()
        while self.thread_run:
            _, img_bgr = self.camera.read()
            self.imgtk = self.get_imgtk(img_bgr)
            self.image_ctl.configure(image=self.imgtk)
            if time.time() - predict_time > 2:
                r, roi, color = self.predictor.predict(img_bgr)
                self.show_roi(r, roi, color)
                predict_time = time.time()
        print("run end")


def close_window():
    print("destroy")
    if surface.thread_run:
        surface.thread_run = False
        surface.thread.join(2.0)
    win.destroy()


if __name__ == '__main__':
    win = tk.Tk()

    surface = Surface(win)
    win.protocol('WM_DELETE_WINDOW', close_window)
    win.mainloop()
在上述代码中,先使用图像边缘和车牌颜色定位车牌再识别字符。车牌字符识别使用的算法是Opencv 的SVM,车牌字符识别在predict方法(perdict.py )中实现,代码如下:
import cv2
import numpy as np
from numpy.linalg import norm
import sys
import os
import json

SZ = 20          #训练图片长宽
MAX_WIDTH = 1000 #原始图片最大宽度
Min_Area = 2000  #车牌区域允许最大面积
PROVINCE_START = 1000
#读取图片文件
def imreadex(filename):
	return cv2.imdecode(np.fromfile(filename, dtype=np.uint8), cv2.IMREAD_COLOR)

def point_limit(point):
	if point[0] < 0:
		point[0] = 0
	if point[1] < 0:
		point[1] = 0

#根据设定的阈值和图片直方图,找出波峰,用于分隔字符
def find_waves(threshold, histogram):
	up_point = -1#上升点
	is_peak = False
	if histogram[0] > threshold:
		up_point = 0
		is_peak = True
	wave_peaks = []
	for i,x in enumerate(histogram):
		if is_peak and x < threshold:
			if i - up_point > 2:
				is_peak = False
				wave_peaks.append((up_point, i))
		elif not is_peak and x >= threshold:
			is_peak = True
			up_point = i
	if is_peak and up_point != -1 and i - up_point > 4:
		wave_peaks.append((up_point, i))
	return wave_peaks

#根据找出的波峰,分隔图片,从而得到逐个字符图片
def seperate_card(img, waves):
	part_cards = []
	for wave in waves:
		part_cards.append(img[:, wave[0]:wave[1]])
	return part_cards

#来自opencv的sample,用于svm训练
def deskew(img):
	m = cv2.moments(img)
	if abs(m['mu02']) < 1e-2:
		return img.copy()
	skew = m['mu11']/m['mu02']
	M = np.float32([[1, skew, -0.5*SZ*skew], [0, 1, 0]])
	img = cv2.warpAffine(img, M, (SZ, SZ), flags=cv2.WARP_INVERSE_MAP | cv2.INTER_LINEAR)
	return img
#来自opencv的sample,用于svm训练
def preprocess_hog(digits):
	samples = []
	for img in digits:
		gx = cv2.Sobel(img, cv2.CV_32F, 1, 0)
		gy = cv2.Sobel(img, cv2.CV_32F, 0, 1)
		mag, ang = cv2.cartToPolar(gx, gy)
		bin_n = 16
		bin = np.int32(bin_n*ang/(2*np.pi))
		bin_cells = bin[:10,:10], bin[10:,:10], bin[:10,10:], bin[10:,10:]
		mag_cells = mag[:10,:10], mag[10:,:10], mag[:10,10:], mag[10:,10:]
		hists = [np.bincount(b.ravel(), m.ravel(), bin_n) for b, m in zip(bin_cells, mag_cells)]
		hist = np.hstack(hists)

		# transform to Hellinger kernel
		eps = 1e-7
		hist /= hist.sum() + eps
		hist = np.sqrt(hist)
		hist /= norm(hist) + eps

		samples.append(hist)
	return np.float32(samples)
#不能保证包括所有省份
provinces = [
"zh_cuan", "川",
"zh_e", "鄂",
"zh_gan", "赣",
"zh_gan1", "甘",
"zh_gui", "贵",
"zh_gui1", "桂",
"zh_hei", "黑",
"zh_hu", "沪",
"zh_ji", "冀",
"zh_jin", "津",
"zh_jing", "京",
"zh_jl", "吉",
"zh_liao", "辽",
"zh_lu", "鲁",
"zh_meng", "蒙",
"zh_min", "闽",
"zh_ning", "宁",
"zh_qing", "靑",
"zh_qiong", "琼",
"zh_shan", "陕",
"zh_su", "苏",
"zh_sx", "晋",
"zh_wan", "皖",
"zh_xiang", "湘",
"zh_xin", "新",
"zh_yu", "豫",
"zh_yu1", "渝",
"zh_yue", "粤",
"zh_yun", "云",
"zh_zang", "藏",
"zh_zhe", "浙"
]
class StatModel(object):
	def load(self, fn):
		self.model = self.model.load(fn)
	def save(self, fn):
		self.model.save(fn)
class SVM(StatModel):
	def __init__(self, C = 1, gamma = 0.5):
		self.model = cv2.ml.SVM_create()
		self.model.setGamma(gamma)
		self.model.setC(C)
		self.model.setKernel(cv2.ml.SVM_RBF)
		self.model.setType(cv2.ml.SVM_C_SVC)
#训练svm
	def train(self, samples, responses):
		self.model.train(samples, cv2.ml.ROW_SAMPLE, responses)
#字符识别
	def predict(self, samples):
		r = self.model.predict(samples)
		return r[1].ravel()

class CardPredictor:
	def __init__(self):
		#车牌识别的部分参数保存在js中,便于根据图片分辨率做调整
		f = open('config.js')
		j = json.load(f)
		for c in j["config"]:
			if c["open"]:
				self.cfg = c.copy()
				break
		else:
			raise RuntimeError('没有设置有效配置参数')

	def __del__(self):
		self.save_traindata()
	def train_svm(self):
		#识别英文字母和数字
		self.model = SVM(C=1, gamma=0.5)
		#识别中文
		self.modelchinese = SVM(C=1, gamma=0.5)
		if os.path.exists("svm.dat"):
			self.model.load("svm.dat")
		else:
			chars_train = []
			chars_label = []

			for root, dirs, files in os.walk("train\\chars2"):
				if len(os.path.basename(root)) > 1:
					continue
				root_int = ord(os.path.basename(root))
				for filename in files:
					filepath = os.path.join(root,filename)
					digit_img = cv2.imread(filepath)
					digit_img = cv2.cvtColor(digit_img, cv2.COLOR_BGR2GRAY)
					chars_train.append(digit_img)
					#chars_label.append(1)
					chars_label.append(root_int)

			chars_train = list(map(deskew, chars_train))
			chars_train = preprocess_hog(chars_train)
			#chars_train = chars_train.reshape(-1, 20, 20).astype(np.float32)
			chars_label = np.array(chars_label)
			self.model.train(chars_train, chars_label)
		if os.path.exists("svmchinese.dat"):
			self.modelchinese.load("svmchinese.dat")
		else:
			chars_train = []
			chars_label = []
			for root, dirs, files in os.walk("train\\charsChinese"):
				if not os.path.basename(root).startswith("zh_"):
					continue
				pinyin = os.path.basename(root)
				index = provinces.index(pinyin) + PROVINCE_START + 1 #1是拼音对应的汉字
				for filename in files:
					filepath = os.path.join(root,filename)
					digit_img = cv2.imread(filepath)
					digit_img = cv2.cvtColor(digit_img, cv2.COLOR_BGR2GRAY)
					chars_train.append(digit_img)
					#chars_label.append(1)
					chars_label.append(index)
			chars_train = list(map(deskew, chars_train))
			chars_train = preprocess_hog(chars_train)
			#chars_train = chars_train.reshape(-1, 20, 20).astype(np.float32)
			chars_label = np.array(chars_label)
			print(chars_train.shape)
			self.modelchinese.train(chars_train, chars_label)

	def save_traindata(self):
		if not os.path.exists("svm.dat"):
			self.model.save("svm.dat")
		if not os.path.exists("svmchinese.dat"):
			self.modelchinese.save("svmchinese.dat")

	def accurate_place(self, card_img_hsv, limit1, limit2, color):
		row_num, col_num = card_img_hsv.shape[:2]
		xl = col_num
		xr = 0
		yh = 0
		yl = row_num
		#col_num_limit = self.cfg["col_num_limit"]
		row_num_limit = self.cfg["row_num_limit"]
		col_num_limit = col_num * 0.8 if color != "green" else col_num * 0.5#绿色有渐变
		for i in range(row_num):
			count = 0
			for j in range(col_num):
				H = card_img_hsv.item(i, j, 0)
				S = card_img_hsv.item(i, j, 1)
				V = card_img_hsv.item(i, j, 2)
				if limit1 < H <= limit2 and 34 < S and 46 < V:
					count += 1
			if count > col_num_limit:
				if yl > i:
					yl = i
				if yh < i:
					yh = i
		for j in range(col_num):
			count = 0
			for i in range(row_num):
				H = card_img_hsv.item(i, j, 0)
				S = card_img_hsv.item(i, j, 1)
				V = card_img_hsv.item(i, j, 2)
				if limit1 < H <= limit2 and 34 < S and 46 < V:
					count += 1
			if count > row_num - row_num_limit:
				if xl > j:
					xl = j
				if xr < j:
					xr = j
		return xl, xr, yh, yl

	def predict(self, car_pic, resize_rate=1):
		if type(car_pic) == type(""):
			img = imreadex(car_pic)
		else:
			img = car_pic
		pic_hight, pic_width = img.shape[:2]
		if pic_width > MAX_WIDTH:
			pic_rate = MAX_WIDTH / pic_width
			img = cv2.resize(img, (MAX_WIDTH, int(pic_hight*pic_rate)), interpolation=cv2.INTER_LANCZOS4)
			pic_hight, pic_width = img.shape[:2]

		if resize_rate != 1:
			img = cv2.resize(img, (int(pic_width*resize_rate), int(pic_hight*resize_rate)), interpolation=cv2.INTER_LANCZOS4)
			pic_hight, pic_width = img.shape[:2]

		print("h,w:", pic_hight, pic_width)
		blur = self.cfg["blur"]
		#高斯去噪
		if blur > 0:
			img = cv2.GaussianBlur(img, (blur, blur), 0)#图片分辨率调整
		oldimg = img
		img = cv2.cvtColor(img, cv2.COLOR_BGR2GRAY)
		#equ = cv2.equalizeHist(img)
		#img = np.hstack((img, equ))
		#去掉图像中不会是车牌的区域
		kernel = np.ones((20, 20), np.uint8)
		img_opening = cv2.morphologyEx(img, cv2.MORPH_OPEN, kernel)
		img_opening = cv2.addWeighted(img, 1, img_opening, -1, 0);

		#找到图像边缘
		ret, img_thresh = cv2.threshold(img_opening, 0, 255, cv2.THRESH_BINARY + cv2.THRESH_OTSU)
		img_edge = cv2.Canny(img_thresh, 100, 200)
		#使用开运算和闭运算让图像边缘成为一个整体
		kernel = np.ones((self.cfg["morphologyr"], self.cfg["morphologyc"]), np.uint8)
		img_edge1 = cv2.morphologyEx(img_edge, cv2.MORPH_CLOSE, kernel)
		img_edge2 = cv2.morphologyEx(img_edge1, cv2.MORPH_OPEN, kernel)

		#查找图像边缘整体形成的矩形区域,可能有很多,车牌就在其中一个矩形区域中
		try:
			contours, hierarchy = cv2.findContours(img_edge2, cv2.RETR_TREE, cv2.CHAIN_APPROX_SIMPLE)
		except ValueError:
			image, contours, hierarchy = cv2.findContours(img_edge2, cv2.RETR_TREE, cv2.CHAIN_APPROX_SIMPLE)
		contours = [cnt for cnt in contours if cv2.contourArea(cnt) > Min_Area]
		print('len(contours)', len(contours))
		#一一排除不是车牌的矩形区域
		car_contours = []
		for cnt in contours:
			rect = cv2.minAreaRect(cnt)
			area_width, area_height = rect[1]
			if area_width < area_height:
				area_width, area_height = area_height, area_width
			wh_ratio = area_width / area_height
			#print(wh_ratio)
			#要求矩形区域长宽比在2到5.5之间,2到5.5是车牌的长宽比,其余的矩形排除
			if wh_ratio > 2 and wh_ratio < 5.5:
				car_contours.append(rect)
				box = cv2.boxPoints(rect)
				box = np.int0(box)
				#oldimg = cv2.drawContours(oldimg, [box], 0, (0, 0, 255), 2)
				#cv2.imshow("edge4", oldimg)
				#cv2.waitKey(0)

		print(len(car_contours))

		print("精确定位")
		card_imgs = []
		#矩形区域可能是倾斜的矩形,需要矫正,以便使用颜色定位
		for rect in car_contours:
			if rect[2] > -1 and rect[2] < 1:#创造角度,使得左、高、右、低拿到正确的值
				angle = 1
			else:
				angle = rect[2]
			rect = (rect[0], (rect[1][0]+5, rect[1][1]+5), angle)#扩大范围,避免车牌边缘被排除

			box = cv2.boxPoints(rect)
			heigth_point = right_point = [0, 0]
			left_point = low_point = [pic_width, pic_hight]
			for point in box:
				if left_point[0] > point[0]:
					left_point = point
				if low_point[1] > point[1]:
					low_point = point
				if heigth_point[1] < point[1]:
					heigth_point = point
				if right_point[0] < point[0]:
					right_point = point

			if left_point[1] <= right_point[1]:#正角度
				new_right_point = [right_point[0], heigth_point[1]]
				pts2 = np.float32([left_point, heigth_point, new_right_point])#字符只是高度需要改变
				pts1 = np.float32([left_point, heigth_point, right_point])
				M = cv2.getAffineTransform(pts1, pts2)
				dst = cv2.warpAffine(oldimg, M, (pic_width, pic_hight))
				point_limit(new_right_point)
				point_limit(heigth_point)
				point_limit(left_point)
				card_img = dst[int(left_point[1]):int(heigth_point[1]), int(left_point[0]):int(new_right_point[0])]
				card_imgs.append(card_img)
				#cv2.imshow("card", card_img)
				#cv2.waitKey(0)
			elif left_point[1] > right_point[1]:#负角度

				new_left_point = [left_point[0], heigth_point[1]]
				pts2 = np.float32([new_left_point, heigth_point, right_point])#字符只是高度需要改变
				pts1 = np.float32([left_point, heigth_point, right_point])
				M = cv2.getAffineTransform(pts1, pts2)
				dst = cv2.warpAffine(oldimg, M, (pic_width, pic_hight))
				point_limit(right_point)
				point_limit(heigth_point)
				point_limit(new_left_point)
				card_img = dst[int(right_point[1]):int(heigth_point[1]), int(new_left_point[0]):int(right_point[0])]
				card_imgs.append(card_img)
				#cv2.imshow("card", card_img)
				#cv2.waitKey(0)
		#开始使用颜色定位,排除不是车牌的矩形,目前只识别蓝、绿、黄车牌
		colors = []
		for card_index,card_img in enumerate(card_imgs):
			green = yello = blue = black = white = 0
			card_img_hsv = cv2.cvtColor(card_img, cv2.COLOR_BGR2HSV)
			#有转换失败的可能,原因来自于上面矫正矩形出错
			if card_img_hsv is None:
				continue
			row_num, col_num= card_img_hsv.shape[:2]
			card_img_count = row_num * col_num

			for i in range(row_num):
				for j in range(col_num):
					H = card_img_hsv.item(i, j, 0)
					S = card_img_hsv.item(i, j, 1)
					V = card_img_hsv.item(i, j, 2)
					if 11 < H <= 34 and S > 34:#图片分辨率调整
						yello += 1
					elif 35 < H <= 99 and S > 34:#图片分辨率调整
						green += 1
					elif 99 < H <= 124 and S > 34:#图片分辨率调整
						blue += 1

					if 0 < H <180 and 0 < S < 255 and 0 < V < 46:
						black += 1
					elif 0 < H <180 and 0 < S < 43 and 221 < V < 225:
						white += 1
			color = "no"

			limit1 = limit2 = 0
			if yello*2 >= card_img_count:
				color = "yello"
				limit1 = 11
				limit2 = 34#有的图片有色偏偏绿
			elif green*2 >= card_img_count:
				color = "green"
				limit1 = 35
				limit2 = 99
			elif blue*2 >= card_img_count:
				color = "blue"
				limit1 = 100
				limit2 = 124#有的图片有色偏偏紫
			elif black + white >= card_img_count*0.7:#TODO
				color = "bw"
			print(color)
			colors.append(color)
			print(blue, green, yello, black, white, card_img_count)
			#cv2.imshow("color", card_img)
			#cv2.waitKey(0)
			if limit1 == 0:
				continue
			#以上为确定车牌颜色
			#以下为根据车牌颜色再定位,缩小边缘非车牌边界
			xl, xr, yh, yl = self.accurate_place(card_img_hsv, limit1, limit2, color)
			if yl == yh and xl == xr:
				continue
			need_accurate = False
			if yl >= yh:
				yl = 0
				yh = row_num
				need_accurate = True
			if xl >= xr:
				xl = 0
				xr = col_num
				need_accurate = True
			card_imgs[card_index] = card_img[yl:yh, xl:xr] if color != "green" or yl < (yh-yl)//4 else card_img[yl-(yh-yl)//4:yh, xl:xr]
			if need_accurate:#可能x或y方向未缩小,需要再试一次
				card_img = card_imgs[card_index]
				card_img_hsv = cv2.cvtColor(card_img, cv2.COLOR_BGR2HSV)
				xl, xr, yh, yl = self.accurate_place(card_img_hsv, limit1, limit2, color)
				if yl == yh and xl == xr:
					continue
				if yl >= yh:
					yl = 0
					yh = row_num
				if xl >= xr:
					xl = 0
					xr = col_num
			card_imgs[card_index] = card_img[yl:yh, xl:xr] if color != "green" or yl < (yh-yl)//4 else card_img[yl-(yh-yl)//4:yh, xl:xr]
		#以上为车牌定位
		#以下为识别车牌中的字符
		predict_result = []
		roi = None
		card_color = None
		for i, color in enumerate(colors):
			if color in ("blue", "yello", "green"):
				card_img = card_imgs[i]
				gray_img = cv2.cvtColor(card_img, cv2.COLOR_BGR2GRAY)
				#黄、绿车牌字符比背景暗、与蓝车牌刚好相反,所以黄、绿车牌需要反向
				if color == "green" or color == "yello":
					gray_img = cv2.bitwise_not(gray_img)
				ret, gray_img = cv2.threshold(gray_img, 0, 255, cv2.THRESH_BINARY + cv2.THRESH_OTSU)
				#查找水平直方图波峰
				x_histogram  = np.sum(gray_img, axis=1)
				x_min = np.min(x_histogram)
				x_average = np.sum(x_histogram)/x_histogram.shape[0]
				x_threshold = (x_min + x_average)/2
				wave_peaks = find_waves(x_threshold, x_histogram)
				if len(wave_peaks) == 0:
					print("peak less 0:")
					continue
				#认为水平方向,最大的波峰为车牌区域
				wave = max(wave_peaks, key=lambda x:x[1]-x[0])
				gray_img = gray_img[wave[0]:wave[1]]
				#查找垂直直方图波峰
				row_num, col_num= gray_img.shape[:2]
				#去掉车牌上下边缘1个像素,避免白边影响阈值判断
				gray_img = gray_img[1:row_num-1]
				y_histogram = np.sum(gray_img, axis=0)
				y_min = np.min(y_histogram)
				y_average = np.sum(y_histogram)/y_histogram.shape[0]
				y_threshold = (y_min + y_average)/5#U和0要求阈值偏小,否则U和0会被分成两半

				wave_peaks = find_waves(y_threshold, y_histogram)

				#for wave in wave_peaks:
				#	cv2.line(card_img, pt1=(wave[0], 5), pt2=(wave[1], 5), color=(0, 0, 255), thickness=2)
				#车牌字符数应大于6
				if len(wave_peaks) <= 6:
					print("peak less 1:", len(wave_peaks))
					continue

				wave = max(wave_peaks, key=lambda x:x[1]-x[0])
				max_wave_dis = wave[1] - wave[0]
				#判断是否是左侧车牌边缘
				if wave_peaks[0][1] - wave_peaks[0][0] < max_wave_dis/3 and wave_peaks[0][0] == 0:
					wave_peaks.pop(0)

				#组合分离汉字
				cur_dis = 0
				for i,wave in enumerate(wave_peaks):
					if wave[1] - wave[0] + cur_dis > max_wave_dis * 0.6:
						break
					else:
						cur_dis += wave[1] - wave[0]
				if i > 0:
					wave = (wave_peaks[0][0], wave_peaks[i][1])
					wave_peaks = wave_peaks[i+1:]
					wave_peaks.insert(0, wave)

				#去除车牌上的分隔点
				point = wave_peaks[2]
				if point[1] - point[0] < max_wave_dis/3:
					point_img = gray_img[:,point[0]:point[1]]
					if np.mean(point_img) < 255/5:
						wave_peaks.pop(2)

				if len(wave_peaks) <= 6:
					print("peak less 2:", len(wave_peaks))
					continue
				part_cards = seperate_card(gray_img, wave_peaks)
				for i, part_card in enumerate(part_cards):
					#可能是固定车牌的铆钉
					if np.mean(part_card) < 255/5:
						print("a point")
						continue
					part_card_old = part_card
					#w = abs(part_card.shape[1] - SZ)//2
					w = part_card.shape[1] // 3
					part_card = cv2.copyMakeBorder(part_card, 0, 0, w, w, cv2.BORDER_CONSTANT, value = [0,0,0])
					part_card = cv2.resize(part_card, (SZ, SZ), interpolation=cv2.INTER_AREA)
					#cv2.imshow("part", part_card_old)
					#cv2.waitKey(0)
					#cv2.imwrite("u.jpg", part_card)
					#part_card = deskew(part_card)
					part_card = preprocess_hog([part_card])
					if i == 0:
						resp = self.modelchinese.predict(part_card)
						charactor = provinces[int(resp[0]) - PROVINCE_START]
					else:
						resp = self.model.predict(part_card)
						charactor = chr(resp[0])
					#判断最后一个数是否是车牌边缘,假设车牌边缘被认为是1
					if charactor == "1" and i == len(part_cards)-1:
						if part_card_old.shape[0]/part_card_old.shape[1] >= 8:#1太细,认为是边缘
							print(part_card_old.shape)
							continue
					predict_result.append(charactor)
				roi = card_img
				card_color = color
				break

		return predict_result, roi, card_color#识别到的字符、定位的车牌图像、车牌颜色

if __name__ == '__main__':
	c = CardPredictor()
	c.train_svm()
	r, roi, color = c.predict("car2.jpg")
	print(r)
运行第一个文件会弹出一个选择框;
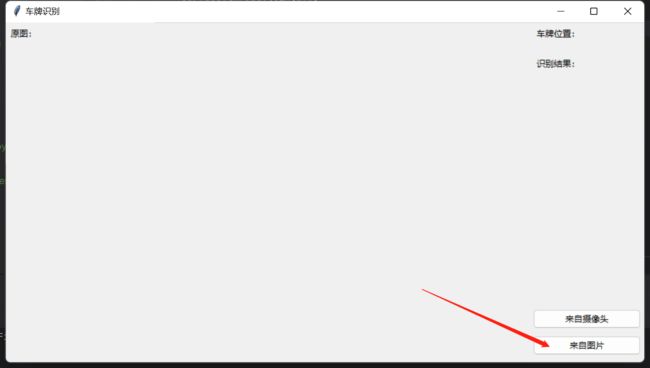
选个图片

运行结果:
['京', 'A', 'D', '7', 'Z', '9', '7', '2']
看来还是需要在训练下模型。后续补充新模型验证测试。
代码中涉及的文件下载地址
下载
https://download.csdn.net/download/hai411741962/88244933