yolov5 V7.0版本 使用Pascal voc 2012 数据集训练
1、环境搭建
# 1、anaconda pycharm环境搭建
https://blog.csdn.net/weixin_45715405/article/details/132100595?spm=1001.2014.3001.5502
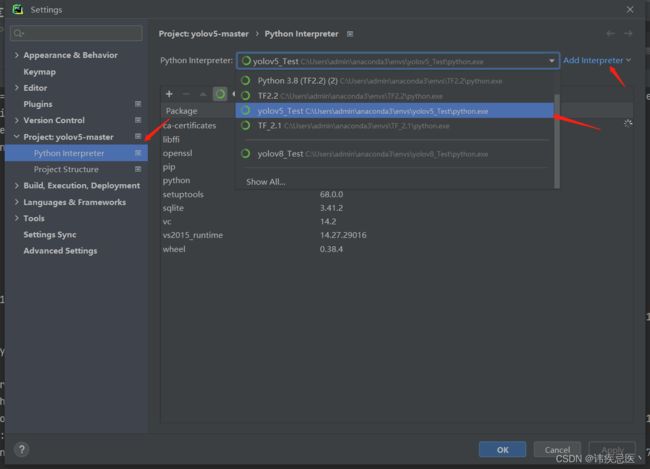
根据上面创建一个conda的虚拟环境python版本为3.8版本

# 2、yolov5 代码下载
https://github.com/ultralytics/yolov5

# 3、安装需要的依赖
pip install -r requirements.txt -i https://pypi.tuna.tsinghua.edu.cn/simple

# 4、测试图片
# 根目录下新建一个weights目录,在yolov5的github页面上下载一个yolov5s.pt
 python .\detect.py --source .\data\images\ --weights .\weights\yolov5s.pt --conf 0.4
2、Pascal voc 2012 数据集下载
解压之后内容,Annotations与JPEGImages “Annotations”里的文件名与“JPEGImages”相互对应,只是后缀名不一样。“Annotations”存放的是xml格式的标签文件。
SegmentationClass应用于分割。保存了分割后的标签图(2913张png图片),标注出了每一个像素属于哪一个类别。
SegmentationObject应用于分割。保存了分割后的标签图(2913张png图片),标注出了每一个像素属于哪一个具体的物体。

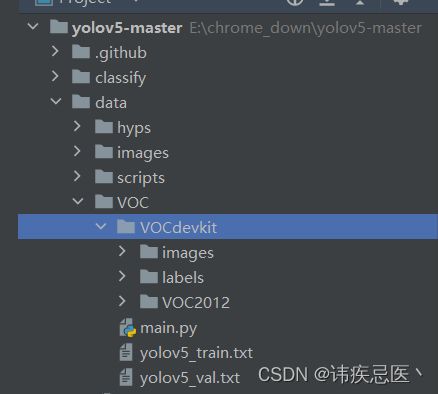
通过目录结构可以看出,将刚才下载好的数据集解压在了data目录下的VOC目录里面,然后在VOC目录下创建一个main.py进行训练数据的转换。
import xml.etree.ElementTree as ET
import pickle
import os
from os import listdir, getcwd
from os.path import join
import random
from shutil import copyfile

classes = ['aeroplane', 'bicycle', 'bird', 'boat', 'bottle', 'bus', 'car', 'cat', 'chair', 'cow', 'diningtable', 'dog',
        'horse', 'motorbike', 'person', 'pottedplant', 'sheep', 'sofa', 'train', 'tvmonitor'] # 划分的类别,依实际情况而定
# classes=["ball"]

TRAIN_RATIO = 80  # 训练集与数据集划分的比例


def clear_hidden_files(path):
    dir_list = os.listdir(path)
    for i in dir_list:
        abspath = os.path.join(os.path.abspath(path), i)
        if os.path.isfile(abspath):
            if i.startswith("._"):
                os.remove(abspath)
        else:
            clear_hidden_files(abspath)


def convert(size, box): # 边界框的转换
    dw = 1. / size[0]
    dh = 1. / size[1]
    x = (box[0] + box[1]) / 2.0
    y = (box[2] + box[3]) / 2.0
    w = box[1] - box[0]
    h = box[3] - box[2]
    x = x * dw
    w = w * dw
    y = y * dh
    h = h * dh
    return (x, y, w, h)


def convert_annotation(image_id):
    in_file = open('VOCdevkit/VOC2012/Annotations/%s.xml' % image_id) # xml路径
    out_file = open('VOCdevkit/VOC2012/YOLOLabels/%s.txt' % image_id, 'w')
    tree = ET.parse(in_file)
    root = tree.getroot()
    size = root.find('size')
    w = int(size.find('width').text)
    h = int(size.find('height').text)

    for obj in root.iter('object'):
        difficult = obj.find('difficult').text
        cls = obj.find('name').text
        if cls not in classes or int(difficult) == 1:
            continue
        cls_id = classes.index(cls)
        xmlbox = obj.find('bndbox')
        b = (float(xmlbox.find('xmin').text), float(xmlbox.find('xmax').text), float(xmlbox.find('ymin').text),
             float(xmlbox.find('ymax').text))
        bb = convert((w, h), b)
        out_file.write(str(cls_id) + " " + " ".join([str(a) for a in bb]) + '\n')
    in_file.close()
    out_file.close()


wd = os.getcwd()
wd = os.getcwd()
data_base_dir = os.path.join(wd, "VOCdevkit/")
if not os.path.isdir(data_base_dir):
    os.mkdir(data_base_dir)
work_sapce_dir = os.path.join(data_base_dir, "VOC2012/")
if not os.path.isdir(work_sapce_dir):
    os.mkdir(work_sapce_dir)
annotation_dir = os.path.join(work_sapce_dir, "Annotations/")
if not os.path.isdir(annotation_dir):
    os.mkdir(annotation_dir)
clear_hidden_files(annotation_dir)
image_dir = os.path.join(work_sapce_dir, "JPEGImages/")
if not os.path.isdir(image_dir):
    os.mkdir(image_dir)
clear_hidden_files(image_dir)
yolo_labels_dir = os.path.join(work_sapce_dir, "YOLOLabels/")
if not os.path.isdir(yolo_labels_dir):
    os.mkdir(yolo_labels_dir)
clear_hidden_files(yolo_labels_dir)
yolov5_images_dir = os.path.join(data_base_dir, "images/")
if not os.path.isdir(yolov5_images_dir):
    os.mkdir(yolov5_images_dir)
clear_hidden_files(yolov5_images_dir)
yolov5_labels_dir = os.path.join(data_base_dir, "labels/")
if not os.path.isdir(yolov5_labels_dir):
    os.mkdir(yolov5_labels_dir)
clear_hidden_files(yolov5_labels_dir)
yolov5_images_train_dir = os.path.join(yolov5_images_dir, "train/")
if not os.path.isdir(yolov5_images_train_dir):
    os.mkdir(yolov5_images_train_dir)
clear_hidden_files(yolov5_images_train_dir)
yolov5_images_test_dir = os.path.join(yolov5_images_dir, "val/")
if not os.path.isdir(yolov5_images_test_dir):
    os.mkdir(yolov5_images_test_dir)
clear_hidden_files(yolov5_images_test_dir)
yolov5_labels_train_dir = os.path.join(yolov5_labels_dir, "train/")
if not os.path.isdir(yolov5_labels_train_dir):
    os.mkdir(yolov5_labels_train_dir)
clear_hidden_files(yolov5_labels_train_dir)
yolov5_labels_test_dir = os.path.join(yolov5_labels_dir, "val/")
if not os.path.isdir(yolov5_labels_test_dir):
    os.mkdir(yolov5_labels_test_dir)
clear_hidden_files(yolov5_labels_test_dir)

train_file = open(os.path.join(wd, "yolov5_train.txt"), 'w')
test_file = open(os.path.join(wd, "yolov5_val.txt"), 'w')
train_file.close()
test_file.close()
train_file = open(os.path.join(wd, "yolov5_train.txt"), 'a')
test_file = open(os.path.join(wd, "yolov5_val.txt"), 'a')
list_imgs = os.listdir(image_dir)  # list image files
prob = random.randint(1, 100)
print("Probability: %d" % prob)
for i in range(0, len(list_imgs)):
    path = os.path.join(image_dir, list_imgs[i])
    if os.path.isfile(path):
        image_path = image_dir + list_imgs[i]
        voc_path = list_imgs[i]
        (nameWithoutExtention, extention) = os.path.splitext(os.path.basename(image_path))
        (voc_nameWithoutExtention, voc_extention) = os.path.splitext(os.path.basename(voc_path))
        annotation_name = nameWithoutExtention + '.xml'
        annotation_path = os.path.join(annotation_dir, annotation_name)
        label_name = nameWithoutExtention + '.txt'
        label_path = os.path.join(yolo_labels_dir, label_name)
    prob = random.randint(1, 100)
    print("Probability: %d" % prob)
    if (prob < TRAIN_RATIO):  # train dataset
        if os.path.exists(annotation_path):
            train_file.write(image_path + '\n')
            convert_annotation(nameWithoutExtention)  # convert label
            copyfile(image_path, yolov5_images_train_dir + voc_path)
            copyfile(label_path, yolov5_labels_train_dir + label_name)
    else:  # test dataset
        if os.path.exists(annotation_path):
            test_file.write(image_path + '\n')
            convert_annotation(nameWithoutExtention)  # convert label
            copyfile(image_path, yolov5_images_test_dir + voc_path)
            copyfile(label_path, yolov5_labels_test_dir + label_name)
train_file.close()
test_file.close()
第9行:根据自己数据集的标签内容而定。
第42和43行:xml文件的路径以及txt文件的存储路径。
第67行到77行:此部分应该为将数据集拆分为测试集和验证集的源文件,需要与42到43行的文件名对应。
文件配置过程主要分为这几个步骤:1.标签格式的转换:xml->txt;2.将数据划分为训练集和验证集。文件准备完成后,应包含图像数据和txt的标签数据,同时还划分成了训练集和验证集。
指向完之后目录结构
3、准备训练
在data目录下新建一个VOC_test.yaml,内容如下
path: ./VOC
train: # train images (relative to 'path')  16551 images
  - E:\\chrome_down\\yolov5-master\\data\\VOC\\VOCdevkit\\images\\train
val: # val images (relative to 'path')  4952 images
  - E:\\chrome_down\\yolov5-master\\data\\VOC\\VOCdevkit\\images\\val

# Classes
names:
  0: aeroplane
  1: bicycle
  2: bird
  3: boat
  4: bottle
  5: bus
  6: car
  7: cat
  8: chair
  9: cow
  10: diningtable
  11: dog
  12: horse
  13: motorbike
  14: person
  15: pottedplant
  16: sheep
  17: sofa
  18: train
  19: tvmonitor
在models目录下新建一个yolov5s-voc.yaml文件,内容如下,只是将yolov5s.yaml第一行nc:80修改成了nc:20,其他不变
# YOLOv5  by Ultralytics, AGPL-3.0 license

# Parameters
nc: 20  # number of classes
depth_multiple: 0.33  # model depth multiple
width_multiple: 0.50  # layer channel multiple
anchors:
  - [10,13, 16,30, 33,23]  # P3/8
  - [30,61, 62,45, 59,119]  # P4/16
  - [116,90, 156,198, 373,326]  # P5/32

# YOLOv5 v6.0 backbone
backbone:
  # [from, number, module, args]
  [[-1, 1, Conv, [64, 6, 2, 2]],  # 0-P1/2
   [-1, 1, Conv, [128, 3, 2]],  # 1-P2/4
   [-1, 3, C3, [128]],
   [-1, 1, Conv, [256, 3, 2]],  # 3-P3/8
   [-1, 6, C3, [256]],
   [-1, 1, Conv, [512, 3, 2]],  # 5-P4/16
   [-1, 9, C3, [512]],
   [-1, 1, Conv, [1024, 3, 2]],  # 7-P5/32
   [-1, 3, C3, [1024]],
   [-1, 1, SPPF, [1024, 5]],  # 9
  ]

# YOLOv5 v6.0 head
head:
  [[-1, 1, Conv, [512, 1, 1]],
   [-1, 1, nn.Upsample, [None, 2, 'nearest']],
   [[-1, 6], 1, Concat, [1]],  # cat backbone P4
   [-1, 3, C3, [512, False]],  # 13

   [-1, 1, Conv, [256, 1, 1]],
   [-1, 1, nn.Upsample, [None, 2, 'nearest']],
   [[-1, 4], 1, Concat, [1]],  # cat backbone P3
   [-1, 3, C3, [256, False]],  # 17 (P3/8-small)

   [-1, 1, Conv, [256, 3, 2]],
   [[-1, 14], 1, Concat, [1]],  # cat head P4
   [-1, 3, C3, [512, False]],  # 20 (P4/16-medium)

   [-1, 1, Conv, [512, 3, 2]],
   [[-1, 10], 1, Concat, [1]],  # cat head P5
   [-1, 3, C3, [1024, False]],  # 23 (P5/32-large)

   [[17, 20, 23], 1, Detect, [nc, anchors]],  # Detect(P3, P4, P5)
  ]
开始训练
python train.py --data data/VOC.yaml --cfg models/yolov5s-voc.yaml --weights weights/yolov5s.pt --batch-size 16 --epochs 100
GPU环境搭建
1、nvidia安装驱动安装
nvidia-smi
2、cuda安装
https://developer.nvidia.com/cuda-downloads?target_os=Windows&target_arch=x86_64&target_version=10&target_type=exe_local
参数解释
    # 设置网络权重文件路径
    parser.add_argument('--weights', nargs='+', type=str, default=ROOT / 'yolov5s.pt', help='model path or triton URL')
    # 设置网络输入路径
    parser.add_argument('--source', type=str, default=ROOT / 'data/images', help='file/dir/URL/glob/screen/0(webcam)')
    # 设置配置文件路径
    parser.add_argument('--data', type=str, default=ROOT / 'data/coco128.yaml', help='(optional) dataset.yaml path')
    # 设置模型检测前会将图片resize成640*640
    parser.add_argument('--imgsz', '--img', '--img-size', nargs='+', type=int, default=[640], help='inference size h,w')
    # 置信度,通俗说,如果设置为0,网络只要认为他预处这个目标有一点点概率是正确的目标就会框出来
    parser.add_argument('--conf-thres', type=float, default=0.25, help='confidence threshold')
    # 调节iOU
    parser.add_argument('--iou-thres', type=float, default=0.45, help='NMS IoU threshold')
    # 一张图片上最多检测目标
    parser.add_argument('--max-det', type=int, default=1000, help='maximum detections per image')
    # 选择GPU使用
    parser.add_argument('--device', default='', help='cuda device, i.e. 0 or 0,1,2,3 or cpu')
    # 是否实时将检测参数显示出来
    parser.add_argument('--view-img', action='store_true', help='show results')
    # 将检测参数保存到txt文件中
    parser.add_argument('--save-txt', action='store_true', help='save results to *.txt')
    # 是否已txt文件保存置信度
    parser.add_argument('--save-conf', action='store_true', help='save confidences in --save-txt labels')
    # 是否将模型检测物体裁剪出来
    parser.add_argument('--save-crop', action='store_true', help='save cropped prediction boxes')
    # 开启这个参数就是不保存预测结果,但是会生成exp文件
    parser.add_argument('--nosave', action='store_true', help='do not save images/videos')
    # classes 0表示只检测yaml这个文件中数组的第一个文件
    parser.add_argument('--classes', nargs='+', type=int, help='filter by class: --classes 0, or --classes 0 2 3')
    # 非常相识的类别可能会存在两个框中,开启这一个参数就只会出现一个
    parser.add_argument('--agnostic-nms', action='store_true', help='class-agnostic NMS')
    # 这个参数增强的方式
    parser.add_argument('--augment', action='store_true', help='augmented inference')
    # 是否把 特征 图 可 视化出来
    parser.add_argument('--visualize', action='store_true', help='visualize features')
    # 开启这个参数,则对所有模型进行strip_optimizer操作,让pt文件中的优化器等信息
    parser.add_argument('--update', action='store_true', help='update all models')
    # 预测结果保存路径
    parser.add_argument('--project', default=ROOT / 'runs/detect', help='save results to project/name')
    # 预测结果文件夹名
    parser.add_argument('--name', default='exp', help='save results to project/name')
    # 预处结果是否保存到原先文件夹中
    parser.add_argument('--exist-ok', action='store_true', help='existing project/name ok, do not increment')
    # 边框粗细
    parser.add_argument('--line-thickness', default=3, type=int, help='bounding box thickness (pixels)')
    # 这个参数是隐藏标签
    parser.add_argument('--hide-labels', default=False, action='store_true', help='hide labels')
    # 隐藏标签的置信度
    parser.add_argument('--hide-conf', default=False, action='store_true', help='hide confidences')
    # 是否使用FP16版半精度推理
    parser.add_argument('--half', action='store_true', help='use FP16 half-precision inference')
    # 是否使用Opencv DNN j进行ONNX推理
    parser.add_argument('--dnn', action='store_true', help='use OpenCV DNN for ONNX inference')


