python使用snap7库实现S7 client的通讯,与TPLC1500通讯
主要步骤:
1. python 安装snap7 的库,指令【使用清华库】:
pip install python-snap7 -i https://pypi.tuna.tsinghua.edu.cn/simple
2. 在python中使用
2.1 加载需要的库文件
import snap7#use client
from snap7.util import *#use function get_bool or set_int for type converting
from snap7.types import * #including variant type and Area ID
2.2 创建client并建立连接
client=snap7.client.Client()#init client
client.connect(ip,rack=0,slot=1)# create connection, for tplc 1500, use rack 0 and slot 1
#针对不同设备的slot的使用,博图组态里有说明,
2.3 读DB变量
data=client.read_area(snap7.types.Areas.DB,1,4,2)#DB1.DBW4的数值,返回bytearray,由于我们使用DBW有2个字节,所以最后参数是2
#read_area(self, area: Areas, dbnumber: int, start: int, size: int)
value=get_int(data,0)#获取bytearray中 int 值,偏移为0
2.4 写DB变量
i=2
data_tobewrite=bytearray(2)#初始化待写入变量
set_int(data_tobewrite,0,i)#变量赋值
client.write_area(snap7.types.Areas.DB,1,4,data_tobewrite)#DB1.DBW4写入变量data_tobewrite
#write_area(self, area: Areas, dbnumber: int, start: int, data: bytearray)
注意:
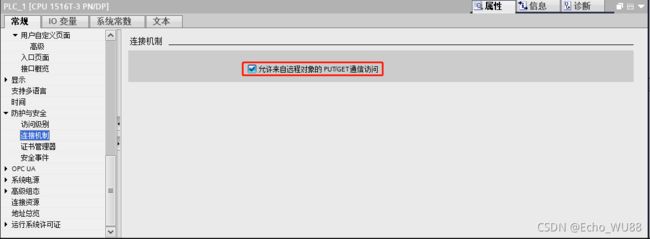
如果读的时候返回错误 cpu refused,这个是PLC端的设置问题,1500的作为服务器的PLC,需要如下额外设置,才能保证S7通信正常。
请点开作为S7服务器(sever)的 CPU 的设备组态,“属性->常规->保护”里“连接机制”一项需要勾选“允许从远程伙伴(PLC\HMI\OPC\...)使用 PUT/GET 通信访问”,如上图所示
另外,如果使用Qt或者Visual Studio进行C++开发,可以去官网下载,refer to Snap7 - Browse Files at SourceForge.net ,里面包含了使用MinGW64编译的lib以及dll【但是具体的操作流程,没有测试】
主要参考链接
小说python操作PLC - 云+社区 - 腾讯云 (tencent.com) 这个对于S7协议中调用函数及函数的变量说明写的特别详细,这边不做赘述
