vue3 语法使用
目录
前言
1、发展历程
2、优势
3、工具
4、基本用法
5、编译器宏
5.1 defineProps
5.2 defineEmits
5.3 defineExpose
6、辅助函数
6.1 useAttrs
6.2 useSlots
6.3 useCssModule
7、使用组件
8、组件name
9、inheritAttrs
10、顶层await支持
11、命名空间组件
12、状态驱动的动态css
13、指令
14、Composition Api类型约束
14.1 ref()
14.2 reactive
14.3 computed
14.4 watch
14.4 getCurrentInstance(this)
15、全局注册
16、mitt 库($on、$off)
16.1 创建mitt.ts文件
16.2 传入、监听、销毁
16.2.1 $emit
16.2.2 $on
16.2.3 $off
17、pinia库(vuex)
17.1 挂载pinia
17.2 pinia模块化
17.3 使用
18、:deep()
19、import.meta(require的替代方案)
总结
前言
本文主要是讲解
-
在 3.0.0-beta.21 版本中增加了
{{ msg }}
2、优势
与组件选项
setup函数对比,{{ msg }}
若需要使用
TypeScript,则将lang属性添加到{{ msg }}
{{ msg }}
{{ getToken() }}
注意:
-
每个
*.vue文件最多可同时包含一个{{ msg }}
{{ title }}TS 版本:
{{ msg }}
{{ title }}从代码中可以发现
TS写法里props没有定义默认值。Vue3为我们提供了withDefaults这个编译器宏,给props提供默认值。{{ msg }}
{{ title }}一个需要注意的地方:在顶层声明一个和
props的属性同名的变量,会有些问题。{{ props.title }}{{ title }}所以,和组件选项一样,不要定义和
props的属性同名的顶层变量。5.2 defineEmits
一样的,在
{{ msg }}
使用组件:
TS 版本:
// ./components/HelloWorld.vue{{ msg }}
使用组件:
5.3 defineExpose
在
Vue3中,默认不会暴露任何在{{ msg }}
使用组件:
TS 版本:
// ./components/HelloWorld.vue{{ msg }}
使用组件:
6、辅助函数
在
// ./components/HelloWorld.vue{{ $attrs.title }}6.2 useSlots
在模板中使用
$slots来访问slots数据。在
默认插槽具名插槽footer6.3 useCssModule
在
Vue3中,也是支持CSS Modules的,在注意,同名的CSS Module,后面的会覆盖前面的。
7、使用组件
在组件选项中,模板需要使用组件(除了全局组件),需要在
components选项中注册。而在
8、组件name
{{ total }}使用:
注意:如果你设置了
lang属性,./components/HelloWorld.vue
hover一下看title hover一下看title10、顶层await支持
注意:
async setup()必须与Suspense组合使用,Suspense目前还是处于实验阶段的特性,其 API 可能随时会发生变动,建议暂时不要使用。11、命名空间组件
在
vue3中,我们可以使用点语法来使用挂载在一个对象上的组件。// components/Form/index.js import Form from './Form.vue' import Input from './Input.vue' import Label from './Label.vue' // 把Input、Label组件挂载到 Form 组件上 Form.Input = Input Form.Label = Label export default Form// 使用:命名空间组件在另外一种场景中的使用,从单个文件中导入多个组件时:
// FormComponents/index.js
import Input from './Input.vue'
import Label from './Label.vue'

export default {
    Input,
    Label,
}
// 使用label 12、状态驱动的动态css
Vue3中13、指令
全局指令:
自定义指令:
导入的指令:
更多关于指令,见官方文档
14、Composition Api类型约束
14.1 ref()
14.2 reactive
14.3 computed
14.4 watch
14.4 getCurrentInstance(this)
15、全局注册
// main.ts

app.config.globalProperties.$message = ElMessage;


//使用
import { getCurrentInstance } from "vue";
const { proxy } = getCurrentInstance();
proxy.$message
16、mitt 库($on、$off)
Vue3移除了$on $off等自带的自定义事件相关方法,因此在vue3中他推荐我们下载mitt库来使用事件总线传递数据,其实mitt的使用方式和vue原本的自定义事件使用方式相同,所以我们不必担心学习成本!
16.1 创建mitt.ts文件
// mitt库默认导出的是一个函数,我们需要执行它从而得到事件总线的对象
/* mitt.ts */
// 这里我们在ts中暴露这个事件总线对象

import type { Emitter } from "mitt";
import mitt from "mitt";
export const emitter: Emitter = mitt();
16.2 传入、监听、销毁
16.2.1 $emit
// 这里我们导入我们单独写的暴露事件总线对象的ts /* a.vue */ //模板代码 // 导入事件总线 import emitter from "./utils/mitt.ts"; const setEmitter = () => { // 触发自定义总线why,并传入一个对象 emitter.emit("test",{name:'why',age:19}) };16.2.2 $on
/* b.vue */

// 导入事件总线
import emitter from "./utils/mitt.ts";

emitter.on("test", e => console.log("test", e));


// emitter.on的第一个参数如果是 * 代表监听所有的事件触发!
// 回调函数的参数就会有2个,1是事件的类型,2是实际实参
emitter.on("*",(eventType,item)=>{
  console.log(`* 监听到的事件类型是:${eventType},接收的参数为:`,item)
})
16.2.3 $off
// 导入事件总线
import emitter from "./utils/mitt.ts";

emitter.off("test"); // 取消监听


// 取消所有的mitt事件
emitter.all.clear()
17、pinia库(vuex)
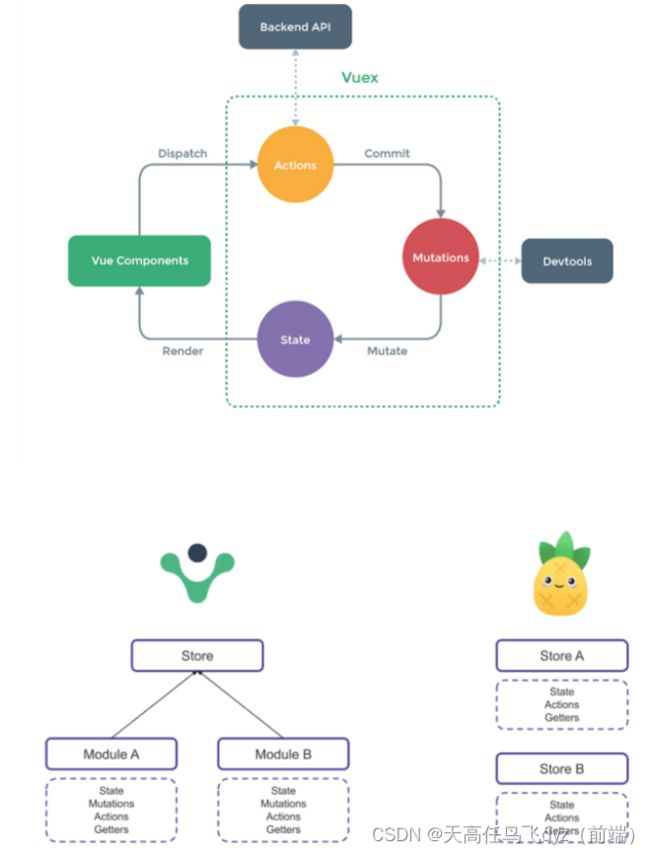
官网地址:Pinia
17.1 挂载pinia
import { createApp } from 'vue'
import App from './App.vue'
import { createPinia } from 'pinia' // 全局状态管理 类似vuex

const app = createApp(App)

app.use(createPinia()).mount('#app')
17.2 pinia模块化
import { defineStore } from 'pinia'
import { store } from '../index'

// state 类型定义
interface AppState {
  num: number
}

export const useAppStore = defineStore({
  id: 'useApp',
  state: (): AppState => ({
    num: 1, // 用于测试使用,没有实际作用
  }),
  getters: {},
  actions: {
    SETNUM(data: number) {
      console.log(data, 8)
      this.num = data
    },
  },
})

export function useAppStoreHook() {
  return useAppStore(store)
}
17.3 使用
{{ useAppStore.num }}测试 18、:deep()
vue3版本将vue2中的/deep/和>>>废除 写法改为:deep()
#swiper >.swiperContext :deep(p) {
  width: 100vw;
  height:60vw;
  background: #000;
  border:5px solid;
}
19、import.meta(require的替代方案)
getImageUrl(name) {
  const url = `../${name}`
  return new URL(url, import.meta.url).pathname
},
总结
日常记述,随时进度更新。。。。。
-