Dockerfile实例
Dockerfile
nginx实例
[root@localhost ~]# vim Dockerfile
1、基于基础镜像centos:7
FROM centos:7
2、维护者信息
MAINTAINER [email protected]
3、添加Centos-7仓库
ADD Centos-7.repo /etc/yum.repos.d/
4、添加epel-7仓库
ADD epel-7.repo /etc/yum.repos.d/
5、安装nginx软件包
RUN  yum -y install nginx
6、暴露指定端口80
EXPOSE 80
CMD ["/usr/sbin/nginx","-g","daemon off;"]
7、构建镜像,镜像名称为nginx:v1
[root@localhost ~]# docker build -t nginx:v1 .
Sending build context to Docker daemon   25.6kB
Step 1/7 : FROM centos:7
7: Pulling from library/centos
2d473b07cdd5: Pull complete
Digest: sha256:9d4bcbbb213dfd745b58be38b13b996ebb5ac315fe75711bd618426a630e0987
Status: Downloaded newer image for centos:7
 ---> eeb6ee3f44bd
Step 2/7 : MAINTAINER [email protected]
 ---> Running in 1451d5aa895f
Removing intermediate container 1451d5aa895f
 ---> 0122bfda9eb9
Step 3/7 : ADD Centos-7.repo /etc/yum.repos.d/
 ---> 0589b92f5fb4
Step 4/7 : ADD epel-7.repo  /etc/yum.repos.d/
 ---> f28e41208a24
Step 5/7 : RUN yum -y install nginx
 ---> Running in 98171c0bbe0a
Loaded plugins: fastestmirror, ovl
Repository base is listed more than once in the configuration
Repository updates is listed more than once in the configuration
Repository extras is listed more than once in the configuration
Repository centosplus is listed more than once in the configuration
Determining fastest mirrors
 * base: mirrors.bupt.edu.cn
 * extras: mirrors.bupt.edu.cn
 * updates: mirrors.bfsu.edu.cn
Resolving Dependencies
--> Running transaction check
---> Package nginx.x86_64 1:1.20.1-9.el7 will be installed
--> Processing Dependency: nginx-filesystem = 1:1.20.1-9.el7 for package: 1:nginx-1.20.1-9.el7.x86_64
--> Processing Dependency: libcrypto.so.1.1(OPENSSL_1_1_0)(64bit) for package: 1:nginx-1.20.1-9.el7.x86_64
--> Processing Dependency: libssl.so.1.1(OPENSSL_1_1_0)(64bit) for package: 1:nginx-1.20.1-9.el7.x86_64
--> Processing Dependency: libssl.so.1.1(OPENSSL_1_1_1)(64bit) for package: 1:nginx-1.20.1-9.el7.x86_64
--> Processing Dependency: nginx-filesystem for package: 1:nginx-1.20.1-9.el7.x86_64
--> Processing Dependency: openssl for package: 1:nginx-1.20.1-9.el7.x86_64
--> Processing Dependency: redhat-indexhtml for package: 1:nginx-1.20.1-9.el7.x86_64
--> Processing Dependency: system-logos for package: 1:nginx-1.20.1-9.el7.x86_64
--> Processing Dependency: libcrypto.so.1.1()(64bit) for package: 1:nginx-1.20.1-9.el7.x86_64
--> Processing Dependency: libprofiler.so.0()(64bit) for package: 1:nginx-1.20.1-9.el7.x86_64
--> Processing Dependency: libssl.so.1.1()(64bit) for package: 1:nginx-1.20.1-9.el7.x86_64
--> Running transaction check
---> Package centos-indexhtml.noarch 0:7-9.el7.centos will be installed
---> Package centos-logos.noarch 0:70.0.6-3.el7.centos will be installed
---> Package gperftools-libs.x86_64 0:2.6.1-1.el7 will be installed
---> Package nginx-filesystem.noarch 1:1.20.1-9.el7 will be installed
---> Package openssl.x86_64 1:1.0.2k-25.el7_9 will be installed
--> Processing Dependency: openssl-libs(x86-64) = 1:1.0.2k-25.el7_9 for package: 1:openssl-1.0.2k-25.el7_9.x86_64
--> Processing Dependency: make for package: 1:openssl-1.0.2k-25.el7_9.x86_64
---> Package openssl11-libs.x86_64 1:1.1.1k-4.el7 will be installed
--> Running transaction check
---> Package make.x86_64 1:3.82-24.el7 will be installed
---> Package openssl-libs.x86_64 1:1.0.2k-19.el7 will be updated
---> Package openssl-libs.x86_64 1:1.0.2k-25.el7_9 will be an update
--> Finished Dependency Resolution

Dependencies Resolved

================================================================================
 Package               Arch        Version                   Repository    Size
================================================================================
Installing:
 nginx                 x86_64      1:1.20.1-9.el7            epel         587 k
Installing for dependencies:
 centos-indexhtml      noarch      7-9.el7.centos            base          92 k
 centos-logos          noarch      70.0.6-3.el7.centos       base          21 M
 gperftools-libs       x86_64      2.6.1-1.el7               base         272 k
 make                  x86_64      1:3.82-24.el7             base         421 k
 nginx-filesystem      noarch      1:1.20.1-9.el7            epel          24 k
 openssl               x86_64      1:1.0.2k-25.el7_9         updates      494 k
 openssl11-libs        x86_64      1:1.1.1k-4.el7            epel         1.5 M
Updating for dependencies:
 openssl-libs          x86_64      1:1.0.2k-25.el7_9         updates      1.2 M

Transaction Summary
================================================================================
Install  1 Package  (+7 Dependent packages)
Upgrade             ( 1 Dependent package)

Total download size: 26 M
Downloading packages:
Delta RPMs disabled because /usr/bin/applydeltarpm not installed.
warning: /var/cache/yum/x86_64/7/base/packages/centos-indexhtml-7-9.el7.centos.noarch.rpm: Header V3 RSA/SHA256 Signature, key ID f4a80eb5: NOKEY
Public key for centos-indexhtml-7-9.el7.centos.noarch.rpm is not installed
Public key for openssl-1.0.2k-25.el7_9.x86_64.rpm is not installed
--------------------------------------------------------------------------------
Total                                              1.4 MB/s |  26 MB  00:18
Retrieving key from file:///etc/pki/rpm-gpg/RPM-GPG-KEY-CentOS-7
Importing GPG key 0xF4A80EB5:
 Userid     : "CentOS-7 Key (CentOS 7 Official Signing Key) "
 Fingerprint: 6341 ab27 53d7 8a78 a7c2 7bb1 24c6 a8a7 f4a8 0eb5
 Package    : centos-release-7-9.2009.0.el7.centos.x86_64 (@CentOS)
 From       : /etc/pki/rpm-gpg/RPM-GPG-KEY-CentOS-7
Running transaction check
Running transaction test
Transaction test succeeded
Running transaction
  Installing : centos-logos-70.0.6-3.el7.centos.noarch                     1/10
  Installing : centos-indexhtml-7-9.el7.centos.noarch                      2/10
  Installing : 1:make-3.82-24.el7.x86_64                                   3/10
  Installing : gperftools-libs-2.6.1-1.el7.x86_64                          4/10
  Updating   : 1:openssl-libs-1.0.2k-25.el7_9.x86_64                       5/10
  Installing : 1:openssl-1.0.2k-25.el7_9.x86_64                            6/10
  Installing : 1:openssl11-libs-1.1.1k-4.el7.x86_64                        7/10
  Installing : 1:nginx-filesystem-1.20.1-9.el7.noarch                      8/10
  Installing : 1:nginx-1.20.1-9.el7.x86_64                                 9/10
  Cleanup    : 1:openssl-libs-1.0.2k-19.el7.x86_64                        10/10
  Verifying  : 1:nginx-filesystem-1.20.1-9.el7.noarch                      1/10
  Verifying  : 1:nginx-1.20.1-9.el7.x86_64                                 2/10
  Verifying  : 1:openssl11-libs-1.1.1k-4.el7.x86_64                        3/10
  Verifying  : 1:openssl-1.0.2k-25.el7_9.x86_64                            4/10
  Verifying  : 1:openssl-libs-1.0.2k-25.el7_9.x86_64                       5/10
  Verifying  : gperftools-libs-2.6.1-1.el7.x86_64                          6/10
  Verifying  : 1:make-3.82-24.el7.x86_64                                   7/10
  Verifying  : centos-indexhtml-7-9.el7.centos.noarch                      8/10
  Verifying  : centos-logos-70.0.6-3.el7.centos.noarch                     9/10
  Verifying  : 1:openssl-libs-1.0.2k-19.el7.x86_64                        10/10

Installed:
  nginx.x86_64 1:1.20.1-9.el7

Dependency Installed:
  centos-indexhtml.noarch 0:7-9.el7.centos
  centos-logos.noarch 0:70.0.6-3.el7.centos
  gperftools-libs.x86_64 0:2.6.1-1.el7
  make.x86_64 1:3.82-24.el7
  nginx-filesystem.noarch 1:1.20.1-9.el7
  openssl.x86_64 1:1.0.2k-25.el7_9
  openssl11-libs.x86_64 1:1.1.1k-4.el7

Dependency Updated:
  openssl-libs.x86_64 1:1.0.2k-25.el7_9

Complete!
Removing intermediate container 98171c0bbe0a
 ---> 3238bcf5d168
Step 6/7 : EXPOSE 80
 ---> Running in 539be2a20227
Removing intermediate container 539be2a20227
 ---> 2945e7681400
Step 7/7 : CMD ["/usr/sbin/nginx","-g","daemon off;"]
 ---> Running in 8daae75f457a
Removing intermediate container 8daae75f457a
 ---> 950767dd76bf
Successfully built 950767dd76bf
Successfully tagged nginx:v1
8、运行容器,容器名称为自己名字的全拼,映射端口88:80
[root@localhost ~]# docker images
REPOSITORY   TAG       IMAGE ID       CREATED         SIZE
nginx        v1        950767dd76bf   2 hours ago     459MB
           88195706ad01   2 hours ago     231MB
centos       7         eeb6ee3f44bd   11 months ago   204MB
[root@localhost ~]# docker run -d --name yijunqi -p 88:80 nginx:v1
cd0b5dc000711fe761ea83bac1e5818bd6393d6be5d7e8ea5ce7fc4862ec3869
[root@localhost ~]# docker ps
CONTAINER ID   IMAGE      COMMAND                  CREATED         STATUS         PORTS                               NAMES
cd0b5dc00071   nginx:v1   "/usr/sbin/nginx -g …"   6 seconds ago   Up 5 seconds   0.0.0.0:88->80/tcp, :::88->80/tcp   yijunqi
9、进入容器,删除默认网页,写入新的默认网页,网页内容为自己名字的全拼
[root@localhost ~]# docker exec -it yijunqi /bin/bash
[root@cd0b5dc00071 /]# cd /usr/share/nginx/
[root@cd0b5dc00071 nginx]# ls
html  modules
[root@cd0b5dc00071 nginx]# cd html/
[root@cd0b5dc00071 html]# ls
404.html  50x.html  en-US  icons  img  index.html  nginx-logo.png  poweredby.png
[root@cd0b5dc00071 html]# rm -rf index.html
[root@cd0b5dc00071 html]# echo 'yijunqi' > index.html
[root@cd0b5dc00071 html]# ls
404.html  50x.html  en-US  icons  img  index.html  nginx-logo.png  poweredby.png
通过浏览器,能够正常访问nginx

扫雷实例 站点部署
1、所需软件包和环境
Centos-7.repo   epel-7.repo  saolei.zip
server1:部署docker扫雷案例
server2:部署apache,将saolei.zip软件包上传上去
[root@130 ~]# dnf -y install httpd
[root@130 ~]# cd /var/www/html/
[root@130 html]# ls
[root@130 html]# dnf -y install lrzsz
[root@130 html]# rz -E
rz waiting to receive.
[root@130 html]# ls
saolei.zip
[root@130 html]# systemctl start httpd
[root@130 html]# systemctl stop firewalld.service
[root@130 html]# systemctl disable firewalld.service
Removed /etc/systemd/system/multi-user.target.wants/firewalld.service.
Removed /etc/systemd/system/dbus-org.fedoraproject.FirewallD1.service.
[root@130 html]# vim /etc/selinux/config
SELINUX= disabled
2、编辑Dockerfile,使用基础镜像centos:7
[root@133 ~]# vim Dockerfile
FROM centos:7
MAINTAINER [email protected]
ADD Centos-7.repo /etc/yum.repos.d/
ADD epel-7.repo /etc/yum.repos.d/
RUN yum -y install tomcat unzip curl
WORKDIR /var/lib/tomcat/webapps/
RUN curl -O http://192.168.78.130/saolei.zip && \
unzip saolei.zip && \
mv saolei ROOT
ADD jay.sh /jay.sh
EXPOSE 8080
CMD ["/bin/bash","/jay.sh"]
[root@133 ~]# vim jay.sh
#!/bin/bash
/usr/libexec/tomcat/server start
3、构建镜像saolei:v1
[root@130 ~]# docker build -t saolei:v1 .
Step 1/10 : FROM centos:7
 ---> ecb9ed3f35bd
Step 2/10 : MAINTAINER [email protected]
 ---> Using cache
 ---> esf51681ce2d
Step 3/10 : ADD Centos-7.repo /etc/yum.repos.d/
 ---> Using cache
 ---> 05ce78dga763
Step 4/10 : ADD epel-7.repo /etc/yum.repos.d/
 ---> Using cache
 ---> 152d3df57361
Step 5/10 : RUN yum -y install tomcat unzip curl
 ---> Using cache
 ---> 46cde6926f67
Step 6/10 : WORKDIR /var/lib/tomcat/webapps/
 ---> Using cache
 ---> 03593fgcd50f
Step 7/10 : RUN curl -O http://192.168.40.100/saolei.zip && unzip saolei.zip && mv saolei ROOT
 ---> Using cache
 ---> cf53960e2c0d
Step 8/10 : ADD haha.sh /haha.sh
 ---> ea0e79356fd9
Step 9/10 : EXPOSE 8080
 ---> Running in 3418e48ecf01
Removing intermediate container 5762e22fff09
 ---> 135f98468e3d
Step 10/10 : CMD ["/bin/bash","/haha.sh"]
 ---> Running in 4c2917273d9e
Removing intermediate container 4c8838135c2e
 ---> 2df364de9d45
Successfully built de5134cd9e63
Successfully tagged saolei:v1
4、运行容器,指定映射端口8081:8080,容器名为自己名字的全拼
[root@130 ~]#  docker run -d --name yijunqi -p 8081:8080 saolei:v1
f2a976f932ec6fe48978c1cdde2c8217a497b1f080c80e49049e02757302cf74
[root@130 ~]# docker ps
CONTAINER ID   IMAGE       COMMAND                CREATED         STATUS         PORTS                                       NAMES
f2a976f932ec   saolei:v1   "/bin/bash /jay.sh"   10 seconds ago   Up 8 seconds   0.0.0.0:8081->8080/tcp, :::8081->8080/tcp   yijunqi
5、使用浏览器访问http://自己docker服务器的ip/saolei.jsp,能够实现扫雷游戏的使用

可道云实例
1、所需软件包
Centos-7.repo   epel-7.repo kodexplorer4.40.zip nginx.conf
2、创建/opt/dockerfile/kod目录,将所需的软件包和文件放置该目录下
[root@130 ~]# mkdir -p /opt/dockerfile/kod
[root@130 ~]# cd /opt/dockerfile/kod
[root@130 kod]# rz -E
rz waiting to receive.
[root@130 kod]# rz -E
rz waiting to receive.
[root@130 kod]# ls
kodexplorer4.40.zip  nginx.txt
3、在该目录下编辑dockerfile,使用基础镜像centos:7
[root@130 kod]# vim Dockerfile
FROM centos:7
ADD Centos-7.repo /etc/yum.repos.d/
ADD epel-7.repo /etc/yum.repos.d/
RUN yum -y install nginx php-fpm php-gd php-mbstring unzip
RUN sed -i '/^user/c user=nginx' /etc/php-fpm.d/www.conf
RUN sed -i '/^group/c group=nginx' /etc/php-fpm.d/www.conf
COPY nginx.conf /etc/nginx/nginx.conf
RUN mkdir /code
WORKDIR /code
COPY kodexplorer4.40.zip .
RUN unzip kodexplorer4.40.zip
RUN chown -R nginx.nginx .
ADD init.sh /init.sh
EXPOSE 80
ENTRYPOINT ["/bin/bash","/init.sh"]
[root@130 kod]# vim init.sh
#!/bin/bash
php-fpm -D
echo "$1" >> /etc/nginx/nginx.conf
nginx -g 'daemon off;'
4、构建镜像kod:v1
[root@130 kod]# mv /root/Centos-7.repo /opt/dockerfile/kod/
[root@130 kod]# mv /root/epel-7.repo /opt/dockerfile/kod/
[root@130 kod]# mv nginx.txt nginx.conf
[root@130 kod]# docker build -t kod:v1 .
Removing intermediate container e48c67ad61ea
 ---> 266d17af8449
Step 12/15 : RUN chown -R nginx.nginx .
 ---> Running in 9ecbd8476349
Removing intermediate container 9ecbd8476349
 ---> 5eacb0983476
Step 13/15 : ADD init.sh /init.sh
 ---> 32cf1035800f
Step 14/15 : EXPOSE 80
 ---> Running in e686bdda87cd
Removing intermediate container e686bdda87cd
 ---> 36415c51bd84
Step 15/15 : ENTRYPOINT ["/bin/bash","/init.sh"]
 ---> Running in efc118cc97de
Removing intermediate container efc118cc97de
 ---> a447aed831df
Successfully built a447aed831df
Successfully tagged kod:v1
5、运行容器,指定映射端口80:80,容器名为自己名字的全拼
[root@130 kod]# docker run -d --name yijunqi -p 80:80 kod:v1 '#jay'
9d2fe7ad3acda4ceb268bb109c053bc054645fc7d4cacb12e3ff98beeb44b7a6
[root@130 kod]# docker ps
CONTAINER ID   IMAGE     COMMAND                  CREATED         STATUS         PORTS                               NAMES
9d2fe7ad3acd   kod:v1    "/bin/bash /init.sh …"   4 seconds ago   Up 4 seconds   0.0.0.0:80->80/tcp, :::80->80/tcp   yijunqi
[root@130 kod]# docker exec -it yijunqi /bin/bash
[root@9d2fe7ad3acd code]# tail -3 /etc/nginx/nginx.conf
	}
}
#jay
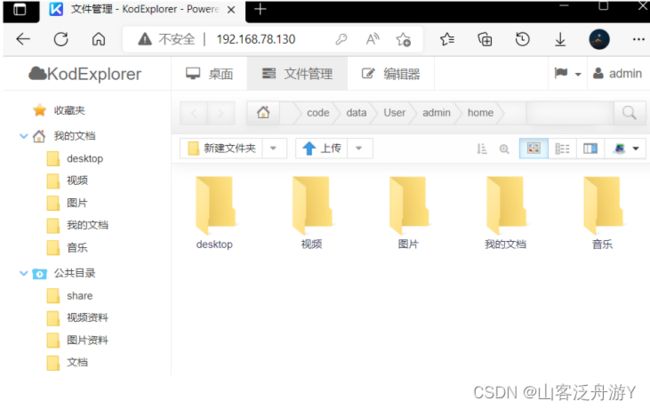
6、使用浏览器访问http://自己docker服务器的ip/index.php,能够实现可道云的使用