40、Thymeleaf的自动配置和基本语法、springboot 整合 Thymeleaf
★ Spring Boot支持如下模板技术:
 FreeMarker
 Groovy
 Thymeleaf
 Mustache

 官方推荐使用  Thymeleaf

 JSP不再被推荐。
★ Thymeleaf的优势
   Thymeleaf标准方言中的大多数处理器都是属性处理器。
   这种页面模版即使在未被处理之前,浏览器也可正确地显示HTML模板文件,
   因为浏览器会简单地忽略其不识别的属性。

比如这个:


主要优势在于:页面模板即使在未被Thymeleaf引擎处理之前,该页面也能被浏览器浏览、并呈现效果。
              因为浏览器会直接忽略th:xxx属性。

Thymeleaf在标准HTML元素中增加一些th:xxx属性
(出于降低学习难度考虑,而且xxx往往还和标准HTML元素的属性名相同)
在模板被解析之前,这些属性会被浏览器忽略;
在模板被解析之后,这些属性完全不存在了,因此它们丝毫不影响在浏览器中呈现效果,
这就是Thymeleaf的优势所在。


简单来说,它和传统 FreeMarker 的改进之处就在于:
          Thymeleaf使用了th:xxx属性来输出动态内容,而FreeMarker使用子元素来输出动态内容。
★ Thymeleaf整合Spring MVC(包括Spring WebFlux)之后的改变
- 在模板中使用Sp EL表达式取代了原来OGNL。
- 允许通过Sp EL语法访问Spring容器中的Bean,如${@myBean.method()}
- 在模板中创建的表单时,完全支持Bean和结果的绑定,包括使用PropertyEditor,转换,和验证等。
   为了表单处理添加了th:field、th:errors和th:errorclass属性等。
- 允许通过Spring MVC管理国际化资源文件来显示国际化信息。
★ Thymeleaf自动配置主要由如下两个类提供支持
自动配置由如下两个类提供:
- ThymeleafAutoConfiguration类对整合所需要的Bean进行自动配置,
  包括templateEngine和templateResolver的配置。

- ThymeleafProperties类则对应application.properties文件中关于Thymeleaf的配置属性,

  它负责读取该文件并设置Thymeleaf
基本语法
★ Thymeleaf引入 th 前缀
要使用这个 Thymeleaf ,需要在页面引入这个命名空间。
pom文件也需要加入thymeleaf的依赖

html 是根元素,把这个th命名空间引入进去,表示这整个html页面都能使用这个thymeleaf语法,都可以使用这个 th 前缀。

        <dependency>
            <groupId>org.springframework.boot</groupId>
            <artifactId>spring-boot-starter-thymeleaf</artifactId>
        </dependency>
★ Thymeleaf引入URL
包括导入各种资源等,都需要用到引入URL.

Thymeleaf对于URL的处理是通过语法@{...}来处理的。
绝对路径
相对路径
默认访问静态资源路径下css文件夹内的资源
★ Thymeleaf表达式
Thymeleaf 提供了一些专门用于获取Web Context中请求参数、请求属性、会话属性和应用属性的表达式,
这些表达式和JSP EL的功能非常相似。

${x}:返回Thymeleaf上下文中的变量x或请求(HttpServletRequest)范围内的x属性的值。
${param.x}:返回名为x的请求参数(可能是多值的)的值。
${session.x}:返回会话(HttpSession)范围内的x属性的值。
${application.x}:返回应用(ServletContext)范围内的x属性的值。
★ Thymeleaf字符串操作
A . 用加号(+)来拼接字符串。

很多时候可能只需要对一大段文字中的某一处地方进行替换,可以通过字符串拼接操作完成。
B. 还有一种更简洁的方式。


  但这种形式限制比较多,|…|中只能包含变量表达式${…},不能包含其他常量、条件表达式等
★ Thymeleaf的运算符
在表达式中可以使用各类算术运算符,例如+、-、*、/、%。
th:with="isEven=(${bookStat.count} % 2 == 0)"

逻辑运算符>,<, <=,>=,==,!=都可以使用,
唯一需要注意的是使用<>时需要用它的HTML转义符。

th:if="${bookStat.count} >  2"
三元表达式:
th:text="'图书价格 ' + ( (${price} > 80 )? '比较贵' : '比较合适' )"
★ Thymeleaf的 if 条件判断
使用  th:if  和  th:unless  属性进行条件判断,标签只有在  th:if  中条件成立时才显示,
th:unless  与  th:if  恰好相反,只有表达式中的条件不成立,才会显示其内容。

  退出

  登录

同样支持  Switch  结构,默认属性  default  可以用*表示。


系统管理员
经理
普通员工
循环迭代
${objList} 就是要遍历的集合
obj 就是集合中的每个元素
iterStat : 就是迭代的状态,可以输出序号之类的。
★ Thymeleaf的内置对象
#dates:负责处理日期格式化的内置对象,具体用法可参考Date、DateFormat等类。
#calendars:类似于#dates,只是功能类似于java.util.Calendar类。
#numbers:负责数字格式化的内置对象。
#strings:负责字符串格式化的内置对象,具体用法可参考java.lang.String等类。
#objects:具体用法可参考java.lang.Object类。
#bools:负责处理boolean类型的内置对象。
#arrays:负责操作数组的内置对象,具体用法可参考java.util.Arrays类。
#lists:负责操作列表的内置对象,具体用法可参考java.util.List类。
#sets:负责操作Set的内置对象,具体用法可参考java.util.Set类。
#maps:负责操作Map的内置对象,具体用法可参考java.util.Map类。
#aggregates:负责对集合和数组执行聚集运算的内置对象。
#messages:负责处理消息的内置对象
★ 整合Thymeleaf的完整示例:
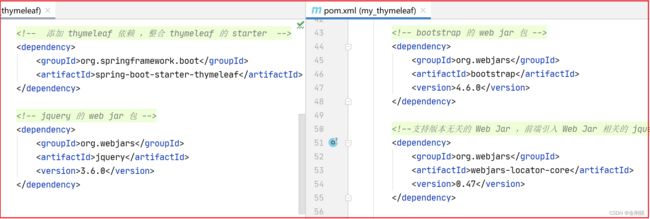
(1) 添加整合Thymeleaf的Starter
根据需要,可能还需要添加对应静态资源的WebJar。
(2)根据需要配置Thymeleaf的属性
spring.thymeleaf.prefix=classpath:/templates/
spring.thymeleaf.suffix=.html
spring.thymeleaf.mode=HTML5
spring.thymeleaf.encoding=UTF-8
spring.thymeleaf.content-type=text/html
# 开发时建议关闭缓存,以便能看到实时看到对该文件的修改
spring.thymeleaf.cache=false
【小技巧】:
开发阶段,可以添加如下设置,这样即使在IDEA中,也能保证修改页面模板之后可通过浏览器立即看到修改结果
spring.thymeleaf.prefix=file:src/main/resources/templates/
告诉Spring Boot直接从src的路径下去加载Thymeleaf的页面模板
——这样当src路径下的页面被修改之后,Spring Boot也能理解更新页面模板。
# 项目打包时应删除如下配置
spring.thymeleaf.prefix=file:src/main/resources/templates/
(3)修改演示代码:
新建一个springboot项目。
把新项目的一些无关的文件先删除。

根据需要配置Thymeleaf的属性
接下来就简单写给登录页面和查看页面
index登录页面
项目访问 http://localhost:8080/ ,就会默认去访问 index 这个页面
把这个index 作为登录页面
controller
controller写接口方法
登录的方法和查看图书的方法

查看图书的页面:
${books} : 就是要遍历的集合
book:就是集合中的每个元素
bookStat : 就是迭代的状态,可以输出序号之类的。

前端代码:
index.html
<!DOCTYPE html>
<html lang="en" xmlns:th="http://www.thymeleaf.org">
<head>
    <meta charset="UTF-8">
    <title>登录页面</title>
    <!--  引入css样式,用 link 元素  ,  stylesheet 样式单 , .gz表示是打包的,但是springboot会自动解包 -->
    <!--  引入 Bootstrap 的 Web Jar 中的 CSS 样式  -->
    <link rel="stylesheet" th:href="@{'/webjars/bootstrap/css/bootstrap.min.css'}">

    <!--  jquery 放在 bootstrap 前面,因为 bootstrap 需要依赖到 jquery  -->
    <!--  引入 jQuery 的 Web Jar 中的 js 脚本  -->
    <script type="text/javascript" th:src="@{'/webjars/jquery/jquery.min.js'}"></script>

    <!--  引入 Bootstrap 的 Web Jar 中的 js 脚本  -->
    <script type="text/javascript" th:src="@{'/webjars/bootstrap/js/bootstrap.bundle.min.js'}"></script>

    <!--  引入 popper 的 Web Jar 中的 Js 脚本  -->
    <script type="text/javascript" th:src="@{'/webjars/popper.js/umd/popper.min.js'}"></script>

</head>
<body>
<div class="container">

    <img th:src="@{/logo.jpg}" src="/logo.jpg" width="100px" height="100px" class="rounded mx-auto d-block">

    <h4>用户登录</h4>

    <div class="alert alert-danger" th:if="${error != null}" th:text="${error}">错误信息</div>

    <form method="post" th:action="@{/login}">
        <div class="form-group row">
            <label for="username" class="col-sm-3 col-form-label">用户名:</label>
            <div class="col-sm-9">
                <input type="text" id="username" name="username"
                       class="form-control" placeholder="输入用户名">
            </div>
        </div>
        <div class="form-group row">
            <label for="password" class="col-sm-3 col-form-label">密码:</label>
            <div class="col-sm-9">
                <input type="password" id="password" name="password"
                       class="form-control" placeholder="输入密码">
            </div>
        </div>
        <div class="form-group row">
            <div class="col-sm-6 text-right">
                <button type="submit" class="btn btn-primary">登录</button>
            </div>
            <div class="col-sm-6">
                <button type="reset" class="btn btn-danger">重设</button>
            </div>
        </div>
    </form>
</div>
</body>
</html>
main.html
<!DOCTYPE html>
<html lang="en" xmlns:th="http://www.thymeleaf.org">
<head>
    <meta charset="UTF-8">
    <title>首页</title>
    <!--  引入css样式,用 link 元素  ,  stylesheet 样式单 , .gz表示是打包的,但是springboot会自动解包 -->
    <!--  引入 Bootstrap 的 Web Jar 中的 CSS 样式  -->
    <link rel="stylesheet" th:href="@{'/webjars/bootstrap/css/bootstrap.min.css'}">

    <!--  jquery 放在 bootstrap 前面,因为 bootstrap 需要依赖到 jquery  -->
    <!--  引入 jQuery 的 Web Jar 中的 js 脚本  -->
    <script type="text/javascript" th:src="@{'/webjars/jquery/jquery.min.js'}"></script>

    <!--  引入 Bootstrap 的 Web Jar 中的 js 脚本  -->
    <script type="text/javascript" th:src="@{'/webjars/bootstrap/js/bootstrap.bundle.min.js'}"></script>

    <!--  引入 popper 的 Web Jar 中的 Js 脚本  -->
    <script type="text/javascript" th:src="@{'/webjars/popper.js/umd/popper.min.js'}"></script>

</head>
<body>
<div class="container">
    <img th:src="@{/logo.jpg}" src="/logo.jpg" width="100px" height="100px" class="rounded mx-auto d-block">
    <div class="text-info">您好,<span th:text="${session.username}">用户名</span></div>
    <br>
    职位: <span th:switch="${session.role}">
        <span th:case="'admin'">管理员</span>
        <span th:case="'manager'">项目经理</span>
        <span th:case="'*'">普通员工</span>
    </span>
    <br>
    <br>
    <a th:href="@{/viewBooks}" class="btn btn-info">查看图书列表</a>
</div>
</body>
</html>
books.html
<!DOCTYPE html>
<html lang="en" xmlns:th="http://www.thymeleaf.org">
<head>
    <meta charset="UTF-8">
    <title>testBranch</title>
    <!--  引入css样式,用 link 元素  ,  stylesheet 样式单 , .gz表示是打包的,但是springboot会自动解包 -->
    <!--  引入 Bootstrap 的 Web Jar 中的 CSS 样式  -->
    <link rel="stylesheet" th:href="@{'/webjars/bootstrap/css/bootstrap.min.css'}">
    <!--  jquery 放在 bootstrap 前面,因为 bootstrap 需要依赖到 jquery  -->
    <!--  引入 jQuery 的 Web Jar 中的 js 脚本  -->
    <script type="text/javascript" th:src="@{'/webjars/jquery/jquery.min.js'}"></script>
    <!--  引入 Bootstrap 的 Web Jar 中的 js 脚本  -->
    <script type="text/javascript" th:src="@{'/webjars/bootstrap/js/bootstrap.bundle.min.js'}"></script>
</head>
<body>
<div class="container">
    <img th:src="@{/logo.jpg}" src="/logo.jpg" width="100px" height="100px" class="rounded mx-auto d-block">
    <table class="table table-hover">
        <tr>
            <th>序号</th>
            <th>Id</th>
            <th>书名</th>
            <th>价格</th>
        </tr>
        <tr th:each="book,bookStat:${books}">
            <td th:text="${bookStat.index}"></td>
            <td th:text="${book.id}"></td>
            <td th:text="${book.name}"></td>
            <td th:text="${book.price}"></td>
        </tr>
    </table>
</div>
</body>
</html>
后端代码:
ThymeleafController:
package cn.ljh.my_thymeleaf.controller;

import cn.ljh.my_thymeleaf.domain.Book;
import cn.ljh.my_thymeleaf.domain.User;
import org.springframework.stereotype.Controller;
import org.springframework.ui.Model;
import org.springframework.web.bind.annotation.GetMapping;
import org.springframework.web.bind.annotation.PostMapping;

import javax.servlet.http.HttpSession;
import java.util.List;


@Controller
public class ThymeleafController {

    //登录方法
    @PostMapping("/login")
    public String login(Model model , User user, HttpSession session){

        if (user.getUsername().equals("ljh")
        && user.getPassword().equals("123456")){
            //登录成功,进入首页
            session.setAttribute("username","ljh");
            session.setAttribute("role","manager");
            return "main";
        }
        //登录失败
        model.addAttribute("error","用户名或密码不正确");
        return "index";
    }

    //查看图书方法
    @GetMapping("/viewBooks")
    public String viewBooks(Model model){

        List<Book> books = List.of(new Book(1, "火隐忍者", 100),
                new Book(2, "家庭教师", 200),
                new Book(3, "七龙珠", 300)
        );
        model.addAttribute("books",books);

        return "books";
    }


}


