【Jetpack】Navigation 导航组件 ⑤ ( NavigationUI 类使用 )
文章目录
- 一、NavigationUI 类简介
- 二、NavigationUI 类使用流程
-
- 1、创建 Fragment
- 2、创建 NavigationGraph
- 3、Activity 导入 NavHostFragment
- 4、创建菜单
- 5、Activity 界面开发 NavigationUI 的主要逻辑 ( 重点 )
-
- a、添加 Fragment 布局
- b、处理 Navigation 导航逻辑 ( 重点 )
- c、启用菜单选项
- d、使用菜单进行 NavigationUI 导航
- e、支持导航回退功能
- 三、完整源码示例 - NavigationUI 类使用
-
- 1、Fragment 相关源码
-
- a、FragmentA 界面的 Kotlin 源码和布局文件
- b、FragmentB 界面的 Kotlin 源码和布局文件
- 2、NavigationGraph 相关源码
- 3、MainActivity 主界面相关源码 ( 重点 )
- 4、执行结果
代码地址 :
- CSDN ( 本博客代码快照 | 推荐下载 0 积分 ) : https://download.csdn.net/download/han1202012/88251933
- GitHub ( 可能已经覆盖 ) : https://github.com/han1202012/Navigation
NavigationUI 类支持一些系统自带的控件 , 配置后 , 自动跳转 Fragment 界面的功能 , 使用起来非常简洁 , 支持的可配置 Navigation 跳转的控件有 :
- ActionBar
- ToolBar
- CollapsingToolbarLayout
- Menu
在 Android 开发中 , NavigationUI 是 用于构建 和 管理应用程序导航界面 的重要工具 , 可以极大地提高开发效率 ;
一、NavigationUI 类简介
NavigationUI 是 Google 官方提供的 用于管理 Navigation 导航的组件 , 属于 Android 系统的 Jetpack 工具包 ;
借助 NavigationUI 可以很方便的 创建和组织应用程序的导航界面 ;
如 : 构建复杂的导航结构,垂直或水平的主菜单 , 侧边栏 , 抽屉导航栏等 ;
开发者 可以通过 NavigationUI 轻松地管理页面的转换和导航 ;
NavigationUI 提供了一些静态方法来处理 顶部应用栏 / 抽屉式导航栏 / 底部导航栏中 的界面导航 ;
本篇博客中介绍一种使用场景 : 使用 AppBar 中的菜单选项控制 Navigation 界面跳转 ;
在 Activity 中 , 使用 Navigation 组件 切换 Fragment 界面时 , 除了进行界面切换之外 , 不同的界面对应的顶部 标题栏 AppBar 需要进行相应的改变 ;
Navigation 组件中 , 提供了 NavigationUI 类 , 统一管理 Fragment 页面切换相关的 UI 改变 ;
二、NavigationUI 类使用流程
本章节介绍使用 AppBar 中的菜单选项控制 Navigation 界面跳转 的流程 ;
1、创建 Fragment
创建两个 Fragment , 分别作为要 互相跳转 的 两个界面 ;
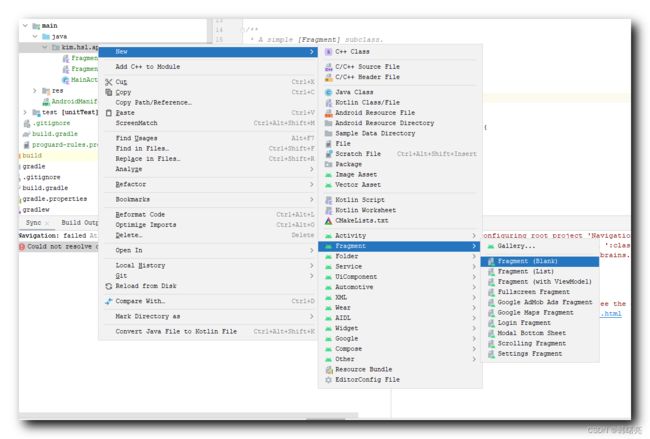
右键点击包名 , 选择 " New / Fragment / Fragment (Blank) " 选项 ,
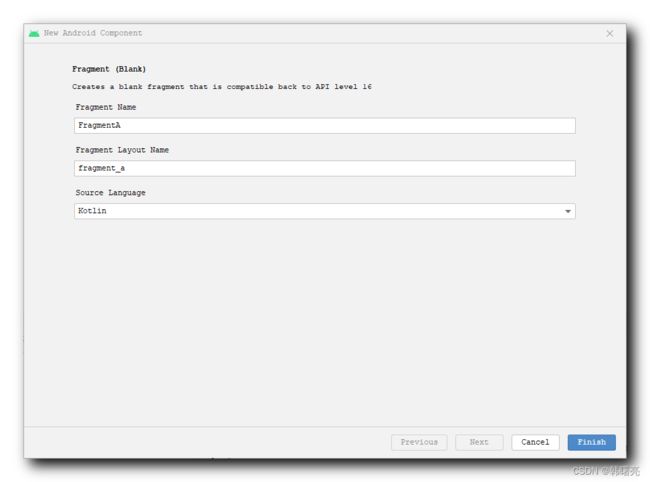
在弹出的界面中 , 输入 Fragment 名称 , 创建新的 Fragment ;
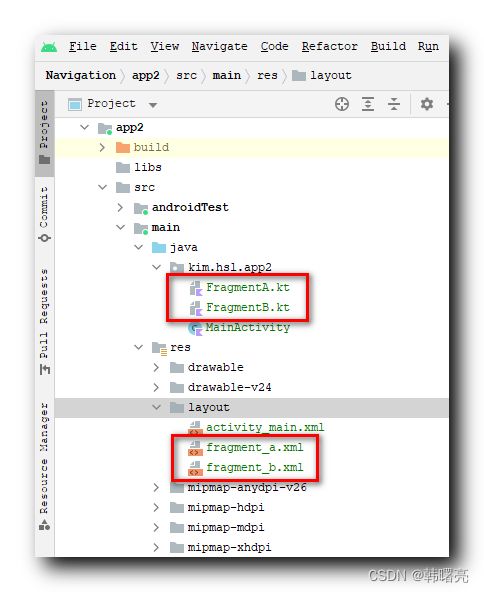
创建 Fragment 时 , 会自动生成对应的 布局文件 :
注意 : 该操作比较坑 , 生成 Fragment 时 , 会自动添加 Kotlin 语言插件的 Gradle 依赖 , 必要时可以删除该依赖 ; 自动生成的依赖没有配置 Maven 源 , 会报错 ;
buildscript {
    dependencies {
        classpath 'org.jetbrains.kotlin:kotlin-gradle-plugin:1.8.0-RC2'
    }
}
2、创建 NavigationGraph
创建完 Fragment 之后 , 才能开始创建 NavigationGraph , 否则没有对应的 Fragment 选项 ;
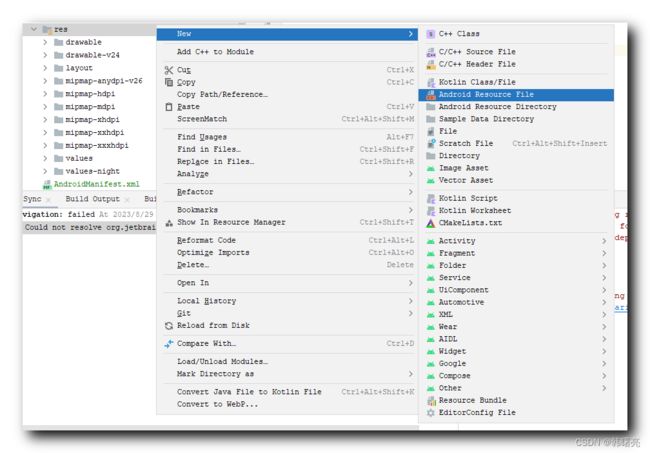
创建 NavigationGraph ,
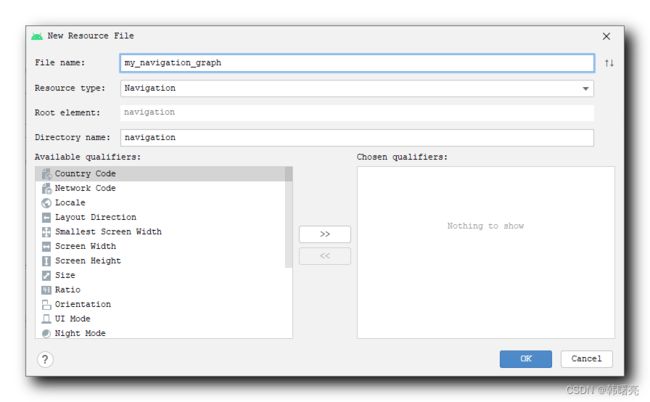
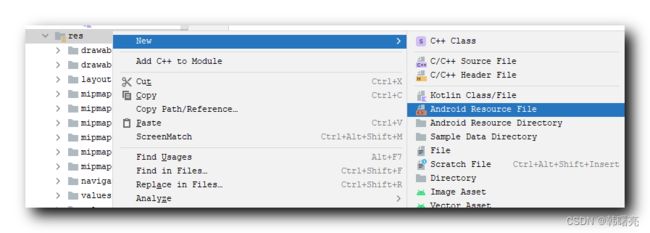
右键点击 res 目录 , 选择 " New / Android Resource File " 选项 ,
在弹出的 " New Resource File " 对话框中 , 设置 文件名 , 资源类型 , 目录名称 ;
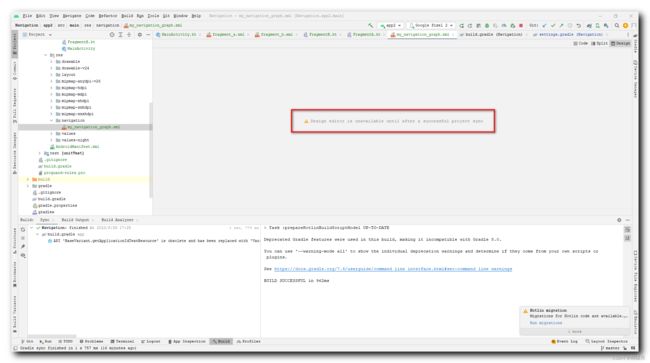
下面开始编辑 NavigationGraph , 进入 Design 模式后 , 会提示 Design editor is unavailable until after a successful project sync , 这是因为创建 Fragment 之后 , 还没有进行第一次编译 ,
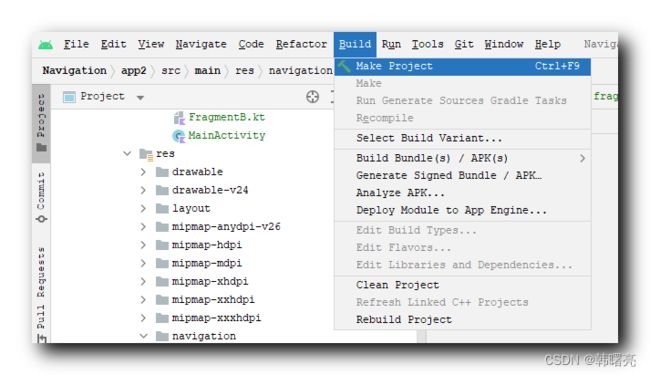
选择 " 菜单栏 / Build / Make Project " 选项 , 编译一次应用 ;
编译成功之后 , 就可以使用 NavigationGraph 的 Design 模式 ;
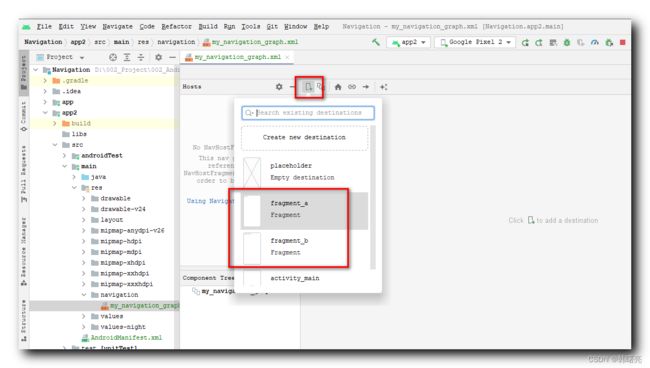
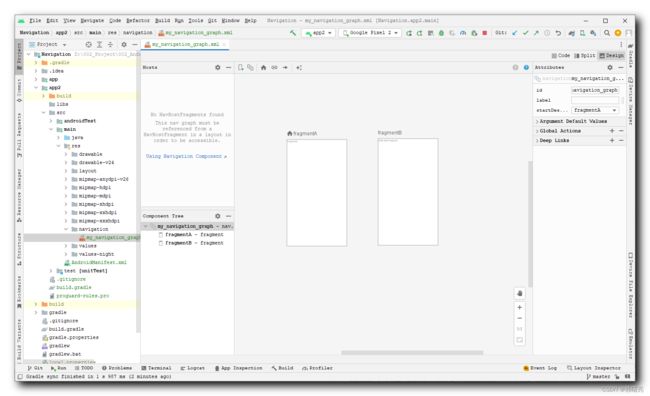
点击 " New Destination " 按钮 , 添加两个 Fragment 到 NavigationGraph 中 ;
将两个 Fragment 添加到 NavigationGraph 中 , 不需要做其它配置 ;
<navigation xmlns:android="http://schemas.android.com/apk/res/android"
    xmlns:app="http://schemas.android.com/apk/res-auto"
    xmlns:tools="http://schemas.android.com/tools"
    android:id="@+id/my_navigation_graph"
    app:startDestination="@id/fragmentA">

    <fragment
        android:id="@+id/fragmentA"
        android:name="kim.hsl.app2.FragmentA"
        android:label="fragment_a"
        tools:layout="@layout/fragment_a" />
    <fragment
        android:id="@+id/fragmentB"
        android:name="kim.hsl.app2.FragmentB"
        android:label="fragment_b"
        tools:layout="@layout/fragment_b" />
navigation>
设置默认的 Fragment , 在根标签 navigation 中 ,
app:startDestination="@id/fragmentA"
配置 , 用于配置默认的初始 Fragment 是哪一个 ;
3、Activity 导入 NavHostFragment
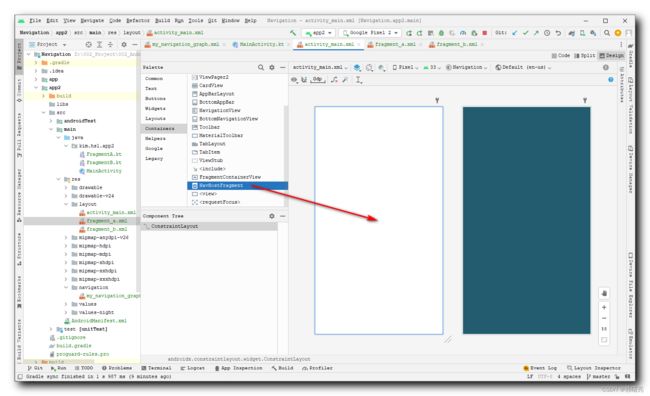
进入 Launcher 界面 MainActivity 的布局中 , 删除布局中的其它元素 ;
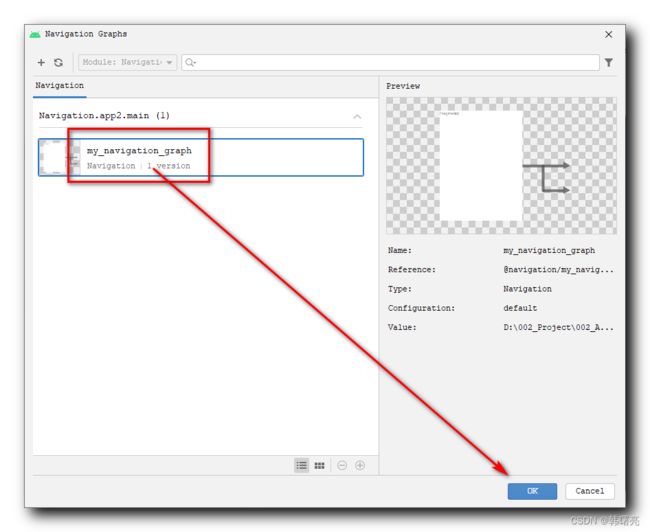
拖入空间到布局后 , 松开鼠标 , 会弹出如下 " Navigation Graph " 对话框 , 选择要拖入的 NavigationGraph , 然后点击右下角 " OK " 按钮 ;
拖入后 , 为该空间添加约束 , 最终源码如下 :
<androidx.constraintlayout.widget.ConstraintLayout
	xmlns:android="http://schemas.android.com/apk/res/android"
    xmlns:app="http://schemas.android.com/apk/res-auto"
    xmlns:tools="http://schemas.android.com/tools"
    android:layout_width="match_parent"
    android:layout_height="match_parent"
    tools:context=".MainActivity">


    <androidx.fragment.app.FragmentContainerView
        android:id="@+id/fragmentContainerView"
        android:name="androidx.navigation.fragment.NavHostFragment"
        android:layout_width="match_parent"
        android:layout_height="match_parent"
        app:defaultNavHost="true"
        app:navGraph="@navigation/my_navigation_graph"
        app:layout_constraintBottom_toBottomOf="parent"
        app:layout_constraintEnd_toEndOf="parent"
        app:layout_constraintStart_toStartOf="parent"
        app:layout_constraintTop_toTopOf="parent"  />

androidx.constraintlayout.widget.ConstraintLayout>
4、创建菜单
右键点击 res 目录 , 选择 " New / Android Resource File " 选项 ,
在弹出的 " New Resource File " 对话框中 , 选择 资源类型为 Menu 菜单类型 , 目录名称是 menu , 然后输入 文件名 , 点击 " OK " 按钮 , 创建菜单 ;
创建完毕后 , 在该菜单配置文件中 , 配置 android:id="@+id/fragmentB" , 其含义是跳转到 NavigationGraph 中 id 为 fragmentB 对应的 Fragment 界面中 , 也就是跳转到 FragmentB 界面 , 触发该菜单选项 , 就会跳转到 FragmentB 界面 ;
<menu xmlns:android="http://schemas.android.com/apk/res/android">
    <item
        android:id="@+id/fragmentB"
        android:icon="@mipmap/ic_launcher"
        android:title="跳转到 Fragment B"/>
menu>
5、Activity 界面开发 NavigationUI 的主要逻辑 ( 重点 )
a、添加 Fragment 布局
在 Activity 的布局文件中 , 添加如下代码 , 不建议在 Design 界面直接拖动 NavHostFragment , 生成的代码报错 , 直接拷贝下面的代码即可 ;
将 app:navGraph="@navigation/my_navigation_graph" 修改成你自己创建的 NavigationGraph 即可 ;
name 属性必须设置成 android:name="androidx.navigation.fragment.NavHostFragment" 样式的 ;
    <fragment
        android:id="@+id/fragmentContainerView"
        android:name="androidx.navigation.fragment.NavHostFragment"
        android:layout_width="match_parent"
        android:layout_height="match_parent"
        app:navGraph="@navigation/my_navigation_graph"
        app:layout_constraintBottom_toBottomOf="parent"
        app:layout_constraintEnd_toEndOf="parent"
        app:layout_constraintStart_toStartOf="parent"
        app:layout_constraintTop_toTopOf="parent"  />
b、处理 Navigation 导航逻辑 ( 重点 )
首先 , 获取 NavController , 从布局文件中定义的 Fragment 布局中获取 ;
        // 1. 获取 NavController
        navController = Navigation.findNavController(this, R.id.fragmentContainerView)
然后 , 创建 AppBarConfiguration , 这是之后绑定 Navigation 与 AppBar 的重要参数 ;
        // 2. 创建 AppBarConfiguration
        appBarConfiguration = AppBarConfiguration.Builder(navController.graph).build()
再后 , 将 Navigation 导航 与 AppBar 进行关联 , 关联后 , 就可以使用 菜单 选项进行界面跳转了 ;
        // 3. 将 Navigation 导航 与 AppBar 进行关联
        NavigationUI.setupActionBarWithNavController(this, navController, appBarConfiguration)
最后 , 监听 Navigation 页面切换状态 , 如果通过 Navigation 切换了界面 , 会触发 DestinationChangedListener 监听器的 onDestinationChanged 函数 ;
        // 4. 监听页面切换状态
        navController.addOnDestinationChangedListener{
                /*
                    相当于重写了下面的函数
                    public fun onDestinationChanged(
                        controller: NavController,
                        destination: NavDestination,
                        arguments: Bundle?)
                 */
                navController: NavController, navDestination: NavDestination, bundle: Bundle? ->
c、启用菜单选项
重写 Activity 的 onCreateOptionsMenu 方法 , 加载资源文件中的菜单 ,
此时 只加载菜单 , 此时不能跳转 , 需要重写 onOptionsItemSelected 方法才可以 ;
    override fun onCreateOptionsMenu(menu: Menu?): Boolean {
        super.onCreateOptionsMenu(menu)
        // 加载资源文件中的菜单
        // 只加载菜单 , 此时不能跳转 , 需要重写 onOptionsItemSelected 方法才可以
        menuInflater.inflate(R.menu.my_menu, menu)
        return true
    }
d、使用菜单进行 NavigationUI 导航
只显示菜单是不行的 , 还需要设置菜单的行为 , 重写了该方法 , 菜单选项才能生效 ,
NavigationUI.onNavDestinationSelected(item, navController) 代码的含义是 : 优先使用 NavigationUI 进行导航 ,
如果跳转失败 , 再使用传统的方式执行默认动作 , 代码为 super.onOptionsItemSelected(item) ;
    override fun onOptionsItemSelected(item: MenuItem): Boolean {
        // 重写了该方法 , 菜单选项才能生效
        // 优先使用 NavigationUI 进行导航 , 如果跳转失败 , 再使用传统的方式
        return NavigationUI.onNavDestinationSelected(item, navController)
                || super.onOptionsItemSelected(item)
    }
e、支持导航回退功能
默认状态下通过 Navigation 导航 , 跳转到 FragmentB 后是无法返回的 , 如果想要返回, 需要重写 onSupportNavigateUp 方法 ;
NavigationUI.navigateUp(navController, appBarConfiguration) 的作用就是将 Navigation 导航切换界面 , 记录到回退栈中 ;
    // 默认状态下进入 FragmentB 后是无法返回的
    // 如果想要返回, 需要重写 onSupportNavigateUp 方法
    override fun onSupportNavigateUp(): Boolean {
        return NavigationUI.navigateUp(navController, appBarConfiguration)
                || super.onSupportNavigateUp()
    }
三、完整源码示例 - NavigationUI 类使用
1、Fragment 相关源码
a、FragmentA 界面的 Kotlin 源码和布局文件
FragmentA 基本是默认代码 , 删除了参数传递相关的逻辑 , 显得更加简洁 ;
FragmentA 代码 :
package kim.hsl.app2

import android.os.Bundle
import android.view.LayoutInflater
import android.view.View
import android.view.ViewGroup
import androidx.fragment.app.Fragment

class FragmentA : Fragment() {
    override fun onCreate(savedInstanceState: Bundle?) {
        super.onCreate(savedInstanceState)
    }

    override fun onCreateView(
        inflater: LayoutInflater, container: ViewGroup?,
        savedInstanceState: Bundle?
    ): View? {
        // Inflate the layout for this fragment
        return inflater.inflate(R.layout.fragment_a, container, false)
    }
}
布局文件 :
<FrameLayout xmlns:android="http://schemas.android.com/apk/res/android"
    xmlns:tools="http://schemas.android.com/tools"
    android:layout_width="match_parent"
    android:layout_height="match_parent"
    tools:context=".FragmentA">


    <TextView
        android:layout_width="match_parent"
        android:layout_height="match_parent"
        android:text="FragmentA" />

FrameLayout>
b、FragmentB 界面的 Kotlin 源码和布局文件
在该界面中 , 设置了 隐藏 AppBar 中的 菜单按钮 的功能 , 跳转到 FragmentB 之后 , 右上角 就不再显示菜单按钮 ;
FragmentB 代码 :
package kim.hsl.app2

import android.os.Bundle
import android.view.*
import androidx.fragment.app.Fragment

class FragmentB : Fragment() {

    override fun onCreate(savedInstanceState: Bundle?) {
        super.onCreate(savedInstanceState)
    }

    override fun onCreateView(
        inflater: LayoutInflater, container: ViewGroup?,
        savedInstanceState: Bundle?
    ): View? {
        // 确保 onCreateOptionsMenu 函数执行
        setHasOptionsMenu(true)
        // 为 Fragment 加载布局
        return inflater.inflate(R.layout.fragment_b, container, false)
    }

    override fun onCreateOptionsMenu(menu: Menu, inflater: MenuInflater) {
        // 清空菜单
        menu.clear()
        super.onCreateOptionsMenu(menu, inflater)
    }
}
FragmentB 的布局文件 :
<FrameLayout xmlns:android="http://schemas.android.com/apk/res/android"
    xmlns:tools="http://schemas.android.com/tools"
    android:layout_width="match_parent"
    android:layout_height="match_parent"
    tools:context=".FragmentB">


    <TextView
        android:layout_width="match_parent"
        android:layout_height="match_parent"
        android:text="FragmentB" />

FrameLayout>
2、NavigationGraph 相关源码
在这里配置两个 Fragment , 不需要配置跳转动作 , 只需要在此处定义 Fragment 即可 ;
<navigation xmlns:android="http://schemas.android.com/apk/res/android"
    xmlns:app="http://schemas.android.com/apk/res-auto"
    xmlns:tools="http://schemas.android.com/tools"
    android:id="@+id/my_navigation_graph"
    app:startDestination="@id/fragmentA">

    <fragment
        android:id="@+id/fragmentA"
        android:name="kim.hsl.app2.FragmentA"
        android:label="fragment_a"
        tools:layout="@layout/fragment_a" />
    <fragment
        android:id="@+id/fragmentB"
        android:name="kim.hsl.app2.FragmentB"
        android:label="fragment_b"
        tools:layout="@layout/fragment_b" />
navigation>
3、MainActivity 主界面相关源码 ( 重点 )
package kim.hsl.app2

import androidx.appcompat.app.AppCompatActivity
import android.os.Bundle
import android.util.Log
import android.view.Menu
import android.view.MenuItem
import androidx.navigation.NavController
import androidx.navigation.NavDestination
import androidx.navigation.Navigation
import androidx.navigation.ui.AppBarConfiguration
import androidx.navigation.ui.NavigationUI

class MainActivity : AppCompatActivity() {

    lateinit var navController: NavController
    lateinit var appBarConfiguration: AppBarConfiguration

    override fun onCreate(savedInstanceState: Bundle?) {
        super.onCreate(savedInstanceState)
        setContentView(R.layout.activity_main)

        // 1. 获取 NavController
        navController = Navigation.findNavController(this, R.id.fragmentContainerView)

        // 2. 创建 AppBarConfiguration
        appBarConfiguration = AppBarConfiguration.Builder(navController.graph).build()

        // 3. 将 Navigation 导航 与 AppBar 进行关联
        NavigationUI.setupActionBarWithNavController(this, navController, appBarConfiguration)

        // 4. 监听页面切换状态
        navController.addOnDestinationChangedListener{
                /*
                    相当于重写了下面的函数
                    public fun onDestinationChanged(
                        controller: NavController,
                        destination: NavDestination,
                        arguments: Bundle?)
                 */
                navController: NavController, navDestination: NavDestination, bundle: Bundle? ->
                Log.i("octopus", "OnDestinationChangedListener 监听器中 onDestinationChanged 函数触发")
        }
    }

    override fun onCreateOptionsMenu(menu: Menu?): Boolean {
        super.onCreateOptionsMenu(menu)
        // 加载资源文件中的菜单
        // 只加载菜单 , 此时不能跳转 , 需要重写 onOptionsItemSelected 方法才可以
        menuInflater.inflate(R.menu.my_menu, menu)
        return true
    }

    override fun onOptionsItemSelected(item: MenuItem): Boolean {
        // 重写了该方法 , 菜单选项才能生效
        // 优先使用 NavigationUI 进行导航 , 如果跳转失败 , 再使用传统的方式
        return NavigationUI.onNavDestinationSelected(item, navController)
                || super.onOptionsItemSelected(item)
    }

    // 默认状态下进入 FragmentB 后是无法返回的
    // 如果想要返回, 需要重写 onSupportNavigateUp 方法
    override fun onSupportNavigateUp(): Boolean {
        return NavigationUI.navigateUp(navController, appBarConfiguration)
                || super.onSupportNavigateUp()
    }
}
配套的 布局文件 :
<androidx.constraintlayout.widget.ConstraintLayout
    xmlns:android="http://schemas.android.com/apk/res/android"
    xmlns:app="http://schemas.android.com/apk/res-auto"
    xmlns:tools="http://schemas.android.com/tools"
    android:layout_width="match_parent"
    android:layout_height="match_parent"
    tools:context=".MainActivity">


    <fragment
        android:id="@+id/fragmentContainerView"
        android:name="androidx.navigation.fragment.NavHostFragment"
        android:layout_width="match_parent"
        android:layout_height="match_parent"
        app:navGraph="@navigation/my_navigation_graph"
        app:layout_constraintBottom_toBottomOf="parent"
        app:layout_constraintEnd_toEndOf="parent"
        app:layout_constraintStart_toStartOf="parent"
        app:layout_constraintTop_toTopOf="parent"  />

androidx.constraintlayout.widget.ConstraintLayout>
配套的 menu 布局文件 :
<menu xmlns:android="http://schemas.android.com/apk/res/android">
    <item
        android:id="@+id/fragmentB"
        android:icon="@mipmap/ic_launcher"
        android:title="跳转到 Fragment B"/>
menu>
4、执行结果
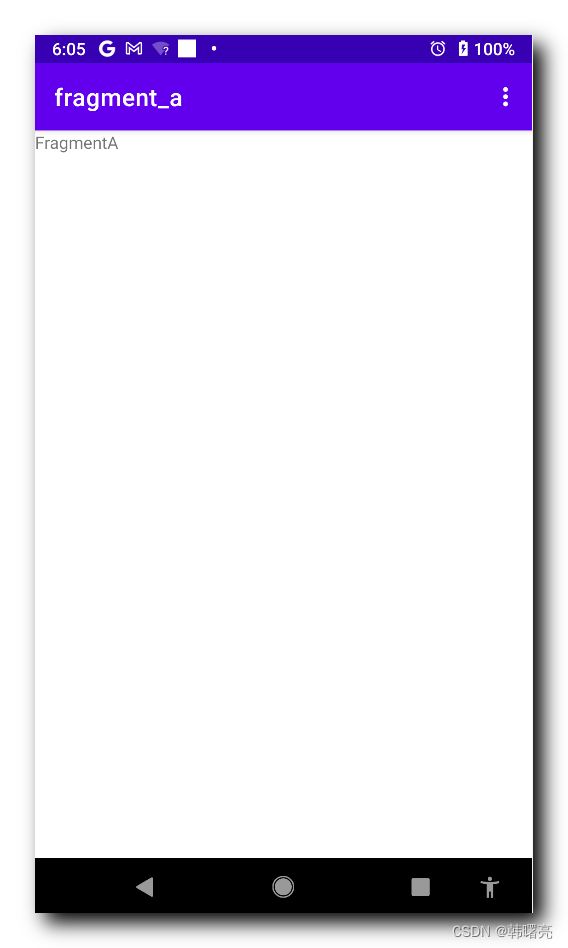
进入界面 , 显示默认的 FragmentA ,
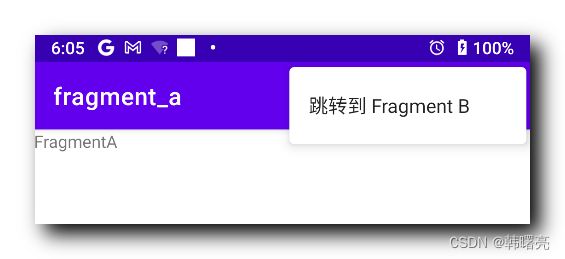
点击右上角菜单栏 , 弹出 " 跳转到 FragmentB " 按钮 , 点击该菜单选项 , 跳转页面 ,
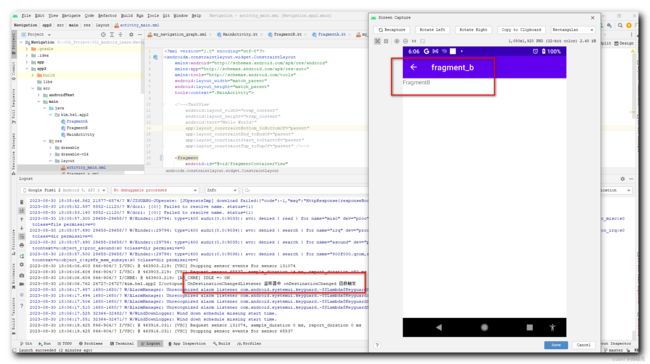
此时跳转到了 FragmentB 页面 , 并且触发了监听器 ,
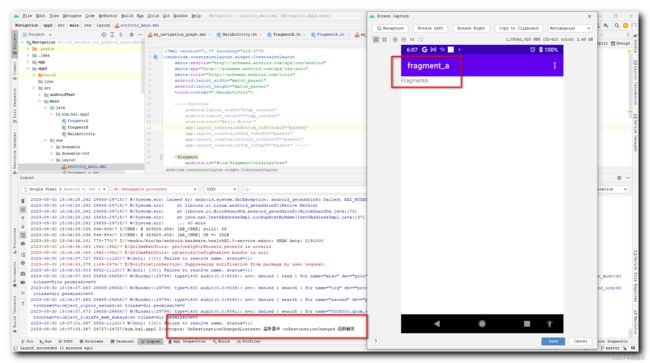
点击回退按钮 , 回到了 FragmentA 界面 , 又触发了监听器 ;
