OkHttp4.9.3源码解析
OkHttp4.9.3
okhttp内部逻辑流程图:
1. 整体结构
主要类有:
- OkHttpClient
- Request 和 Response
- RealCall
简单介绍:
- OkHttpClient:核心管理类,所有内部逻辑和对象归OkHttpClient统一管理,由Builder构造器生成。
- Request 和 Response:两个累完全符合http协议所定义的请求内容和响应内容
- Request:发送请求封装类,包含url、method、headers、body
- Response:返回结果,包含code、message、headers、body
- RealCall:OkHttp 的应用层和网络层之间的桥梁。负责请求的调度(同步走当前线程发送请求,异步使用OkHttp内部的线程池进行),同时负责构造内部逻辑责任链,并执行责任链相关逻辑,知道获取结果。虽然OkHttpClient师整个OkHttp的核心管理类,但是真正发出请求并且组织逻辑的师RealCall类,它同时肩负了调度和责任链组织的两大重任。
重点:
RealCall两个重要方法:execute() 和 enqueue()
- execute() :处理同步请求
- enqueue() :处理异步请求。只是通过异步线程和callback做了一个异步调用的封装,最终逻辑还是会调用到execute(),然后会调用 getResponseWithInterceptorChain()获得请求结果
getResponseWithInterceptorChain()承载了整个请求的核心逻辑。是okhttp的大体请求流程。
  internal fun getResponseWithInterceptorChain(): Response {
    // 创建一个Interceptors拦截器的列表
    val interceptors = mutableListOf<Interceptor>()
    interceptors += client.interceptors
    interceptors += RetryAndFollowUpInterceptor(client)
    interceptors += BridgeInterceptor(client.cookieJar)
    interceptors += CacheInterceptor(client.cache)
    interceptors += ConnectInterceptor
    if (!forWebSocket) {
      interceptors += client.networkInterceptors
    }
    interceptors += CallServerInterceptor(forWebSocket)

    //创建RealInterceptorChain,传入拦截器列表
    val chain = RealInterceptorChain(
        call = this,
        interceptors = interceptors,
        index = 0,
        exchange = null,
        request = originalRequest,
        connectTimeoutMillis = client.connectTimeoutMillis,
        readTimeoutMillis = client.readTimeoutMillis,
        writeTimeoutMillis = client.writeTimeoutMillis
    )

    var calledNoMoreExchanges = false
    try {
      //调用RealInterceptorChain.proceed,传入参数:originalRequest(应用程序未受重定向或身份验证标头的影响的原始请求)
      //获取返回结果
      val response = chain.proceed(originalRequest)
      if (isCanceled()) {
        response.closeQuietly()
        throw IOException("Canceled")
      }
      return response
    } catch (e: IOException) {
      calledNoMoreExchanges = true
      throw noMoreExchanges(e) as Throwable
    } finally {
      if (!calledNoMoreExchanges) {
        noMoreExchanges(null)
      }
    }
  }
Interceptors拦截器的List列表,按顺序依次将:
- client.Interceptors
- RetryAndFollowUpInterceptor,
- BridgeInterceptor
- CacheInterceptor
- ConnectInterceptor
- client.networkInterceptors(forWebSocket==false)
- CallServerInterceptor
结论:okhttp将整个请求的复杂逻辑切成了一个个独立的模块并命名为连接器(Interceptor),通过责任链的设计模式串联到一起,最终完成了请求获取先买个因结果。
2. 拦截器
创建完RealInterceptorChain后,调用RealInterceptorChain.proceed获得响应结果,其流程如下:

//copy函数
  internal fun copy(
    index: Int = this.index,
    exchange: Exchange? = this.exchange,
    request: Request = this.request,
    connectTimeoutMillis: Int = this.connectTimeoutMillis,
    readTimeoutMillis: Int = this.readTimeoutMillis,
    writeTimeoutMillis: Int = this.writeTimeoutMillis
  ) = RealInterceptorChain(call, interceptors, index, exchange, request, connectTimeoutMillis,
      readTimeoutMillis, writeTimeoutMillis)


//RealInterceptorChain.proceed
  @Throws(IOException::class)
  override fun proceed(request: Request): Response {
    check(index < interceptors.size)

    calls++

    if (exchange != null) {
      check(exchange.finder.sameHostAndPort(request.url)) {
        "network interceptor ${interceptors[index - 1]} must retain the same host and port"
      }
      check(calls == 1) {
        "network interceptor ${interceptors[index - 1]} must call proceed() exactly once"
      }
    }

    // Call the next interceptor in the chain.
    val next = copy(index = index + 1, request = request)
    val interceptor = interceptors[index]

    @Suppress("USELESS_ELVIS")
    val response = interceptor.intercept(next) ?: throw NullPointerException(
        "interceptor $interceptor returned null")

    if (exchange != null) {
      check(index + 1 >= interceptors.size || next.calls == 1) {
        "network interceptor $interceptor must call proceed() exactly once"
      }
    }

    check(response.body != null) { "interceptor $interceptor returned a response with no body" }

    return response
  }
其本质上就是通过将多个拦截器以责任链的方式来一层层调用,上一个拦截器处理完后将就将结果传给下一个拦截器,直到最后一个拦截器(即 CallServerInterceptor )处理完后将 Response 再一层层往上传递。
具体步骤
- 拦截器按照添加顺序依次执行
- 拦截器的执行从RealInterceptorChain.proceed()开始,进入到第一个拦截器的执行逻辑
- 每个拦截器在执行之前,会将剩余尚未执行的拦截器组成新的RealInterceptorChain
- 拦截器的逻辑被新的责任链调用next.proceed()切分为start、next.proceed、end这三个部分依次执行
- next.proceed() 所代表的其实就是剩余所有拦截器的执行逻辑
- 所有拦截器最终形成一个层层内嵌的嵌套结构
拦截器都继承了Interceptor接口:
fun interface Interceptor {
  @Throws(IOException::class)
  fun intercept(chain: Chain): Response //每个拦截器具体逻辑实现在intercept()

  companion object {
    /**
     * ```kotlin
     * val interceptor = Interceptor { chain: Interceptor.Chain ->
     *     chain.proceed(chain.request())
     * }
     * ```
     */
    inline operator fun invoke(crossinline block: (chain: Chain) -> Response): Interceptor =
      Interceptor { block(it) }
  }

  interface Chain {
    fun request(): Request

    @Throws(IOException::class)
    fun proceed(request: Request): Response

    /**
     * Returns the connection the request will be executed on. This is only available in the chains
     * of network interceptors; for application interceptors this is always null.
     */
    fun connection(): Connection?

    fun call(): Call

    fun connectTimeoutMillis(): Int

    fun withConnectTimeout(timeout: Int, unit: TimeUnit): Chain

    fun readTimeoutMillis(): Int

    fun withReadTimeout(timeout: Int, unit: TimeUnit): Chain

    fun writeTimeoutMillis(): Int

    fun withWriteTimeout(timeout: Int, unit: TimeUnit): Chain
  }
}
拦截器主要分为两类:自定义拦截器和OkHttp内部拦截器,自定义拦截器可以在创建OkHttpClient.Builder时,通过addInterceptor 和 addNetworkdInterceptor 添加自定义的拦截器
自定义拦截器:
- client.Interceptors
- client.networkInterceptors:满足 forWebSocket==false 才添加
OkHttp内部拦截器:
- RetryAndFollowUpInterceptor:失败和重定向拦截器
- BridgeInterceptor:封装request和response拦截器
- CacheInterceptor:缓存相关的拦截器,负责读取缓存直接返回、更新缓存
- ConnectInterceptor:连接服务,负责和服务器建立连接,真正的请求网络
- CallServerInterceptor:执行流操作(写出请求体、获取相应数据)负责向服务器发送请求数据,从服务器读取响应数据,进行http请求报文的封装和请求报文的解析
2.1 RetryAndFollowUpInterceptor
RetryAndFollowUpInterceptor:失败和重定向拦截器
为什么要重新发送请求
- 路由失败,这里稍微解释一下路由就是一个web服务可能会有代理或者多个IP地址,这些就可以组成所谓的路由,只要我们能够连通其中任意一条路由即可与服务器通信,所以在路由失败之后还可以选择其他的路由进行连接
- 获取到3xx的重定向要求进行重定向请求,服务器或者代理要求认证信息
class RetryAndFollowUpInterceptor(private val client: OkHttpClient) : Interceptor {

  @Throws(IOException::class)
  override fun intercept(chain: Interceptor.Chain): Response {
    val realChain = chain as RealInterceptorChain
    var request = chain.request
    val call = realChain.call
    var followUpCount = 0
    var priorResponse: Response? = null
    var newExchangeFinder = true
    var recoveredFailures = listOf<IOException>()
    //设置一个死循环,对上面两个可能的情况进行不断的重新发送请求
    while (true) {
      call.enterNetworkInterceptorExchange(request, newExchangeFinder)

      var response: Response
      var closeActiveExchange = true
      try {
        if (call.isCanceled()) {
          throw IOException("Canceled")
        }

        try {
            //链式调用
          response = realChain.proceed(request)
          newExchangeFinder = true
        } catch (e: RouteException) {
          //抛出路由异常-->是否满足重试条件
          if (!recover(e.lastConnectException, call, request, requestSendStarted = false)) {
            throw e.firstConnectException.withSuppressed(recoveredFailures)
          } else {
            recoveredFailures += e.firstConnectException
          }
          newExchangeFinder = false
          continue
        } catch (e: IOException) {
          //抛出IO异常-->是否满足重试条件
          if (!recover(e, call, request, requestSendStarted = e !is ConnectionShutdownException)) {
            throw e.withSuppressed(recoveredFailures)
          } else {
            recoveredFailures += e
          }
          newExchangeFinder = false
          continue
        }

        // Attach the prior response if it exists. Such responses never have a body.
        if (priorResponse != null) {
          response = response.newBuilder()
              .priorResponse(priorResponse.newBuilder()
                  .body(null)
                  .build())
              .build()
        }

        val exchange = call.interceptorScopedExchange
        //调用followUpRequest()进行跟进处理,这里面根据服务器返回码进行相应的处理,具体的要翻看http协议返回码对应的意义
        val followUp = followUpRequest(response, exchange)

        //根据followUp的结果判断是否需要重新发送请求或者直接返回response
        if (followUp == null) {
          if (exchange != null && exchange.isDuplex) {
            call.timeoutEarlyExit()
          }
          closeActiveExchange = false
          return response
        }

        val followUpBody = followUp.body
        if (followUpBody != null && followUpBody.isOneShot()) {
          closeActiveExchange = false
          return response
        }

        response.body?.closeQuietly()

        if (++followUpCount > MAX_FOLLOW_UPS) {
          throw ProtocolException("Too many follow-up requests: $followUpCount")
        }

        request = followUp
        priorResponse = response
      } finally {
        call.exitNetworkInterceptorExchange(closeActiveExchange)
      }
    }
  }
}
(recover)是否满足重试条件的判定逻辑如下:
  private fun recover(
    e: IOException,
    call: RealCall,
    userRequest: Request,
    requestSendStarted: Boolean
  ): Boolean {
    // 设置重试的参数为false
    if (!client.retryOnConnectionFailure) return false

    // 请求的body已经发出
    if (requestSendStarted && requestIsOneShot(e, userRequest)) return false

    // 特殊异常类型:ProtocolException,SSLHandshakeException等
    if (!isRecoverable(e, requestSendStarted)) return false

    //没有更多的route(包含proxy和inetaddress)
    if (!call.retryAfterFailure()) return false

    // 否则重试当前请求
    return true
  }
2.4 Interceptors和networkInterceptors
在OkHttpClient.Builder的构造方法有两个参数,使用者可以通过addInterceptor 和 addNetworkdInterceptor 添加自定义的拦截器
从前面添加拦截器的顺序可以知道 Interceptors 和 networkInterceptors 刚好一个在 RetryAndFollowUpInterceptor 的前面,一个在后面。
结合前面的责任链调用图可以分析出来,假如一个请求在 RetryAndFollowUpInterceptor 这个拦截器内部重试或者重定向了 N 次,那么其内部嵌套的所有拦截器也会被调用N次,同样 networkInterceptors 自定义的拦截器也会被调用 N 次。而相对的 Interceptors 则一个请求只会调用一次,所以在OkHttp的内部也将其称之为 Application Interceptor。
Interceptors(应用拦截器)
-
不需要担心中间响应,如重定向和重试。
-
总是调用一次,即使从缓存提供HTTP响应。
-
遵守应用程序的原始意图。不注意OkHttp注入的头像If-None-Match。
-
允许短路和不通话Chain.proceed()。
-
允许重试并进行多次呼叫Chain.proceed()。
networkInterceptors(网络拦截器)
-
能够对重定向和重试等中间响应进行操作。
-
不调用缓存的响应来短路网络。
-
观察数据,就像通过网络传输一样。
-
访问Connection该请求。
2.3 BridgeInterceptor
BridgeInterceptor:封装request和response拦截器
负责把用户构造的请求转换为发送到服务器的请求 、把服务器返回的响应转换为用户友好的响应,是从应用程序代码到网络代码的桥梁
BridgeInterceptor拦截器的逻辑流程如下:
- 设置内容长度,内容编码
- 设置gzip压缩,并在接收到内容后进行解压。省去了应用层处理数据解压的麻烦
- 添加cookie
- 设置其他报头,如User-Agent,Host,Keep-alive等。其中Keep-Alive是实现连接复用的必要步骤
class BridgeInterceptor(private val cookieJar: CookieJar) : Interceptor {

  @Throws(IOException::class)
  override fun intercept(chain: Interceptor.Chain): Response {
    val userRequest = chain.request()
    val requestBuilder = userRequest.newBuilder()

    val body = userRequest.body
    if (body != null) {
      val contentType = body.contentType()
      if (contentType != null) {
        requestBuilder.header("Content-Type", contentType.toString())
      }

      val contentLength = body.contentLength()
      if (contentLength != -1L) {
        requestBuilder.header("Content-Length", contentLength.toString())
        requestBuilder.removeHeader("Transfer-Encoding")
      } else {
        requestBuilder.header("Transfer-Encoding", "chunked")
        requestBuilder.removeHeader("Content-Length")
      }
    }

    if (userRequest.header("Host") == null) {
      requestBuilder.header("Host", userRequest.url.toHostHeader())
    }

    if (userRequest.header("Connection") == null) {
      requestBuilder.header("Connection", "Keep-Alive")
    }

    // If we add an "Accept-Encoding: gzip" header field we're responsible for also decompressing
    // the transfer stream.
    var transparentGzip = false
    if (userRequest.header("Accept-Encoding") == null && userRequest.header("Range") == null) {
      transparentGzip = true
      requestBuilder.header("Accept-Encoding", "gzip")
    }

    val cookies = cookieJar.loadForRequest(userRequest.url)
    if (cookies.isNotEmpty()) {
      requestBuilder.header("Cookie", cookieHeader(cookies))
    }

    if (userRequest.header("User-Agent") == null) {
      requestBuilder.header("User-Agent", userAgent)
    }


    val networkResponse = chain.proceed(requestBuilder.build())

    cookieJar.receiveHeaders(userRequest.url, networkResponse.headers)

    val responseBuilder = networkResponse.newBuilder()
        .request(userRequest)

    if (transparentGzip &&
        "gzip".equals(networkResponse.header("Content-Encoding"), ignoreCase = true) &&
        networkResponse.promisesBody()) {
      val responseBody = networkResponse.body
      if (responseBody != null) {
        val gzipSource = GzipSource(responseBody.source())
        val strippedHeaders = networkResponse.headers.newBuilder()
            .removeAll("Content-Encoding")
            .removeAll("Content-Length")
            .build()
        responseBuilder.headers(strippedHeaders)
        val contentType = networkResponse.header("Content-Type")
        responseBuilder.body(RealResponseBody(contentType, -1L, gzipSource.buffer()))
      }
    }

    return responseBuilder.build()
  }

  private fun cookieHeader(cookies: List<Cookie>): String = buildString {
    cookies.forEachIndexed { index, cookie ->
      if (index > 0) append("; ")
      append(cookie.name).append('=').append(cookie.value)
    }
  }
}
2.4 CacheInterceptor
CacheInterceptor:缓存相关的拦截器,负责读取缓存直接返回、更新缓存
页面置换基于LRU算法
OkHttp已经有实现Cache的整套策略,在Cache类,但默认情况下不会使用,需要自己在创建OkHttpClient时,手动创建并传给OkHttpClient.Builder。
        int cacheSize = 10 * 1024 * 1024; // 10 MiB
        File cacheFile =  new File("E:\\okhttpcache");
        Cache cache = new Cache(cacheFile, cacheSize);

        OkHttpClient.Builder builder = new OkHttpClient.Builder()
                .connectTimeout(20, TimeUnit.SECONDS)
                .writeTimeout(20, TimeUnit.SECONDS)
                .readTimeout(20, TimeUnit.SECONDS)
                .cache(cache);
CacheInterceptor拦截器的逻辑流程如下:
- 通过Request尝试到Cache中拿缓存,当然前提是OkHttpClient中配置了缓存,默认是不支持的。
- 根据response,time,request创建一个缓存策略,用于判断怎样使用缓存。
- 如果缓存策略中设置禁止使用网络,并且缓存又为空,则构建一个Response直接返回,注意返回码=504
- 缓存策略中设置不使用网络,但是又缓存,直接返回缓存
- 接着走后续过滤器的流程,chain.proceed(networkRequest)
- 当缓存存在的时候,如果网络返回的Resposne为304,则使用缓存的Resposne。
- 构建网络请求的Resposne
- 当在OkHttpClient中配置了缓存,则将这个Resposne缓存起来。
- 缓存起来的步骤也是先缓存header,再缓存body。
- 返回Resposne
class CacheInterceptor(internal val cache: Cache?) : Interceptor {

  @Throws(IOException::class)
  override fun intercept(chain: Interceptor.Chain): Response {
    val call = chain.call()
    //尝试获取当前的缓存
    val cacheCandidate = cache?.get(chain.request())

    val now = System.currentTimeMillis()

    val strategy = CacheStrategy.Factory(now, chain.request(), cacheCandidate).compute()
    val networkRequest = strategy.networkRequest
    val cacheResponse = strategy.cacheResponse

    cache?.trackResponse(strategy)
    val listener = (call as? RealCall)?.eventListener ?: EventListener.NONE

    if (cacheCandidate != null && cacheResponse == null) {
      //返回数据为空,不需要缓存,关闭缓存拦截器
      cacheCandidate.body?.closeQuietly()
    }

    // 缓存策略中设置禁止使用网络,并且缓存又为空,则构建一个Response直接返回,注意返回码=504
    if (networkRequest == null && cacheResponse == null) {
      return Response.Builder()
          .request(chain.request())
          .protocol(Protocol.HTTP_1_1)
          .code(HTTP_GATEWAY_TIMEOUT)
          .message("Unsatisfiable Request (only-if-cached)")
          .body(EMPTY_RESPONSE)
          .sentRequestAtMillis(-1L)
          .receivedResponseAtMillis(System.currentTimeMillis())
          .build().also {
            listener.satisfactionFailure(call, it)
          }
    }

    // 缓存策略中设置不使用网络,但是有缓存,直接返回缓存
    if (networkRequest == null) {
      return cacheResponse!!.newBuilder()
          .cacheResponse(stripBody(cacheResponse))
          .build().also {
            listener.cacheHit(call, it)
          }
    }

    if (cacheResponse != null) {
      listener.cacheConditionalHit(call, cacheResponse)
    } else if (cache != null) {
      listener.cacheMiss(call)
    }

    var networkResponse: Response? = null
    try {
      //走后续过滤器的流程,chain.proceed(networkRequest)
      networkResponse = chain.proceed(networkRequest)
    } finally {
      // If we're crashing on I/O or otherwise, don't leak the cache body.
      if (networkResponse == null && cacheCandidate != null) {
        cacheCandidate.body?.closeQuietly()
      }
    }

    //当缓存存在的时候,如果网络返回的Resposne为304,则使用缓存的Resposne。
    if (cacheResponse != null) {
      if (networkResponse?.code == HTTP_NOT_MODIFIED) {
        val response = cacheResponse.newBuilder()
            .headers(combine(cacheResponse.headers, networkResponse.headers))
            .sentRequestAtMillis(networkResponse.sentRequestAtMillis)
            .receivedResponseAtMillis(networkResponse.receivedResponseAtMillis)
            .cacheResponse(stripBody(cacheResponse))
            .networkResponse(stripBody(networkResponse))
            .build()

        networkResponse.body!!.close()

        // Update the cache after combining headers but before stripping the
        // Content-Encoding header (as performed by initContentStream()).
        cache!!.trackConditionalCacheHit()
        cache.update(cacheResponse, response)
        return response.also {
          listener.cacheHit(call, it)
        }
      } else {
        cacheResponse.body?.closeQuietly()
      }
    }

    //构建网络请求的Resposne
    val response = networkResponse!!.newBuilder()
        .cacheResponse(stripBody(cacheResponse))
        .networkResponse(stripBody(networkResponse))
        .build()

    if (cache != null) {
      if (response.promisesBody() && CacheStrategy.isCacheable(response, networkRequest)) {
        //配置缓存
        val cacheRequest = cache.put(response)
        return cacheWritingResponse(cacheRequest, response).also {
          if (cacheResponse != null) {
            // This will log a conditional cache miss only.
            listener.cacheMiss(call)
          }
        }
      }

      if (HttpMethod.invalidatesCache(networkRequest.method)) {
        try {
          cache.remove(networkRequest)
        } catch (_: IOException) {
          // The cache cannot be written.
        }
      }
    }
    //返回response
    return response
  }
}
2.5 ConnectInterceptor
ConnectInterceptor:连接服务,负责和服务器建立连接,真正的请求网络
它同时负责了Dns解析和Socket连接(包括tls连接)。
object ConnectInterceptor : Interceptor {
  @Throws(IOException::class)
  override fun intercept(chain: Interceptor.Chain): Response {
    val realChain = chain as RealInterceptorChain
    //realChain.call为RealCall
    val exchange = realChain.call.initExchange(chain)
    val connectedChain = realChain.copy(exchange = exchange)
    return connectedChain.proceed(realChain.request)
  }
}
  internal fun initExchange(chain: RealInterceptorChain): Exchange {
    synchronized(this) {
      check(expectMoreExchanges) { "released" }
      check(!responseBodyOpen)
      check(!requestBodyOpen)
    }

    val exchangeFinder = this.exchangeFinder!!
    //ExchangeFinder.find(client, chain) 是创建连接的入口
    val codec = exchangeFinder.find(client, chain)
    val result = Exchange(this, eventListener, exchangeFinder, codec)
    this.interceptorScopedExchange = result
    this.exchange = result
    synchronized(this) {
      this.requestBodyOpen = true
      this.responseBodyOpen = true
    }

    if (canceled) throw IOException("Canceled")
    return result
  }
//ExchangeFinder.find
 fun find(
    client: OkHttpClient,
    chain: RealInterceptorChain
  ): ExchangeCodec {
    try {
      //1. 调用的findHealthConnection()方法
      val resultConnection = findHealthyConnection(
          connectTimeout = chain.connectTimeoutMillis,
          readTimeout = chain.readTimeoutMillis,
          writeTimeout = chain.writeTimeoutMillis,
          pingIntervalMillis = client.pingIntervalMillis,
          connectionRetryEnabled = client.retryOnConnectionFailure,
          doExtensiveHealthChecks = chain.request.method != "GET"
      )
      //2. 创建并返回 Http2ExchangeCodec/ Http1ExchangeCodec
      return resultConnection.newCodec(client, chain)
    } catch (e: RouteException) {
      trackFailure(e.lastConnectException)
      throw e
    } catch (e: IOException) {
      trackFailure(e)
      throw RouteException(e)
    }
  }

  //ExchangeFinder.findHealthConnection
//从连接池里RealConnectionPool找到可用连接RealConnection,并且打开连接
  @Throws(IOException::class)
  private fun findHealthyConnection(
    connectTimeout: Int,
    readTimeout: Int,
    writeTimeout: Int,
    pingIntervalMillis: Int,
    connectionRetryEnabled: Boolean,
    doExtensiveHealthChecks: Boolean
  ): RealConnection {
    while (true) {
      //1. 从连接池里找连接(建立socket连接)
      val candidate = findConnection(
          connectTimeout = connectTimeout,
          readTimeout = readTimeout,
          writeTimeout = writeTimeout,
          pingIntervalMillis = pingIntervalMillis,
          connectionRetryEnabled = connectionRetryEnabled
      )
	  //确认连接安全,并返回
      if (candidate.isHealthy(doExtensiveHealthChecks)) {
        return candidate
      }
	  //否则将连接池里取出
      candidate.noNewExchanges()

      // 确保我们还有其他连接路径可以尝试获取
      if (nextRouteToTry != null) continue

      val routesLeft = routeSelection?.hasNext() ?: true
      if (routesLeft) continue

      val routesSelectionLeft = routeSelector?.hasNext() ?: true
      if (routesSelectionLeft) continue

      throw IOException("exhausted all routes")
    }
  }

//resultConnection.newCodec(client, chain)
  @Throws(SocketException::class)
  internal fun newCodec(client: OkHttpClient, chain: RealInterceptorChain): ExchangeCodec {
    val socket = this.socket!!
    val source = this.source!!
    val sink = this.sink!!
    val http2Connection = this.http2Connection

    return if (http2Connection != null) {
      //http2协议
      Http2ExchangeCodec(client, this, chain, http2Connection)
    } else {
      socket.soTimeout = chain.readTimeoutMillis()
      source.timeout().timeout(chain.readTimeoutMillis.toLong(), MILLISECONDS)
      sink.timeout().timeout(chain.writeTimeoutMillis.toLong(), MILLISECONDS)
      //http1协议
      Http1ExchangeCodec(client, this, source, sink)
    }
  }
ExchangeFinder就是负责连接的创建,把创建好的连接放入连接池,如果连接池中已经有该连接,就直接取出来复用。
ExchangeFinder管理两个重要的角色:RealConnection、RealConnectionPool
- RealConnection的主要属性成员有:socket、handshake、protocol。是一个Socket连接的包装类,而ExchangeCode对象是对RealConnection操作(writeRequestHeader、readResponseHeader)的封装
//RealConnection
private var socket: Socket? = null
private var handshake: Handshake? = null
private var protocol: Protocol? = null
private var http2Connection: Http2Connection? = null
private var source: BufferedSource? = null
private var sink: BufferedSink? = null
最终获得的是一个已经建立连接的Socket对象,也就是说,在ConnectInterceptor内部已经完成了socket连接。
ExchangeFinder调用的findHealthConnection()方法,因此,socket连接的获取和建立都是在这里完成的
在socket进行连接之前,其实还有一个dns的过程,也是隐含在findHealthConnection 里的内部逻辑,详细的过程在后面DNS的过程再进行分析,这里ConnectionInterceptor的任务已经完成了。
在执行完ConnectInterceptor之后,其实添加了自定义的网络拦截器networkInterceptors,按照顺序执行的规定,所有的networkInterceptor执行,socket连接其实已经建立了,可以通过realChain拿到socket做一些事情了,这也就是为什么称之为network Interceptor的原因。
2.6 CallServerInterceptor
CallServerInterceptor:执行流操作(写出请求体、获取相应数据)负责向服务器发送请求数据,从服务器读取响应数据,进行http请求报文的封装和请求报文的解析
CalllServerInterceptor是最后一个拦截器了,前面的拦截器已经完成了socket连接和tls连接,那么这一步就是传输http的头部和body数据
class CallServerInterceptor(private val forWebSocket: Boolean) : Interceptor {

  @Throws(IOException::class)
  override fun intercept(chain: Interceptor.Chain): Response {
    val realChain = chain as RealInterceptorChain
    //Exchange类型
    val exchange = realChain.exchange!!
    val request = realChain.request
    val requestBody = request.body
    val sentRequestMillis = System.currentTimeMillis()

    var invokeStartEvent = true
    var responseBuilder: Response.Builder? = null
    var sendRequestException: IOException? = null
    try {
        //调用Http1ExchangeCodec的writeRequestHeaders方法写入请求的头部信息
      exchange.writeRequestHeaders(request)

      //如果不是HEAD不是GET方法,且有请求体,则写入请求体
      if (HttpMethod.permitsRequestBody(request.method) && requestBody != null) {
        // 如果请求中有“Expect: 100-continue”标头,请在传输请求正文之前等待“HTTP1.1 100 Continue”响应。
        // 如果我们没有得到那个,返回我们得到的(例如 4xx 响应)而不传输请求正文。
        if ("100-continue".equals(request.header("Expect"), ignoreCase = true)) {
          exchange.flushRequest()
          responseBuilder = exchange.readResponseHeaders(expectContinue = true)
          exchange.responseHeadersStart()
          invokeStartEvent = false
        }
        if (responseBuilder == null) {
          if (requestBody.isDuplex()) {
            // 准备一个双工正文,以便应用程序可以稍后发送请求正文
            exchange.flushRequest()
            val bufferedRequestBody = exchange.createRequestBody(request, true).buffer()
            requestBody.writeTo(bufferedRequestBody)
          } else {
            // 发送requestBody
            val bufferedRequestBody = exchange.createRequestBody(request, false).buffer()
            requestBody.writeTo(bufferedRequestBody)
            bufferedRequestBody.close()
          }
        } else {
          exchange.noRequestBody()
          if (!exchange.connection.isMultiplexed) {
            exchange.noNewExchangesOnConnection()
          }
        }
      } else {
        exchange.noRequestBody()
      }

      if (requestBody == null || !requestBody.isDuplex()) {
        //表明完成了http请求request的写入工作
        exchange.finishRequest()
      }
    } catch (e: IOException) {
      if (e is ConnectionShutdownException) {
        throw e // No request was sent so there's no response to read.
      }
      if (!exchange.hasFailure) {
        throw e // Don't attempt to read the response; we failed to send the request.
      }
      sendRequestException = e
    }

    try {
      if (responseBuilder == null) {
        //读取响应头
        responseBuilder = exchange.readResponseHeaders(expectContinue = false)!!
        if (invokeStartEvent) {
          exchange.responseHeadersStart()
          invokeStartEvent = false
        }
      }
      // 读取 response header,先构造一个 Response 对象
      var response = responseBuilder
          .request(request)
          .handshake(exchange.connection.handshake())
          .sentRequestAtMillis(sentRequestMillis)
          .receivedResponseAtMillis(System.currentTimeMillis())
          .build()
      var code = response.code
      if (code == 100) {
        //读取响应的Header信息
        responseBuilder = exchange.readResponseHeaders(expectContinue = false)!!
        if (invokeStartEvent) {
          exchange.responseHeadersStart()
        }
        response = responseBuilder
            .request(request)
            .handshake(exchange.connection.handshake())
            .sentRequestAtMillis(sentRequestMillis)
            .receivedResponseAtMillis(System.currentTimeMillis())
            .build()
        code = response.code
      }

      exchange.responseHeadersEnd(response)

      response = if (forWebSocket && code == 101) {
        // Connection is upgrading, but we need to ensure interceptors see a non-null response body.
        response.newBuilder()
            .body(EMPTY_RESPONSE)
            .build()
      } else {
        //读取响应的body信息
        response.newBuilder()
            .body(exchange.openResponseBody(response))
            .build()
      }
      if ("close".equals(response.request.header("Connection"), ignoreCase = true) ||
          "close".equals(response.header("Connection"), ignoreCase = true)) {
        exchange.noNewExchangesOnConnection()
      }
      if ((code == 204 || code == 205) && (response.body?.contentLength() ?: -1L) > 0L) {
        throw ProtocolException(
            "HTTP $code had non-zero Content-Length: ${response.body?.contentLength()}")
      }
      return response
    } catch (e: IOException) {
      if (sendRequestException != null) {
        sendRequestException.addSuppressed(e)
        throw sendRequestException
      }
      throw e
    }
  }
}
//Exchange
//传输单个 HTTP 请求和响应对。这在处理实际 IO 的 [ExchangeCodec] 上分层连接管理和事件
class Exchange(
  internal val call: RealCall,
  internal val eventListener: EventListener,
  internal val finder: ExchangeFinder,
  //ExchangeCodec: 简单理解为它能编码 request 和解码 response
  private val codec: ExchangeCodec
){...}
//Exchange.writeRequestHeaders
 fun writeRequestHeaders(request: Request) {
    try {
      eventListener.requestHeadersStart(call)
      //codec.writeRequestHeaders
      codec.writeRequestHeaders(request)
      eventListener.requestHeadersEnd(call, request)
    } catch (e: IOException) {
      eventListener.requestFailed(call, e)
      trackFailure(e)
      throw e
    }
  }

//http1ExchangeCodec
  override fun writeRequestHeaders(request: Request) {
    val requestLine = RequestLine.get(request, connection.route().proxy.type())
    writeRequest(request.headers, requestLine)
  }

  fun get(request: Request, proxyType: Proxy.Type): String = buildString {
    append(request.method)
    append(' ')
    if (includeAuthorityInRequestLine(request, proxyType)) {
      append(request.url)
    } else {
      append(requestPath(request.url))
    }
    append(" HTTP/1.1")
  }

  fun writeRequest(headers: Headers, requestLine: String) {
    check(state == STATE_IDLE) { "state: $state" }
    sink.writeUtf8(requestLine).writeUtf8("\r\n")
    for (i in 0 until headers.size) {
      sink.writeUtf8(headers.name(i))
          .writeUtf8(": ")
          .writeUtf8(headers.value(i))
          .writeUtf8("\r\n")
    }
    sink.writeUtf8("\r\n")
    state = STATE_OPEN_REQUEST_BODY
  }
3. 整体架构
整个okhttp的架构纵向来看就是五个内部拦截器,通过对横向分层的调用来完成整个请求过程。
[外链图片转存失败,源站可能有防盗链机制,建议将图片保存下来直接上传(img-NSt2UN6t-1638543024382)(https://raw.githubusercontent.com/rachel-lly/image_host/master/OkHttp/image.7jb1ypuikag0.png)]
interface Connection {
  //返回这个连接使用的路由
  fun route(): Route

  //返回这个连接使用的socket
  fun socket(): Socket

  //如果是HTTPS,返回TLS握手信息用于连接,否则返回null
  fun handshake(): Handshake?

  //返回应用层使用的协议,Protocl是个枚举,例如HTTP1.1、HTTP2
  fun protocol(): Protocol
}
最终建立Socket连接的方法是通过(ConnectInterceptor)ExchangeFinder的findConnection来完成的
  @Throws(IOException::class)
  private fun findConnection(
    connectTimeout: Int,
    readTimeout: Int,
    writeTimeout: Int,
    pingIntervalMillis: Int,
    connectionRetryEnabled: Boolean
  ): RealConnection {
    if (call.isCanceled()) throw IOException("Canceled")

    //1. 尝试重用来自呼叫的连接
    val callConnection = call.connection // This may be mutated by releaseConnectionNoEvents()!
    if (callConnection != null) {
      var toClose: Socket? = null
      synchronized(callConnection) {
        if (callConnection.noNewExchanges || !sameHostAndPort(callConnection.route().address.url)) {
          toClose = call.releaseConnectionNoEvents()
        }
      }

      //若连接没有被释放,重复使用
      if (call.connection != null) {
        check(toClose == null)
        return callConnection
      }

      // 连接已被释放
      toClose?.closeQuietly()
      eventListener.connectionReleased(call, callConnection)
    }

    //2. 不行的话则需要一个新连接,重新初始化
    refusedStreamCount = 0
    connectionShutdownCount = 0
    otherFailureCount = 0

    //3. 第一次尝试从连接池获取RealConnection(复用检查)
    if (connectionPool.callAcquirePooledConnection(address, call, null, false)) {
      val result = call.connection!!
      eventListener.connectionAcquired(call, result)
      return result
    }

    // 4. 连接池为空,查找有无下一个Route(路由)可以尝试,这里只有重试的情况会走进来
    val routes: List<Route>?
    val route: Route
    if (nextRouteToTry != null) {
      //使用来自先前合并连接的路由。
      routes = null
      route = nextRouteToTry!!
      nextRouteToTry = null
    } else if (routeSelection != null && routeSelection!!.hasNext()) {
      //使用现有路线选择中的路线
      routes = null
      route = routeSelection!!.next()
    } else {
      //5. 通过routeSelector来获取到新的Route来进行Connection的建立
      var localRouteSelector = routeSelector
      if (localRouteSelector == null) {
        localRouteSelector = RouteSelector(address, call.client.routeDatabase, call, eventListener)
        this.routeSelector = localRouteSelector
      }
      //获取route的过程其实就是DNS获取到域名IP的过程,这是一个阻塞的过程,会等待DNS结果返回
      val localRouteSelection = localRouteSelector.next()
      routeSelection = localRouteSelection
      routes = localRouteSelection.routes

      if (call.isCanceled()) throw IOException("Canceled")

      //6. 前面如果通过routeSelector拿到新的Route,其实就是相当于拿到一批新的IP,这里会再次尝试从ConnectionPool
      // 中检查是否有可以复用的Connection
      if (connectionPool.callAcquirePooledConnection(address, call, routes, false)) {
        val result = call.connection!!
        eventListener.connectionAcquired(call, result)
        return result
      }
	  //前面我们拿到的是一批IP,这里通过routeSelection获取到其中一个IP,Route是proxy和InetAddress的包装类
      route = localRouteSelection.next()
    }

    // 7. 用新的route创建RealConnection
    val newConnection = RealConnection(connectionPool, route)
    call.connectionToCancel = newConnection
    try {
      //8. 这里是进行TCP + TLS连接的地方
      newConnection.connect(
          connectTimeout,
          readTimeout,
          writeTimeout,
          pingIntervalMillis,
          connectionRetryEnabled,
          call,
          eventListener
      )
    } finally {
      call.connectionToCancel = null
    }
    call.client.routeDatabase.connected(newConnection.route())

    //9. 如果第二次从connectionPool获取到Connection可以直接返回(复用检查)
    if (connectionPool.callAcquirePooledConnection(address, call, routes, true)) {
      val result = call.connection!!
      nextRouteToTry = route
      newConnection.socket().closeQuietly()
      eventListener.connectionAcquired(call, result)
      return result
    }

    //10. 将连接成功的RealConnection放到ConnectionPool里面
    synchronized(newConnection) {
      connectionPool.put(newConnection)
      call.acquireConnectionNoEvents(newConnection)
    }

    eventListener.connectionAcquired(call, newConnection)
    return newConnection
  }
因此这里就是OkHttp的连接复用其实是通过ConnectionPool来实现的,前面的类图中也反映出来,ConnectionPool内部有一个connections的ArrayDeque对象就是用来保存缓存的连接池。
DNS过程
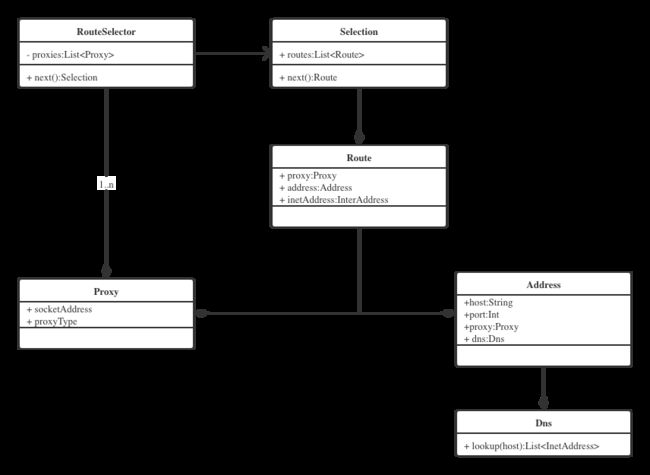
- RouteSelector在调用next遍历在不同proxy情况下获得下一个Selection封装类,Selection持有一个Route的列表,也就是每个proxy都对应有Route列表
- Selection其实就是针对List< Route>封装的一个迭代器,通过next()方法获得下一个Route,Route持有proxy、address和inetAddress,可以理解为Route就是针对IP和Proxy配对的一个封装
- RouteSelector的next()方法内部调用了nextProxy(), nextProxy()又会调用resetNextInetSocketAddres()方法
- resetNextInetSocketAddres通过address.dns.lookup获取InetSocketAddress,也就是IP地址
通过上面一系列流程知道,IP地址最终是通过address的dns获取到的,而这个dns又是怎么构建的呢?
反向追踪代码,定位到address的dns是transmitter在构建address的时候,将内置的client.dns传递进来,而client.dns是在OkHttpclient的构建过程中传递进来Dns.System,里面的lookup是通过InetAddress.getAllByName 方法获取到对应域名的IP,也就是默认的Dns实现。
Socket的建立
      newConnection.connect(
          connectTimeout,
          readTimeout,
          writeTimeout,
          pingIntervalMillis,
          connectionRetryEnabled,
          call,
          eventListener
      )
newConnection是RealConnection类型。
//RealConnection.connect
  fun connect(
    connectTimeout: Int,
    readTimeout: Int,
    writeTimeout: Int,
    pingIntervalMillis: Int,
    connectionRetryEnabled: Boolean,
    call: Call,
    eventListener: EventListener
  ) {
    check(protocol == null) { "already connected" }

    var routeException: RouteException? = null
    val connectionSpecs = route.address.connectionSpecs
    val connectionSpecSelector = ConnectionSpecSelector(connectionSpecs)

    //路由选择
    if (route.address.sslSocketFactory == null) {
      if (ConnectionSpec.CLEARTEXT !in connectionSpecs) {
        throw RouteException(UnknownServiceException(
            "CLEARTEXT communication not enabled for client"))
      }
      val host = route.address.url.host
      if (!Platform.get().isCleartextTrafficPermitted(host)) {
        throw RouteException(UnknownServiceException(
            "CLEARTEXT communication to $host not permitted by network security policy"))
      }
    } else {
      if (Protocol.H2_PRIOR_KNOWLEDGE in route.address.protocols) {
        throw RouteException(UnknownServiceException(
            "H2_PRIOR_KNOWLEDGE cannot be used with HTTPS"))
      }
    }

    while (true) {
      try {
        //通道模式,建立通道连接
        if (route.requiresTunnel()) {
          //这里进入的条件是,通过http代理了https请求,有一个特殊的协议交换过程
          connectTunnel(connectTimeout, readTimeout, writeTimeout, call, eventListener)
          if (rawSocket == null) {
            // We were unable to connect the tunnel but properly closed down our resources.
            break
          }
        } else {
           //否则建立socket连接
          connectSocket(connectTimeout, readTimeout, call, eventListener)
        }
         //如果前面判定是https请求,这里就是https的tls建立过程
        establishProtocol(connectionSpecSelector, pingIntervalMillis, call, eventListener)
        eventListener.connectEnd(call, route.socketAddress, route.proxy, protocol)
        break
      } catch (e: IOException) {
        //关闭资源
        socket?.closeQuietly()
        rawSocket?.closeQuietly()
        socket = null
        rawSocket = null
        source = null
        sink = null
        handshake = null
        protocol = null
        http2Connection = null
        allocationLimit = 1

        eventListener.connectFailed(call, route.socketAddress, route.proxy, null, e)
		//对异常做二次封装,然后抛出
        if (routeException == null) {
          routeException = RouteException(e)
        } else {
          routeException.addConnectException(e)
        }

        if (!connectionRetryEnabled || !connectionSpecSelector.connectionFailed(e)) {
          throw routeException
        }
      }
    }

    if (route.requiresTunnel() && rawSocket == null) {
      throw RouteException(ProtocolException(
          "Too many tunnel connections attempted: $MAX_TUNNEL_ATTEMPTS"))
    }

    idleAtNs = System.nanoTime()
  }
connect方法并不复杂,先会判定是否有代理的情况做一些特殊处理,然后调用系统方法建立socket连接。
如果是https请求,还有一个tls的连接要建立,这中间如果有抛出异常,会做一个二次封装再抛出去。
//RealConnection.connectSocket
  @Throws(IOException::class)
  private fun connectSocket(
    connectTimeout: Int,
    readTimeout: Int,
    call: Call,
    eventListener: EventListener
  ) {
    val proxy = route.proxy
    val address = route.address

     //根据代理类型的不同创建Socket
    val rawSocket = when (proxy.type()) {
      Proxy.Type.DIRECT, Proxy.Type.HTTP -> address.socketFactory.createSocket()!!
      else -> Socket(proxy)
    }
    this.rawSocket = rawSocket

    eventListener.connectStart(call, route.socketAddress, proxy)
    rawSocket.soTimeout = readTimeout
    try {

      //建立Socket连接
      Platform.get().connectSocket(rawSocket, route.socketAddress, connectTimeout)
    } catch (e: ConnectException) {
      throw ConnectException("Failed to connect to ${route.socketAddress}").apply {
        initCause(e)
      }
    }

    try {

      //获得Socket的输入输出流
      source = rawSocket.source().buffer()
      sink = rawSocket.sink().buffer()
    } catch (npe: NullPointerException) {
      if (npe.message == NPE_THROW_WITH_NULL) {
        throw IOException(npe)
      }
    }
  }
4. 任务队列
TaskQueue:一组按顺序执行的任务。队列中的工作不是并发的。这相当于每个队列都有一个专门的线程来完成它的工作;实际上,一组队列可以共享一组线程以节省资源。
class TaskQueue internal constructor(
  internal val taskRunner: TaskRunner,
  internal val name: String
) {
  internal var shutdown = false

  //此队列当前正在执行的任务,如果当前没有正在执行,则为 null。
  internal var activeTask: Task? = null

  //[Task.nextExecuteNanoTime] 排序的计划任务。
  internal val futureTasks = mutableListOf<Task>()

  //如果 [activeTask] 完成后应取消,则为 True
  internal var cancelActiveTask = false

  //将来执行的任务
  val scheduledTasks: List<Task>
    get() = synchronized(taskRunner) { futureTasks.toList() }

  //如果任务已经在队列中,则使用最早的执行时间。
  fun schedule(task: Task, delayNanos: Long = 0L) {
    synchronized(taskRunner) {
      if (shutdown) {
        if (task.cancelable) {
          taskRunner.logger.taskLog(task, this) { "schedule canceled (queue is shutdown)" }
          return
        }
        taskRunner.logger.taskLog(task, this) { "schedule failed (queue is shutdown)" }
        throw RejectedExecutionException()
      }

      if (scheduleAndDecide(task, delayNanos, recurrence = false)) {
        taskRunner.kickCoordinator(this)
      }
    }
  }
//在一组任务队列之间共享的一组工作线程。将 [INSTANCE] 用于使用守护线程的任务运行器。当前没有非守护线程的共享实例。任务运行器还负责在卸载库时释放保留的线程。这是为了实现代码卸载的容器环境。大多数应用程序应该共享一个进程范围的 [TaskRunner] 并为每个客户端的工作使用队列。
class TaskRunner(
  val backend: Backend,
  internal val logger: Logger = TaskRunner.logger
) {
  private var nextQueueName = 10000
  private var coordinatorWaiting = false
  private var coordinatorWakeUpAt = 0L

  //执行队列
  private val busyQueues = mutableListOf<TaskQueue>()

  //准备队列
  private val readyQueues = mutableListOf<TaskQueue>()

  private val runnable: Runnable = object : Runnable {
    override fun run() {
      while (true) {
        val task = synchronized(this@TaskRunner) {
          awaitTaskToRun()
        } ?: return

        logger.logElapsed(task, task.queue!!) {
          var completedNormally = false
          try {
            runTask(task)
            completedNormally = true
          } finally {
            //若任务崩溃,启动另一个线程来为队列提供服务
            if (!completedNormally) {
              backend.execute(this)
            }
          }
        }
      }
    }
  }

  private fun runTask(task: Task) {
    this.assertThreadDoesntHoldLock()

    val currentThread = Thread.currentThread()
    val oldName = currentThread.name
    currentThread.name = task.name

    var delayNanos = -1L
    try {
      delayNanos = task.runOnce()
    } finally {
      synchronized(this) {
        afterRun(task, delayNanos)
      }
      currentThread.name = oldName
    }
  }
其中连接池使用了任务队列:
RealConnectionPool
class RealConnectionPool(
  taskRunner: TaskRunner,
  /** The maximum number of idle connections for each address. */
  private val maxIdleConnections: Int,
  keepAliveDuration: Long,
  timeUnit: TimeUnit
) {
  private val keepAliveDurationNs: Long = timeUnit.toNanos(keepAliveDuration)

  private val cleanupQueue: TaskQueue = taskRunner.newQueue()
  private val cleanupTask = object : Task("$okHttpName ConnectionPool") {
    override fun runOnce(): Long = cleanup(System.nanoTime())
  }

  //双端队列,保存连接
  private val connections = ConcurrentLinkedQueue<RealConnection>()

  init {
    require(keepAliveDuration > 0L) { "keepAliveDuration <= 0: $keepAliveDuration" }
  }
put方法
  fun put(connection: RealConnection) {
    connection.assertThreadHoldsLock()
	//将新建连接插入队列
    connections.add(connection)
    //使用线程池执行清理任务
    cleanupQueue.schedule(cleanupTask)
  }
cleanup方法(LRU算法)
  fun cleanup(now: Long): Long {
    var inUseConnectionCount = 0
    var idleConnectionCount = 0
    var longestIdleConnection: RealConnection? = null
    var longestIdleDurationNs = Long.MIN_VALUE

    //遍历所有连接,记录空闲连接和正在使用连接各自的数量
    for (connection in connections) {
      synchronized(connection) {

        //如果该连接还在使用,pruneAndGetAllocationCount种通过引用计数的方式判断一个连接是否空闲
        if (pruneAndGetAllocationCount(connection, now) > 0) {
          inUseConnectionCount++
        } else {

        //如果该连接没有在使用,  空闲连接数加1
          idleConnectionCount++


        //记录keepalive时间最长的那个空闲连接
          val idleDurationNs = now - connection.idleAtNs
          if (idleDurationNs > longestIdleDurationNs) {
            longestIdleDurationNs = idleDurationNs
            longestIdleConnection = connection
          } else Unit
        }
      }
    }
  //默认keepalive时间keepAliveDurationNs最长为5分钟,空闲连接数idleConnectionCount最大为5个
    when {
      longestIdleDurationNs >= this.keepAliveDurationNs
          || idleConnectionCount > this.maxIdleConnections -> {
   //如果longestIdleConnection的keepalive时间大于5分钟 或 空闲连接数超过5个
            //把longestIdleConnection连接从队列清理掉
        val connection = longestIdleConnection!!
        synchronized(connection) {
          if (connection.calls.isNotEmpty()) return 0L // No longer idle.
          if (connection.idleAtNs + longestIdleDurationNs != now) return 0L // No longer oldest.
          connection.noNewExchanges = true
          connections.remove(longestIdleConnection)
        }

        //关闭socket连接
        connection.socket().closeQuietly()
        if (connections.isEmpty()) cleanupQueue.cancelAll()

        // Clean up again immediately.
        return 0L
      }

      idleConnectionCount > 0 -> {
   //如果空闲连接数小于5个 并且 longestIdleConnection连接还没到期清理
            //返回该连接的到期时间,下次再清理
        return keepAliveDurationNs - longestIdleDurationNs
      }

      inUseConnectionCount > 0 -> {
     //如果没有空闲连接 且 所有连接都还在使用
            //返回keepAliveDurationNs,5分钟后再清理
        return keepAliveDurationNs
      }

      else -> {
         // 没有任何连接
        return -1
      }
    }
  }