ARM64 Linux Kernel and rootfs(busybox or buildroot) via NFS over QEMU with GDB
简述
现在学习ARM64 Linux Kernel源码无需购买开发板,有台PC就行。下面告诉大家如何在在ubuntu20.04上,使用QEMU搭建arm64 的Linux开发调试环境,以及使用gdb调试内核。
版本和环境信息如下:
PC平台: ubuntu20.04
Kernel版本: Linux 5.10.111
qemu版本: 7.10.0
qemu模拟环境: aarch64
GCC版本: GCC_linaro_7.5.0-2019.12
交叉编译工具链: aarch64-linux-gun-
buildroot版本: 2022.02.5
busybox版本: 1.32.1
安装Ubuntu基础工具
sudo apt-get install samba smbclient git make expect vim net-tools python2.7 wget openssl libncurses5 libncurses5-dev libpython2.7 nfs-kernel-server pkg-config libglib2.0-dev libmount-dev python3 python3-pip python3-dev libssl-dev libffi-dev build-essential autoconf automake libfreetype6-dev libtheora-dev libtool libvorbis-dev texinfo zlib1g-dev unzip cmake yasm libx264-dev libmp3lame-dev libopus-dev libxcb1-dev libxcb-shm0-dev libxcb-xfixes0-dev libpixman-1-0-dev
- Ubuntu常用工具
samba smbclient git make expect vim net-tools python3-pip python2.7 wget openssl。 - aarch64-linux-gnu-gdb调试工具需要的动态链接库
libncurses5 libncurses5-dev libpython2.7。 - NFS server网络文件系统服务器需要工具
nfs-kernel-server - QEMU安装需要基础工具包:
pkg-config libglib2.0-dev libmount-dev python3 python3-pip python3-dev libssl-dev libffi-dev build-essential autoconf automake libfreetype6-dev libtheora-dev libtool libvorbis-dev texinfo zlib1g-dev unzip cmake yasm libx264-dev libmp3lame-dev libopus-dev libxcb1-dev libxcb-shm0-dev libxcb-xfixes0-dev libpixman-1-0-dev
编译安装QEMU
QEMU是一套由法布里斯·贝拉(Fabrice Bellard)所编写的以GPL许可证分发源码的模拟处理器,在GNU/Linux平台上使用广泛。
安装QEMU,有两种方式,源码安装和ubuntu自带package安装:
1. qemu源码安装
cd ~
mkdir workspace
mkdir workspace/qemu-aarch6
cd workspace/qemu-aarch6
wget https://download.qemu.org/qemu-7.1.0.tar.bz2
tar jxf qemu-7.1.0.tar.bz2
cd qemu-7.1.0
./configure –target-list=aarch64-softmmu
make && make install
–target-list=aarch64-softmmu 表示只需要安装aarch64平台。
2. ubuntu自带package安装
ubuntu20.04源提供相对比较高的QEMU版本,可以选择命令行直接安装。对于比较老旧的发行版,建议选择源码安装。
sudo apt-get install qemu qemu-system qemu-user
安装完成后,可以通过Tab键补全检查安装好的qemu 工具:“qemu-system-”。
root@ubuntu20_04:# qemu-
qemu-img                  qemu-system-cris          qemu-system-mips64        qemu-system-ppc64le       qemu-system-tricore
qemu-io                   qemu-system-hppa          qemu-system-mips64el      qemu-system-riscv32       qemu-system-unicore32
qemu-make-debian-root     qemu-system-i386          qemu-system-mipsel        qemu-system-riscv64       qemu-system-x86_64
qemu-nbd                  qemu-system-lm32          qemu-system-moxie         qemu-system-s390x         qemu-system-xtensa
qemu-pr-helper            qemu-system-m68k          qemu-system-nios2         qemu-system-sh4           qemu-system-xtensaeb
qemu-system-aarch64       qemu-system-microblaze    qemu-system-or1k          qemu-system-sh4eb
qemu-system-alpha         qemu-system-microblazeel  qemu-system-ppc           qemu-system-sparc
qemu-system-arm           qemu-system-mips          qemu-system-ppc64         qemu-system-sparc64
qemu-system-aarch64就是我们要使用的,用于模拟ARM64平台的qemu工具。
安装aarch64交叉编译工具
安装aarch64,同样有两种方式,源码安装和ubuntu自带package安装:
1.ubuntu自带package安装
可以通过命令"apt-cache search aarch64" 查看系统源中有哪些安装包可供安装:
root@ubuntu20_04:# apt-cache search aarch64 | grep gcc
gcc-9-aarch64-linux-gnu - GNU C compiler (cross compiler for arm64 architecture)
gcc-9-aarch64-linux-gnu-base - GCC, the GNU Compiler Collection (base package)
gcc-aarch64-linux-gnu - GNU C compiler for the arm64 architecture
gcc-10-aarch64-linux-gnu - GNU C compiler (cross compiler for arm64 architecture)
gcc-10-aarch64-linux-gnu-base - GCC, the GNU Compiler Collection (base package)
gcc-10-plugin-dev-aarch64-linux-gnu - Files for GNU GCC plugin development.
gcc-8-aarch64-linux-gnu - GNU C compiler (cross compiler for arm64 architecture)
gcc-8-aarch64-linux-gnu-base - GCC, the GNU Compiler Collection (base package)
gcc-8-plugin-dev-aarch64-linux-gnu - Files for GNU GCC plugin development.
gcc-9-plugin-dev-aarch64-linux-gnu - Files for GNU GCC plugin development.
gccgo-10-aarch64-linux-gnu - GNU Go compiler
gccgo-8-aarch64-linux-gnu - GNU Go compiler
gccgo-9-aarch64-linux-gnu - GNU Go compiler
gccgo-aarch64-linux-gnu - Go compiler (based on GCC) for the arm64 architecture
选择"gcc-10-aarch64-linux-gnu"进行安装:
sudo apt-get install gcc-10-aarch64-linux-gnu
# 为方便使用可以软连接或者重命名aarch64-linux-gnu-gcc-10
mv  /usr/bin/aarch64-linux-gnu-gcc-10  /usr/bin/aarch64-linux-gnu-gcc
2. gcc_linaro源码安装
cd ~
mkdir workspace
mkdir workspace/toolchains
cd workspace/toolchains
wget https://releases.linaro.org/components/toolchain/binaries/latest-7/aarch64-linux-gnu/gcc-linaro-7.5.0-2019.12-x86_64_aarch64-linux-gnu.tar.xz
tar xf gcc-linaro-7.5.0-2019.12-x86_64_aarch64-linux-gnu.tar.xz
mv gcc-linaro-7.5.0-2019.12-x86_64_aarch64-linux-gnu gcc-linaro-7.5.0
为gcc_linaro和qemu-system-aarch64设置环节变量
vim ~/.bashrc
export ARCH=arm64
export CROSS_COMPILE=aarch64-linux-gnu-
export PATH=~/workspace/toolchains/gcc-linaro-7.5.0/bin:$PATH
export PATH=~/workspace/qemu-aarch64/qemu-7.1.0/build/aarch64-softmmu:$PATH
编译Linux kernel
本文使用的时linux-5.10.111源码。
调整kernel配置如下:
    CONFIG_KCOV=y
    CONFIG_DEBUG_INFO=y
    CONFIG_DEBUG_FS=y
    CONFIG_NET_9P=y
    CONFIG_NET_9P_VIRTIO=y
进入kernel配置调整命令如下:
make qemu_defconfig -C ~/workspace/linux-5.10.111 O=~/workspace/linux-5.10.111/build
make menuconfig -C ~/workspace/linux-5.10.111 O=~/workspace/linux-5.10.111/build
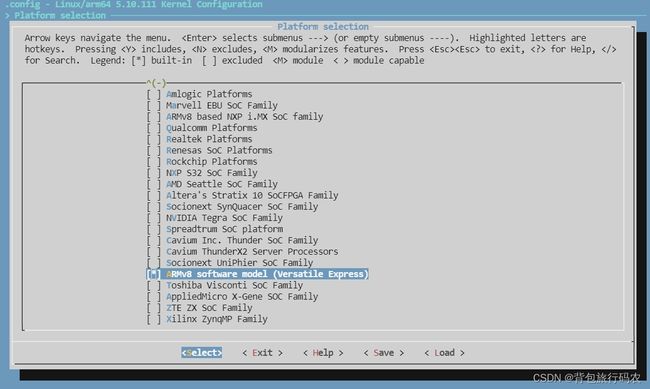
选择qemu arm64平台 “ARMv8 software model (Versatile Express)”。

查询需要配置选项位置,输入“/”。用鼠标右键粘贴被复制的内容,或者直接输入要查询的配置选项。

选择CONFIG_KCOV


选择CONFIG_DEBUG_INFO

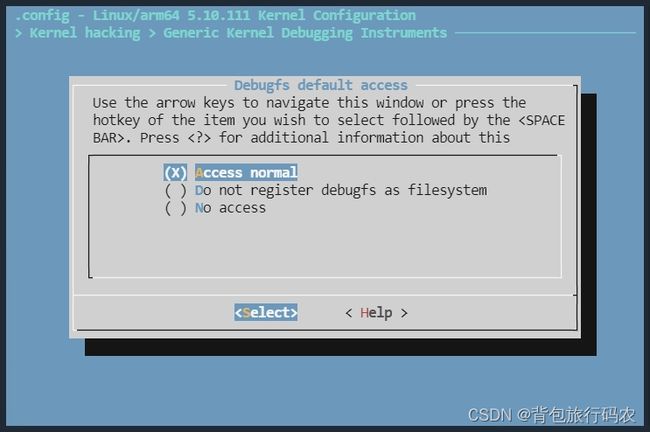
选择CONFIG_DEBUG_FS
选择CONFIG_NET_9P and CONFIG_NET_9P_VIRTIO

保存退出。
编译kernel镜像:
make -j4 all -C ~/workspace/linux-5.10.111 O=~/workspace/linux-5.10.111/build
在arch/arm64/boot/ 下检查生成的内核,其中"Image"为非压缩版,"Image.gz"为压缩内核,并包含了自解压程序。。
制作根文件系统
可以根据自己需要制定rootfs,可以选择ramdisk、initramfs、nfs等。
buildroot根文件系统制作
我们可以使用buildroot创建磁盘镜像。buildroot-2022.02.5。
cd ~/workspace
mkdir rootfs
cd rootfs
wget https://buildroot.uclibc.org/downloads/buildroot-2022.02.5.tar.gz
tar xzf buildroot-2022.02.5.tar.gz
cd buildroot-2022.02.5
make menuconfig
选择buildroot选项如下:
 Target options  --->
     Target Architecture (AArch64 (little endian))
 Toolchain  --->
     Toolchain type (External toolchain)  --->
     Toolchain (Linaro AArch64 2018.05)  --->
 System configuration  --->
     [*] Enable root login with password
     (root) Root password
     [*] Run a getty (login prompt) after boot  --->
         (console) TTY port
 Target packages  --->
     -*- BusyBox
     [*]   Show packages that are also provided by busybox
     Networking applications  --->
     [*] dhcpcd
     [*] dhcpdump
     [*] ethtool
     [*]   enable pretty printing
     [*] ifupdown scripts
     [*] iproute2
     [*] iptables
     [*]   bpfc and nfsynproxy
     [*]   nftables compat
     [*] openssh
     [*]   client
     [*]   server
     [*]   key utilities
 Filesystem images  --->
     [*] cpio the root filesystem (for use as an initial RAM filesystem)
     [*] ext2/3/4 root filesystem
           ext2/3/4 variant (ext3)  --->
     [*] tar the root filesystem
运行make, 在编译结束后可以在output/images/目录发现rootfs.ext3与rootfs.cpio文件。
root@ubuntu20_04:~/workspace/rootfs/buildroot-2022.02.5/output/images$ ls -al
total 105720
drwxr-xr-x 2 root root     4096 9月   4 17:20 .
drwxrwxr-x 6 root root     4096 9月   3 09:21 ..
-rw-r--r-- 1 root root 32917504 9月   4 17:20 rootfs.cpio
-rw-r--r-- 1 root root 62914560 9月   4 17:20 rootfs.ext2
lrwxrwxrwx 1 root root       11 9月   4 17:20 rootfs.ext3 -> rootfs.ext2
-rw-r--r-- 1 root root 34068480 9月   4 17:20 rootfs.tar
虚拟机启动 rootfs.ext3:
qemu-system-aarch64 \
  -machine virt \
  -cpu cortex-a53 \
  -nographic -smp 1 \
  -hda ~/workspace/rootfs/buildroot-2022.02.5/output/images/rootfs.ext3 \
  -kernel ~/workspace/linux-5.10.111/build/arch/arm64/boot/Image \
  -append "console=ttyAMA0 root=/dev/vda oops=panic debug" \
  -m 2048 \
  -net user,hostfwd=tcp::10023-:22 -net nic
虚拟机启动 rootfs.cpio:
qemu-system-aarch64 \
  -machine virt \
  -cpu cortex-a53 \
  -nographic -smp 1 \
  -kernel ~/workspace/linux-5.10.111/build/arch/arm64/boot/Image \
  -initrd ~/workspace/rootfs/buildroot-2022.02.5/output/images/rootfs.cpio \
  -append "init=/init console=ttyAMA0" \
  -m 1024 \
  -net user,hostfwd=tcp::10023-:22 -net nic
  -gdb tcp::1235
busybox根文件系统制作
我们可以使用busybox创建最小rootfs。busybox.1.32.1源码。
cd ~/workspace/rootfs
wget https://github.com/mirror/busybox/archive/refs/tags/1_32_1.tar.gz
tar xzf 1_32_1.tar.gz
cd busybox-1_32_1
make menuconfig
选择busybox选项如下:
 Settings  --->
     --- Build Options
     [*] Build static binary (no shared libs)
运行make, 指定安装在指定的../nft目录下
make CONFIG_PREFIX=../initramfs install
基于busybox的文件系统启动流程:
# /sbin/init => /etc/inittab => /etc/init.d/rdS => /etc/fstab ...
cd ~/workspace/rootfs/busybox-1_32_1
cd ../initramfs
mkdir -p dev etc home lib mnt proc root sys tmp var

vim etc/inittab
::sysinit:/etc/init.d/rcS
::respawn:-/bin/sh
::askfirst:-/bin/sh
::cttlaltdel:/bin/umount -a -r

chmod 755 etc/inittab

mkdir -p etc/init.d/
vim etc/init.d/rcS

echo "----------mount all in fstab----------------"
/bin/mount -a #读取/etc/fstab,加载文件系统
mkdir -p /dev/pts
mount -t devpts devpts /dev/pts
echo /sbin/mdev > /proc/sys/kernel/hotplug
/sbin/mdev -s
echo "****************Hello World********************"
echo "Kernel Version:linux-5.10.111"
echo "***********************************************"

chmod 755 etc/init.d/rcS

vim etc/fstab

#device mount-point type option dump fsck
proc  /proc proc  defaults 0 0
temps /tmp  rpoc  defaults 0 0
none  /tmp  ramfs defaults 0 0
sysfs /sys  sysfs defaults 0 0
mdev  /dev  ramfs defaults 0 0

cd dev
mknod console c 5 1
mknod null c 1 3
制作根文件系统镜像文件rootfs.cpio与rootfs.cpio.gz
cd ~/workspace/rootfs/initramfs
find . | cpio -o -H newc > ../rootfs.cpio
gzip -c ../rootfs.cpio > ../rootfs.cpio.gz
虚拟机启动 rootfs.cpio:
qemu-system-aarch64 \
  -machine virt \
  -cpu cortex-a53 \
  -nographic -smp 1 \
  -kernel ~/workspace/linux-5.10.111/build/arch/arm64/boot/Image \
  -initrd ~/workspace/rootfs/rootfs.cpio \
  -append "rdinit=/linuxrc console=ttyAMA0" \
  -m 1024
NFS根文件系统制作
Linux主机安装并配置NFS服务
sudo apt install -y nfs-kernel-server bridge-utils
配置NFS
sudo vim /etc/exports
// 添加NFS共享目录
/home/weston/workspace/rootfs/buildroot-2022.02.5/output/target  127.0.0.1(rw,sync,no_subtree_check,all_squash,insecure,anonuid=1000,anongid=1000)
    rw    				可读可写操作
    sync    			内存和磁盘上的内容保持同步
    no_subtree_check    不检查根文件系统子目录文件
重启NFS服务
sudo /etc/init.d/rpcbind restart
sudo /etc/init.d/nfs-kernel-server restart

或者

sudo systemctl restart nfs-kernel-server
检查NFS共享目录是否创建
# sudo showmount -e
Export list for VirtualBox:
/home/weston/workspace/rootfs/buildroot-2022.02.5/output/target *
在内核配置编译时需要Linux内核对nfs文件系统的支持
File systems  --->
	--- Network File Systems
	<*>   NFS client support
	<*>     NFS client support for NFS version 2
	<*>     NFS client support for NFS version 3
	<*>     NFS client support for NFS version 4
	[*]     NFS client support for NFSv4.1
	[*]     NFS client support for NFSv4.2
	(kernel.org) NFSv4.1 Implementation ID Domain
	[*]     NFSv4.1 client support for migration
	[*]     Root file system on NFS
	[*]     NFS: Disable NFS UDP protocol support
	<*>     Plan 9 Resource Sharing Support (9P2000)
虚拟机启动NFS根文件系统:
qemu-system-aarch64 \
  -machine virt \
  -cpu cortex-a53 \
  -nographic -smp 1 \
  -kernel ~/workspace/linux-5.10.111/build/arch/arm64/boot/Image \
  --append "console=ttyAMA0 loglevel=1 ignore_loglevel earlycon=pl011,mmio32,0x9000000 root=/dev/nfs nfsroot=10.0.2.2:/home/weston/workspace/rootfs/buildroot-2022.02.5/output/target,proto=tcp,nfsvers=3,nolock rw ip=dhcp init=/linuxrc" \
  -m 1024
Linux内核在线GDB调试配置
Kernel hacking  --->
    Compile-time checks and compiler options  --->
    [*] Compile the kernel with debug info
    [ ]   Reduce debugging information
    [*]   Provide GDB scripts for kernel debugging
    -*- Compile the kernel with frame pointers
    CONFIG_DEBUG_INFO=y
    CONFIG_DEBUG_INFO_REDUCED=n
    CONFIG_GDB_SCRIPTS=y
    CONFIG_FRAME_POINTER=y

    Generic Kernel Debugging Instruments  --->
    [*] KGDB: kernel debugger  --->
    CONFIG_KGDB=y

    Kernel Features  --->
    [ ] Randomize the address of the kernel image
    CONFIG_RANDOMIZE_BASE=n
qemu-system-aarch64 \
  -machine virt \
  -cpu cortex-a53 \
  -nographic -smp 1 \
  -kernel ~/workspace/linux-5.10.111/build/arch/arm64/boot/Image \
  --append "console=ttyAMA0 loglevel=1 ignore_loglevel earlycon=pl011,mmio32,0x9000000 root=/dev/nfs nfsroot=10.0.2.2:/home/weston/workspace/rootfs/buildroot-2022.02.5/output/target,proto=tcp,nfsvers=3,nolock rw ip=dhcp init=/linuxrc" \
  -m 1024 \
  -gdb tcp::1235 -S
GDB调试
停下來等待gdb連接 在另外終端執行如下命令:
cd ~/workspace/linux-5.10.111/build/
aarch64-linux-gnu-gdb vmlinux

GNU gdb (Linaro_GDB-2019.12) 8.3.1.20191204-git
Copyright (C) 2019 Free Software Foundation, Inc.
License GPLv3+: GNU GPL version 3 or later <http://gnu.org/licenses/gpl.html>
This is free software: you are free to change and redistribute it.
There is NO WARRANTY, to the extent permitted by law.
Type "show copying" and "show warranty" for details.
This GDB was configured as "--host=x86_64-unknown-linux-gnu --target=aarch64-linux-gnu".
Type "show configuration" for configuration details.
For bug reporting instructions, please see:
<http://www.gnu.org/software/gdb/bugs/>.
Find the GDB manual and other documentation resources online at:
    <http://www.gnu.org/software/gdb/documentation/>.

For help, type "help".
Type "apropos word" to search for commands related to "word"...
Reading symbols from vmlinux...
(gdb) target remote localhost:1235
Remote debugging using localhost:1235
0x0000000040000000 in ?? ()
(gdb) set disassemble-next-line on
(gdb) l
1       /* SPDX-License-Identifier: GPL-2.0-only */
2       /*
3        * Low-level CPU initialisation
4        * Based on arch/arm/kernel/head.S
5        *
6        * Copyright (C) 1994-2002 Russell King
7        * Copyright (C) 2003-2012 ARM Ltd.
8        * Authors:     Catalin Marinas <[email protected]>
9        *              Will Deacon <[email protected]>
10       */
(gdb) b start_kernel
Breakpoint 1 at 0xffff8000103a0a40: file ../init/main.c, line 854.
(gdb) b setup_arch
Breakpoint 2 at 0xffff8000103a384c: file ../arch/arm64/kernel/setup.c, line 287.
(gdb) b mm_init
Breakpoint 3 at 0xffff800010017458: mm_init. (2 locations)
(gdb) b paging_init
Breakpoint 4 at 0xffff8000103a5d68: file ../arch/arm64/mm/mmu.c, line 752.
(gdb) info b
Num     Type           Disp Enb Address            What
1       breakpoint     keep y   0xffff8000103a0a40 in start_kernel at ../init/main.c:854
2       breakpoint     keep y   0xffff8000103a384c in setup_arch at ../arch/arm64/kernel/setup.c:287
3       breakpoint     keep y   <MULTIPLE>
3.1                         y   0xffff800010017458 in mm_init at ../kernel/fork.c:1018
3.2                         y   0xffff8000103a0c5c in mm_init at ../arch/arm64/include/asm/jump_label.h:21
4       breakpoint     keep y   0xffff8000103a5d68 in paging_init at ../arch/arm64/mm/mmu.c:752
(gdb) c
Continuing.

Thread 1 hit Breakpoint 1, start_kernel () at ../init/main.c:854
854             set_task_stack_end_magic(&init_task);