OpenCV
文章目录
- OpenCV学习报告
-
- 读取图片和网络摄像头
-
- 1.1 图片读取
- 1.2 视频读取
-
- 1.1.1 读取视频文件
- 1.1.2读取网络摄像头
- OpenCV基础功能
- 调整、裁剪图像
-
- 3.1 调整图像大小
- 3.2 裁剪图像
- 图像上绘制形状和文本
-
- 4.1 图像上绘制形状
- 4.2图像上写文字
- 透视变换
- 图像拼接
- 颜色检测
- 轮廓检测
- 人脸检测
-
- 9.1静态图片
- 9.2 摄像头
- 实战
-
- 10.1虚拟绘画
- 10.2纸张扫描
- 10.3 车牌检测器
- 参考资料
OpenCV学习报告
读取图片和网络摄像头
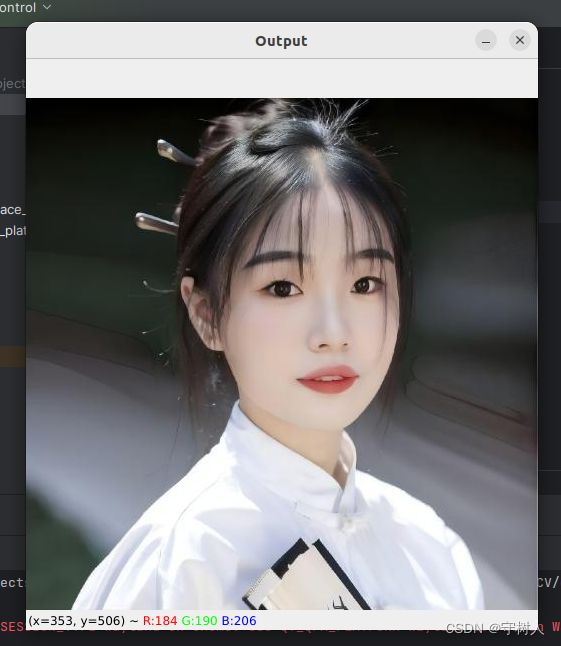
1.1 图片读取
import cv2
# read image
img = cv2.imread("Resources/dnn.jpg")
cv2.imshow("Output",img)
cv2.waitKey(0)
1.2 视频读取
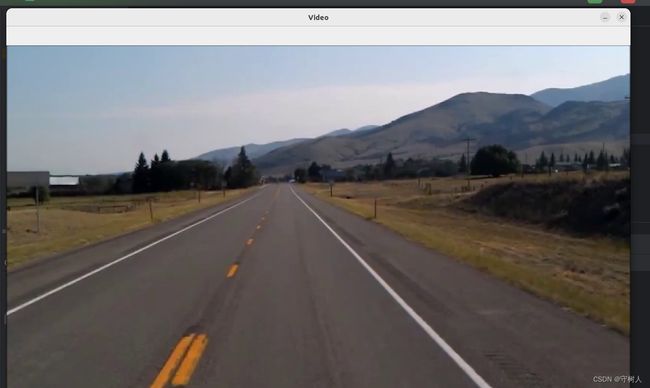
1.1.1 读取视频文件
import cv2
# read video
cap = cv2.VideoCapture("Resources/test_video.mp4")
while True:
   success,img = cap.read()
   cv2.imshow("Video",img)
   if cv2.waitKey(1) & 0xFF == ord('q'):
       break
1.1.2读取网络摄像头
import cv2
# read webcam
cap = cv2.VideoCapture(0)
cap.set(3,640) #width
cap.set(4,480) #height
cap.set(10,100)

while True:
   success,img = cap.read()
   cv2.imshow("Video",img)
   if cv2.waitKey(1) & 0xFF == ord('q'):
       break

OpenCV基础功能
import cv2
import numpy as np
# basic function
img = cv2.imread("Resources/dnn.jpg")
kernel = np.ones((5,5),np.uint8)
# 灰度转换
imgGray = cv2.cvtColor(img,cv2.COLOR_BGR2GRAY)
# 图像模糊
imgBlur = cv2.GaussianBlur(imgGray,(7,7),0)
# 边缘检测
imgCanny = cv2.Canny(img,100,100)
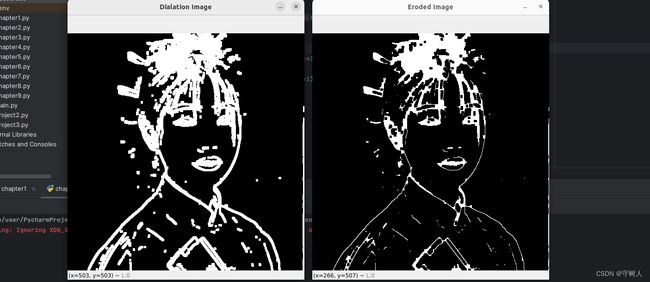
# 膨胀
imgDialation = cv2.dilate(imgCanny, kernel,iterations=1)
# 腐蚀
imgEroded = cv2.erode(imgDialation,kernel,iterations=1)
# cv2.imshow("Output",img)
cv2.imshow("Gray Image",imgGray)
cv2.imshow("Blur Image",imgBlur)
cv2.imshow("Blur Image",imgCanny)
cv2.imshow("Dialation Image",imgDialation)
cv2.imshow("Eroded Image",imgEroded)
cv2.waitKey(0)

调整、裁剪图像
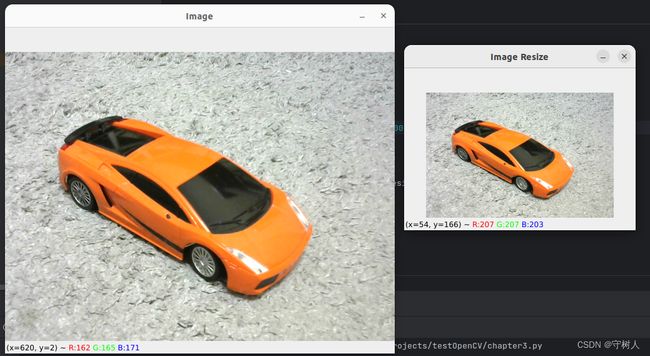
3.1 调整图像大小
import cv2

# resize image

img = cv2.imread("Resources/lambo.PNG")
print(img.shape)

imgResize = cv2.resize(img,(300,200))
print(imgResize.shape)

cv2.imshow("Image",img)
cv2.imshow("Image Resize",imgResize)


cv2.waitKey(0)
3.2 裁剪图像
import cv2

img=cv2.imread("Resources/lambo.PNG")
cv2.imshow('image',img)


print(img.shape)#height,width,dpth


crop_img=img[100:400,50:500]
cv2.imshow('crop image',crop_img)

cv2.waitKey(0)

图像上绘制形状和文本
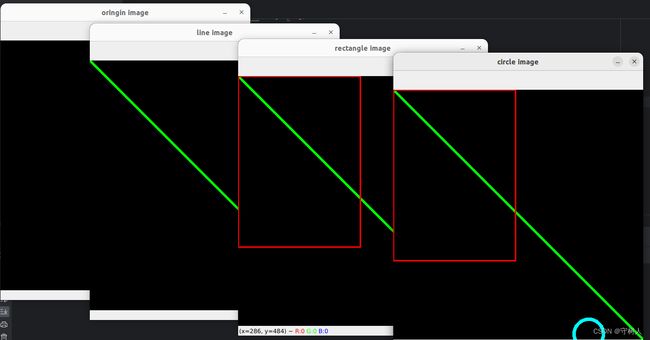
4.1 图像上绘制形状
import cv2
import numpy as np
# shapes and texts
img = np.zeros((512,512,3),np.uint8)
cv2.imshow('oringin image',img)

cv2.line(img,(0,0),(img.shape[1],img.shape[0]),(0,255,0),3)
cv2.imshow('line image',img)

cv2.rectangle(img,(0,0),(250,350),(0,0,255),2)
cv2.imshow('rectangle image',img)

cv2.circle(img,(400,500),30,(255,255,0),5)
cv2.imshow('circle image',img)

cv2.waitKey(0)
4.2图像上写文字
import cv2
import numpy as np

img = np.zeros((512,512,3),np.uint8)
cv2.imshow('oringin image',img)

cv2.putText(img,"OPENCV",(300,200),cv2.FONT_HERSHEY_COMPLEX,1,(0,150,0),1)
cv2.imshow("putText01 Image",img)
cv2.putText(img,"I LOVE XD",(100,300),cv2.FONT_HERSHEY_COMPLEX,1,(0,150,0),1)
cv2.imshow("putText02 Image",img)

cv2.waitKey(0)

透视变换
import cv2
import numpy as np
# warp perspective
img = cv2.imread("Resources/cards.jpg")

width,height = 250,350
pts1 = np.float32([[111,219],[287,188],[154,482],[352,440]])
pts2 = np.float32([[0,0],[width,0],[0,height],[width,height]])
matrix = cv2.getPerspectiveTransform(pts1,pts2)
imgOutput = cv2.warpPerspective(img,matrix,(width,height))

cv2.imshow("Image",img)
cv2.imshow("Output",imgOutput)

cv2.waitKey(0)

图像拼接
import cv2
import numpy as np
# join images
def stackImages(scale,imgArray):
    rows = len(imgArray)
    cols = len(imgArray[0])
    rowsAvailable = isinstance(imgArray[0], list)
    width = imgArray[0][0].shape[1]
    height = imgArray[0][0].shape[0]
    if rowsAvailable:
        for x in range ( 0, rows):
            for y in range(0, cols):
                if imgArray[x][y].shape[:2] == imgArray[0][0].shape [:2]:
                    imgArray[x][y] = cv2.resize(imgArray[x][y], (0, 0), None, scale, scale)
                else:
                    imgArray[x][y] = cv2.resize(imgArray[x][y], (imgArray[0][0].shape[1], imgArray[0][0].shape[0]), None, scale, scale)
                if len(imgArray[x][y].shape) == 2: imgArray[x][y]= cv2.cvtColor( imgArray[x][y], cv2.COLOR_GRAY2BGR)
        imageBlank = np.zeros((height, width, 3), np.uint8)
        hor = [imageBlank]*rows
        hor_con = [imageBlank]*rows
        for x in range(0, rows):
            hor[x] = np.hstack(imgArray[x])
        ver = np.vstack(hor)
    else:
        for x in range(0, rows):
            if imgArray[x].shape[:2] == imgArray[0].shape[:2]:
                imgArray[x] = cv2.resize(imgArray[x], (0, 0), None, scale, scale)
            else:
                imgArray[x] = cv2.resize(imgArray[x], (imgArray[0].shape[1], imgArray[0].shape[0]), None,scale, scale)
            if len(imgArray[x].shape) == 2: imgArray[x] = cv2.cvtColor(imgArray[x], cv2.COLOR_GRAY2BGR)
        hor= np.hstack(imgArray)
        ver = hor
    return ver


img = cv2.imread('Resources/dnn.jpg')
imgGray = cv2.cvtColor(img,cv2.COLOR_BGR2GRAY)

imgStack = stackImages(0.5,([img,imgGray,img],[img,img,img]))

# imgHdr = np.hstack((img,img))
# imgVer = np.vstack((img,img))
# cv2.imshow("Horizontal",imgHdr)
# cv2.imshow("Vertical",imgVer)

cv2.imshow("ImageStack",imgStack)

cv2.waitKey(0)

颜色检测
import cv2
import numpy as np
# color dection

def empty(a):
    pass
'''连接图片'''
def stackImages(scale,imgArray):
    rows = len(imgArray)
    cols = len(imgArray[0])
    rowsAvailable = isinstance(imgArray[0], list)
    width = imgArray[0][0].shape[1]
    height = imgArray[0][0].shape[0]
    if rowsAvailable:
        for x in range ( 0, rows):
            for y in range(0, cols):
                if imgArray[x][y].shape[:2] == imgArray[0][0].shape [:2]:
                    imgArray[x][y] = cv2.resize(imgArray[x][y], (0, 0), None, scale, scale)
                else:
                    imgArray[x][y] = cv2.resize(imgArray[x][y], (imgArray[0][0].shape[1], imgArray[0][0].shape[0]), None, scale, scale)
                if len(imgArray[x][y].shape) == 2: imgArray[x][y]= cv2.cvtColor( imgArray[x][y], cv2.COLOR_GRAY2BGR)
        imageBlank = np.zeros((height, width, 3), np.uint8)
        hor = [imageBlank]*rows
        hor_con = [imageBlank]*rows
        for x in range(0, rows):
            hor[x] = np.hstack(imgArray[x])
        ver = np.vstack(hor)
    else:
        for x in range(0, rows):
            if imgArray[x].shape[:2] == imgArray[0].shape[:2]:
                imgArray[x] = cv2.resize(imgArray[x], (0, 0), None, scale, scale)
            else:
                imgArray[x] = cv2.resize(imgArray[x], (imgArray[0].shape[1], imgArray[0].shape[0]), None,scale, scale)
            if len(imgArray[x].shape) == 2: imgArray[x] = cv2.cvtColor(imgArray[x], cv2.COLOR_GRAY2BGR)
        hor= np.hstack(imgArray)
        ver = hor
    return ver

# 调整滑动条的位置来改变图像的颜色阈值,从而实现对图像的颜色分割或过滤
path = 'Resources/lambo.PNG'
framWidth = 640
framHeight = 480

cap = cv2.VideoCapture(path)
cap.set(3,framWidth) #width
cap.set(4,framHeight) #height
cap.set(10,150)

cv2.namedWindow("TrackBars")
cv2.resizeWindow("TrackBars",640,240)
cv2.createTrackbar("Hue Min","TrackBars",0,179,empty)  # hue
cv2.createTrackbar("Hue Max","TrackBars",179,179,empty)
cv2.createTrackbar("Sat Min","TrackBars",0,255,empty) # saturation
cv2.createTrackbar("Sat Max","TrackBars",255,255,empty)
cv2.createTrackbar("Val Min","TrackBars",0,255,empty)  # value
cv2.createTrackbar("Val Max","TrackBars",255,255,empty)

while True:
    img = cv2.imread(path)
    imgHSV = cv2.cvtColor(img,cv2.COLOR_BGR2HSV)
    h_min = cv2.getTrackbarPos("Hue Min","TrackBars")
    h_max = cv2.getTrackbarPos("Hue Max", "TrackBars")
    s_min = cv2.getTrackbarPos("Sat Min", "TrackBars")
    s_max = cv2.getTrackbarPos("Sat Max", "TrackBars")
    v_min = cv2.getTrackbarPos("Val Min", "TrackBars")
    v_max = cv2.getTrackbarPos("Val Max", "TrackBars")
    # print(h_min,h_max,s_min,s_max,v_min,v_max)
    lower = np.array([h_min,s_min,v_min])
    upper = np.array([h_max,s_max,v_max])
    #用掩码对原始图像进行位运算
    mask = cv2.inRange(imgHSV,lower,upper)
    imgResult = cv2.bitwise_and(img,img,mask=mask) #二值图像

    # cv2.imshow("Original",img)
    # cv2.imshow("HSV",imgHSV)
    # cv2.imshow("Mask", mask)
    # cv2.imshow("Result", imgResult)

    imgStack = stackImages(0.6, ([img, imgHSV], [mask, imgResult]))
    cv2.imshow("Stacked Images", imgStack)

    cv2.waitKey(1)

轮廓检测
import cv2
import numpy as np

#contours / shape detection

def stackImages(scale,imgArray):
    rows = len(imgArray)
    cols = len(imgArray[0])
    rowsAvailable = isinstance(imgArray[0], list)
    width = imgArray[0][0].shape[1]
    height = imgArray[0][0].shape[0]
    if rowsAvailable:
        for x in range ( 0, rows):
            for y in range(0, cols):
                if imgArray[x][y].shape[:2] == imgArray[0][0].shape [:2]:
                    imgArray[x][y] = cv2.resize(imgArray[x][y], (0, 0), None, scale, scale)
                else:
                    imgArray[x][y] = cv2.resize(imgArray[x][y], (imgArray[0][0].shape[1], imgArray[0][0].shape[0]), None, scale, scale)
                if len(imgArray[x][y].shape) == 2: imgArray[x][y]= cv2.cvtColor( imgArray[x][y], cv2.COLOR_GRAY2BGR)
        imageBlank = np.zeros((height, width, 3), np.uint8)
        hor = [imageBlank]*rows
        hor_con = [imageBlank]*rows
        for x in range(0, rows):
            hor[x] = np.hstack(imgArray[x])
        ver = np.vstack(hor)
    else:
        for x in range(0, rows):
            if imgArray[x].shape[:2] == imgArray[0].shape[:2]:
                imgArray[x] = cv2.resize(imgArray[x], (0, 0), None, scale, scale)
            else:
                imgArray[x] = cv2.resize(imgArray[x], (imgArray[0].shape[1], imgArray[0].shape[0]), None,scale, scale)
            if len(imgArray[x].shape) == 2: imgArray[x] = cv2.cvtColor(imgArray[x], cv2.COLOR_GRAY2BGR)
        hor= np.hstack(imgArray)
        ver = hor
    return ver

def getContours(img):
    contours,hierarchy = cv2.findContours(img,cv2.RETR_EXTERNAL,cv2.CHAIN_APPROX_NONE)
    for cnt in contours:
        area = cv2.contourArea(cnt)
        print(area)
        if area>500:
            cv2.drawContours(imgContour,cnt,-1,(255,0,0),3)
            #计算轮廓曲线长度
            peri = cv2.arcLength(cnt,True)
            print(peri)

            approx = cv2.approxPolyDP(cnt,0.02*peri,True)
            print(len(approx))
            objCor = len(approx)
            x,y,w,h = cv2.boundingRect(approx)

			# 图形分类
            if objCor == 3: objectType = "Tri"
            elif objCor == 4 :
                aspRatio = w / float(h)
                if aspRatio > 0.98 and aspRatio < 1.03: objectType = "Square"
                else: objectType = "Rectangle"
            elif objCor > 4: objectType = "Circles"
            else: objectType = "None"

            cv2.rectangle(imgContour,(x,y),(x+w,y+h),(0,255,0),2)
            cv2.putText(imgContour,objectType,(x+(w//2)-10,y+(h//2)-10),cv2.FONT_HERSHEY_COMPLEX,0.7,(0,0,0),2)


path = 'Resources/shapes.png'
img = cv2.imread(path)
imgContour = img.copy()

imgGray = cv2.cvtColor(img,cv2.COLOR_BGR2GRAY)
imgBlur = cv2.GaussianBlur(imgGray,(7,7),1)
imgCanny = cv2.Canny(imgBlur,50,50)
getContours(imgCanny)

imgBlank = np.zeros_like(img)
imgStack = stackImages(0.8,([img,imgGray],[imgCanny,imgContour]))

cv2.imshow("Stack",imgStack)

cv2.waitKey(0)

人脸检测
9.1静态图片
import cv2
# face detection
faceCascade = cv2.CascadeClassifier("Resources/haarcascade_frontalface_default.xml")
img = cv2.imread("Resources/dnn.jpg")
imgGray = cv2.cvtColor(img,cv2.COLOR_BGR2GRAY)

faces = faceCascade.detectMultiScale(imgGray,1.1,4)

for(x,y,w,h) in faces:
    cv2.rectangle(img,(x,y),(x+w,y+h),(255,0,0),2)
cv2.imshow("Result",img)

cv2.waitKey(0)

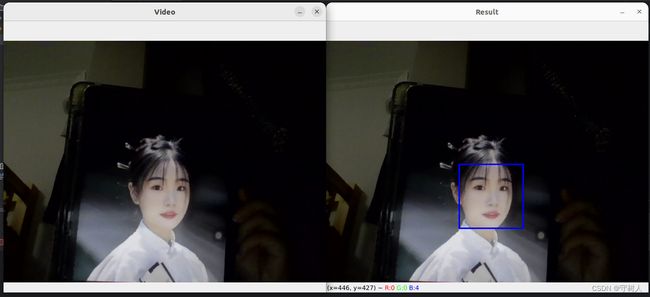
9.2 摄像头
import cv2

faceCascade = cv2.CascadeClassifier("Resources/haarcascade_frontalface_default.xml")

cap = cv2.VideoCapture(0)
cap.set(3,640) #width
cap.set(4,480) #height
cap.set(10,100)

while True:
   success,img = cap.read()
   cv2.imshow("Video",img)
   imgGray = cv2.cvtColor(img, cv2.COLOR_BGR2GRAY)

   faces = faceCascade.detectMultiScale(imgGray, 1.1, 4)

   for (x, y, w, h) in faces:
       cv2.rectangle(img, (x, y), (x + w, y + h), (255, 0, 0), 2)
   cv2.imshow("Result", img)
   if cv2.waitKey(1) & 0xFF == ord('q'):
       break
实战
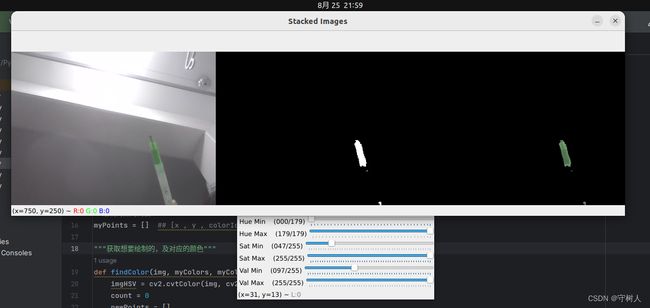
10.1虚拟绘画
import cv2
import numpy as np

frameWidth = 640
frameHeight = 480
cap = cv2.VideoCapture(0)
cap.set(3, frameWidth)
cap.set(4, frameHeight)
cap.set(10, 150)

# 想要检测的颜色
myColors = [[0,89,0,98,255,255], [0,47,0,97,255,255], [0,66,0,179,255,255], [0,54,0,98,255,255]]
# 想要绘制的颜色  BGR
myColorValues = [[51, 153, 255],[0, 255, 0],[255,0,0],[0,255,255]]
# 绘制的点的列表
myPoints = []  ## [x , y , colorId ]

"""获取想要绘制的,及对应的颜色"""
def findColor(img, myColors, myColorValues):
    imgHSV = cv2.cvtColor(img, cv2.COLOR_BGR2HSV)
    count = 0
    newPoints = []
    for color in myColors:
        lower = np.array(color[0:3])
        upper = np.array(color[3:6])
        mask = cv2.inRange(imgHSV, lower, upper)

        x, y = getContours(mask)  # 想要绘制的点

        cv2.circle(imgResult, (x, y), 20, myColorValues[count], cv2.FILLED)  # 将点绘制在图上
        if x != 0 and y != 0:
            newPoints.append([x, y, count])  # 将点添加到 newPoints列表中,count为想要绘制颜色的编号
        count += 1
    return newPoints


def getContours(img):
    contours, Heriachy = cv2.findContours(img, cv2.RETR_EXTERNAL, cv2.CHAIN_APPROX_NONE)
    x, y, w, h = 0, 0, 0, 0
    for cnt in contours:
        area = cv2.contourArea(cnt)
        if area > 500:
            # cv2.drawContours(imgResult, cnt, -1, (255, 0, 0), 3)
            peri = cv2.arcLength(cnt, True)
            approx = cv2.approxPolyDP(cnt, 0.02 * peri, True)
            x, y, w, h = cv2.boundingRect(approx)
    return x + w // 2, y


"""把点绘制在画布上"""
def drawOnCanvas(myPoints, myColorValues):
    for point in myPoints:
        cv2.circle(imgResult, (point[0], point[1]), 20, myColorValues[point[2]], cv2.FILLED)


while True:
    success, img = cap.read()
    imgResult = img.copy()
    newPoints = findColor(img, myColors, myColorValues)  # 想要绘制的点
    if len(newPoints) != 0:
        for newP in newPoints:
            myPoints.append(newP)
    if len(myPoints) != 0:
        drawOnCanvas(myPoints, myColorValues)  # 将点绘制在画布上

    cv2.imshow("Result", imgResult)
    if cv2.waitKey(1) & 0xFF == ord('q'):
        break
利用颜色检测滑杆来得出笔的颜色


10.2纸张扫描
import cv2
import numpy as np

widthImg=480
heightImg =640

img = cv2.imread("Resources/1.jpg")

"""图像预处理"""
def preProcessing(img):
    imgGray = cv2.cvtColor(img,cv2.COLOR_BGR2GRAY)
    imgBlur = cv2.GaussianBlur(imgGray,(5,5),1)
    imgCanny = cv2.Canny(imgBlur,200,200)
    kernel = np.ones((5,5))
    imgDial = cv2.dilate(imgCanny,kernel,iterations=2)
    imgThres = cv2.erode(imgDial,kernel,iterations=1)
    return imgThres

'''获取最大轮廓角点'''
def getContours(img):
    biggest = np.array([])
    maxArea = 0
    contours,Heriachy= cv2.findContours(img,cv2.RETR_EXTERNAL,cv2.CHAIN_APPROX_NONE)
    for cnt in contours:
        area = cv2.contourArea(cnt)
        if area>5000:
            peri = cv2.arcLength(cnt,True)
            approx = cv2.approxPolyDP(cnt,0.02*peri,True)
            if area >maxArea and len(approx) == 4:
                biggest = approx
                maxArea = area

    #绘制轮廓(biggest仅仅包含矩形的轮廓)
    cv2.drawContours(imgContour, biggest, -1, (255, 0, 0), 20)
    return biggest

'''矩形角点的重新处理:按照一定的顺序排列(左上,右上,左下,右下)'''
def reorder (myPoints):
    myPoints = myPoints.reshape((4,2))#四个角点
    myPointsNew = np.zeros((4,1,2),np.int32)

    #点按照一定的顺序重新排列
    add = myPoints.sum(1)#将点进行x+y计算,
    myPointsNew[0] = myPoints[np.argmin(add)] #和最小的点为左上角点
    myPointsNew[3] = myPoints[np.argmax(add)]#和最大的点为右下角点

    diff = np.diff(myPoints,axis=1)#将点进行x-y差异计算
    myPointsNew[1]= myPoints[np.argmin(diff)]#差异最小的点为右上
    myPointsNew[2] = myPoints[np.argmax(diff)]#差异最大的点为左下

    return myPointsNew

'''鸟瞰转换'''
def getWarp(img,biggest):

    #矩阵角点的处理,按照一个统一顺序排列
    biggest = reorder(biggest)

    pts1 = np.float32(biggest)
    pts2 = np.float32([[0, 0], [widthImg, 0], [0, heightImg], [widthImg, heightImg]])

    matrix = cv2.getPerspectiveTransform(pts1, pts2)
    #鸟瞰图
    imgOutput = cv2.warpPerspective(img, matrix, (widthImg, heightImg))

    #得到的鸟瞰图,边缘有其他背景,所以裁剪边缘,并将裁剪后的图像,重新调整为原来窗口大小。
    imgCropped = imgOutput[20:imgOutput.shape[0]-20,20:imgOutput.shape[1]-20]
    imgCropped = cv2.resize(imgCropped,(widthImg,heightImg))

    return imgCropped


'''图像堆叠显示'''
def stackImages(scale,imgArray):
    rows = len(imgArray)
    cols = len(imgArray[0])
    rowsAvailable = isinstance(imgArray[0], list)
    width = imgArray[0][0].shape[1]
    height = imgArray[0][0].shape[0]
    if rowsAvailable:
        for x in range ( 0, rows):
            for y in range(0, cols):
                if imgArray[x][y].shape[:2] == imgArray[0][0].shape [:2]:
                    imgArray[x][y] = cv2.resize(imgArray[x][y], (0, 0), None, scale, scale)
                else:
                    imgArray[x][y] = cv2.resize(imgArray[x][y], (imgArray[0][0].shape[1], imgArray[0][0].shape[0]), None, scale, scale)
                if len(imgArray[x][y].shape) == 2: imgArray[x][y]= cv2.cvtColor( imgArray[x][y], cv2.COLOR_GRAY2BGR)
        imageBlank = np.zeros((height, width, 3), np.uint8)
        hor = [imageBlank]*rows
        hor_con = [imageBlank]*rows
        for x in range(0, rows):
            hor[x] = np.hstack(imgArray[x])
        ver = np.vstack(hor)
    else:
        for x in range(0, rows):
            if imgArray[x].shape[:2] == imgArray[0].shape[:2]:
                imgArray[x] = cv2.resize(imgArray[x], (0, 0), None, scale, scale)
            else:
                imgArray[x] = cv2.resize(imgArray[x], (imgArray[0].shape[1], imgArray[0].shape[0]), None,scale, scale)
            if len(imgArray[x].shape) == 2: imgArray[x] = cv2.cvtColor(imgArray[x], cv2.COLOR_GRAY2BGR)
        hor= np.hstack(imgArray)
        ver = hor
    return ver


while True:
    imgresize = cv2.resize(img,(widthImg,heightImg))
    imgContour = imgresize.copy()
    imgThres = preProcessing(imgresize)
    biggest = getContours(imgThres)

    if biggest.size != 0:
        # 鸟瞰转换
        imgWarped = getWarp(imgresize, biggest)
        imageArray = ([imgresize,imgThres],
                  [imgContour,imgWarped])
        cv2.imshow("ImageWarped", imgWarped)
    else:
        imageArray = ([imgContour, img])

        # 图像堆叠显示
    stackedImages = stackImages(0.5, imageArray)
    cv2.imshow("WorkFlow", stackedImages)
    cv2.waitKey(0)

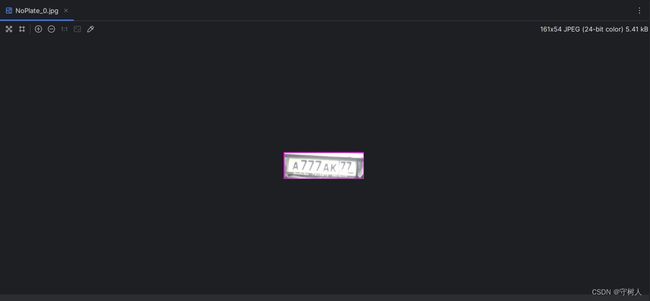
10.3 车牌检测器
import cv2

frameWidth = 640
frameHeight = 480
nPlateCascade = cv2.CascadeClassifier("Resources/haarcascade_russian_plate_number.xml")
minArea = 200
color = (255,0,255)

cap = cv2.VideoCapture(0)
cap.set(3, frameWidth)
cap.set(4, frameHeight)
cap.set(10,150)
count = 0

while True:
    success, img = cap.read()
    imgGray = cv2.cvtColor(img, cv2.COLOR_BGR2GRAY)

    #车牌检测
    numberPlates = nPlateCascade.detectMultiScale(imgGray, 1.1, 10)
    for (x, y, w, h) in numberPlates:
        area = w*h
        if area >minArea:
            #绘制矩形
            cv2.rectangle(img, (x, y), (x + w, y + h), (255, 0, 255), 2)
            #绘制文字
            cv2.putText(img,"Number Plate",(x,y-5),cv2.FONT_HERSHEY_COMPLEX_SMALL,1,color,2)
            imgRoi = img[y:y+h,x:x+w]
            cv2.imshow("ROI", imgRoi)

    cv2.imshow("Result", img)

    if cv2.waitKey(1) & 0xFF == ord('s'):
        cv2.imwrite("Resources/Scanned/NoPlate_"+str(count)+".jpg",imgRoi)
        cv2.rectangle(img,(0,200),(640,300),(0,255,0),cv2.FILLED)
        cv2.putText(img,"Scan Saved",(150,265),cv2.FONT_HERSHEY_DUPLEX,2,(0,0,255),2)
        cv2.imshow("Result",img)
        cv2.waitKey(500)
        count +=1
        break
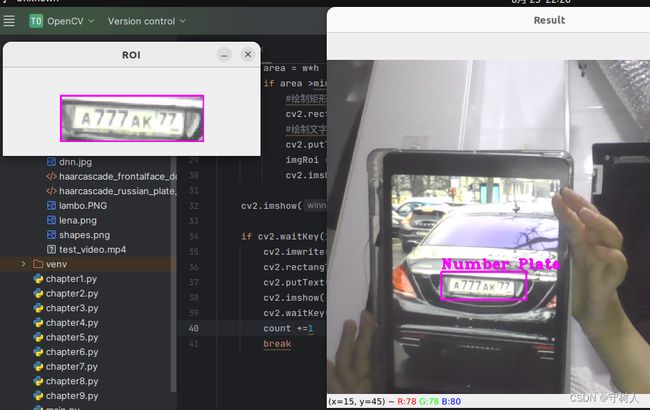
按s键后可保存车牌
参考资料
ChatGPT (openai.com)
RGB Color Codes Chart (rapidtables.com)
图像基本操作 - 【布客】OpenCV 4.0.0 中文翻译 (apachecn.org)