使用ELK收集解析nginx日志和kibana可视化仪表盘
文章目录
- ELK生产环境配置
-
- filebeat 配置
- logstash 配置
- kibana仪表盘配置
- 配置nginx转发ES和kibana
- ELK设置账号和密码
ELK生产环境配置
ELK收集nginx日志有多种方案,一般比较常见的做法是在生产环境服务器搭建filebeat 收集nginx的文件日志并写入到队列(kafka/redis),然后在另一台机器上消费队列中的日志数据并流转到logstash中进行解析处理,然后再输出到elasticsearch中,再由kibana展示到页面上。
虽然logstash也能直接收集日志,但因为filebeat比logstash更轻量级,不会耗费太多系统资源,因此适合在生产环境机器上部署filebeat。
- 生产环境机器:
filebeat ---> redis - 日志处理机器:
redis ---> logstash ---> elasticsearch ---> kibana
filebeat 配置
# vim filebeat-5.6.9/filebeat.yml

filebeat.inputs: #用于定义数据原型
- type: log #指定数据的输入类型,这里是log,即日志,是默认值,还可以指定为stdin,即标准输入
  enabled: true #启用手工配置filebeat,而不是采用模块方式配置filebeat
  paths: #用于指定要监控的日志文件,可以指定一个完整路径的文件,也可以是一个模糊匹配格式,如 nginx_*.log
    - /usr/local/nginx/logs/access.log
  # tags: ["access"]
  fields:
    app: www #表示www项目
    type: nginx-access #通过type区分哪种日志,这里表示是nginx的access日志
  fields_under_root: true

- type: log
  paths:
    - /usr/local/nginx/logs/error.log
  # tags: ["error"]
  fields:
    app: wap #表示wap项目
    type: nginx-error #通过type区分哪种日志,这里表示是nginx的error日志
  fields_under_root: true

name: "172.16.213.157" #设置filebeat收集的日志中对应主机的名字,如果配置为空,则使用该服务器的主机名。这里设置为IP,便于区分多台主机的日志信息。

output.redis: #输出到redis的配置
  enabled: true #表明这个模块是否启用
  hosts: ["192.168.0.1"]
  port: 6379
  password: "123456"
  key: "filebeat"
  db: 5
  datatype: list

output.kafka: #输出到kafka的配置
  enabled: false #表明这个模块是否启用
  hosts: ["172.16.213.51:9092", "172.16.213.75:9092", "172.16.213.109:9092"] #指定输出数据到kafka集群上,地址为kafka集群IP加端口号。
  version: "0.10"
  topic: '%{[fields][log_topic]}' #指定要发送数据给kafka集群的哪个topic,若指定的topic不存在,则会自动创建此topic。
  partition.round_robin:
    reachable_only: true
  worker: 2
  required_acks: 1
  compression: gzip
  max_message_bytes: 10000000
logging.level: debug #定义filebeat的日志输出级别,有critical、error、warning、info、debug五种级别可选,在调试的时候可选择debug模式。
启动filebeat并且不输出内容
nohup ./filebeat -e -c filebeat.yml >/dev/null 2>&1 &
查看redis:
redis-cli -h 192.168.0.1 -p 6379 -a 123456

192.168.0.1:6379[5]> llen filebeat
(integer) 101

192.168.0.1:6379[5]> lrange filebeat 0 0
1) "{\"@timestamp\":\"2023-08-30T06:21:56.896Z\",\"beat\":{\"hostname\":\"yourhost\",\"name\":\"yourhost\",\"version\":\"5.6.9\"},\"input_type\":\"log\",\"message\":\"{\\\"@timestamp\\\": \\\"2023-08-30T14:21:55+08:00\\\", \\\"remote_addr\\\": \\\"222.128.101.33\\\", \\\"remote_user\\\": \\\"-\\\", \\\"body_bytes_sent\\\": \\\"8637\\\", \\\"request_time\\\": \\\"2.554\\\", \\\"status\\\": \\\"200\\\", \\\"request_uri\\\": \\\"/user/info\\\", \\\"request_method\\\": \\\"POST\\\", \\\"http_referrer\\\": \\\"https://www.test.com/\\\", \\\"http_x_forwarded_for\\\": \\\"-\\\"}\",\"offset\":35407874,\"source\":\"/usr/local/nginx/logs/access.log\",\"type\":\"log\"}"
logstash 配置
下面是一个logstash从redis中读取日志数据并解析输出到ES的完整配置:
# vim logstash-7.17.12/config/logstash-from-redis-to-es.conf

input {
    redis {
        host => "192.168.0.1"
        port => 6379
        password => "123456"
        db => "5"
        data_type => "list"
        key => "filebeat"
    }
}

filter {
  if [app] == "www" { #如果是www项目(下面还可以再写else if ... ),对应上面filebeat配置信息的fields.app
    if [type] == "nginx-access" { #如果是nginx的access日志,对应上面filebeat配置信息的fields.type
      json { #解析json模块
          source => "message" #将message中的每个字段解析到一级节点
          remove_field => ["message","beat"] #经过上面source解析后,移除原本的message字段,避免日志内容冗余;beat字段也没啥用,所以也移除。
      }
      geoip { #根据ip地址解析 国家和城市 信息
          source => "remote_addr" #根据nginx日志的remote_addr字段解析
          target => "geoip" #解析后的结果放到这个字段中
          database => "/home/es/soft/GeoLite2-City.mmdb" #解析位置信息的数据库文件所在路径
          add_field => ["[geoip][coordinates]", "%{[geoip][longitude]}"] #添加字段:经纬度信息
          add_field => ["[geoip][coordinates]", "%{[geoip][latitude]}"]
      }
      mutate { #修改某个字段的数据,比如类型转换
          convert => ["[geoip][coordinates]", "float"]
      }
    }
  }
}

output {
  elasticsearch {
      hosts  => ["http://192.168.0.212:9200","http://192.168.0.213:9200","http://192.168.0.214:9200"]
      index  => "logstash-%{type}-%{+YYYY.MM.dd}" #这里的 %{type} 是 filebeat配置信息的fields.type 对应的值
      user => "elastic" #ES账号
      password => "123456" #ES密码
  }
}
GeoLite2-City.mmdb 下载地址:https://download.csdn.net/download/rxbook/88274725
启动logstash:nohup ./bin/logstash -f ./config/logstash-from-redis-to-es.conf >/dev/null 2>&1 &
kibana仪表盘配置
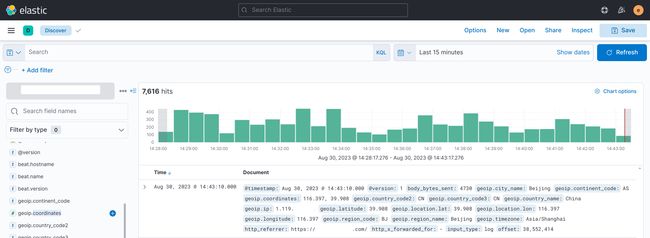
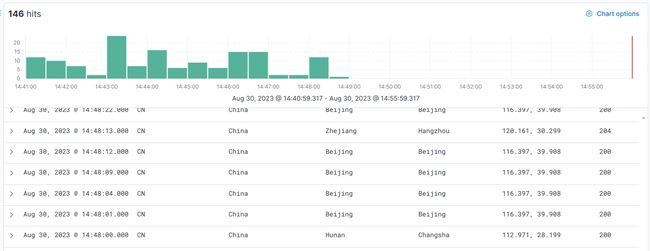
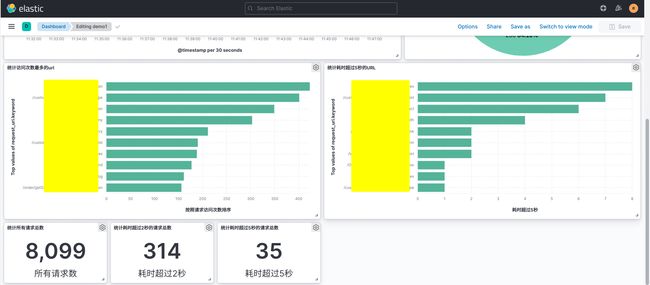
kibana dashboard 是一个统计数据展示面板,可以通过不同的维度进行统计和展示。
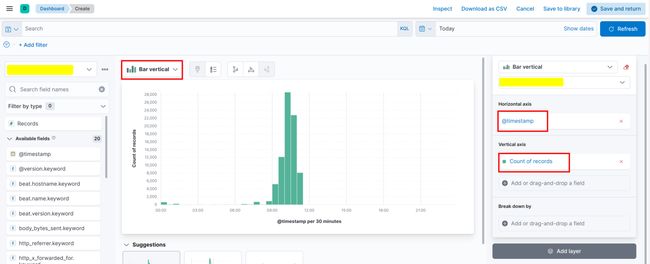
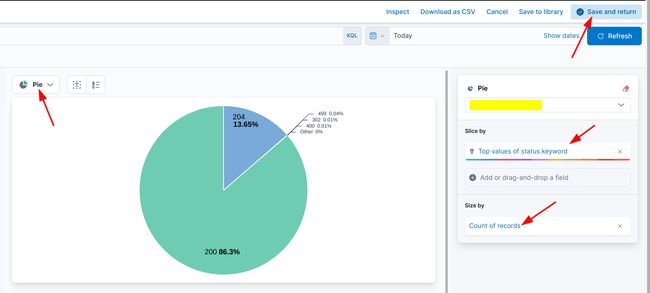
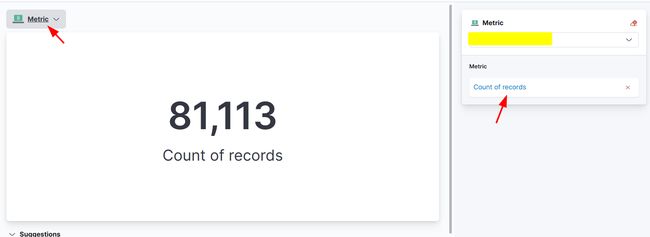
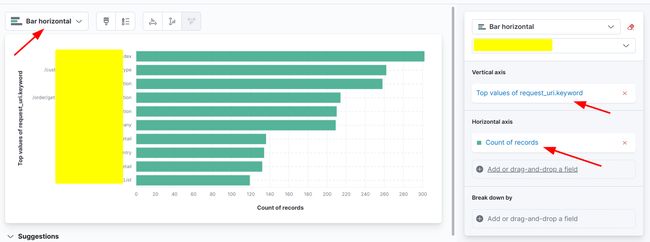
我这里用kibana7.17.12版本演示,不同版本的kibana界面可能不一样。进入kibana --> Visualize Library --> Create new visualization --> Lens
配置nginx转发ES和kibana
如果需要使用80端口访问ES或kibana页面,可以在nginx中配置代理转发9200或5601端口,配置如下:
server {
    listen  80;
    server_name     es.xxxx.com;
    location / {
        proxy_pass      http://127.0.0.1:9200;
    }
}

server {
    listen  80;
    server_name     kibana.xxxx.com;
    location / {
        proxy_pass      http://127.0.0.1:5601;
    }
}
上面配置后就可以直接通过域名来访问kibana的页面(需要添加hosts)。
ELK设置账号和密码
修改ES的配置文件vi config/elasticsearch.yml 添加如下内容
http.cors.enabled: true
http.cors.allow-origin: "*"
http.cors.allow-headers: Authorization
xpack.security.enabled: true
xpack.security.transport.ssl.enabled: true
保存后重启ES,然后执行:./bin/elasticsearch-setup-passwords interactive,需要设置以下六种账户的密码elastic、apm_system、kibana、logstash_system、beats_system、remote_monitoring_user
输入y开始设置,六种密码设置完成后,需要再次重启ES。
![]()
然后打开ES的页面,账号:elastic,密码就是你刚才设置的密码。
![]()
设置kibana的密码,vi config/kibana.yml,添加:
elasticsearch.username: "elastic"
elasticsearch.password: "你在es中设置的密码"
然后重新启动kibana,再次访问,需要输入账号和密码。
![]()
