Linux:Jupyterhub多用户远程登录安装、使用经验
1、安装
首先,打开官网帮助文档:
JupyterHub 官方安装帮助文档
一般安装都是参考官方最新版安装文档。
1.1环境条件
本次安装 JupyterHub的软件环境:
- 基于 Linux Centos系统;
- Python 3.9或更高版本;
- 安装 nodejs/npm ;
安装 nodejs/npm:
如果使用conda:conda 将为您安装 nodejs 和 npm 依赖项。
如果您正在使用pip,请安装最新版本的 nodejs/npm。
例如,使用以下命令在 Linux 上安装:
sudo apt-get install nodejs npm也可以yum安装
sudo yum install npm nodejs
安装完成后, 通过 node -v 和 npm -v 来查看是否安装成功。
1.2安装
JupyterHub安装可以用pip命令(和代理npm)或conda命令:
pip命令:npm:
python3 -m pip install jupyterhub
npm install -g configurable-http-proxy
python3 -m pip install jupyterlab notebook
conda命令:
conda install -c conda-forge jupyterhub
conda install jupyterlab notebook
安装完成后执行 jupyterhub --version 来查看是否安装成功。
1.3配置
按照官方配置文档一步一步配置即可:
JupyterHub 官方环境配置帮助
首先通过jupyterhub --generate-config命令生成配置文件jupyterhub_config.py,下面的配置参数都是写在jupyterhub_config.py文件中的:
import sys
# configurable_http_proxy 代理设置
c.ConfigurableHTTPProxy.should_start = True #允许hub启动代理 可以不写,默认的,为False 就需要自己去 启动configurable-http-proxy
c.ConfigurableHTTPProxy.api_url = 'http://127.0.0.1:8001' # proxy与hub与代理通讯,这应该是默认值不行也行
# 对外登录设置的ip
c.JupyterHub.ip = '0.0.0.0'
c.JupyterHub.port = 8000
c.PAMAuthenticator.encoding = 'utf8'
# 用户名单设置,默认身份验证方式PAM与NUIX系统用户管理层一致,root用户可以添加用户test1,test2等等,非root用户,sudo useradd test1/test2 不起作用,目前我不知道sudo useradd 和 root下 useradd本质区别*(没有特意学过linux,一切只靠用时百度)
# c.Authenticator.allowed_users = {'test1', 'test2'}
c.Authenticator.admin_users = {'jupyterhub'} # 管理员用户
c.DummyAuthenticator.password = "123456" # 初始密码设置
c.JupyterHub.admin_access = True # 则管理员有权在各自计算机上以其他用户身份登录,以进行调试
c.LocalAuthenticator.create_system_users=True # 此选项通常用于 JupyterHub 的托管部署,以避免在启动服务之前手动创建所有用户c.JupyterHub.authenticator_class = 'jupyterhub.auth.PAMAuthenticator' #解决Centos下用户认证问题
# 设置每个用户的 book类型 和 工作目录(创建.ipynb文件自动保存的地方)
c.Spawner.notebook_dir = '~'
c.Spawner.default_url = '/lab'
c.Spawner.args = ['--allow-root']
c.Spawner.cmd ='jupyter-labhub'
# 为jupyterhub 添加额外服务,用于处理闲置用户进程。使用时不好使安装一下:pip install jupyterhub-ilde-culler
c.JupyterHub.services = [
{
'name': 'idle-culler',
'command': ['python3', '-m', 'jupyterhub_idle_culler', '--timeout=3600'],
'admin':True # 1.5.0 需要服务管理员权限,去kill 部分闲置的进程notebook, 2.0版本已经改了,可以只赋给 idel-culler 部分特定权限,roles
}
]
1.4启动
1.4.1添加环境变量
将jupyterhub所在的目录加入系统环境变量。添加方法是:在/etc/profile.d/目录下新建jupyterhub.sh文件并写入下面两行代码
export JUPYTERHUB_HOME=/usr/local/bin
export PATH=$JUPYTERHUB_HOME:$PATH
然后执行
source /etc/profile.d/jupyterhub.sh这样可以防止报错 Error in Authenticator.pre_spawn_start: FileNotFoundError [Errno 2] No such file or directory: 'jupyterhub-singleuser': 'jupyterhub-singleuser'
1.4.2使用root权限启动
先切换到root用户, 再启动jupyterhub, 否则会出现权限不足和有些用户无法登录的情况。
1.4.3添加用户
root将用户‘jupyterhub’添加到系统:
useradd jupyterhub
passwd jupyterhub
根据提示输入密码‘123456’即可!
1.4.4启动命令
在系统中输入
jupyterhub -f jupyterhub_config.py即可启动。
后台运行启动命令:
nohup jupyterhub -f jupyterhub_config.py >nohup.out & 查看启动的进程:
ps -aux | grep jupyterhub2、使用
2.1用户登录
访问安装http://ip:8000/hub/login
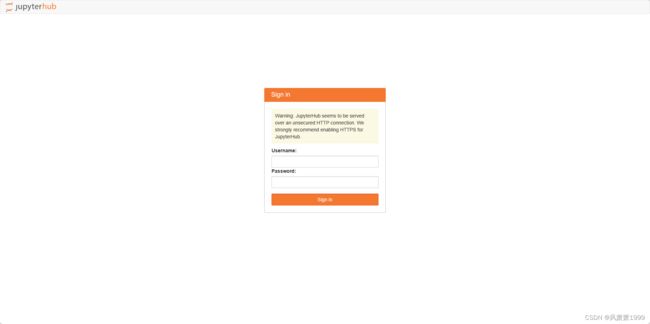
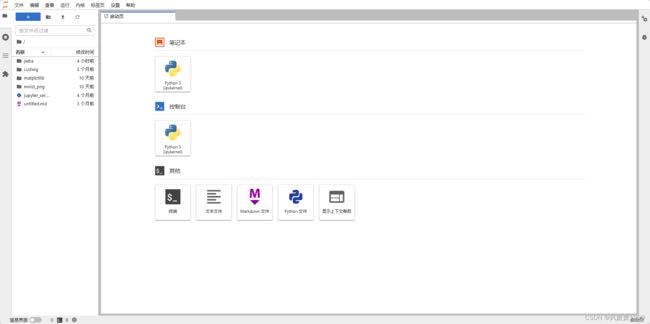
登录完成后的页面:
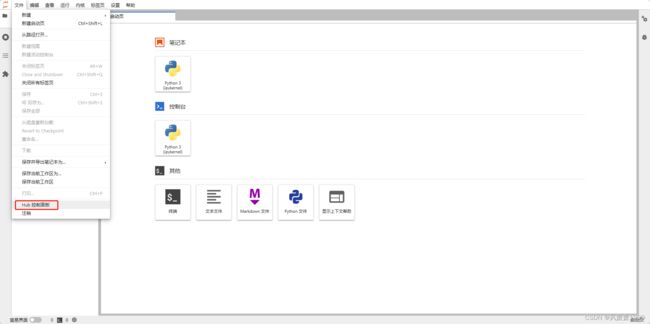
2.2用户管理
选择:文件->HUB控制面板,点击即可:
点击:Admin
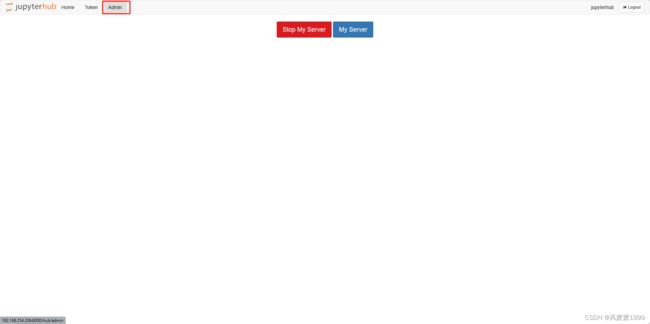
 即可对用户进行管理,包括用户新建、编辑、删除,不过用户的密码不能在此进行操作,还需要参考1.4.3中进行操作!