Configuring the FBX SDK for Windows
Downloading and installing the FBX SDK
To download and install the FBX SDK on Windows:
- Go to http://www.autodesk.com/fbx.
- Click GET FBX SDK to access the FBX SDK Downloads page.
- Select the FBX SDK for Windows for your version of Visual Studio and download the setup file.
- Run the setup program, and follow the instructions.
- The setup program lets you specify a destination folder. Specify a folder which is new or empty. In this topic, it is called as , your distribution directory for FBX SDK.
- Read the \\readme.txt file. The readme.txt file contains detailed information about changes in FBX SDK since the previous version, as well as any last-minute documentation.
Notes:
- The setup program does not modify the Windows registry or the Windows start menu.
- You can have more than one version of the FBX SDK installed on your computer, provided you install each version in a separate folder.
Uninstalling the FBX SDK
To remove the FBX SDK from your computer:
- Run
\uninstall.exe .
Runtime libraries for Windows
Make sure to use the appropriate runtime library for your version of Visual Studio, and for the processor architecture of your target application. The FBX libraries are organized into subdirectories under
\lib\ \ \
For example:
\lib\vs2012\x64\release
Each of those subdirectories contains several versions of the libraries, compiled with different flags. The following table presents the FBX SDK library filenames and their descriptions.
Note:
Dynamic .lib files require that their corresponding .dll file be available at application run-time (see the Application Dependency column in the table below). If you intend on using a dynamic library version of the FBX SDK with your application, you must distribute the appropriate .dll along with your executable.
| Library File | Library Description | Required Runtime Library Option | Required Preprocessor Definition |
|---|---|---|---|
libfbxsdk.lib |
Dynamic linking | FBXSDK_SHARED | |
libfbxsdk-md.lib |
Static linking | /MD |
|
libfbxsdk-mt.lib |
Static linking | /MT |
The following table provides a description of the relevant runtime library options. These descriptions can also be found at: http://msdn.microsoft.com/en-us/library/2kzt1wy3.aspx.
| Runtime Library Option | Description |
|---|---|
MT |
Causes your application to use the multithread, static version of the run-time library. Defines _MT and causes the compiler to place the library name LIBCMT.lib into the .obj file so that the linker uses LIBCMT.lib to resolve external symbols. |
MD |
Causes your application to use the multithread- and DLL-specific version of the run-time library. Defines _MT and _DLL and causes the compiler to place the library name MSVCRT.lib into the .obj file. Applications compiled with this option are statically linked to MSVCRT.lib. This library provides a layer of code that allows the linker to resolve external references. The actual working code is contained in MSVCR100.DLL, which must be available at run time to applications linked with MSVCRT.lib. |
Note:
These libraries can all be linked to Microsoft’s multithreaded C libraries. FBX SDK code, however, is not guaranteed to be thread-safe.
Configuring Visual Studio
The instructions in this section are based on Visual Studio 2010.
Note To build and run the sample programs for the FBX SDK, see Building and Running the Sample Programs.
To create a new Visual Studio solution that uses FBX SDK:
- Start Visual Studio.
-
To create a new project, choose New > Project in the File menu.
- Choose Visual C++ > Win32.
- Continue as usual, then click Finish. The new project and solution appears.
-
Select PROJECT > Properties. The Property Pages dialog appears.

-
In the property tree on the left of the Property Pages dialog, choose Configuration Properties > C/C++ > General.
-
In the properties sheet on the right of the dialog, select
in the Additional Include Directories drop-down box. The Additional Include Directories dialog appears. 
-
In the list box on the top of the Additional Include Directories dialog, click the top blank line until you see a control to browse for directories.
- Use this control to add the full path for the
\include directory and click OK. -
In the tree on the left of the Property Pages dialog, select Code Generation.

- In the property sheet on the right, choose the type of run-time library for your project in the Runtime Library drop-down box. The list corresponds to the Visual C++ compiler options:
/MD,/MDd,/MT,/MTd, and so on. Not all compiler options are available for all versions of Visual Studio (see Configuring the FBX SDK for Windows). - In the Property Pages dialog box, choose Linker > General.
- In the Additional Library Dependencies drop-down box, select
. The Additional Library Directories dialog appears. -
Enter the full path for the
\lib folder of the FBX SDK distribution.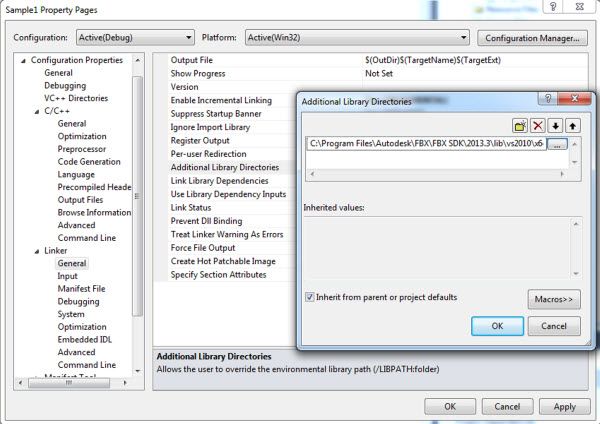
- In the Property Pages dialog box, choose Linker > Input. In the Additional Dependencies drop-down box, select
. The Additional Dependencies dialog appears. Add the appropriate FBX SDK library. For a table describing the available FBX SDK library files, see Configuring the FBX SDK for Windows. -
In the previous step, if you selected a debug version of the FBX SDK library that uses static linking, then you must do the following:
- In the Ignore Specific Default Library drop-down box, select
. The Ignore Specific Default Library dialog appears. - Enter
LIBCMT, and click OK. - In the Additional Dependencies drop-down box, select
. The Additional Dependencies dialog appears. - Enter
wininet.lib, and click OK.
- In the Ignore Specific Default Library drop-down box, select
Note:
If you are using a dynamic library version of the FBX SDK, add FBXSDK_SHARED to the preprocessor definitions of your project.
Important notes on preprocessor definitions for your projects
If you are using a dynamic library version of the FBX SDK, add FBXSDK_SHARED to the preprocessor definitions of your project. To do this in Visual Studio, in your project, select: PROJECT > Properties > Configuration Properties > C/C++ > Preprocessor, and edit the Preprocessor Definitions field.
Note:
Starting from FBX SDK 2012.0, the following are no longer required:
- The
KFBX_DLLINFOpreprocessor definition is no longer required for the dynamic library versions. - As of FBX SDK version 2012, the static libraries are built with
\_SECURE_SCL=1, which is the default value for Visual Studio 2010 and later. If you are using Visual Studio 2010 or later with an older version of the FBX SDK, you need to explicitly include\_SECURE_SCL=0. If you are using Visual Studio 2008 with FBX SDK 2012 or later, you need to explicitly include\_SECURE_SCL=1. Otherwise, you can omit\_SECURE_SCLfrom your definitions.
From :http://help.autodesk.com/view/FBX/2018/ENU/?guid=FBX_Developer_Help_getting_started_installing_and_configuring_configuring_the_fbx_sdk_for_wind_html
FBX SDK 2018 + VS2015+Win10 开发环境搭建
官方介绍很详细,所以主要以官方文档为主:
http://help.autodesk.com/view/FBX/2018/ENU/
因为我们主要用VS2015+Win10,
下载地址FBX SDK 2018 :
选择下载:FBX SDK 2018.1.1 VS2015 (exe - 90355Kb)
双击安装FBX SDK,记住安装文件夹。官方文档说不改变windows的注册表和开始菜单,所以可以安装FBX SDK的多个版本在一台Windows平台上,但是要记住文件夹位置。
本大PC的
(以前还安装了2016版:
我们的第一个目标是将第一个Sample Code中的示例跑起来:D:\Program Files\Autodesk\FBX\FBX SDK\2018.1.1\samples\Animation
生成方法如下:
http://help.autodesk.com/view/FBX/2018/ENU/?guid=__files_GUID_AB36BF12_CFA7_4789_8CFA_0F1F026472A2_htm
文档太详细了,不说了;直接打开,生成,调试。
作业:
实验验证如下功能:
1. 提取FBX中动画用于其他FBX中的角色;
2. Kinect动画捕捉,生成FBX动画;