动手深度学习:08 线性回归(线性回归的从零开始实现)(二)
1、线性回归的从零开始实现
我们将从零开始实现整个方法,包括数据流水线、模型、损失函数和小批量随机梯度下降优化器
d2l包可以直接在conda的prompt里面输入命令 pip install -U d2l 来安装
%matplotlib inline
import random  #导入随机数包
import torch   #
from d2l import torch as d2l		#l是字母
def synthetic_data(w,b,num_examples):
    """生成y=Xw +b+ 噪声"""
    X=torch.normal(0,1,(num_examples,len(w)))
    y=torch.matmul(X,w)+b
    y+=torch.normal(0,0.01,y.shape)
    return X,y.reshape((-1,1))

true_w =torch.tensor([2,-3.4])
true_b=4.2
features,label=synthetic_data(true_w,true_b,1000)
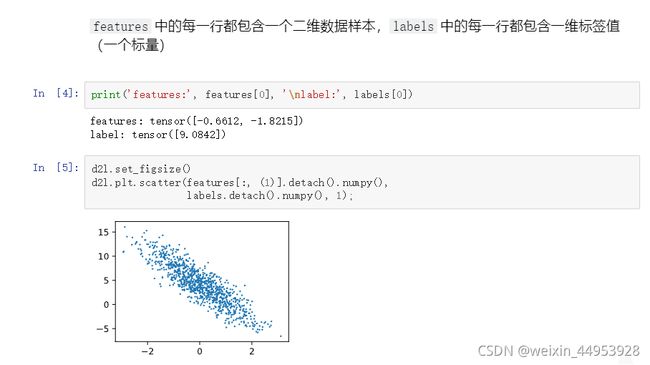
features中的每一行都包含一个二维数据样本,labels 中的每行都包含一维标签值(一个标量)
print('features:',features[0],'\nlabel:',labels[0])
定义一个data_iter 函数, 该函数接收批量大小、特征矩阵和标签向量作为输入,生成大小为batch_size的小批量
def data_iter(batch_size, features, labels):
    num_examples = len(features)
    indices = list(range(num_examples))   #0到1000
    # 这些样本是随机读取的,没有特定顺序
    random.shuffle(indices)
    for i in range(0, num_examples, batch_size):
        batch_indices = torch.tensor(indices[i:min(i +
                                                   batch_size, num_examples)])
        yield features[batch_indices], labels[batch_indices]

batch_size = 10 #小批量

for X, y in data_iter(batch_size, features, labels):
    print(X, '\n', y)
    break
tensor([[ 0.0527, -0.2697],
        [-0.9873,  0.3681],
        [ 1.2239, -0.6601],
        [ 1.1599, -0.6122],
        [-1.9831,  0.5967],
        [ 0.0946,  0.6731],
        [-2.4599, -0.7290],
        [-0.9440,  0.8467],
        [ 0.6230, -0.6486],
        [-0.5504,  0.4925]])
 tensor([[ 5.2405],
        [ 0.9606],
        [ 8.8817],
        [ 8.5919],
        [-1.7813],
        [ 2.1116],
        [ 1.7657],
        [-0.5781],
        [ 7.6454],
        [ 1.4349]])
定义 初始化模型参数
我们通过从均值为0、标准差为0.01的正态分布中采样随机数来初始化权重,并将偏置初始化为0。
w = torch.normal(0, 0.01, size=(2, 1), requires_grad=True)
b = torch.zeros(1, requires_grad=True)
定义模型
def linreg(X, w, b):
    """线性回归模型。"""
    return torch.matmul(X, w) + b
定义损失函数
def squared_loss(y_hat, y):  #预测值,真实值
    """均方损失。"""
    return (y_hat - y.reshape(y_hat.shape))**2 / 2
定义优化算法
def sgd(params, lr, batch_size):    #params:是一个list
    """小批量随机梯度下降。"""
    with torch.no_grad():
        for param in params:
            param -= lr * param.grad / batch_size  #param.grad梯度,batch_size学习率
            param.grad.zero_()#把梯度设置为0
训练过程
lr = 0.03    #学习率
num_epochs = 3  #数据扫三遍
net = linreg    #线性回归模型
loss = squared_loss  #均方损失。

for epoch in range(num_epochs):
    for X, y in data_iter(batch_size, features, labels):  #batch_size 小批量
        l = loss(net(X, w, b), y)  # x和y的小批量损失
        #因为l的形状是[batch_size,1],而不是一个标量,l中的所有元素被加到
        #并以此计算关于[w,b]的梯度
        l.sum().backward()
        sgd([w, b], lr, batch_size)
    with torch.no_grad():
        train_l = loss(net(features, w, b), labels)
        print(f'epoch {epoch + 1}, loss {float(train_l.mean()):f}')
epoch 1, loss 0.033103
epoch 2, loss 0.000124
epoch 3, loss 0.000054
比较真实参数和通过训练学到的参数来评估训练的成功程度
print(f'w的估计误差: {true_w - w.reshape(true_w.shape)}')
print(f'b的估计误差: {true_b - b}')
#输出
w的估计误差: tensor([ 0.0006, -0.0004], grad_fn=)
b的估计误差: tensor([0.0003], grad_fn=)
#2. 线性回归的简洁实现
通过使用深度学习框架来简洁地实现 线性回归模型 生成数据集
import numpy as np
import torch
from torch.utils import data
from d2l import torch as d2l

true_w = torch.tensor([2, -3.4])
true_b = 4.2
features, labels = d2l.synthetic_data(true_w, true_b, 1000)
def synthetic_data(w,b,num_examples):
    """生成y=Xw +b+ 噪声"""
    X=torch.normal(0,1,(num_examples,len(w)))
    y=torch.matmul(X,w)+b
    y+=torch.normal(0,0.01,y.shape)
    return X,y.reshape((-1,1))

true_w =torch.tensor([2,-3.4])
true_b=4.2
features,label=synthetic_data(true_w,true_b,1000)
调用框架中现有的API来读取数据
def load_array(data_arrays, batch_size, is_train=True):
    """构造一个PyTorch数据迭代器。"""
    dataset = data.TensorDataset(*data_arrays)
    return data.DataLoader(dataset, batch_size, shuffle=is_train)

batch_size = 10
data_iter = load_array((features, labels), batch_size)

next(iter(data_iter))
[tensor([[-0.3503, -1.4372],
         [-1.0654,  0.4921],
         [ 0.3208,  0.4166],
         [-2.5884, -0.9802],
         [-1.6644, -0.0677],
         [ 0.7457,  1.1798],
         [-1.4640,  1.7983],
         [ 0.0327, -1.6439],
         [-0.8879, -1.6287],
         [-0.8156, -1.5579]]),
 tensor([[ 8.3842],
         [ 0.3884],
         [ 3.4247],
         [ 2.3456],
         [ 1.0868],
         [ 1.6896],
         [-4.8205],
         [ 9.8460],
         [ 7.9508],
使用框架的预定义好的层
#nn是神经网络的缩写
from torch import nn

net = nn.Sequential(nn.Linear(2, 1))
初始化模型参数
net[0].weight.data.normal_(0, 0.01)		#权重
net[0].bias.data.fill_(0)   #偏差
tensor([0.])
计算均方误差使用的是MSELoss类,也称为平方 范数
loss = nn.MSELoss()
实例化 SGD 实例
trainer = torch.optim.SGD(net.parameters(), lr=0.03)
训练过程代码与我们从零开始实现时所做的非常相似
num_epochs = 3
for epoch in range(num_epochs):
    for X, y in data_iter:
        l = loss(net(X), y)
        trainer.zero_grad()	#先把梯度清零
        l.backward()		#这里pytorch已经做了sum
        trainer.step()		#调用

    l = loss(net(features), labels)
    print(f'epoch {epoch + 1}, loss {l:f}')
epoch 1, loss 0.000232
epoch 2, loss 0.000101
epoch 3, loss 0.000102
比较生成数据集的真实参数和通过有限数据训练获得的模型参数
w = net[0].weight.data
print('w的估计误差:', true_w - w.reshape(true_w.shape))
b = net[0].bias.data
print('b的估计误差:', true_b - b)
w的估计误差: tensor([1.3828e-05, 9.5677e-04])
b的估计误差: tensor([0.0005])

