【设备树笔记整理4】内核对设备树的处理
1 从源头分析_内核head.S对dtb的简单处理
1.1 bootloader向内核传递的参数
(1)bootloader启动内核时,会设置r0,r1,r2三个寄存器:
- r0一般设置为0;
- r1一般设置为machine_id (在使用设备树时该参数没有被使用);
- r2一般设置ATAGS或DTB的开始地址
(2)bootloader给内核传递的参数时有2种方法:ATAGS 或 DTB
对于ATAGS传参方法, 可以参考"毕业班视频-自己写bootloader"
从www.100ask.net下载页面打开百度网盘,
打开如下目录:
100ask分享的所有文件
006_u-boot_内核_根文件系统(新1期_2期间的衔接)
视频
第002课_从0写bootloader_更深刻理解bootloader
(3)补充:machine_id(在以前不使用设备树的内核版本中使用该参数)
1.2 内核的启动流程相关
linux内核的入口是 arch/arm/kernel/head.S 文件中的 stext 函数。
1.3 内核head.S/head-common.S文件简要分析
(1)__lookup_processor_type : 使用汇编指令读取CPU ID, 根据该ID找到对应的proc_info_list结构体(里面含有这类CPU的初始化函数、信息)
(2)__vet_atags : 判断是否存在可用的ATAGS或DTB
(3)__create_page_tables : 创建页表, 即创建虚拟地址和物理地址的映射关系
(4)__enable_mmu : 使能MMU, 以后就要使用虚拟地址了
(5)__mmap_switched : 上述函数里将会调用__mmap_switched
(6)把bootloader传入的r2参数, 保存到变量__atags_pointer中
(7)调用C函数start_kernel
1.4 小结
在head.S/head-common.S文件中和设备树相关的处理:
- 把bootloader传来的r1值, 赋给了C变量: __machine_arch_type
- 把bootloader传来的r2值, 赋给了C变量: __atags_pointer // dtb首地址
2 对设备树中平台信息的处理
2.1 函数调用过程
start_kernel // init/main.c
    setup_arch(&command_line);  // arch/arm/kernel/setup.c
        mdesc = setup_machine_fdt(__atags_pointer);  // arch/arm/kernel/devtree.c
                    early_init_dt_verify(phys_to_virt(dt_phys)  // 判断是否有效的dtb, drivers/of/ftd.c
                                    initial_boot_params = params;
                    mdesc = of_flat_dt_match_machine(mdesc_best, arch_get_next_mach);  // 找到最匹配的machine_desc, drivers/of/ftd.c
                                    while ((data = get_next_compat(&compat))) {
                                        score = of_flat_dt_match(dt_root, compat);
                                        if (score > 0 && score < best_score) {
                                            best_data = data;
                                            best_score = score;
                                        }
                                    }
2.1.1 函数static inline void *phys_to_virt(phys_addr_t x)
该函数用于将物理地址x转换为虚拟地址后返回。
2.1.2 函数bool early_init_dt_verify(void *params);
该函数用来检查地址parms头部中的magic的值来判断该地址是否为dtb文件的地址,如果是,则返回真,并把dtb文件的地址赋给全局变量initial_boot_params。
2.1.3 函数of_flat_dt_match_machine()
(1)设备树根节点的compatible属性列出了一系列的字符串,表示它兼容的单板名,从"最兼容"到次之。
(2)内核中有多个machine_desc,其中有dt_compat成员, 它指向一个字符串数组,里面表示该machine_desc支持哪些单板。
(3)使用compatile属性的值,跟每一个machine_desc.dt_compat比较,成绩为"吻合的compatile属性值的位置",成绩越低越匹配, 对应的machine_desc即被选中。
2.2 小结
在start_kernel函数中根据设备树文件为kernel选择合适的machine_desc。
3 对设备树中运行时配置信息的处理
3.1 函数调用过程:
start_kernel // init/main.c
    setup_arch(&command_line);  // arch/arm/kernel/setup.c
        mdesc = setup_machine_fdt(__atags_pointer);  // arch/arm/kernel/devtree.c
                    early_init_dt_scan_nodes();      // drivers/of/ftd.c
                        /* Retrieve various information from the /chosen node */
                        of_scan_flat_dt(early_init_dt_scan_chosen, boot_command_line);

                        /* Initialize {size,address}-cells info */
                        of_scan_flat_dt(early_init_dt_scan_root, NULL);

                        /* Setup memory, calling early_init_dt_add_memory_arch */
                        of_scan_flat_dt(early_init_dt_scan_memory, NULL);
3.2 关于chosen结点
	chosen {
		bootargs = "noinitrd root=/dev/mtdblock4 rw init=/linuxrc console=ttySAC0,115200";
	};
chosen结点中的bootargs参数保存内核启动时的命令行参数,其中:
(1)"root=/dev/mtdblock4" 指定根文件系统的位置
(2)"init=/linuxrc" 指定了第一个运行的应用程序是哪个
(3)"console=ttySAC0,115200" 指定内核的打印信息通过哪个设备进行输出
3.3 小结
(1)/chosen节点中bootargs属性的值, 存入全局变量: boot_command_line
(2)确定根节点的这2个属性的值: #address-cells, #size-cells
分别存入全局变量: dt_root_addr_cells, dt_root_size_cells
(3)解析/memory中的reg属性, 提取出"base, size", 最终调用memblock_add(base, size);
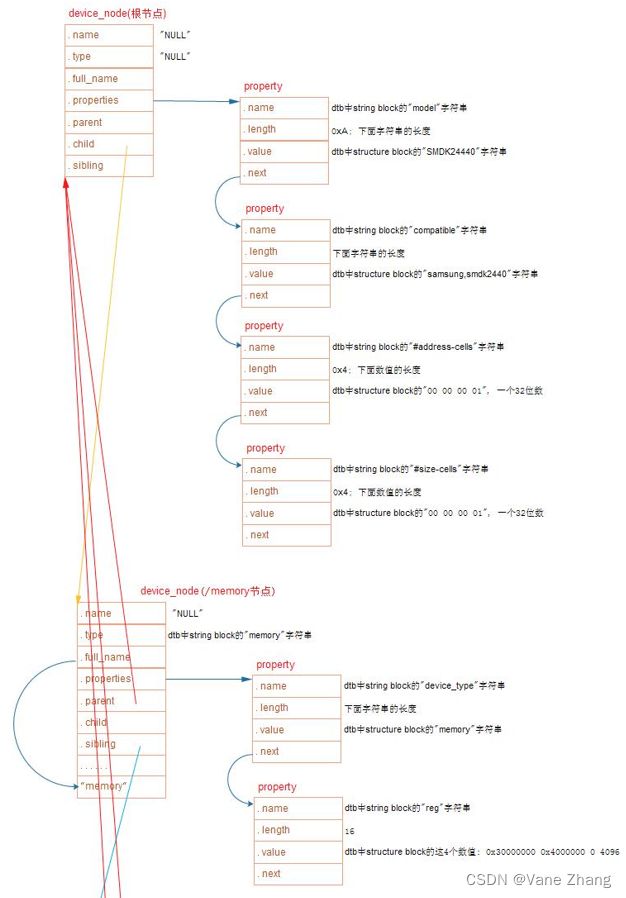
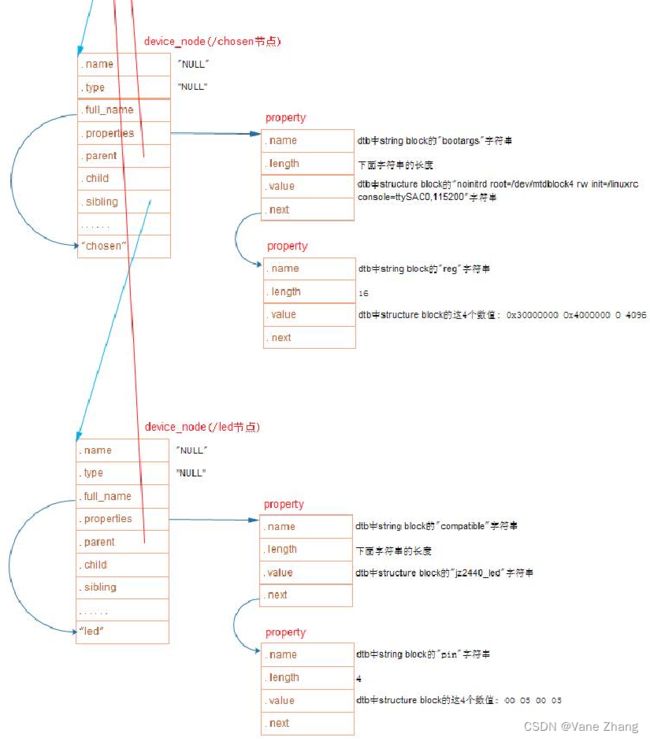
4 dtb转换为device_node
4.1 图示
4.2 函数调用过程
start_kernel // init/main.c
    setup_arch(&command_line);  // arch/arm/kernel/setup.c
        arm_memblock_init(mdesc);   // arch/arm/kernel/setup.c
            early_init_fdt_reserve_self();
                    /* Reserve the dtb region */
                    // 把DTB所占区域保留下来, 即调用: memblock_reserve
                    early_init_dt_reserve_memory_arch(__pa(initial_boot_params),
                                      fdt_totalsize(initial_boot_params),
                                      0);
            early_init_fdt_scan_reserved_mem();  // 根据dtb中的memreserve信息, 调用memblock_reserve

        unflatten_device_tree();    // arch/arm/kernel/setup.c
            __unflatten_device_tree(initial_boot_params, NULL, &of_root,
                        early_init_dt_alloc_memory_arch, false);            // drivers/of/fdt.c

                /* First pass, scan for size */
                size = unflatten_dt_nodes(blob, NULL, dad, NULL);

                /* Allocate memory for the expanded device tree */
                mem = dt_alloc(size + 4, __alignof__(struct device_node));

                /* Second pass, do actual unflattening */
                unflatten_dt_nodes(blob, mem, dad, mynodes);
                    populate_node
                        np = unflatten_dt_alloc(mem, sizeof(struct device_node) + allocl,
                                    __alignof__(struct device_node));

                        np->full_name = fn = ((char *)np) + sizeof(*np);

                        populate_properties
                                pp = unflatten_dt_alloc(mem, sizeof(struct property),
                                            __alignof__(struct property));

                                pp->name   = (char *)pname;
                                pp->length = sz;
                                pp->value  = (__be32 *)val;
4.3 函数详细说明
(1)在DTB文件中,
每一个节点都以TAG(FDT_BEGIN_NODE, 0x00000001)开始, 节点内部可以嵌套其他节点,
每一个属性都以TAG(FDT_PROP, 0x00000003)开始
(2)每一个节点都转换为一个device_node结构体:
 struct device_node {
            const char *name;  // 来自节点中的name属性, 如果没有该属性, 则设为"NULL"
            const char *type;  // 来自节点中的device_type属性, 如果没有该属性, 则设为"NULL"
            phandle phandle;
            const char *full_name;  // 节点的名字, node-name[@unit-address]
            struct fwnode_handle fwnode;

            struct  property *properties;  // 节点的属性
            struct  property *deadprops;    /* removed properties */
            struct  device_node *parent;   // 节点的父亲
            struct  device_node *child;    // 节点的孩子(子节点)
            struct  device_node *sibling;  // 节点的兄弟(同级节点)
        #if defined(CONFIG_OF_KOBJ)
            struct  kobject kobj;
        #endif
            unsigned long _flags;
            void    *data;
        #if defined(CONFIG_SPARC)
            const char *path_component_name;
            unsigned int unique_id;
            struct of_irq_controller *irq_trans;
        #endif
};
(3)device_node结构体中有properties, 用来表示该节点的属性
每一个属性对应一个property结构体:
        struct property {
            char    *name;    // 属性名字, 指向dtb文件中的字符串
            int length;       // 属性值的长度
            void    *value;   // 属性值, 指向dtb文件中value所在位置, 数据仍以big endian存储
            struct property *next;
        #if defined(CONFIG_OF_DYNAMIC) || defined(CONFIG_SPARC)
            unsigned long _flags;
        #endif
        #if defined(CONFIG_OF_PROMTREE)
            unsigned int unique_id;
        #endif
        #if defined(CONFIG_OF_KOBJ)
            struct bin_attribute attr;
        #endif
        };
(4)这些device_node构成一棵树, 根节点为: of_root
5 device_node转换为platform_device
设备树转换过程:dts -> dtb -> device_node -> platform_device
5.1 哪些device_node可以转换为platform_device
5.1.1 并非所有的device_node都会转换为platform_device,只有以下的device_node会转换:
- 根节点下含有compatile属性的子节点
- 含有特殊compatible属性的节点的子节点(子节点必须含有compatible属性):这些特殊的compatilbe属性为: "simple-bus","simple-mfd","isa","arm,amba-bus"
5.1.2 分析如下设备树文件,观察哪些结点可以转换为 platform_device:
/dts-v1/;

/ {
	model = "SMDK24440";
	compatible = "samsung,smdk2440";

	#address-cells = <1>;
	#size-cells = <1>;

	memory@30000000 {
		device_type = "memory";
		reg =  <0x30000000 0x4000000>;
	};

	chosen {
		bootargs = "noinitrd root=/dev/mtdblock4 rw init=/linuxrc console=ttySAC0,115200";
	};

	led {
		compatible = "jz2440_led";
		reg = ;
	};

    i2c {
        compatile = "samsung,i2c";
        at24c02 {
            compatile = "at24c02";
        };
    };

    mytest {
        compatile = "mytest", "simple-bus";
        mytest@0 {
            compatile = "mytest_0";
        };
    };
};
(1)led 结点可以转换为 platform_device,因为其是根节点下的子节点,且含有compatile属性
(2)i2c 结点可以转换为 platform_device,理由同 led 结点。但是 i2c 的子节点 at24c02 不可以转换为 platform_device, 理由其不是根节点下的子节点。另外,像 i2c 下的子节点 at24c02 一般交给驱动程序的中的probe函数来处理,对于i2c驱动,会将其转换I2C_Client结构体。
(3)mytest 结点可以转换为 platform_device,理由同 led 结点。注意,其子节点 mytest@0 也可以转换为 platform_device,理由是 mytest 结点的 compatile 属性为: "simple-bus",且子节点 mytest@0 中也包含 compatile 属性。
[补充]: simple-bus 表示一点简单的内存映射的总线,既然CPU可以访问到这段内存,那么该子节点也会转换为 platform_device。
5.2 device_node 如何转换为 platform_device 的
5.2.1 概述
platform_device中含有resource数组, 它来自device_node的reg, interrupts属性;
platform_device.dev.of_node指向device_node, 可以通过它获得其他属性
5.2.2 函数调用过程
(1)of_platform_default_populate_init (drivers/of/platform.c) 被调用到过程:
start_kernel     // init/main.c
    rest_init();
        pid = kernel_thread(kernel_init, NULL, CLONE_FS);
                    kernel_init
                        kernel_init_freeable();
                            do_basic_setup();
                                do_initcalls();
                                    for (level = 0; level < ARRAY_SIZE(initcall_levels) - 1; level++)
                                        do_initcall_level(level);  // 比如 do_initcall_level(3)
                                                                               for (fn = initcall_levels[3]; fn < initcall_levels[3+1]; fn++)
                                                                                    do_one_initcall(initcall_from_entry(fn));  // 就是调用"arch_initcall_sync(fn)"中定义的fn函数
[补充]: of_platform_default_populate_init()函数的段属性被标记为".initcall3s.init",内核启动时会自动从该段属性中取出对应的函数指针去执行。
(2)of_platform_default_populate_init (drivers/of/platform.c) 生成platform_device的过程:
of_platform_default_populate_init
    of_platform_default_populate(NULL, NULL, NULL);
        of_platform_populate(NULL, of_default_bus_match_table, NULL, NULL)
            for_each_child_of_node(root, child) {
                rc = of_platform_bus_create(child, matches, lookup, parent, true);  // 调用过程看下面
                            dev = of_device_alloc(np, bus_id, parent);   // 根据device_node节点的属性设置platform_device的resource
                if (rc) {
                    of_node_put(child);
                    break;
                }
            }
[补充]: 对于根节点下的每一个一级子节点,都会当做总线结点来处理。会为其创建platform_device,并构造资源变量,并将of_node指针指向对应的设备树的device_node。另外,如果总线结点的子节点中compatile 属性包含"simple-bus","simple-mfd","isa","arm,amba-bus"等特殊属性,也会将其作为总线结点去处理。
(3)of_platform_bus_create(bus, matches, ...)的调用过程(处理bus节点生成platform_devie, 并决定是否处理它的子节点):
        dev = of_platform_device_create_pdata(bus, bus_id, platform_data, parent);  // 生成bus节点的platform_device结构体
        if (!dev || !of_match_node(matches, bus))  // 如果bus节点的compatile属性不吻合matches成表, 就不处理它的子节点
            return 0;

        for_each_child_of_node(bus, child) {    // 取出每一个子节点
            pr_debug("   create child: %pOF\n", child);
            rc = of_platform_bus_create(child, matches, lookup, &dev->dev, strict);   // 处理它的子节点, of_platform_bus_create是一个递归调用
            if (rc) {
                of_node_put(child);
                break;
            }
        }
(4)I2C总线节点的处理过程:
   /i2c节点一般表示i2c控制器, 它会被转换为platform_device, 在内核中有对应的platform_driver;
   platform_driver的probe函数中会调用i2c_add_numbered_adapter:

   i2c_add_numbered_adapter   // drivers/i2c/i2c-core-base.c
        __i2c_add_numbered_adapter
            i2c_register_adapter
                of_i2c_register_devices(adap);   // drivers/i2c/i2c-core-of.c
                    for_each_available_child_of_node(bus, node) {
                        client = of_i2c_register_device(adap, node);
                                        client = i2c_new_device(adap, &info);   // 设备树中的i2c子节点被转换为i2c_client
                    }
(5)SPI总线节点的处理过程:
   /spi节点一般表示spi控制器, 它会被转换为platform_device, 在内核中有对应的platform_driver;
   platform_driver的probe函数中会调用spi_register_master, 即spi_register_controller:

   spi_register_controller        // drivers/spi/spi.c
        of_register_spi_devices   // drivers/spi/spi.c
            for_each_available_child_of_node(ctlr->dev.of_node, nc) {
                spi = of_register_spi_device(ctlr, nc);  // 设备树中的spi子节点被转换为spi_device
                                spi = spi_alloc_device(ctlr);
                                rc = of_spi_parse_dt(ctlr, spi, nc);
                                rc = spi_add_device(spi);
            }
[补充]: 资源包括 ① IO资源 ② 内存资源 ③ 中断资源
6 platform_device跟platform_driver的匹配
涉及到的源码文件:drivers/base/platform.c
6.1 注册 platform_driver 的过程:
platform_driver_register
    __platform_driver_register
        drv->driver.probe = platform_drv_probe;
        driver_register
            bus_add_driver
                klist_add_tail(&priv->knode_bus, &bus->p->klist_drivers);    // 把 platform_driver 放入 platform_bus_type 的driver链表中
                driver_attach
                    bus_for_each_dev(drv->bus, NULL, drv, __driver_attach);  // 对于plarform_bus_type下的每一个设备, 调用__driver_attach
                        __driver_attach
                            ret = driver_match_device(drv, dev);  // 判断dev和drv是否匹配成功
                                        return drv->bus->match ? drv->bus->match(dev, drv) : 1;  // 调用 platform_bus_type.match
                            driver_probe_device(drv, dev);
                                        really_probe
                                            drv->probe  // platform_drv_probe
                                                platform_drv_probe
                                                    struct platform_driver *drv = to_platform_driver(_dev->driver);
                                                    drv->probe
6.2 注册 platform_device 的过程:
platform_device_register
    platform_device_add
        device_add
            bus_add_device
                klist_add_tail(&dev->p->knode_bus, &bus->p->klist_devices); // 把 platform_device 放入 platform_bus_type的device链表中
            bus_probe_device(dev);
                device_initial_probe
                    __device_attach
                        ret = bus_for_each_drv(dev->bus, NULL, &data, __device_attach_driver); // // 对于plarform_bus_type下的每一个driver, 调用 __device_attach_driver
                                    __device_attach_driver
                                        ret = driver_match_device(drv, dev);
                                                    return drv->bus->match ? drv->bus->match(dev, drv) : 1;  // 调用platform_bus_type.match
                                        driver_probe_device
6.3 匹配过程按优先顺序罗列如下:
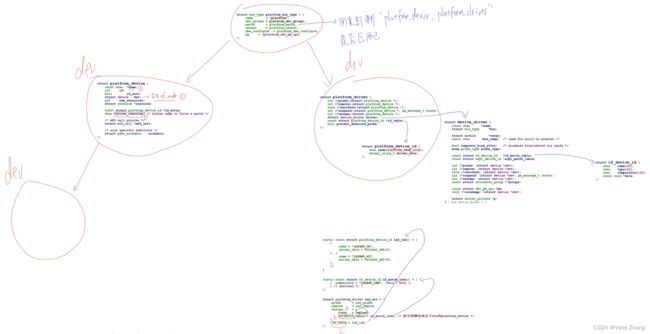
(1)比较 platform_dev.driver_override 和 platform_driver.drv->name
(2)比较 platform_dev.dev.of_node的compatible属性 和 platform_driver.drv->of_match_table
(3)比较 platform_dev.name 和 platform_driver.id_table
(4)比较 platform_dev.name 和 platform_driver.drv->name
[补充]: 匹配函数是platform_bus_type.match, 即platform_match。有一个成功, 即匹配成功。
6.4 补充:图解笔记
7 内核中设备树的操作函数
include/linux/目录下有很多of开头的头文件:
7.1 处理dtb相关的函数
of_fdt.h           // dtb文件的相关操作函数, 我们一般用不到,
                   // 因为dtb文件在内核中已经被转换为device_node树(它更易于使用)
7.2 处理device_node相关的函数
of.h               // 提供设备树的一般处理函数, 比如 of_property_read_u32
                   // (读取某个属性的u32值), of_get_child_count(获取某个device_node的子节点数)
of_address.h       // 地址相关的函数, 比如 of_get_address(获得reg属性中的addr, size值)
of_dma.h           // 设备树中DMA相关属性的函数
of_gpio.h          // GPIO相关的函数
of_graph.h         // GPU相关驱动中用到的函数, 从设备树中获得GPU信息
of_iommu.h         // 很少用到
of_irq.h           // 中断相关的函数
of_mdio.h          // MDIO (Ethernet PHY) API
of_net.h           // OF helpers for network devices.
of_pci.h           // PCI相关函数
of_pdt.h           // 很少用到
of_reserved_mem.h  // reserved_mem的相关函数
7.3 处理platform_device相关的函数
of_platform.h      // 把device_node转换为platform_device时用到的函数,
                   // 比如of_device_alloc(根据device_node分配设置platform_device),
                   //     of_find_device_by_node (根据device_node查找到platform_device),
                   //     of_platform_bus_probe (处理device_node及它的子节点)
of_device.h        // 设备相关的函数, 比如 of_match_device(从matches数组中取出与当前设备最匹配的一项)
8 在根文件系统中查看设备树(有助于调试)
8.1 该文件系统中查看dtb文件
我们知道uboot会把dtb文件传递给内核,并且dtb所占据的那块内存会被保留下来,我们可以在该文件系统中去查看dtb文件,具体查看方法如下:
(1)查看目录:/sys/firmware/fdt        // 原始dtb文件
(2)查看方法:hexdump -C /sys/firmware/fdt
8.2 以目录的形式查看设备树文件
/sys/firmware/devicetree // 以目录结构程现的dtb文件, 根节点对应base目录, 每一个节点对应一个目录, 每一个属性对应一个文件。
8.3 在根文件系统中查看platform_device
/sys/devices/platform // 系统中所有的platform_device, 有来自设备树的, 也有来有.c文件中注册的。对于来自设备树的platform_device,可以进入 /sys/devices/platform/<设备名>/of_node 查看它的设备树属性。(如果有of_node属性,说明该平台设备来自于设备树)
8.4 在/proc目录下查看设备树文件
/proc/device-tree 是链接文件, 指向 /sys/firmware/devicetree/base


