CentOS安装docker
前言
本文是使用CentOS 7 作为示例来安装docker(当然用其他linux发行版也可以的,只是安装命令可能有略微的差异),原则上,CentOS 7、CentOS 8 Stream 、 CentOS 9 Stream 都应该可以。
目前docker有两个版本
- 企业版(Enterprise Edition,EE)(付费)
- 社区版(Community Edition,CE)(免费)
安装方法
您可以根据需要以不同的方式安装 Docker:
- 大多数用户 设置 Docker 的存储库并从中安装,以便于安装和升级任务。这是推荐的方法。
- 一些用户下载 RPM 包并 手动安装它并完全手动管理升级。无法联网的系统上安装 Docker 等情况下很有用。
- 在测试和开发环境中,一些用户选择使用自动化便利脚本来安装 Docker。
存储库安装
以下安装是直接使用的root账号安装,如果你不是root账号,请使用有sudo权限的用户,并且在下面的命令前都加上sudo执行
1. 检查linux版本
Docker 要求 CentOS 系统的内核版本高于 3.10 ,查看本页面的前提条件来验证你的CentOS 版本是否支持 Docker
[root@localhost ~]# uname -r
3.10.0-229.el7.x86_64
2. 卸载旧版本
[root@localhost ~]# yum remove docker \
                   docker-client \
                   docker-client-latest \
                   docker-common \
                   docker-latest \
                   docker-latest-logrotate \
                   docker-logrotate \
                   docker-engine
已加载插件:fastestmirror
参数 docker 没有匹配
参数 docker-client 没有匹配
参数 docker-client-latest 没有匹配
参数 docker-common 没有匹配
参数 docker-latest 没有匹配
参数 docker-latest-logrotate 没有匹配
参数 docker-logrotate 没有匹配
参数 docker-engine 没有匹配
不删除任何软件包
3. 更新yum
[root@localhost ~]# yum -y update
4. 安装yum-utils包(提供yum-config-manager 实用程序)
[root@localhost ~]# yum -y install yum-utils
5. 设置存储库
以下3选1即可
官方存储库
[root@localhost ~]# yum-config-manager \
    --add-repo \
    https://download.docker.com/linux/centos/docker-ce.repo
阿里镜像存储库
[root@localhost ~]# yum-config-manager \
    --add-repo \
    http://mirrors.aliyun.com/docker-ce/linux/centos/docker-ce.repo
清华大学存储库
[root@localhost ~]# yum-config-manager \
    --add-repo \
    https://mirrors.tuna.tsinghua.edu.cn/docker-ce/linux/centos/docker-ce.repo
6. 安装Docker Engine、containerd 和 Docker Compose
如下命令安装我们配置的仓库中最新的版本
[root@localhost ~]# yum -y install docker-ce docker-ce-cli containerd.io docker-compose-plugin
指定版本安装
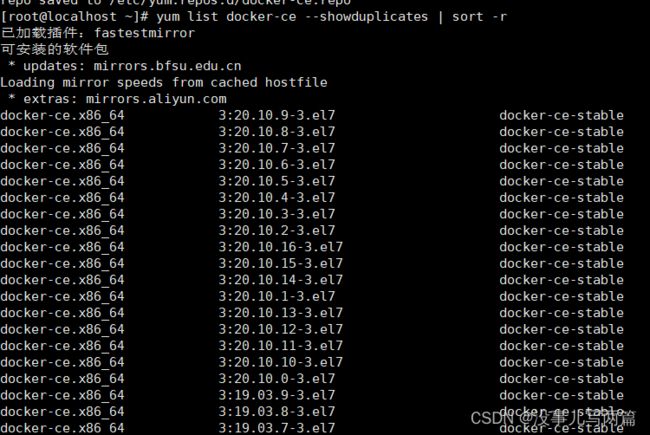
首先,列出可选版本
[root@localhost ~]# yum list docker-ce --showduplicates | sort -r
# 表示版本号
[root@localhost ~]# yum install docker-ce- docker-ce-cli- containerd.io docker-compose-plugin
此命令会安装 Docker,但不会启动 Docker。它会创建一个 docker用户组,但是默认情况下它不会将任何用户添加到该组中。
7. 启动docker
启动命令
[root@localhost ~]# systemctl start docker
关闭命令
[root@localhost ~]# systemctl stop docker
8. 设置docker开机自启动
设置开机自启动
[root@localhost ~]# systemctl enable docker.service
[root@localhost ~]# systemctl enable containerd.service
关闭开机自启动
[root@localhost ~]# systemctl disable docker.service
[root@localhost ~]# systemctl disable containerd.service
9. 创建非root用户来执行docker命令
没有账号,添加账号,并把docker组添加到该账号上(记得给test账号设置密码)
[root@localhost ~]# useradd -G docker test
有账号,修改账号,把docker组添加到该账号上
[root@localhost ~]# usermod -G docker test
我们的账号名称是test,docker组是我们在docker安装是,docker自动创建的用户组。
账号设置成功后,需要重新登录test
10. 验证安装成功
以下方式都可以验证
[test@localhost ~]$ docker --version
Docker version 20.10.16, build aa7e414
[test@localhost ~]$ docker system info
Client:
 Context:    default
 Debug Mode: false
 Plugins:
  app: Docker App (Docker Inc., v0.9.1-beta3)
  buildx: Docker Buildx (Docker Inc., v0.8.2-docker)
  compose: Docker Compose (Docker Inc., v2.5.0)
  scan: Docker Scan (Docker Inc., v0.17.0)
  ..........
  ..........未截完
[test@localhost ~]$ docker run hello-world
Unable to find image 'hello-world:latest' locally
latest: Pulling from library/hello-world
2db29710123e: Pull complete
Digest: sha256:80f31da1ac7b312ba29d65080fddf797dd76acfb870e677f390d5acba9741b17
Status: Downloaded newer image for hello-world:latest

Hello from Docker!
This message shows that your installation appears to be working correctly.

To generate this message, Docker took the following steps:
 1. The Docker client contacted the Docker daemon.
 2. The Docker daemon pulled the "hello-world" image from the Docker Hub.
    (amd64)
 3. The Docker daemon created a new container from that image which runs the
    executable that produces the output you are currently reading.
 4. The Docker daemon streamed that output to the Docker client, which sent it
    to your terminal.

To try something more ambitious, you can run an Ubuntu container with:
 $ docker run -it ubuntu bash

Share images, automate workflows, and more with a free Docker ID:
 https://hub.docker.com/

For more examples and ideas, visit:
 https://docs.docker.com/get-started/
卸载Docker
卸载安装文件
[root@localhost ~]# yum -y remove docker-ce docker-ce-cli containerd.io docker-compose-plugin
删除镜像、容器、配置等文件
[root@localhost ~]# rm -rf /var/lib/docker/
到此,我们的存储库安装的方式就完成了。此方式需要宿主机能联网。但如果宿主机不能联网,我们就需要使用rpm的方式来安装了,这个我们下一篇讲述。
上一篇:Docker 简介
下一篇:Docker rpm安装

