在Windows10上编译grpc工程,得到protoc.exe和grpc_cpp_plugin.exe
grpc是google于2015年发布的一款跨进程、跨语言、开源的RPC(远程过程调用)技术。使用C/S模式,在客户端、服务端共享一个protobuf二进制数据。在点对点通信、微服务、跨语言通信等领域应用很广,下面介绍grpc在windows10上编译,这里以编译grpc v1.42.0版本为例,进行说明,如图(1)所示:
https://github.com/grpc/grpc/tree/v1.42.0/
1 安装编译工具
1.1 安装VS2019
下载VS2019,官网地址:https://visualstudio.microsoft.com/zh-hans/vs/older-downloads/
个人地址: https://pan.baidu.com/s/1VaQC5_CprbTtp8mbPWCaBA
提取码:uo1b
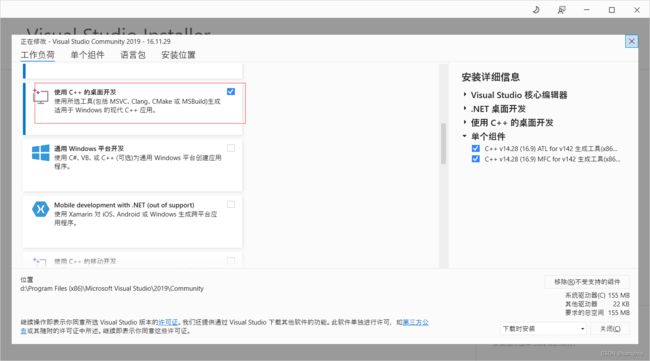
双击该安装包,选中"使用C++的桌面开发",然后一路默认,直到安装完成。
1.2 安装git
git官网: ttps://git-scm.com/
git的安装方法进,参考这篇文件: git详细安装教程
1.3 安装cmake
cmake官网: https://cmake.org/download/
cmake的安装方法,参考这篇文件: cmake安装
1.4 安装nasm
nasm官网: https://www.nasm.us/
nasm的安装方法,参考这篇文件: nasm安装
1.5 安装ninja
ninja官网: https://ninja-build.org/
ninja的安装方法,参考这篇文件: ninja安装
2 配置工程
2.1 Git配置ssh
git配置ssh请参考这篇文章:https://www.cnblogs.com/yiven/p/8465054.html
2.2 修改zlib的版本号
将grpc\third_party\zlib\CMakeLists.txt里的第一行cmake版本号,改成如下:
cmake_minimum_required(VERSION 2.8...3.22)
2.3 下载第三方依赖包
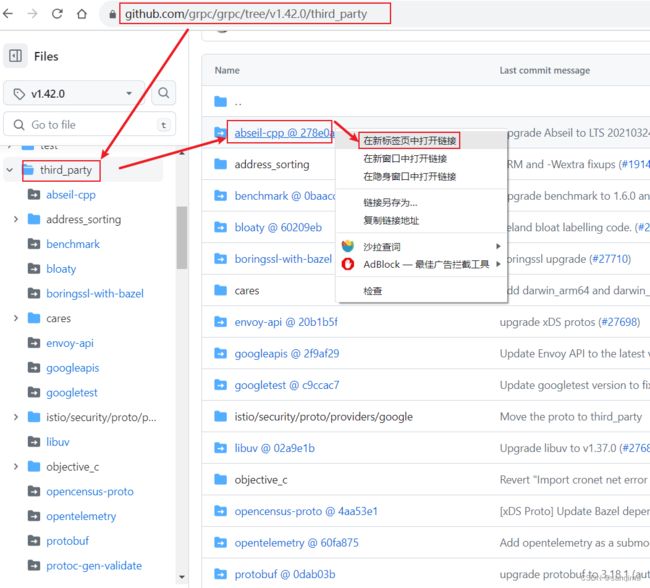
在https://github.com/grpc/grpc/tree/v1.42.0/third_party链接里,
https://github.com/grpc/grpc/tree/v1.42.0/third_party
下载编译所需的第三方依赖包,具体如下:
abseil-cpp
benchmark
bloaty
boringssl
c-ares
data-plane-api
googleapis
googletest
libuv
opencensus-proto
opentelemetry-proto
protobuf
protoc-gen-validate
re2
xds
zlib
将这些第三方依赖包下载后,解压,把它们放到grpc\third_party的同名目录里。
或者,在这个链接里下载: https://pan.baidu.com/s/1fplVSH39XML3pRnshFGnVA
提取码:dair
3 使用cmake编译grpc
打开Git ,克隆grpc工程,然后,设置第三方的依赖库,在使用make命令编译。
## 1) 克隆grpc工程
git clone --recurse-submodules -b v1.42.0 https://gitee.com/mirrors/grpc

## 2) 进入grpc工程
cd grpc

## 3) 同步第三方模块
git submodule sync

## 4)使用VS2019构建静态库
cmake -G "Visual Studio 16 2019" -DgRPC_INSTALL=ON -DgRPC_BUILD_TESTS=OFF ./CMakeLists.txt

## 5) 设置debug目录,并编译
cmake --build . --config Debug

## 6) 设置Releae目录,并编译
cmake --build . --config Release
4 生成protobuf文件
4.1 提取protoc
编译成功后,在grpc\third_party\protobuf\Release目录,会看到protoc.exe、libprotoc.lib等文件;
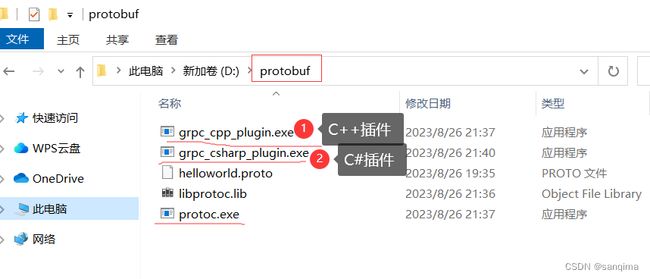
在grpc\Release\grpc_cpp_plugin.exe、grpc_csharp_plugin.exe,将其拷贝出来,放到D:\protobuf,如图(5)所示:
4.2 创建一个helloworld.proto文件
helloworld.proto的内容如下:
//helloworld.proto
syntax = "proto3";

option java_multiple_files = true;
option java_package = "io.grpc.examples.helloworld";
option java_outer_classname = "HelloWorldProto";
option objc_class_prefix = "HLW";

package helloworld;

// The greeting service definition.
service Greeter {
  // Sends a greeting
  rpc SayHello (HelloRequest) returns (HelloReply) {}
}

// The request message containing the user's name.
message HelloRequest {
  string name = 1;
}

// The response message containing the greetings
message HelloReply {
  string message = 1;
}
4.3 生成pb文件
按Win+R快捷键,输入:cmd,依次输入如下命令:
## 1)切换到D盘
D:

## 2)进入protobuf目录
D:\protobuf

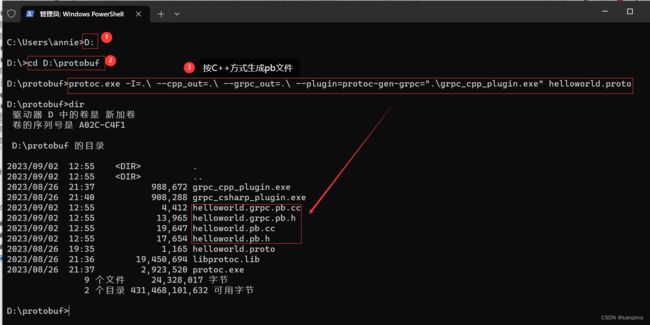
## 3)执行C++方式的protoc命令
protoc.exe -I=.\ --cpp_out=.\ --grpc_out=.\ --plugin=protoc-gen-grpc=".\grpc_cpp_plugin.exe" helloworld.proto

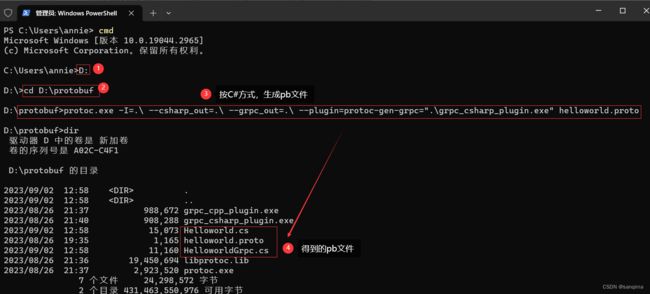
## 4) 执行Csharp方式的protoc命令
protoc.exe -I=.\ --csharp_out=.\ --grpc_out=.\ --plugin=protoc-gen-grpc=".\grpc_csharp_plugin.exe" helloworld.proto
本例采用C++方式的protoc命令,如图(6)所示:
protoc.exe -I=.\ --cpp_out=.\ --grpc_out=.\ --plugin=protoc-gen-grpc=".\grpc_cpp_plugin.exe" helloworld.proto
或按C# (CSharp)方式,生成pb文件,如图(7)所示:
参考文献
【1】 cmake编译grpc v1.42.0
【2】 grpc C++笔记


