SpringBoot3【② Web开发】
SpringBoot3-Web开发
SpringBoot的Web开发能力,由SpringMVC提供。
0. WebMvcAutoConfiguration原理
1. 生效条件
@AutoConfiguration(after = { DispatcherServletAutoConfiguration.class, TaskExecutionAutoConfiguration.class,
		ValidationAutoConfiguration.class }) //在这些自动配置之后
@ConditionalOnWebApplication(type = Type.SERVLET) //如果是web应用就生效,类型SERVLET、REACTIVE 响应式web
@ConditionalOnClass({ Servlet.class, DispatcherServlet.class, WebMvcConfigurer.class })
@ConditionalOnMissingBean(WebMvcConfigurationSupport.class) //容器中没有这个Bean,才生效。默认就是没有
@AutoConfigureOrder(Ordered.HIGHEST_PRECEDENCE + 10)//优先级
@ImportRuntimeHints(WebResourcesRuntimeHints.class)//一些指标统计不用管
public class WebMvcAutoConfiguration {
}
2. 效果——>看@Bean注入的组件
- 放了两个Filter:
-
a.
HiddenHttpMethodFilter;页面表单提交Rest请求(GET、POST、PUT、DELETE)有些版本并没有默认开启我的springMVC笔记,复习RestFul部分也就是说在不支持真实PUT,DELETE请求的地方,可以通过这种包装类的方式伪造一个REST风格的请求 -

-
b.
FormContentFilter: 表单内容Filter,GET(数据放URL后面)、POST(数据放请求体)请求可以携带数据,PUT、DELETE 的请求体数据会被忽略,为了让Tomcat服务器不忽略它们携带的数据,使用它可以不被忽略
-
- 给容器中放了
WebMvcConfigurer组件;给SpringMVC添加各种定制功能- a. 所有的功能最终会和配置文件进行绑定
- b. WebMvcProperties:
spring.mvc配置文件 - c. WebProperties:
spring.web配置文件
	@Configuration(proxyBeanMethods = false)
	@Import(EnableWebMvcConfiguration.class) //额外导入了其他配置
	@EnableConfigurationProperties({ WebMvcProperties.class, WebProperties.class })
	@Order(0)
	public static class WebMvcAutoConfigurationAdapter implements WebMvcConfigurer, ServletContextAware{

    }
只有一个有参构造器,而容器中的组件的构造器和方法的值如果容器中有会自动从容器里取。
		public WebMvcAutoConfigurationAdapter(WebProperties webProperties, WebMvcProperties mvcProperties,
				ListableBeanFactory beanFactory, ObjectProvider<HttpMessageConverters> messageConvertersProvider,
				ObjectProvider<ResourceHandlerRegistrationCustomizer> resourceHandlerRegistrationCustomizerProvider,
				ObjectProvider<DispatcherServletPath> dispatcherServletPath,
				ObjectProvider<ServletRegistrationBean<?>> servletRegistrations) {
			this.resourceProperties = webProperties.getResources();
			this.mvcProperties = mvcProperties;
			this.beanFactory = beanFactory;
			this.messageConvertersProvider = messageConvertersProvider;
			this.resourceHandlerRegistrationCustomizer = resourceHandlerRegistrationCustomizerProvider.getIfAvailable();
			this.dispatcherServletPath = dispatcherServletPath;
			this.servletRegistrations = servletRegistrations;
			this.mvcProperties.checkConfiguration();
		}
3. WebMvcConfigurer接口
提供了配置SpringMVC底层的所有组件入口
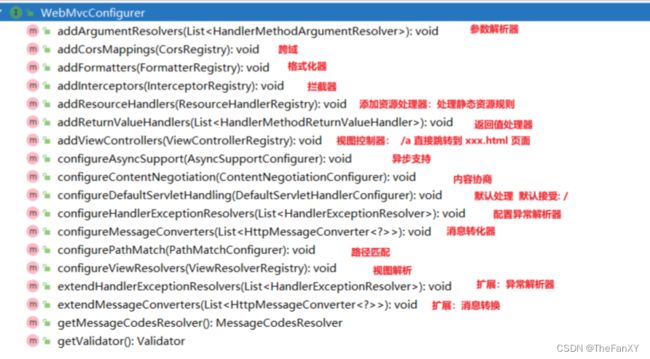
- 参数解析器:SpringMVC的组件里面的参数自动获取需要从ioc获取
- 跨域:用于前后端分离
- 格式化器:如从配置文件的日期字节流读成规定格式的如Date类型的数据
- 拦截器:SpringMVC的拦截器,我的SpringMVC笔记
- 资源处理器:处理静态资源规则
- 视图控制器:springmvc学过,不写Controller方法,直接在配置文件里写的一些网页,如index
- 消息转化器:做消息转化用的,一般不用管
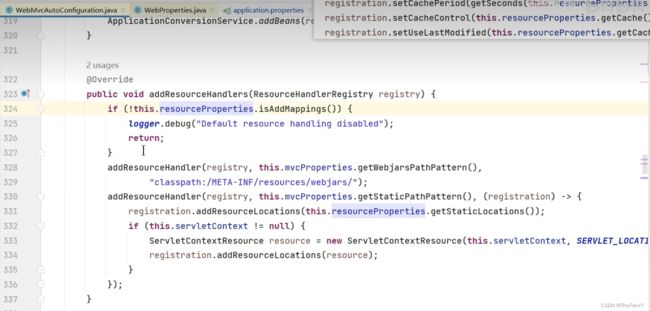
4. 静态资源规则源码
@Override
public void addResourceHandlers(ResourceHandlerRegistry registry) {
    if (!this.resourceProperties.isAddMappings()) {
        logger.debug("Default resource handling disabled");
        return;
    }
    //1、
    addResourceHandler(registry, this.mvcProperties.getWebjarsPathPattern(),
            "classpath:/META-INF/resources/webjars/");
    addResourceHandler(registry, this.mvcProperties.getStaticPathPattern(), (registration) -> {
        registration.addResourceLocations(this.resourceProperties.getStaticLocations());
        if (this.servletContext != null) {
            ServletContextResource resource = new ServletContextResource(this.servletContext, SERVLET_LOCATION);
            registration.addResourceLocations(resource);
        }
    });
}
常见的类路径就是带颜色的java包路径,和带颜色的resource包路径(带颜色需要Idea给它标记,默认一般都有)
/不会拦截页面,只会拦截路径。
/*会路径和页面/*是拦截所有的文件夹,不包含子文件夹
/**是拦截所有的文件夹及里面的子文件夹
相当于/*只有后面一级
/**可以包含多级
- 规则0:如果配置文件把默认配置属性 :配置为
false(默认为true) :spring.web.resources.add-mappings=false直接禁用静态资源配置 - 规则一:访问:
/webjars/**路径就去classpath:/META-INF/resources/webjars/下找资源.- a. maven 导入依赖(不太常用,了解一下即可)
- b.
- 规则二:访问:
/**路径就去静态资源默认的四个位置找资源- a.
classpath:/META-INF/resources/ - b.
classpath:/resources/ - c.
classpath:/static/ - d.
classpath:/public/
- a.
- 规则三:静态资源默认都有缓存规则的设置
- a. 所有缓存的设置,直接通过配置文件:
spring.web - b. cachePeriod: 缓存周期; 多久不用找服务器要新的。 默认没有,以s为单位
- c. cacheControl: HTTP缓存控制;参考网站
- d. useLastModified:是否使用最后一次修改。配合HTTP Cache规则。最后一次修改时间作对比有就上一次浏览器缓存的,时间不同就从服务器获取。
- a. 所有缓存的设置,直接通过配置文件:
如果浏览器访问了一个静态资源
index.js,如果服务这个资源没有发生变化,下次访问的时候就可以直接让浏览器用自己缓存中的东西,而不用给服务器发请求。
registration.setCachePeriod(getSeconds(this.resourceProperties.getCache().getPeriod()));
registration.setCacheControl(this.resourceProperties.getCache().getCachecontrol().toHttpCacheControl());
registration.setUseLastModified(this.resourceProperties.getCache().isUseLastModified());
5. EnableWebMvcConfiguration 源码
在1. 生效条件可以看到 WebMvcAutoConfiguration 存在ConditionMissBean,指的就是WebMvcConfigurationSupport 组件
//SpringBoot 给容器中放 WebMvcConfigurationSupport 组件。
//我们如果自己放了 WebMvcConfigurationSupport 组件,Boot的WebMvcAutoConfiguration都会失效。
@Configuration(proxyBeanMethods = false)
@EnableConfigurationProperties(WebProperties.class)
public static class EnableWebMvcConfiguration extends DelegatingWebMvcConfiguration implements ResourceLoaderAware
{


}
HandlerMapping: 根据请求路径/a找那个handler能处理请求- a.
WelcomePageHandlerMapping:- ①. 访问
/**路径下的所有请求,都在以前四个静态资源路径下找,欢迎页也一样 - ②. 找
index.html:只要静态资源的位置有一个index.html页面,项目启动默认访问
- ①. 访问
- a.
6. 为什么容器中放一个WebMvcConfigurer就能配置底层行为
专门写了一个授权类,然后让WebMvcAutoConfiguration类去继承,在这个delegate类中注入所有的webMvcConfiguration配置类,然后让所有的配置类生效 ——>雷神视频p32讲解
- WebMvcAutoConfiguration 是一个自动配置类,它里面有一个
EnableWebMvcConfiguration内部静态类 EnableWebMvcConfiguration继承于DelegatingWebMvcConfiguration,这两个都生效DelegatingWebMvcConfiguration利用 DI (@AutoWire)把容器中 所有WebMvcConfigurer注入进来- 别人调用
DelegatingWebMvcConfiguration的方法配置底层规则,而它遍历调用所有WebMvcConfigurer的配置底层方法。
7. WebMvcConfigurationSupport
提供了很多的默认设置。
判断系统中是否有相应的类:如果有,就加入相应的 HttpMessageConverter
jackson2Present = ClassUtils.isPresent("com.fasterxml.jackson.databind.ObjectMapper", classLoader) &&
				ClassUtils.isPresent("com.fasterxml.jackson.core.JsonGenerator", classLoader);
jackson2XmlPresent = ClassUtils.isPresent("com.fasterxml.jackson.dataformat.xml.XmlMapper", classLoader);
jackson2SmilePresent = ClassUtils.isPresent("com.fasterxml.jackson.dataformat.smile.SmileFactory", classLoader);
1. Web场景
1. 自动配置
1、整合web场景
        <dependency>
            <groupId>org.springframework.bootgroupId>
            <artifactId>spring-boot-starter-webartifactId>
        dependency>
2、引入了 autoconfigure 功能
3、@EnableAutoConfiguration注解使用@Import(AutoConfigurationImportSelector.class)批量导入组件
4、加载 META-INF/spring/org.springframework.boot.autoconfigure.AutoConfiguration.imports 文件中配置的所有组件
5、所有自动配置类如下
org.springframework.boot.autoconfigure.web.client.RestTemplateAutoConfiguration
org.springframework.boot.autoconfigure.web.embedded.EmbeddedWebServerFactoryCustomizerAutoConfiguration
====以下是响应式web场景和现在的没关系======
org.springframework.boot.autoconfigure.web.reactive.HttpHandlerAutoConfiguration
org.springframework.boot.autoconfigure.web.reactive.ReactiveMultipartAutoConfiguration
org.springframework.boot.autoconfigure.web.reactive.ReactiveWebServerFactoryAutoConfiguration
org.springframework.boot.autoconfigure.web.reactive.WebFluxAutoConfiguration
org.springframework.boot.autoconfigure.web.reactive.WebSessionIdResolverAutoConfiguration
org.springframework.boot.autoconfigure.web.reactive.error.ErrorWebFluxAutoConfiguration
org.springframework.boot.autoconfigure.web.reactive.function.client.ClientHttpConnectorAutoConfiguration
org.springframework.boot.autoconfigure.web.reactive.function.client.WebClientAutoConfiguration
================以上没关系=================
org.springframework.boot.autoconfigure.web.servlet.DispatcherServletAutoConfiguration
org.springframework.boot.autoconfigure.web.servlet.ServletWebServerFactoryAutoConfiguration
org.springframework.boot.autoconfigure.web.servlet.error.ErrorMvcAutoConfiguration
org.springframework.boot.autoconfigure.web.servlet.HttpEncodingAutoConfiguration
org.springframework.boot.autoconfigure.web.servlet.MultipartAutoConfiguration
org.springframework.boot.autoconfigure.web.servlet.WebMvcAutoConfiguration
6、绑定了配置文件的一堆配置项,可以通过进入这些类看他们的@EnableConfigurationProperties()注解逐个查看
- 1、SpringMVC的所有配置
spring.mvc - 2、Web场景通用配置
spring.web - 3、文件上传配置
spring.servlet.multipart - 4、服务器的配置
server: 比如:编码方式
2. 默认效果
默认配置:
- 包含了
ContentNegotiatingViewResolver和BeanNameViewResolver组件,方便视图解析,现在前后端分离,一般是返回json数据 - 默认的静态资源处理机制: 静态资源放在
static文件夹下即可直接访问 - 自动注册了
Converter,GenericConverter,Formatter组件,适配常见数据类型转换和格式化需求 - 支持
HttpMessageConverters,可以方便返回json等数据类型 - 注册
MessageCodesResolver,方便国际化及错误消息处理,用的比较少,一般企业都会做两套网站 - 支持 静态
index.html - 自动使用
ConfigurableWebBindingInitializer,实现消息处理、数据绑定、类型转化、数据校验等功能
重要:
● 如果想保持 boot mvc 的默认配置,并且自定义更多的 mvc 配置,如:interceptors, formatters, view controllers 等。可以使用@Configuration注解添加一个WebMvcConfigurer类型的配置类,并不要标注@EnableWebMvc
● 如果想保持 boot mvc 的默认配置,但要自定义核心组件实例,比如:RequestMappingHandlerMapping,RequestMappingHandlerAdapter, 或ExceptionHandlerExceptionResolver,给容器中放一个WebMvcRegistrations组件即可
● 如果想全面接管 Spring MVC,@Configuration标注一个配置类,并加上@EnableWebMvc注解,实现WebMvcConfigurer接口
2. 静态资源
1. 默认规则
1. 静态资源映射
静态资源映射规则在 WebMvcAutoConfiguration 中进行了定义:
/webjars/**的所有路径 资源都在classpath:/META-INF/resources/webjars//**的所有路径 资源都在classpath:/META-INF/resources/、classpath:/resources/、classpath:/static/、classpath:/public/- 所有静态资源都定义了
缓存规则。【浏览器访问过一次,就会缓存一段时间】,但此功能参数无默认值
a.period: 缓存间隔。 默认 0S;
b.cacheControl:缓存控制。 默认无;
c.useLastModified:是否使用lastModified头。 默认 false;
2. 静态资源缓存
如前面所述
- 所有静态资源都定义了
缓存规则。【浏览器访问过一次,就会缓存一段时间】,但此功能参数无默认值
a.period: 缓存间隔。 默认 0S;
b.cacheControl:缓存控制。 默认无;
c.useLastModified:是否使用lastModified头。 默认 false;
3. 欢迎页
欢迎页规则在 WebMvcAutoConfiguration 中进行了定义:
- 在静态资源目录下找
index.html - 没有就在
templates下找index模板页
4. Favicon
- 在静态资源目录下找
favicon.ico- 非重点:其实根据官网知道,springboot配合浏览器,浏览器一般可能会请求一个favicon.ico的资源,也就是网站图标,springboot中如果把图标放在上述静态资源的四个目录之一,也能让项目运行自带图标
5. 缓存实验
server.port=9000

#1、spring.web:
# 1.配置国际化的区域信息
# 2.静态资源策略(开启、处理链、缓存)

#开启静态资源映射规则 (默认是开启的)
spring.web.resources.add-mappings=true

#设置缓存
#spring.web.resources.cache.period=3600
##缓存详细合并项控制,覆盖period配置:
## 浏览器第一次请求服务器,服务器告诉浏览器此资源缓存7200秒,7200秒以内的所有此资源访问不用发给服务器请求,7200秒以后发请求给服务器
spring.web.resources.cache.cachecontrol.max-age=7200
#使用资源 last-modified 时间,来对比服务器和浏览器的资源是否相同没有变化。相同返回 304
spring.web.resources.cache.use-last-modified=true
浏览器返回状态码304表示请求的资源未被修改,可以直接使用缓存的版本。
2. 自定义静态资源规则
自定义静态资源路径、自定义缓存规则
1. 配置方式
spring.mvc: 静态资源访问前缀路径
spring.web:
● 静态资源目录
● 静态资源缓存策略
总配置
#1、spring.web:
# 1.配置国际化的区域信息
# 2.静态资源策略(开启、处理链、缓存)

#开启静态资源映射规则
spring.web.resources.add-mappings=true

#设置缓存
spring.web.resources.cache.period=3600
##缓存详细合并项控制,覆盖period配置:
## 浏览器第一次请求服务器,服务器告诉浏览器此资源缓存7200秒,7200秒以内的所有此资源访问不用发给服务器请求,7200秒以后发请求给服务器
spring.web.resources.cache.cachecontrol.max-age=7200
## 共享缓存
spring.web.resources.cache.cachecontrol.cache-public=true
#使用资源 last-modified 时间,来对比服务器和浏览器的资源是否相同没有变化。相同返回 304
spring.web.resources.cache.use-last-modified=true

#自定义静态资源文件夹位置
spring.web.resources.static-locations=classpath:/a/,classpath:/b/,classpath:/static/

#2、 spring.mvc
## 2.1. 自定义webjars路径前缀
spring.mvc.webjars-path-pattern=/wj/**
## 2.2. 静态资源访问路径前缀 这样就不用非得使用拦截器去做处理
spring.mvc.static-path-pattern=/static/**
开启静态资源映射规则对应源码
# 开启静态资源映射规则
spring.web.resources.add-mappings=true
2. 代码方式
● 容器中只要有一个 WebMvcConfigurer 组件。配置的底层行为都会生效
● @EnableWebMvc //禁用boot的默认配置
遇到不太会写或者遗忘的情况,可以去看WebMvcAutoConfiguration类,它实现了WebMvcConfigurer接口,并重写了默认的方法,我们根据它的代码学习如何重写。
这里哪怕我们没有调用父类方法,它依然在,因为默认会调用父类的方法,把默认路径加上。
@Configuration //这是一个配置类
public class MyConfig implements WebMvcConfigurer {


    @Override
    public void addResourceHandlers(ResourceHandlerRegistry registry) {
        // 保留以前的springmvc自定义的配置,不写也成立 boot的会自动调用
        // WebMvcConfigurer.super.addResourceHandlers(registry);
        //自己写新的规则。
        registry.addResourceHandler("/static/**")
                .addResourceLocations("classpath:/a/","classpath:/b/")
                .setCacheControl(CacheControl.maxAge(1180, TimeUnit.SECONDS));
    }
}
@Configuration //这是一个配置类,给容器中放一个 WebMvcConfigurer 组件,就能自定义底层
public class MyConfig  /*implements WebMvcConfigurer*/ {


    @Bean
    public WebMvcConfigurer webMvcConfigurer(){
        return new WebMvcConfigurer() {
            @Override
            public void addResourceHandlers(ResourceHandlerRegistry registry) {
                registry.addResourceHandler("/static/**")
                        .addResourceLocations("classpath:/a/", "classpath:/b/")
                        .setCacheControl(CacheControl.maxAge(1180, TimeUnit.SECONDS));
            }
        };
    }

}
3. 路径匹配
Spring5.3 之后加入了更多的
请求路径匹配的实现策略;
以前只支持AntPathMatcher策略, 现在提供了PathPatternParser策略。并且可以让我们指定到底使用那种策略。
1. Ant风格路径用法
Ant 风格的路径模式语法具有以下规则:
*:表示任意数量的字符。?:表示任意一个字符。**:表示任意数量的目录。{}:表示一个命名的模式占位符。[]:表示字符集合,例如[a-z]表示小写字母。
例如:*.html匹配任意名称,扩展名为.html的文件。/folder1/*/*.java匹配在folder1目录下的任意两级目录下的.java文件。/folder2/**/*.jsp匹配在folder2目录下任意目录深度的.jsp文件。/{type}/{id}.html匹配任意文件名为{id}.html,在任意命名的{type}目录下的文件。
注意:Ant 风格的路径模式语法中的特殊字符需要转义,如:- 要匹配文件路径中的星号,则需要转义为
\\* - 要匹配文件路径中的问号,则需要转义为
\\?
2. 模式切换
AntPathMatcher与PathPatternParser
●PathPatternParser在 jmh 基准测试下,有 6~8 倍吞吐量提升,降低 30%~40%空间分配率
●PathPatternParser兼容AntPathMatcher语法,并支持更多类型的路径模式
●PathPatternParser"**"多段匹配 的支持仅允许在模式末尾使用
    @GetMapping("/a*/b?/{p1:[a-f]+}")
    public String hello(HttpServletRequest request,
                        @PathVariable("p1") String path) {

        log.info("路径变量p1: {}", path);
        //获取请求路径
        String uri = request.getRequestURI();
        return uri;
    }
总结:
- 使用默认的路径匹配规则,是由
PathPatternParser提供的 - 如果路径中间需要有
**,替换成ant风格路径
# 改变路径匹配策略:
# ant_path_matcher 老版策略;
# path_pattern_parser 新版策略;
spring.mvc.pathmatch.matching-strategy=ant_path_matcher
4. 内容协商
一套系统适配多端数据返回

1. 多端内容适配
1. 默认规则
- SpringBoot 多端内容适配。
1.1. 基于请求头内容协商:(默认开启)
1.1.1. 客户端向服务端发送请求,携带HTTP标准的Accept请求头。
1.1.1.1. Accept:application/json、text/xml、text/yaml
1.1.1.2. 服务端根据客户端请求头期望的数据类型进行动态返回
1.2. 基于请求参数内容协商:(需要开启)
1.2.1. 发送请求GET /projects/spring-boot?format=json
1.2.2. 匹配到@GetMapping("/projects/spring-boot")
1.2.3. 根据参数协商,优先返回 json 类型数据**【需要开启参数匹配设置】**
1.2.4. 发送请求GET /projects/spring-boot?format=xml,优先返回 xml 类型数据
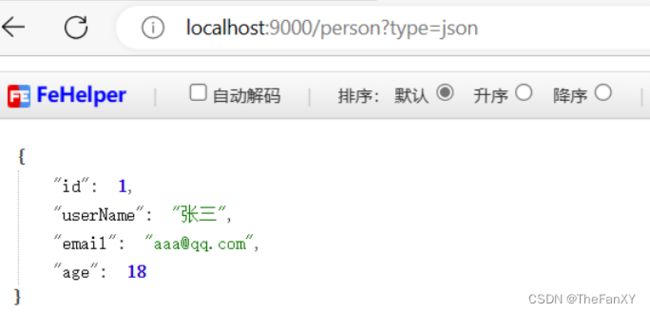
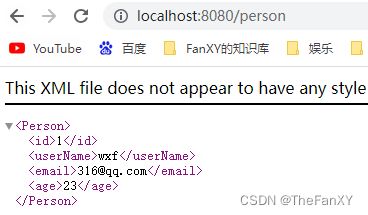
2. 效果演示
请求同一个接口,可以返回json和xml不同格式数据
springboot的web场景启动器默认导入了jackson的包,默认支持把java对象返回为json类型数据。
- 引入支持写出xml内容依赖
<dependency>
    <groupId>com.fasterxml.jackson.dataformatgroupId>
    <artifactId>jackson-dataformat-xmlartifactId>
dependency>
- 标注注解
@JacksonXmlRootElement  // 可以写出为xml文档
@Data
public class Person {
    private Long id;
    private String userName;
    private String email;
    private Integer age;
}
- 开启基于请求参数的内容协商
# 开启基于请求参数的内容协商功能。 默认参数名:format。 默认此功能不开启
spring.mvc.contentnegotiation.favor-parameter=true
# 指定内容协商时使用的参数名。默认是 format
spring.mvc.contentnegotiation.parameter-name=type
- 效果
3. 配置协商规则与支持类型
- 修改内容协商方式
#使用参数进行内容协商
spring.mvc.contentnegotiation.favor-parameter=true
#自定义参数名,默认为format
spring.mvc.contentnegotiation.parameter-name=myparam
但是现在也就只能返回xml和json数据类型,如果想用别的需要进行配置
- 大多数 MediaType 都是开箱即用的。也可以自定义内容类型,如:
spring.mvc.contentnegotiation.media-types.yaml=text/yaml
2. 自定义内容返回
1. 增加yaml返回支持
导入依赖
<dependency>
    <groupId>com.fasterxml.jackson.dataformatgroupId>
    <artifactId>jackson-dataformat-yamlartifactId>
dependency>
把对象写出成YAML
    public static void main(String[] args) throws JsonProcessingException {
        Person person = new Person();
        person.setId(1L);
        person.setUserName("张三");
        person.setEmail("[email protected]");
        person.setAge(18);
		// 这个设置可以把默认添加的分页符 --- 去除,还有别的一些配置方法
        YAMLFactory factory = new YAMLFactory().disable(YAMLGenerator.Feature.WRITE_DOC_START_MARKER);
        ObjectMapper mapper = new ObjectMapper(factory);

        String s = mapper.writeValueAsString(person);
        System.out.println(s);
    }
编写配置
#新增一种媒体类型
spring.mvc.contentnegotiation.media-types.yaml=text/yaml
在我们刚刚使用的配置类中,配置的WebMvcConfigurer组件中,增加HttpMessageConverter组件,专门负责把对象写出为yaml格式
    @Bean
    public WebMvcConfigurer webMvcConfigurer(){
        return new WebMvcConfigurer() {
            @Override //配置一个能把对象转为yaml的messageConverter
            public void configureMessageConverters(List<HttpMessageConverter<?>> converters) {
                converters.add(new MyYamlHttpMessageConverter());
            }
        };
    }
2. 思考:如何增加其他
- 配置媒体类型支持:
spring.mvc.contentnegotiation.media-types.yaml=text/yaml
- 编写对应的
HttpMessageConverter,要告诉Boot这个支持的媒体类型- 按照3的示例
- 把MessageConverter组件加入到底层
- 容器中放一个
WebMvcConfigurer组件,并配置底层的MessageConverter
- 容器中放一个
3. HttpMessageConverter的示例写法
一般我们把这种类型的组件类都放在component包下
public class MyYamlHttpMessageConverter extends AbstractHttpMessageConverter<Object> {

    private ObjectMapper objectMapper = null; //把对象转成yaml

    public MyYamlHttpMessageConverter(){
        //告诉SpringBoot这个MessageConverter支持哪种媒体类型  //媒体类型
        super(new MediaType("text", "yaml", Charset.forName("UTF-8")));
        YAMLFactory factory = new YAMLFactory()
                .disable(YAMLGenerator.Feature.WRITE_DOC_START_MARKER);
        this.objectMapper = new ObjectMapper(factory);
    }

    @Override
    protected boolean supports(Class<?> clazz) {
        //只要是对象类型,不是基本类型
        return true;
    }

    @Override  //@RequestBody
    protected Object readInternal(Class<?> clazz, HttpInputMessage inputMessage) throws IOException, HttpMessageNotReadableException {
        return null;
    }

    @Override //@ResponseBody 把对象怎么写出去
    protected void writeInternal(Object methodReturnValue, HttpOutputMessage outputMessage) throws IOException, HttpMessageNotWritableException {

        //try-with写法,自动关流
        try(OutputStream os = outputMessage.getBody()){
            this.objectMapper.writeValue(os,methodReturnValue);
        }

    }
}
3. 内容协商原理-HttpMessageConverter
●
HttpMessageConverter怎么工作?合适工作?
● 定制HttpMessageConverter来实现多端内容协商
● 编写WebMvcConfigurer提供的configureMessageConverters底层,修改底层的MessageConverter
1. @ResponseBody由HttpMessageConverter处理
雷神源码级讲解 P35
标注了@ResponseBody的返回值 将会由支持它的 HttpMessageConverter写给浏览器
- 如果controller方法的返回值标注了
@ResponseBody注解
1.1. 请求进来先来到DispatcherServlet的doDispatch()进行处理
1.2. 找到一个HandlerAdapter适配器。利用适配器执行目标方法
1.3.RequestMappingHandlerAdapter来执行,调用invokeHandlerMethod()来执行目标方法
1.4. 目标方法执行之前,准备好两个东西
1.4.1.HandlerMethodArgumentResolver:参数解析器,确定目标方法每个参数值
1.4.2.HandlerMethodReturnValueHandler:返回值处理器,确定目标方法的返回值改怎么处理
1.5.RequestMappingHandlerAdapter里面的invokeAndHandle()真正执行目标方法
1.6. 目标方法执行完成,会返回返回值对象
1.7. 找到一个合适的返回值处理器HandlerMethodReturnValueHandler
1.8. 最终找到RequestResponseBodyMethodProcessor能处理 标注了@ResponseBody注解的方法
1.9.RequestResponseBodyMethodProcessor调用writeWithMessageConverters,利用MessageConverter(消息转换器)把返回值写出去
上面解释:
@ResponseBody由HttpMessageConverter处理
HttpMessageConverter会先进行内容协商
2.1. 遍历所有的MessageConverter看谁支持这种内容类型的数据
2.2. 默认MessageConverter有以下
2.3.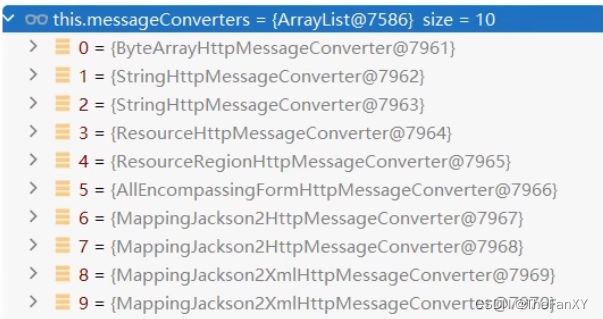
2.4. 最终因为要json所以MappingJackson2HttpMessageConverter支持写出json
2.5. jackson用ObjectMapper把对象写出去
2. WebMvcAutoConfiguration提供几种默认HttpMessageConverters
● EnableWebMvcConfiguration通过 addDefaultHttpMessageConverters添加了默认的MessageConverter;如下:
○ ByteArrayHttpMessageConverter: 支持字节数据读写
○ StringHttpMessageConverter: 支持字符串读写
○ ResourceHttpMessageConverter:支持资源读写
○ ResourceRegionHttpMessageConverter: 支持分区资源写出
○ AllEncompassingFormHttpMessageConverter:支持表单xml/json读写
○ MappingJackson2HttpMessageConverter: 支持请求响应体Json读写
默认8个:
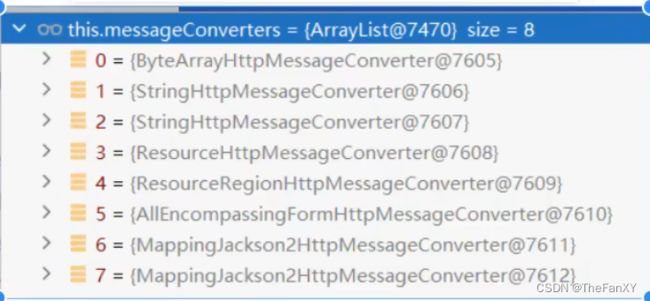
这里可能系统出现一些bug,同样的转换器配置了两遍
系统提供默认的
MessageConverter功能有限,仅用于json或者普通返回数据。额外增加新的内容协商功能,必须增加新的HttpMessageConverter
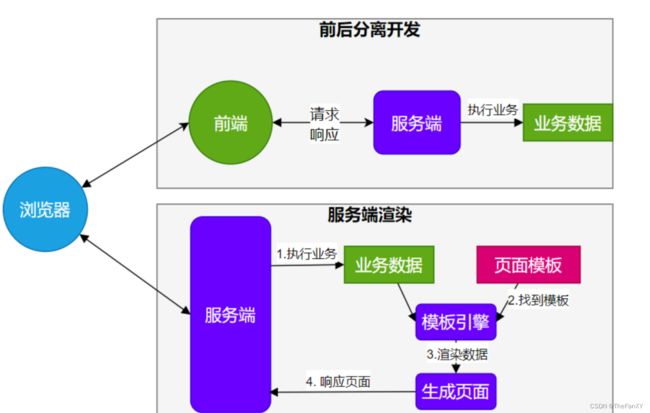
5. 模板引擎
- 由于 SpringBoot 使用了嵌入式 Servlet 容器。所以 JSP 默认是不能使用的。
- 如果需要服务端页面渲染,优先考虑使用
模板引擎。
模板引擎页面默认放在 src/main/resources/templates
SpringBoot 包含以下模板引擎的自动配置
● FreeMarker
● Groovy
● Thymeleaf
● Mustache
Thymeleaf官网
DOCTYPE html>
<html xmlns:th="http://www.thymeleaf.org">
<head>
	<title>Good Thymes Virtual Grocerytitle>
	<meta http-equiv="Content-Type" content="text/html; charset=UTF-8" />
	<link rel="stylesheet" type="text/css" media="all" th:href="@{/css/gtvg.css}" />
head>
<body>
	<p th:text="#{home.welcome}">Welcome to our grocery store!p>