IoT hardware doc
XC4388 Arduino Yun Shield
短接arduino 的两个pin值
In a UNO the uart connection between the mega328P and mega16u2 will influence the bridge feature of the Yun Shield. Therefore we have to disconnect it by setting the mega16u2 into reset mode, as below:

if you buy the Arduino Yun Wifi shield. Inside the package, there is a small component for users to shortcut the two pins
Use with Arduino UNO
Note: No need to put the jumper anymore in Yun Shield v1.1.6 and Yun Shield v2.4
Note: USB upgrade/debug won’t work after this change: the User will have to upgrade sketches and debug via the Arduino IDE via WiFi (see examples)
Put the Yun Shield on top of Uno and power it via DC jack.
https://www.arduino.cc/en/Guide/ArduinoYunShield#quick-setup
When you first power on the board to which the Yún Shield is attached, it will create a WiFi network called ArduinoYun-XXXXXXXXXXXX. Connect your computer to this network.
Once you've obtained an IP address, open a web browser, and enter http://arduino.local or 192.168.240.1 in the address bar. After a few moments, a web page will appear asking for a password. Enter "arduino" and click the Log In button.
Programming the attached board over WiFi
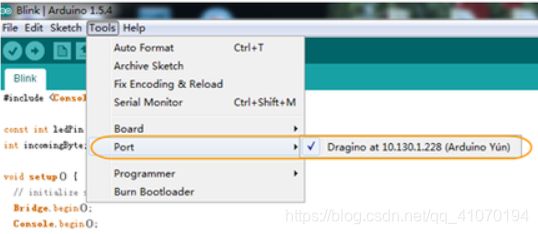
To see the Console, select your Yún's name and IP address in the Port menu. The Yún Shied 101 will only show up in the Ports menu if your computer is on the same LAN as the Yún.
DETECT YUN SHIELD
Make sure your laptop and Yun Shield are on the same network. The Yun Shield will broadcast data on this network and the Arduino IDE will receive this data and show the Yun Shield in Tools →Port.
Upload via WiFi/ LAN from IDE
- In the Arduino IDE, choose the correct board type for the AVR module.
- In the Arduino IDE → port, choose the correct port. (Should be Arduino Yun port with an ip address)
- In the Yun Shield GUI → Sensor page, choose the correct board type for upload.
- Compile the sketch and upload it to the Arduino Board. During upload, the Yun Shield will ask you to key in the password, by default, the password is dragino.
EXAMPLE : UPLOAD DATA TO IOT SERVER
https://osoyoo.com/2018/03/27/how-to-use-the-yun-shield-with-arduino/
// include all Libraries needed:
#include "Process.h"	//Process lib use to call Linux Commands in Yun Shield
#include "Console.h"	//Console lib, used to show debug info in Arduino IDE
#include "passwords.h"      // contains my passwords, see below

/*
  NOTE: passwords.h is not included with this repo because it contains my passwords.
 You need to create it for your own version of this application.  To do so, make
 a new tab in Arduino, call it passwords.h, and include the following variables and constants:

 #define APIKEY        "foo"                  // replace your pachube api key here
 #define FEEDID        “0000”                   // replace your feed ID
 #define USERAGENT     "my-project"           // user agent is the project name
 */


// set up net client info:
const unsigned long postingInterval = 60000;  //delay between updates to xively.com
unsigned long lastRequest = 0;      // when you last made a request
String dataString = "";

void setup() {
  // start console:
  Bridge.begin();
  Console.begin();

  while (!Console);   // wait for Network Serial to open
  Console.println("Xively client");

  // Do a first update immediately
  updateData();
  sendData();
  lastRequest = millis();
}

void loop() {
  // get a timestamp so you can calculate reading and sending intervals:
  long now = millis();

  // if the sending interval has passed since your
  // last connection, then connect again and send data:
  if (now - lastRequest >= postingInterval) {
    updateData();
    sendData();
    lastRequest = now;
  }
}

void updateData() {
  // convert the readings to a String to send it:
  dataString = "Temperature,";
  dataString += random(10) + 20;
  // add pressure:
  dataString += "\nPressure,";
  dataString += random(5) + 100;
}

// this method makes a HTTP connection to the server:
void sendData() {
  // form the string for the API header parameter:
  String apiString = "X-ApiKey: ";
  apiString += APIKEY;

  // form the string for the URL parameter:
  String url = "https://api.xively.com/v2/feeds/";
  url += FEEDID;
  url += ".csv";

  // Send the HTTP PUT request, form the linux command and use Process Class to send this command to Yun Shield

  // Is better to declare the Process here, so when the
  // sendData function finishes the resources are immediately
  // released. Declaring it global works too, BTW.
  Process xively;
  Console.print("\n\nSending data... ");
  xively.begin("curl");
  xively.addParameter("-k");
  xively.addParameter("--request");
  xively.addParameter("PUT");
  xively.addParameter("--data");
  xively.addParameter(dataString);
  xively.addParameter("--header");
  xively.addParameter(apiString);
  xively.addParameter(url);
  xively.run();
  Console.println("done!");