springboot整合websocket实现简单聊天功能
什么是websocket?
WebSocket 是 HTML5 开始提供的一种在单个 TCP 连接上进行全双工通讯的协议,使得客户端和服务器之间的数据交换变得更加简单,允许服务端主动向客户端推送数据。

WebSocket消息推送流程

由于springboot创建项目相对比较简单,配置也很简单
使用idea创建一个springboot项目

需要的依赖:
选上这几个就够了

pom文件:
    4.0.0

        org.springframework.boot
        spring-boot-starter-parent
        2.3.4.RELEASE


    com.xiaomifeng1010
    websocketdemo
    0.0.1-SNAPSHOT
    war
    websocketdemo
    Demo project for Spring Boot


        1.8


            org.springframework.boot
            spring-boot-starter-amqp


            org.springframework.boot
            spring-boot-starter-web


            org.springframework.boot
            spring-boot-starter-websocket


            org.springframework.boot
            spring-boot-devtools
            runtime
            true


            org.springframework.boot
            spring-boot-configuration-processor
            true


            org.projectlombok
            lombok
            true


            org.springframework.boot
            spring-boot-starter-tomcat
            provided


            org.springframework.boot
            spring-boot-starter-test
            test


                    org.junit.vintage
                    junit-vintage-engine


            org.springframework.amqp
            spring-rabbit-test
            test


                org.springframework.boot
                spring-boot-maven-plugin
项目结构:

前端文件放在static文件夹下:
show.html
测试websocket点对点发送
用户:
消息:
js文件有三个min.js的是开源库需要自己下载,还有一个js文件websocket.js是自定义的js文件

websocket.js
var stompClient = null;
var wsCreateHandler = null;
var userId = null;

function connect() {
    var host = window.location.host; // 带有端口号
    userId =  GetQueryString("userId");
    var socket = new SockJS("http://" + host + "/websocket");
    stompClient = Stomp.over(socket);
    stompClient.connect({}, function (frame) {
            writeToScreen("connected: " + frame);
            stompClient.subscribe('/topic', function (response) {
                writeToScreen(response.body);
            });

            stompClient.subscribe("/user/" + userId + "/topic", function (response) {
                writeToScreen(response.body);
            });

            stompClient.subscribe('/sendToAll', function (response) {
                writeToScreen("sendToAll:" + response.body);
            });

        }, function (error) {
            wsCreateHandler && clearTimeout(wsCreateHandler);
            wsCreateHandler = setTimeout(function () {
                console.log("重连...");
                connect();
                console.log("重连完成");
            }, 1000);
        }
    )
}

function disconnect() {
    if (stompClient != null) {
        stompClient.disconnect();
    }
    writeToScreen("disconnected");
}

function writeToScreen(message) {
    if(DEBUG_FLAG)
    {
        $("#debuggerInfo").val($("#debuggerInfo").val() + "\n" + message);
    }
}

function GetQueryString(name) {
    var reg = new RegExp("(^|&)" + name + "=([^&]*)(&|$)", "i");
    var r = window.location.search.substr(1).match(reg); //获取url中"?"符后的字符串并正则匹配
    var context = "";
    if (r != null)
        context = r[2];
    reg = null;
    r = null;
    return context == null || context == "" || context == "undefined" ? "" : context;
}
后端的配置及代码
application.properties中只配置了服务器端口就可以了
server.port=8939
启动类和servlet初始化类
package com.xiaomifeng1010.websocket;

import org.springframework.boot.SpringApplication;
import org.springframework.boot.autoconfigure.SpringBootApplication;

@SpringBootApplication
public class WebsocketdemoApplication {

    public static void main(String[] args) {
        SpringApplication.run(WebsocketdemoApplication.class, args);
    }

}
package com.xiaomifeng1010.websocket;

import org.springframework.boot.builder.SpringApplicationBuilder;
import org.springframework.boot.web.servlet.support.SpringBootServletInitializer;

public class ServletInitializer extends SpringBootServletInitializer {

    @Override
    protected SpringApplicationBuilder configure(SpringApplicationBuilder application) {
        return application.sources(WebsocketdemoApplication.class);
    }

}
这项目中有两个项目包configuration包和controller包
配置类:
package com.xiaomifeng1010.websocket.configuration;

import org.springframework.context.annotation.Configuration;
import org.springframework.web.socket.config.annotation.EnableWebSocketMessageBroker;
import org.springframework.web.socket.config.annotation.StompEndpointRegistry;
import org.springframework.web.socket.config.annotation.WebSocketMessageBrokerConfigurer;

@Configuration
@EnableWebSocketMessageBroker
public class WebSocketConfig implements WebSocketMessageBrokerConfigurer {

    @Override
    public void registerStompEndpoints(StompEndpointRegistry registry){
        //客户端连接端点
        registry.addEndpoint("/websocket")
                .setAllowedOrigins("*")
                .withSockJS();
    }


    @Override
    public void configureMessageBroker(MessageBrokerRegistry registry) {
        registry.enableSimpleBroker("/topic/","/queue/");
        registry.setUserDestinationPrefix("/queue/");
        registry.setApplicationDestinationPrefixes("/app");
    }

}
@EnableWebSocketMessageBroker 作用是开启websocket服务,registerStompEndpoints方法配置websocket消息服务端
controller类
package com.xiaomifeng1010.websocket.controller;

import org.springframework.beans.factory.annotation.Autowired;
import org.springframework.messaging.handler.annotation.MessageMapping;
import org.springframework.messaging.handler.annotation.SendTo;
import org.springframework.messaging.simp.SimpMessagingTemplate;
import org.springframework.web.bind.annotation.GetMapping;
import org.springframework.web.bind.annotation.RequestParam;
import org.springframework.web.bind.annotation.RestController;

import java.util.Map;


@RestController
public class WebsocketController {
    @Autowired
    private SimpMessagingTemplate template;

    @MessageMapping("/sendToAll")
    public String sendToAll(String msg) {
        return msg;
    }


     //@MessageMapping("/sendToAll")
    //public void sendToAll(String msg) {
    //    String destination = "/queue/chat";
     //   template.convertAndSend(destination, msg);
    //}

    @MessageMapping("/send")
    @SendTo("/topic")
    public String say(String msg) {
        return msg;
    }

    @MessageMapping("/sendToUser")
    public void sendToUserByTemplate(Map params) {
        String fromUserId = params.get("fromUserId");
        String toUserId = params.get("toUserId");
        String msg = "来自" + fromUserId + "消息:" + params.get("msg");

        template.convertAndSendToUser(toUserId,"/topic", msg);
    }

    @GetMapping("/sendToAllByTemplate")
    @MessageMapping("/sendToAllByTemplate")
    public void sendToAllByTemplate(@RequestParam String msg) {
        template.convertAndSend("/topic", msg);
    }

    @GetMapping("/send")
    public String msgReply(@RequestParam String msg) {
        template.convertAndSend("/topic", msg);
        return msg;
    }
}
@MessageMapping的作用类似@requestMapping的作用,声明请求映射路径的
1、@SendTo 不通用,固定发送给指定的订阅者
2、@SimpMessagingTemplate 灵活,支持多种发送方式
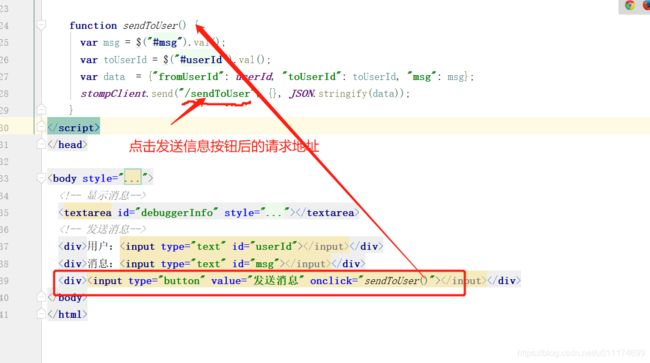
现在的show.html文件中发请求是发到"/sendToUser"这个请求的
@MessageMapping("/sendToUser")
public void sendToUserByTemplate(Map
String fromUserId = params.get("fromUserId");
String toUserId = params.get("toUserId");
String msg = "来自" + fromUserId + "消息:" + params.get("msg");
template.convertAndSendToUser(toUserId,"/topic", msg);
}
可以从show.html文件中看出
启动springboot项目,然后在浏览器中访问show.html

访问成功,会展示连接信息
请求中带上userId参数,表示fromUser的值,用户对应的文本输入框输入的是toUser的值

toUser值的获取:

fromUser值的获取:

是从get请求中获取的参数值
发送消息的时候,直接使用的是stompClient发送的请求
后端代码:

在刚才的那个窗口 浏览器地址栏输入的userId=1,用户的文本框输入的也是1(那么当前打开的窗口就是1号客户端,fromUser和toUse都是1,相当于1号自己给自己发信息,服务端的信息还是返回给了1号,可以看到信息来自1,消息是4)
可以多开几个页面窗口,模拟多个消息发送窗口
在开一个用户2,给1号发送消息5

然后查看1号用户窗口:

可以看到2号用户给1号用户发送的信息5
再开一个窗口,模拟3号用户

然后从1号用户窗口给3号发信息233

再观察3号用户窗口:

可以看到1号用户发送的信息233,从而实现了点对点,用户对精确目标用户来发送信息 。
在任何一个用户的窗口,F12查看network都可以
然后看websocket请求
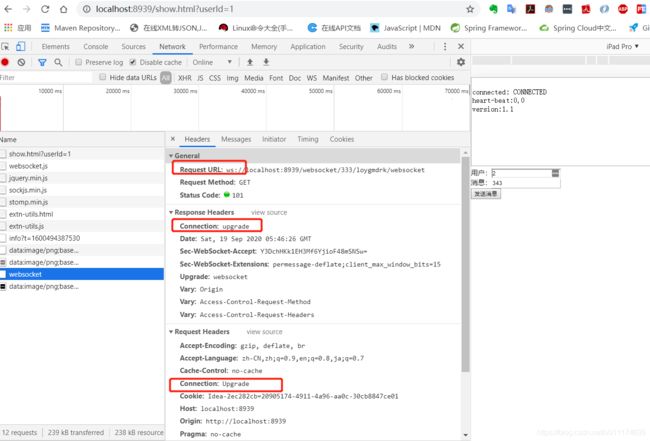
可以看到http请求,http协议升级成了websocket协议(ws),requestURL是以ws开头而不是http开头了,connection的值是upgrade (升级)了