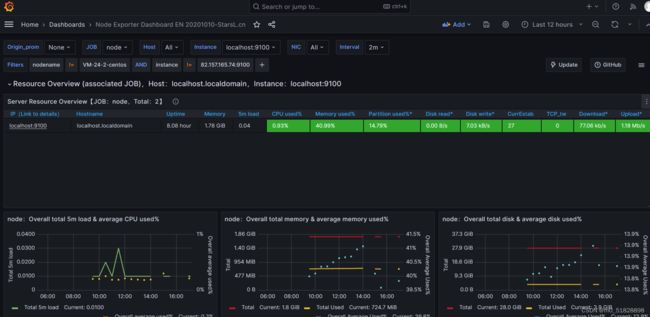
普罗米修斯之一实现图形化监控
普罗米修斯之一实现图形化监控
- 1:prometheus
-
- 1. 下载:
- 2. 安装:
- 3. 启动:
-
- 1:启动方式之一加入systemctl
- 2:启动方式之二---直接启动
- 3:启动方式之三----后台运行
- 4:默认配置文件prometheus.yml讲解
- 2:使用Node Exporter采集主机运行数据
-
- 1:下载安装
- 2: 启动
-
- 1:启动方式之一---加入系统管理
- 2:启动方式之二---直接启动
- 3:启动方式之三----后台运行
- 3: 测试
- 4:编辑prometheus.yml
- 5:查看服务是否添加成功
- 3: 监控数据可视化----使用Grafana创建可视化Dashboard
-
- 1: 下载安装
- 2:启动Grafana
- 3:检查端口是否监听
- 4: 访问Grafana
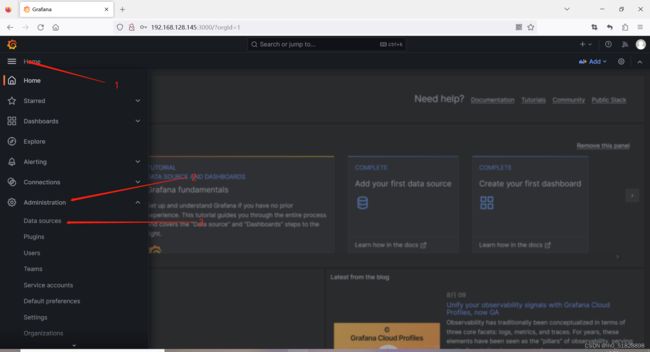
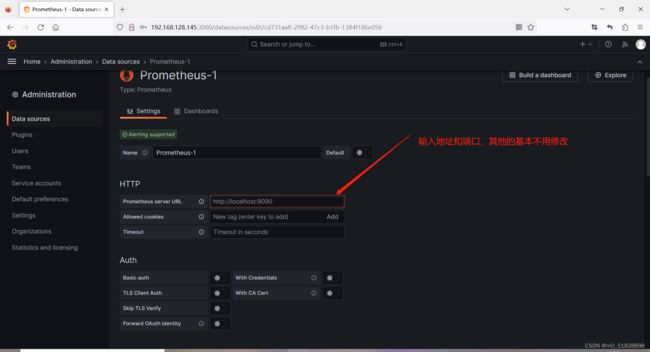
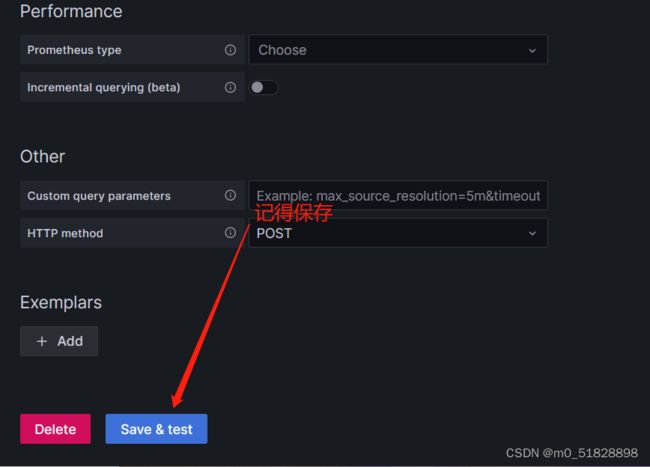
- 5: 配置数据源
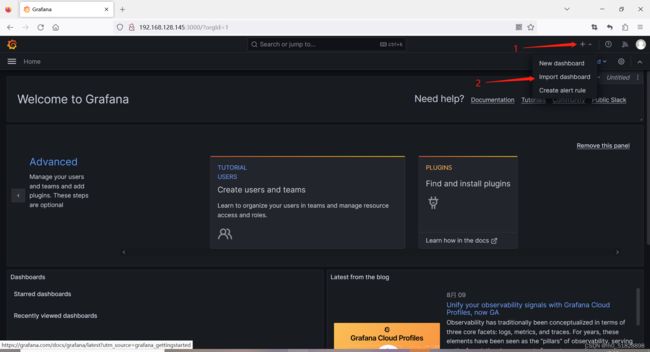
- 6: 安装对应的Dashboard
- 998:安装时遇到的问题(不定时更新)
-
- 1:Prometheus 由于时间不同步导致数据不显示
- 999: 放在最后
-
- 1:资料的来源:
- 3: 资源分享
1:prometheus
1. 下载:
- 前往官网下载prometheus的文件到电脑————前往普罗米修斯官网下载地址
- 复制 prometheus 的下载地址 直接使用相关命令下载到服务器。
prometheus 源码包下载地址:此链接为2.46版本且只适用于linux系统
https://github.com/prometheus/prometheus/releases/download/v2.46.0/prometheus-2.46.0.linux-amd64.tar.gz
2. 安装:
解压即用
tar -zxvf /path/to/prometheus-2.46.0.linux-amd64.tar.gz -C /path/install/prometheus
#说明:从存放压缩包的环境解压到指定的安装目录
3. 启动:
1:启动方式之一加入systemctl
1:加入系统管理,一般勤快下是加入到用户目录
系统目录:/usr/lib/systemd/system
用户目录:/etc/systemd/system
参考的prometheus.service
[Unit]
Description=https://prometheus.io
# 这里是对服务的描述,通常简要说明服务的功能或用途。

[Service]
Restart=on-failure
# 这里指定了服务的行为。"Restart=on-failure"表示如果服务出现失败,则会自动重新启动。

ExecStart=/home/jiang/prometheus/prometheus/prometheus --config.file=/home/jiang/prometheus/prometheus/prometheus.yml
# 这是服务启动时要执行的命令。它指定了启动Prometheus的可执行文件路径,并通过--config.file选项指定了使用的配置文件路径。

[Install]
WantedBy=multi-user.target
# 这里定义了服务的安装位置和启动级别。"WantedBy=multi-user.target"表示在多用户环境下启用服务。
vim /etc/systemd/system/prometheus.service
# 内容为上文的参考内容
systemctl daemon-reload
# 刷新内容
systemctl start prometheus.service
# 启动服务
systemctl status prometheus.service
# 查看状态
2:启动方式之二—直接启动
1:进入安装目录
2:
./prometheus [--config.file=/config_path/to/*.yml]
# 说明[]里的可选
3:启动方式之三----后台运行
nohub /path/to//prometheus [--config.file=/config_path/to/*.yml] &
# 说明[]里的可选
4:默认配置文件prometheus.yml讲解
# 全局配置
global:
  scrape_interval: 15s # Set the scrape interval to every 15 seconds. Default is every 1 minute.
  evaluation_interval: 15s # Evaluate rules every 15 seconds. The default is every 1 minute.
  # scrape_timeout is set to the global default (10s).

# 警报管理器的相关的配置
 alerting:
  alertmanagers:
    - static_configs:
        - targets:
          # - alertmanager:9093


# 配置相关的报警规则,目录可以自己指定
rule_files:
  # - "first_rules.yml"
  # - "second_rules.yml"
  # - /usr/lib/prometheus/rules/*.rules


# A scrape configuration containing exactly one endpoint to scrape:
# Here it's Prometheus itself.
# 添加配置的节点
scrape_configs:
  # 作业名称作为标签“job=”添加到从此配置抓取的任何时间序列中。
  - job_name: "prometheus"

    # metrics_path 默认为 '/metrics'
    # scheme 默认为 'http'.

    static_configs:
    # 如果需要监控的不止这一个,且远程服务器也安装了普罗米修斯,且端口有开放,则可以继续在- targets其中添加,下同. 比如服务器的地址为10.10.101.200
      - targets: ["localhost:9090","10.10.101.200:9090"]

  # 以下的内容是自己添加的,这里有两个服务,一个是关于服务器基本信息的,一个是关于数据库的基本信息
  - job_name: "node_exporter"
    static_configs:
      - targets: ["localhost:9100"]


  - job_name: "mysqld_exporter"
    static_configs:
      - targets: ["localhost:9105"]
2:使用Node Exporter采集主机运行数据
1:下载安装
官网下载,
2: 启动
1:启动方式之一—加入系统管理
cat >> /etc/systemd/system/node_exporter.service <<EOF
[Unit]
Description=node exporter service
Documentation=https://prometheus.io
After=network.target

[Service]
Type=simple
User=root
Group=root
ExecStart=/home/jiang/prometheus/node_exporter/node_exporter
Restart=on-failure

[Install]
WantedBy=multi-user.target
EOF
systemctl daemon-reload
# 刷新内容
systemctl start prometheus.service
# 启动服务
systemctl status prometheus.service
# 查看状态
2:启动方式之二—直接启动
1:进入安装目录
2:
./node_exporter
3:启动方式之三----后台运行
nohub /path/to/node_exporter &
# 说明[]里的可选
3: 测试
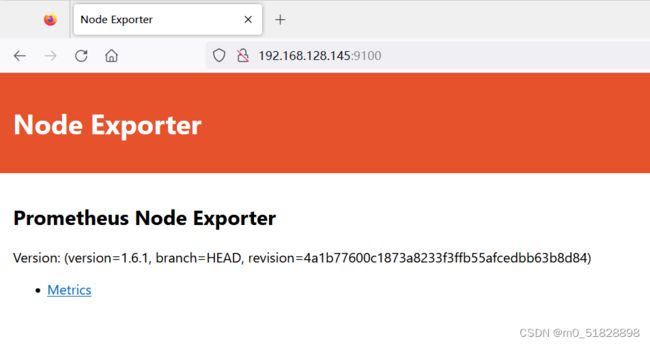
如果是虚拟机请关闭防火墙,或者添加对应的规则
启动成功了应该是图片中的样子
4:编辑prometheus.yml
scrape_configs:
  # The job name is added as a label `job=` to any timeseries scraped from this config.
  - job_name: "prometheus"

    # metrics_path defaults to '/metrics'
    # scheme defaults to 'http'.

    static_configs:
      - targets: ["localhost:9090"]
# 添加这个
  - job_name: "node"

    static_configs:
      - targets: ["localhost:9100"]
重启 prometheus
systemctl restart prometheus
5:查看服务是否添加成功
3: 监控数据可视化----使用Grafana创建可视化Dashboard
1: 下载安装
这个是 官方指引 ,里面包含所有的安装方法.
以下是Red Hat, CentOS, RHEL版本的系统的安装方式
sudo yum install -y https://dl.grafana.com/enterprise/release/grafana-enterprise-10.0.3-1.x86_64.rpm
2:启动Grafana
systemctl daemon-reload
systemctl start grafana-server.service
systemctl enable grafana-server.service
3:检查端口是否监听
netstat -tulnp | grep :3000
tcp6 0 0 :::3000 :::* LISTEN 24024/grafana-serve
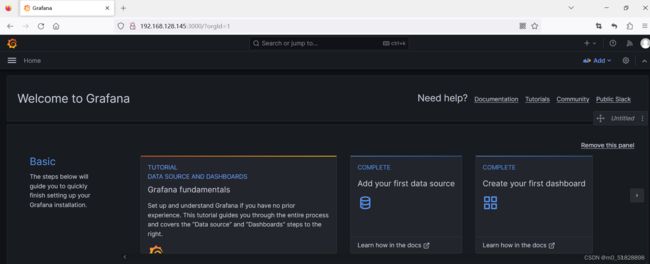
4: 访问Grafana
http://ip:3000
admin/admin

登录成功后
5: 配置数据源
6: 安装对应的Dashboard
在上一步添加完数据源后,可视化已经完成,可以通过查询时间序列来生成图形,如下图

但是作为开源软件,Grafana社区鼓励用户分享Dashboard通过https://grafana.com/dashboards网站,可以找到大量可直接使用的Dashboard:
998:安装时遇到的问题(不定时更新)
1:Prometheus 由于时间不同步导致数据不显示
yum -y install ntp

systemctl enable ntpd

ntpdate time1.aliyun.com
999: 放在最后
1:资料的来源:
1:普罗米修斯官网----https://prometheus.io/
最新的,最全的,最好的,就是没有中文
2:Prometheus 中文文档-----https://www.prometheus.wang/
个人觉得挺好用的,就是好久没更新了,里面的东西有些已经过时.

