xlnet+bilstm实现菜品正负评价分类
摘要
CMU和google brain联手推出了bert的改进版xlnet。在这之前也有很多公司对bert进行了优化,包括百度、清华的知识图谱融合,微软在预训练阶段的多任务学习等等,但是这些优化并没有把bert致命缺点进行改进。xlnet作为bert的升级模型,主要在以下三个方面进行了优化
- 采用AR模型替代AE模型,解决mask带来的负面影响
- 双流注意力机制
- 引入transformer-xl
今天我们使用xlnet+BiLSTM实现一个二分类模型。
数据集
数据集如下图:
是顾客对餐厅的正负评价。正面的评论是1,负面的是0。这类的数据集很多,比如电影的正负评论,商品的正负评论。
模型
模型结构如下:
思路:将xlnet做为嵌入层提取特征,然后传入BiLSTM,最后使用全连接层输出分类。创建xlnet_lstm模型,代码如下:
class xlnet_lstm(nn.Module):
    def __init__(self, xlnetpath, hidden_dim, output_size, n_layers, bidirectional=True, drop_prob=0.5):
        super(xlnet_lstm, self).__init__()

        self.output_size = output_size
        self.n_layers = n_layers
        self.hidden_dim = hidden_dim
        self.bidirectional = bidirectional

        # xlnet ----------------重点,xlnet模型需要嵌入到自定义模型里面
        self.xlnet = XLNetModel.from_pretrained(xlnetpath)
        for param in self.xlnet.parameters():
            param.requires_grad = True

        # LSTM layers
        self.lstm = nn.LSTM(768, hidden_dim, n_layers, batch_first=True, bidirectional=bidirectional)

        # dropout layer
        self.dropout = nn.Dropout(drop_prob)

        # linear and sigmoid layers
        if bidirectional:
            self.fc = nn.Linear(hidden_dim * 2, output_size)
        else:
            self.fc = nn.Linear(hidden_dim, output_size)

        # self.sig = nn.Sigmoid()

    def forward(self, x, hidden):
        # 生成xlnet字向量
        x = self.xlnet(x)[0]  # xlnet 字向量

        # lstm_out
        # x = x.float()
        lstm_out, (hidden_last, cn_last) = self.lstm(x, hidden)
        # print(lstm_out.shape)   #[batchsize,64,768]
        # print(hidden_last.shape)   #[4, batchsize, 384]
        # print(cn_last.shape)    #[4,batchsize, 384]

        # 修改 双向的需要单独处理
        if self.bidirectional:
            # 正向最后一层,最后一个时刻
            hidden_last_L = hidden_last[-2]#[batchsize, 384]
            # 反向最后一层,最后一个时刻
            hidden_last_R = hidden_last[-1]#[batchsize, 384]
            # 进行拼接
            hidden_last_out = torch.cat([hidden_last_L, hidden_last_R], dim=-1) #[batchsize, 768]
        else:
            hidden_last_out = hidden_last[-1]  # [batchsize, 384]
        # dropout and fully-connected layer
        out = self.dropout(hidden_last_out) #out的shape[batchsize,768]
        out = self.fc(out)

        return out

    def init_hidden(self, batch_size):
        weight = next(self.parameters()).data

        number = 1
        if self.bidirectional:
            number = 2

        if (USE_CUDA):
            hidden = (weight.new(self.n_layers * number, batch_size, self.hidden_dim).zero_().float().cuda(),
                      weight.new(self.n_layers * number, batch_size, self.hidden_dim).zero_().float().cuda()
                      )
        else:
            hidden = (weight.new(self.n_layers * number, batch_size, self.hidden_dim).zero_().float(),
                      weight.new(self.n_layers * number, batch_size, self.hidden_dim).zero_().float()
                      )

        return hidden
xlnet_lstm需要的参数功6个,参数说明如下:
--xlnetpath:xlnet预训练模型的路径
--hidden_dim:隐藏层的数量。
--output_size:分类的个数。
--n_layers:lstm的层数
--bidirectional:是否是双向lstm
--drop_prob:dropout的参数
定义xlnet的参数,如下:
class ModelConfig:
    batch_size = 2
    output_size = 2
    hidden_dim = 384  # 768/2
    n_layers = 2
    lr = 2e-5
    bidirectional = True  # 这里为True,为双向LSTM
    # training params
    epochs = 10
    # batch_size=50
    print_every = 10
    clip = 5  # gradient clipping
    use_cuda = USE_CUDA
    xlnet_path = 'xlnet-base-chinese'  # 预训练bert路径
    save_path = 'xlnet_bilstm.pth'  # 模型保存路径
batch_size:batchsize的大小,根据显存设置。
output_size:输出的类别个数,本例是2.
hidden_dim:隐藏层的数量。
n_layers:lstm的层数。
bidirectional:是否双向
print_every:输出的间隔。
use_cuda:是否使用cuda,默认使用,不用cuda太慢了。
xlnet_path:预训练模型存放的文件夹。
save_path:模型保存的路径。
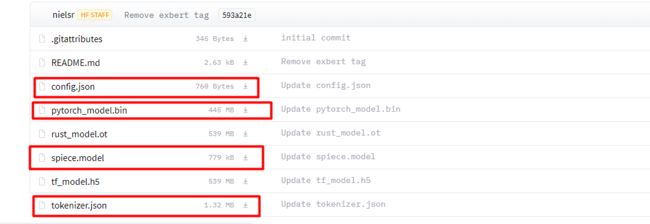
下载预训练模型
本例使用的预训练模型是xlnet-base-cased,下载地址:https://huggingface.co/hfl/chinese-xlnet-base/tree/main
将上图画框的文件下载下来,如果下载后的名字和上面显示的名字不一样,则要修改回来。
将下载好的文件放入xlnet-base-chinese文件夹中。
配置环境
需要下载transformers和sentencepiece,执行命令:
conda install sentencepiece
conda install transformers
训练、验证和预测
训练详见train_model函数,验证详见test_model,单次预测详见predict函数。
代码和模型链接:
https://download.csdn.net/download/hhhhhhhhhhwwwwwwwwww/36194843


