JavaWeb项目基础配置
这里写目录标题
- 前言
- 1.pom.xml
- 2.webxml
- 3.连接JDBC
- 4.常用代码
-
- 4.1获取时间
- 4.2实现上传文件需要用到第三方库fileupload
- 常用快捷键
- 常用操作
-
- Tomcat基础操作:
前言
本文主要讲述了
1.pom.xml
<project xmlns="http://maven.apache.org/POM/4.0.0" xmlns:xsi="http://www.w3.org/2001/XMLSchema-instance"
  xsi:schemaLocation="http://maven.apache.org/POM/4.0.0 http://maven.apache.org/xsd/maven-4.0.0.xsd">
  <modelVersion>4.0.0modelVersion>


  <groupId>com.bitgroupId>
  <artifactId>java_image_servletartifactId>
  <version>1.0-SNAPSHOTversion>
  <packaging>warpackaging>


  <name>untitled15 Maven Webappname>

  <url>http://www.example.comurl>

  <properties>
    <project.build.sourceEncoding>UTF-8project.build.sourceEncoding>
    <maven.compiler.source>1.7maven.compiler.source>
    <maven.compiler.target>1.7maven.compiler.target>
  properties>

  <dependencies>
    <dependency>
      <groupId>junitgroupId>
      <artifactId>junitartifactId>
      <version>4.11version>
      <scope>testscope>
    dependency>

    <dependency>
      <groupId>com.google.code.gsongroupId>
      <artifactId>gsonartifactId>
      <version>2.10.1version>
    dependency>

    <dependency>
      <groupId>mysqlgroupId>
      <artifactId>mysql-connector-javaartifactId>
      <version>8.0.13version>
    dependency>

    <dependency>
      <groupId>javax.servletgroupId>
      <artifactId>javax.servlet-apiartifactId>
      <version>3.1.0version>

      <scope>providedscope>


    dependency>

  dependencies>

  <build>
    <finalName>java_image_servletfinalName>
    <pluginManagement>
      <plugins>
        <plugin>
          <artifactId>maven-clean-pluginartifactId>
          <version>3.1.0version>
        plugin>

        <plugin>
          <artifactId>maven-resources-pluginartifactId>
          <version>3.0.2version>
        plugin>
        <plugin>
          <artifactId>maven-compiler-pluginartifactId>
          <version>3.8.0version>
        plugin>
        <plugin>
          <artifactId>maven-surefire-pluginartifactId>
          <version>2.22.1version>
        plugin>
        <plugin>
          <artifactId>maven-war-pluginartifactId>
          <version>3.2.2version>
        plugin>
        <plugin>
          <artifactId>maven-install-pluginartifactId>
          <version>2.5.2version>
        plugin>
        <plugin>
          <artifactId>maven-deploy-pluginartifactId>
          <version>2.8.2version>
        plugin>
      plugins>
    pluginManagement>
  build>
project>
2.webxml
<web-app xmlns:xsi="http://www.w3.org/2001/XMLSchema-instance"
         xmlns="http://xmlns.jcp.org/xml/ns/javaee"
         xsi:schemaLocation="http://xmlns.jcp.org/xml/ns/javaee http://xmlns.jcp.org/xml/ns/javaee/web-app_3_1.xsd"
         version="3.1">

  <servlet>

    <servlet-name>ImageServletservlet-name>

    <servlet-class>api.ImageServletservlet-class>
  servlet>

  <servlet-mapping>
    <servlet-name>ImageServletservlet-name>

    <url-pattern>/imageurl-pattern>
  servlet-mapping>

web-app>
3.连接JDBC
    private static final String URL = "jdbc:mysql://127.0.0.1:3306/image_table?characterEncoding=utf8&useSSL=false&serverTimezone=UTC&allowPublicKeyRetrieval=true";
    private static final String USERNAME = "root";
    private static final String PASSWORD = "123456";
private static volatile DataSource dataSource = null;

    public static DataSource getDataSource(){
        if(dataSource == null){
            Synchronized(DBUtil.class);{
                if(dataSource == null){
                    dataSource = new MysqlDataSource();
                    // MysqlDataSource 对象强制转换为 MysqlDataSource 类型,
                    // 并使用 setURL()、setUser() 和 setPassword() 方法设置数据库连接的相关信息,包括 URL、用户名和密码。
                    MysqlDataSource tmpDataSour = (MysqlDataSource) dataSource;
                    tmpDataSour.setURL(URL);
                    tmpDataSour.setUser(USERNAME);
                    tmpDataSour.setPassword(PASSWORD);
                }
            }

        }

        return dataSource;
    }
    //建立连接
    public static Connection getConnection() throws SQLException {
        return getDataSource().getConnection();
    }
    //关闭连接
    public static void close(Connection connection, PreparedStatement preparedStatement, ResultSet resultSet) throws RuntimeException {
        if(resultSet != null) {
            try {
                resultSet.close();
            } catch (SQLException e) {
                throw new RuntimeException(e);
            }
        }
        if(preparedStatement != null){
            try {
                preparedStatement.close();
            } catch (SQLException e) {
                throw new RuntimeException(e);
            }
        }
        if (connection != null){
            try {
                connection.close();
            } catch (SQLException e) {
                throw new RuntimeException(e);
            }
        }


        }

    private static void Synchronized(Class<DBUtil> dbUtilClass) {
    }
4.常用代码
4.1获取时间
1.获取当前时间
//获取当前时间作为存储时间,存储于image中的UploadTime
SimpleDateFormat simpleDateFormat = new SimpleDateFormat("yyyyMMdd")
image.setUploadTime(simpleDateFormat.format(new Date()));
2.获取毫秒级的时间戳
//获取毫秒级的时间戳加入到文件存储路径中(这里的文件存储路径是:./image/时间戳_文件名)
image.setPath("./image"+System.currentTimeMillis()+"_"+fileItem.getName());
4.2实现上传文件需要用到第三方库fileupload
pom.xml
    <dependency>
      <groupId>commons-fileuploadgroupId>
      <artifactId>commons-fileuploadartifactId>
      <version>1.4version>
    dependency>
类中代码:
//(1)创建一个factory对象和fileUpload对象,为获取图片属性做的准备工作(固定逻辑)
FileItemFactory factory = new DiskFileItemFactory();
ServletFileUpload fileUpload = new ServletFileUpload(factory);
//(2)fileUpload对象进一步解析,将数据存入items
try {
    List<FileItem> items = fileUpload.parseRequest(req);
    //此时Itmes已经把图片信息获取到了(此时获取到图片信息的可能不止一个图片的,所以用列表存储)
    //(3)将fileUpload解析得到的信息存入image
    FileItem fileItem = items.get(0);
    //取出items中存储的众多图片中的第一个图片的信息存储于fileItem
    Image image = new Image();
    image.setImageName(fileItem.getName());//将取出的数据中文件名赋值给ImageName
    image.setSize((int) fileItem.getSize());
    //获取当前时间作为存储时间,存储于image中的UploadTime
    SimpleDateFormat simpleDateFormat = new SimpleDateFormat("yyyyMMdd");
    image.setUploadTime(simpleDateFormat.format(new Date()));
    image.setContentType(fileItem.getContentType());
    //构造一个路径:./image+图片名,但是这个文件存储路径会导致文件名相同时文件路径就会相同,无法存储,所以可以在这个路径中加入时间戳(毫秒级)来分开两个文件
    image.setPath("./image/"+System.currentTimeMillis()+"_"+fileItem.getName());
    image.setMd5("12903421");//当前先写死
    //(4)将数据存入数据库,利用imageDao中的insert方法
    ImageDao imageDao = new ImageDao();
    imageDao.insert(image);

    //2.将图片内容存入磁盘
    File file =new File(image.getPath());
    try {
         fileItem.write(file);
    } catch (Exception e) {
         resp.setContentType("application:json;charset=utf-8");
         resp.getWriter().write("{\"ok\":false ,\"reason\":\"写入磁盘失败\"}");
    }
} catch (FileUploadException e) {
    //解析失败的情况
    resp.setContentType("application:json;charset=utf-8");
    resp.getWriter().write("{\"ok\":false ,\"reason\":\"请求解析失败\"}");
}
常用快捷键
将选定的代码块包装在 try/catch 块中: Ctrl + Alt + T (Windows 和 Linux)或 Command + Option + T (Mac)
撤销操作:Ctrl +z
自动补全代码:Ctrl + Space
注释/取消注释行:Ctrl + /
取消注释选中的代码块:Ctrl + Shift + /
复制当前行或选中的代码块:Ctrl + D
删除当前行或选中的代码块:Ctrl + Y
重做上一次操作:Ctrl + Shift + Z
全局查找:Ctrl + Shift + F
查找文本:Ctrl + F
打开变量视图:Ctrl + Alt + V
打开类文件:Ctrl + Alt + O
常用操作
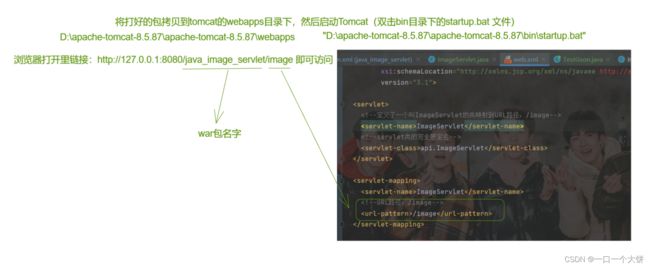
Tomcat基础操作:
//打好的包拷贝到这里
D:\apache-tomcat-8.5.87\apache-tomcat-8.5.87\webapps
//运行Tomcat
D:\apache-tomcat-8.5.87\apache-tomcat-8.5.87\bin\startup.bat
//浏览器运行
http://127.0.0.1:8080/war包名字/类的映射路径
//举例:
http://127.0.0.1:8080/java_image_servlet/image