ssm(spring+springmvc+mybatis)+Maven+Mysql+eclipse 实现登录功能
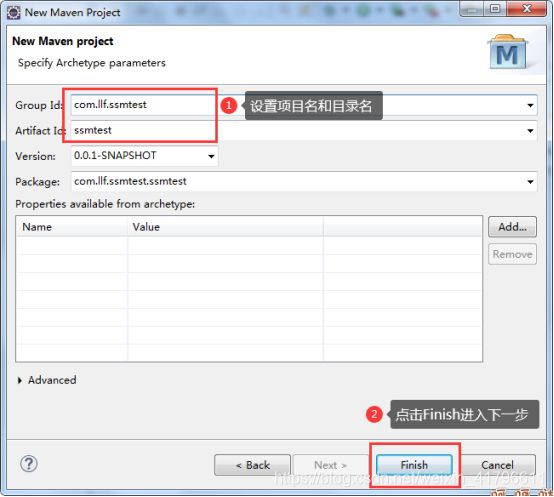
项目名:ssmtest
项目框架:ssm(spring+springmvc+mybatis)
环境配置:Tomcat8.5,Maven,Mysql
开发软件:eclipse
1、初始化项目
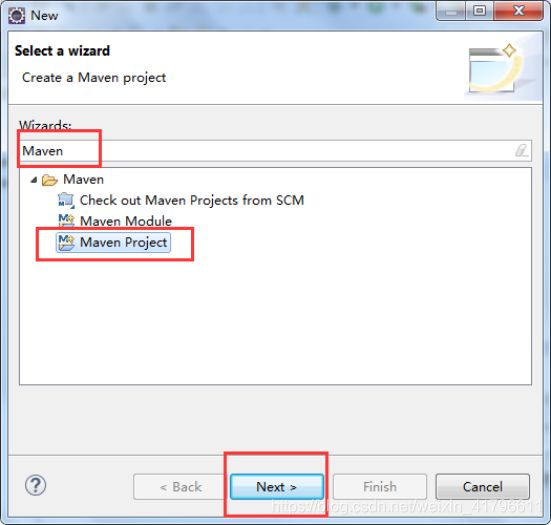
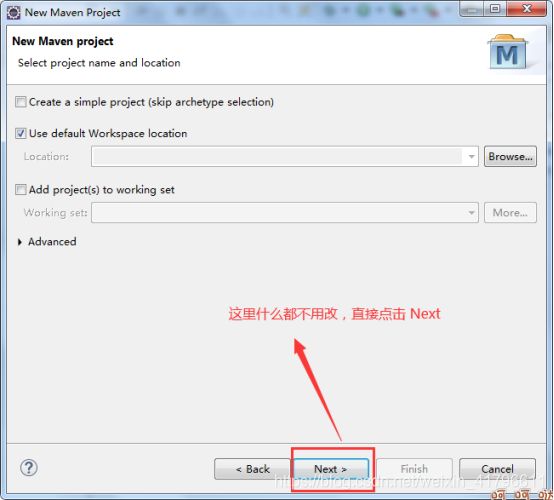
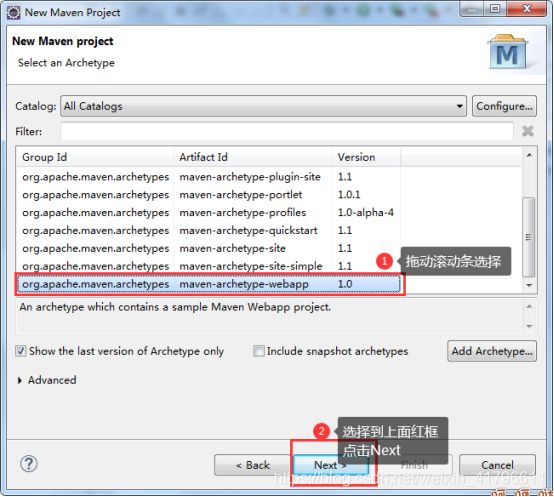
鼠标右键点击项目区空白处,选择new ---> other..在弹出框中输入maven,选择Maven Project。
到此,项目初始化完成
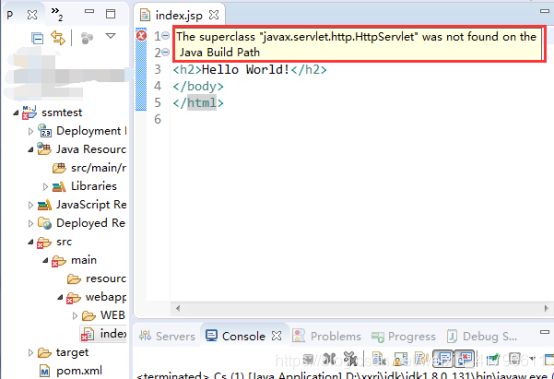
项目初始化后可能会报错,如下:
The superclass "javax.servlet.http.HttpServlet" was not found on the Java Build Path
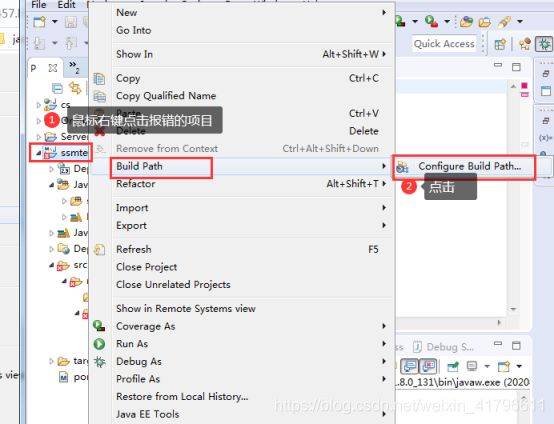
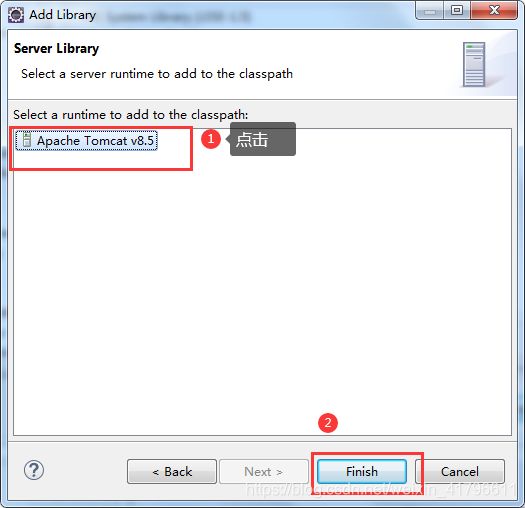
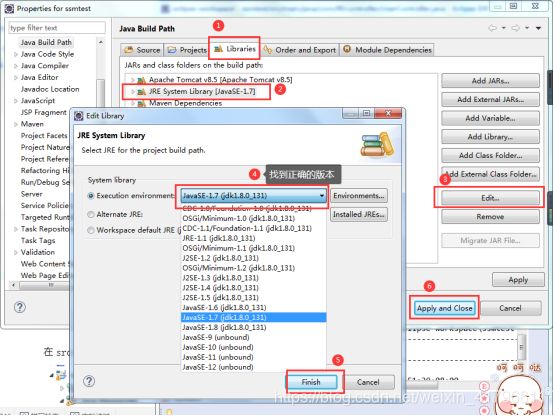
就是在Java Build Path中没有“javax.servlet.http.HttpServlet”的配置,解决方法如下:
最后点击 Apply and Close,然后不再报错就解决了
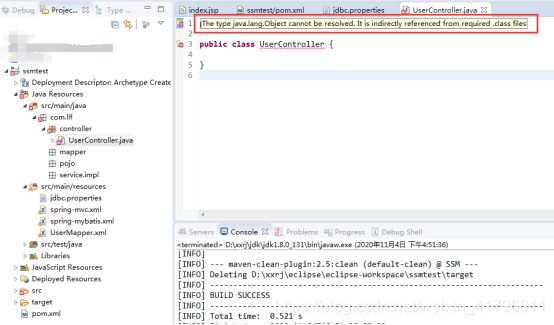
新建java文件报错:The type java.lang.Object cannot be resolved. It is indirectly referenced from required .class files
导致的原因是:项目没有引入JRE System Library或者引入的版本错误
没有引入解决方案:把java的类库加载进去,在工程上右键选择属性->Java Build Path的Libraries->Add Library选择JRE System Library->点击Next->选择Execution environment并选择jre版本或workspace default jre(有显示的版本不是都能选的的,只有默认自带的jre和安装绑定过的选了才能起作用)->点击Finish。
引入版本错误解决方式:如果Java Build Path中已经导入了JRE System Library
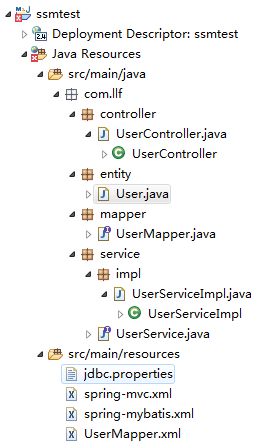
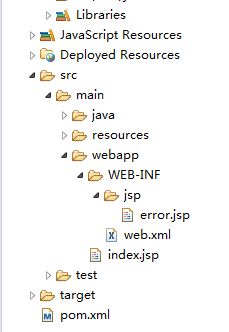
2、项目结构
3、项目代码
(1)配置pom.xml文件(ps:如果是第一次用maven配置项目,pom配置下载需要时间,在此期间可以往下看代码)
  4.0.0
  com.llf.ssmtest
  ssmtest
  war
  0.0.1-SNAPSHOT
  ssmtest Maven Webapp
  http://maven.apache.org


    UTF-8
    UTF-8


      org.springframework
      spring-core
      4.3.5.RELEASE


      org.springframework
      spring-aop
      4.3.5.RELEASE


      org.springframework
      spring-orm
      4.3.5.RELEASE


		org.springframework
		spring-oxm
		4.3.5.RELEASE


      org.springframework
      spring-web
      4.3.5.RELEASE


      org.springframework
      spring-webmvc
      4.3.5.RELEASE


      org.springframework
      spring-tx
      4.3.5.RELEASE


      org.springframework
      spring-test
      4.3.5.RELEASE


      org.springframework
      spring-jdbc
      4.3.5.RELEASE


      org.springframework
      spring-mock
      2.0.8


      org.springframework
      spring-context
      4.3.5.RELEASE


      org.springframework
      spring-expression
      4.3.5.RELEASE


      org.springframework
      spring-context-support
      4.3.5.RELEASE


      org.mybatis
      mybatis-spring
      1.3.1


		javax.servlet
		javax.servlet-api
		 3.1.0


      org.mybatis
      mybatis
      3.2.8


      com.github.pagehelper
      pagehelper
      3.7.3


      com.github.jsqlparser
      jsqlparser
      0.9.1


      javax.servlet
      servlet-api
      3.0-alpha-1


      javax.servlet
      jstl
      1.2


      taglibs
      standard
      1.1.2


      org.aspectj
      aspectjrt
      1.8.10


      org.aspectj
      aspectjweaver
      1.8.10


      commons-lang
      commons-lang
      2.6


      dom4j
      dom4j
      1.6.1


      mysql
      mysql-connector-java
      5.1.40


      commons-dbcp
      commons-dbcp
      1.4


        commons-pool
		commons-pool
		1.6


      com.alibaba
      fastjson
      1.2.23


      xml-apis
      xml-apis
      2.0.2


      commons-net
      commons-net
      3.5


      org.slf4j
      slf4j-api
      1.7.22


      org.slf4j
      slf4j-log4j12
      1.7.22


      log4j
      log4j
      1.2.17


      junit
      junit
      4.12
      test


        org.apache.maven.plugins
        maven-war-plugin
        2.4

          SSM


              src/main/resources/resources/config
              WEB-INF/classes/resources/config
              true


              src/main/java

                **/*.xml

              WEB-INF/classes


      org.mybatis.generator
      mybatis-generator-maven-plugin
      1.3.2

        true
        true


        org.apache.maven.plugins
        maven-resources-plugin
        2.4.3

          UTF-8


        org.apache.maven.plugins
        maven-compiler-plugin


        org.apache.felix
        maven-bundle-plugin
        true
        true


        org.apache.maven.plugins
        maven-surefire-plugin

          true


        org.apache.maven.plugins
        maven-site-plugin

        3.3

          zh_CN


                org.springframework.boot
                spring-boot-maven-plugin


                        none
(2)、web.xml 配置文件
  ssmtest

    index.jsp


		contextConfigLocation
		classpath:spring-mybatis.xml


		encodingFilter
		org.springframework.web.filter.CharacterEncodingFilter
		true

			encoding
			UTF-8


		encodingFilter
		/*


		org.springframework.web.context.ContextLoaderListener


		org.springframework.web.util.IntrospectorCleanupListener


		SpringMVC
		org.springframework.web.servlet.DispatcherServlet

			contextConfigLocation
			classpath:spring-mvc.xml

		1
		true


		SpringMVC
		/
(3)、jdbc.properties 数据库连接配置
driver=com.mysql.jdbc.Driver
url=jdbc:mysql://localhost/ssm?useSSL=false&serverTimezone=UTC&allowPublicKeyRetrieval=true
username=root
password=
#\u5B9A\u4E49\u521D\u59CB\u8FDE\u63A5\u6570
initialSize=0
#\u5B9A\u4E49\u6700\u5927\u8FDE\u63A5\u6570
maxActive=20
#\u5B9A\u4E49\u6700\u5927\u7A7A\u95F2
maxIdle=20
#\u5B9A\u4E49\u6700\u5C0F\u7A7A\u95F2
minIdle=1
#\u5B9A\u4E49\u6700\u957F\u7B49\u5F85\u65F6\u95F4
maxWait=60000
-
Ps:我的mysql没有设置密码,你们在写的时候mysql如果有密码记得填
(4)、spring-mvc.xml 配置文件
(5)、spring-mybatis.xml 配置文件
(6)、UserMapper.xml 配置文件
(7)、UserController.java java代码
package com.llf.controller;
import javax.annotation.Resource;
import javax.servlet.http.HttpServletRequest;
import org.springframework.stereotype.Controller;
import org.springframework.ui.Model;
import org.springframework.web.bind.annotation.RequestMapping;
import com.llf.service.UserService;

@Controller
@RequestMapping("/user")
public class UserController {
	@Resource
	private UserService userService;

	@RequestMapping("/login")
	public String loginAction(HttpServletRequest request,Model model) {
		//从index.jsp的表单获取到的用户输入的用户名
		String userName = request.getParameter("userName");
		//从index.jsp的表单获取到的用户输入的密码
		String userPassword1 = request.getParameter("userPassword");
		//从数据库查询到的用户密码
		String userPassword2 = this.userService.getPasswordByName(userName);
		String message = "";
		//判断密码是否一致
		if(userPassword1.equals(userPassword2)){
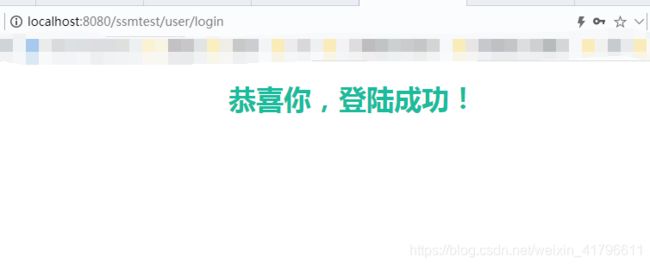
			message = "恭喜你,登陆成功!";
		}else{
			message = "很遗憾,登陆失败!";
		}
		model.addAttribute("message", message);
		//跳转到error.jsp页面
		return "error";
	}
}
(8)、User.java java代码
package com.llf.entity;

public class User {
	private int userId;
	private String userName;
	private String userPassword;

	public int getUserId() {
		return userId;
	}
	public void setUserId(int userId) {
		this.userId = userId;
	}
	public String getUserName() {
		return userName;
	}
	public void setUserName(String userName) {
		this.userName = userName;
	}
	public String getUserPassword() {
		return userPassword;
	}
	public void setUserPassword(String userPassword) {
		this.userPassword = userPassword;
	}
}(9)、UserMapper.java java代码
package com.llf.mapper;

public interface UserMapper {
	//根据用户名查找用户密码
	public String getPasswordByName(String userName);
}(10)、UserService.java java代码
package com.llf.service;

public interface UserService {
	//根据用户名查找用户密码
	public String getPasswordByName(String userName);
}(11)、UserService.java java代码
package com.llf.service.impl;
import javax.annotation.Resource;
import org.springframework.stereotype.Service;
import com.llf.mapper.UserMapper;
import com.llf.service.UserService;

@Service("userService")
public class UserServiceImpl implements UserService {

	@Resource
	private UserMapper userMapper;
	//UserService调用UserMapper的访问数据库的方法获得原始数据,然后对原始数据进行操作
	//(ps:这里虽然未进行操作,但也建议不要缺省了创建service接口及其实现类这一步)
	public String getPasswordByName(String userName) {
		String userPassWord = userMapper.getPasswordByName(userName);
		return userPassWord;
	}
}(12)、error.jsp jsp代码
<%@ page language="java" contentType="text/html; charset=UTF-8"
    pageEncoding="UTF-8"%>


提示信息


			${message }
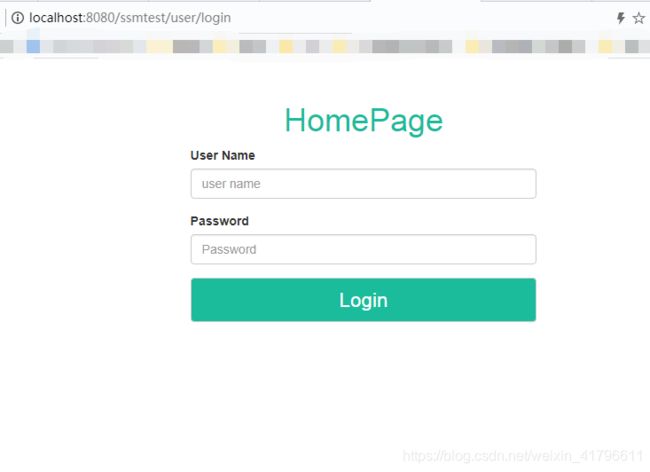
(13)、index.jsp 页面代码
<%@ page language="java" contentType="text/html; charset=UTF-8"
pageEncoding="UTF-8"%>
主页
HomePage
4、书写代码时出现的BUG
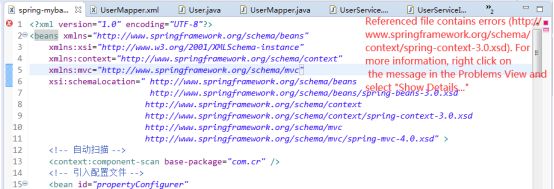
(1)、Referenced file contains errors(翻译:引用文件包含错误)
(http://www.springframework.org/schema/context/spring-context-3.0.xsd). For more information,right click on the message in the Problems View and select "Show Details..."
如下图:
解决方式:
我的是自动扫描的包的名字写错了
(2)、运行项目时报错:java.lang.ClassNotFoundException:org.springframework.web.context.ContextLoaderListener
解决方案(开发环境eclipse):
其实是你的jar文件没有同步发布到自己项目的lib目录中
如果是用Maven进行构建的话
鼠标右键点击报错项目 点击 Properties 选择Deployment Assembly 再点击右边的Add按钮 选择
Java Build Path Entries后点击Next按钮 然后选择你的Maven Dependencies 确定即可
(3)、项目运行时报错:
org.springframework.beans.factory.BeanCreationException: Error creating bean with name 'userController': Injection of resource dependencies failed; nested exception is org.springframework.beans.factory.BeanCreationException: Error creating bean with name 'userService': Injection of resource dependencies failed; nested exception is org.springframework.beans.factory.NoSuchBeanDefinitionException: No qualifying bean of type 'com.llf.mapper.UserMapper' available: expected at least 1 bean which qualifies as autowire candidate. Dependency annotations: {@javax.annotation.Resource(shareable=true, lookup=, name=, description=, authenticationType=CONTAINER, type=class java.lang.Object, mappedName=)}
原因:配置扫描DAO接口所在的包名书写错误
解决方法:将包名改为正确的就好
(4)、UserService cannot be resolved to a type
eclipse查找项目类型策略所致
解决方法:
eclipse下,上述两条都对比过了,没有任何问题,可偏偏还报这错。这时,需要操作一下 Project | Clean... ,问题即可解决。原因是,机制所致。因为某些特殊原因,eclipse没能自动编译源代码到build/classes(或其他classes目录),导致类型查找不到。
-
到此,tomcat启动项目,然后在游览器中输入路径:http://localhost:8080/ssmtest/ 即可访问项目首页(登录页)
-
在mysql中建立连接,建立一个名为ssm的数据库,建立一个表,表名user,然后建立数据,然后利用那个数据进行登录
