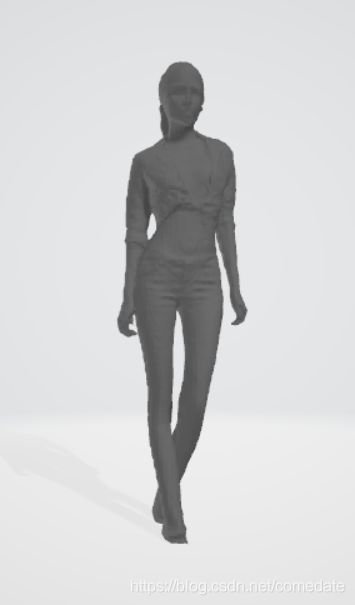
PIFuHD Demo 详细使用说明 以及复现
最近,Fackbook AI 研究出从一张图片生成Mesh模型的算法PIFuHD,非常好玩又实用。具体的代码,在Google Colab 上的有Demo。
考虑到广大的筒子们都不能FQ, 所以,我在Colab上验证通过后,精简了一下复现的过程。
大家可以参考如下操作。
1. 论文背景资料
相关的资料
More Info
Paper: https://arxiv.org/pdf/2004.00452.pdf
Repo: https://github.com/facebookresearch/pifuhd
Project Page: https://shunsukesaito.github.io/PIFuHD/
2. 克隆 PIFuHD 仓库
git clone https://github.com/facebookresearch/pifuhd
···

```bash
Cloning into 'pifuhd'...
remote: Enumerating objects: 213, done.
remote: Total 213 (delta 0), reused 0 (delta 0), pack-reused 213
Receiving objects: 100% (213/213), 402.72 KiB | 30.98 MiB/s, done.
Resolving deltas: 100% (104/104), done.
3. 设置输入的图片参数
- 进入到sample_images文件夹下。一般输入的图像在这个文件夹中
cd /content/pifuhd/sample_images
此处,filename 修改成你要生成的图像的名字,并放在/content/pifuhd/sample_images/文件夹下面
import os

try:
  filename = 'result_jpg_52.jpg'
  image_path = '/content/pifuhd/sample_images/%s' % filename
except:
  image_path = '/content/pifuhd/sample_images/test.png' # example image
image_dir = os.path.dirname(image_path)
file_name = os.path.splitext(os.path.basename(image_path))[0]

# output pathes
obj_path = '/content/pifuhd/results/pifuhd_final/recon/result_%s_256.obj' % file_name
out_img_path = '/content/pifuhd/results/pifuhd_final/recon/result_%s_256.png' % file_name
video_path = '/content/pifuhd/results/pifuhd_final/recon/result_%s_256.mp4' % file_name
video_display_path = '/content/pifuhd/results/pifuhd_final/result_%s_256_display.mp4' % file_name
回退到 content 目录下:
cd /content
4. 用于裁剪图像的预处理
- git 下载 lightweight-human-pose-estimation 的源代码
git clone https://github.com/Daniil-Osokin/lightweight-human-pose-estimation.pytorch.git
下载成功控制台信息
Cloning into 'lightweight-human-pose-estimation.pytorch'...
remote: Enumerating objects: 115, done.
remote: Total 115 (delta 0), reused 0 (delta 0), pack-reused 115
Receiving objects: 100% (115/115), 224.46 KiB | 16.03 MiB/s, done.
Resolving deltas: 100% (49/49), done.
- 进入到 pytorch 目录文件下
cd /content/lightweight-human-pose-estimation.pytorch/
- 下载已经得到的CheckPoints
!wget https://download.01.org/opencv/openvino_training_extensions/models/human_pose_estimation/checkpoint_iter_370000.pth
- 定义得到 get_rect 函数
import torch
import cv2
import numpy as np
from models.with_mobilenet import PoseEstimationWithMobileNet
from modules.keypoints import extract_keypoints, group_keypoints
from modules.load_state import load_state
from modules.pose import Pose, track_poses
import demo

def get_rect(net, images, height_size):
    net = net.eval()

    stride = 8
    upsample_ratio = 4
    num_keypoints = Pose.num_kpts
    previous_poses = []
    delay = 33
    for image in images:
        rect_path = image.replace('.%s' % (image.split('.')[-1]), '_rect.txt')
        img = cv2.imread(image, cv2.IMREAD_COLOR)
        orig_img = img.copy()
        orig_img = img.copy()
        heatmaps, pafs, scale, pad = demo.infer_fast(net, img, height_size, stride, upsample_ratio, cpu=False)

        total_keypoints_num = 0
        all_keypoints_by_type = []
        for kpt_idx in range(num_keypoints):  # 19th for bg
            total_keypoints_num += extract_keypoints(heatmaps[:, :, kpt_idx], all_keypoints_by_type, total_keypoints_num)

        pose_entries, all_keypoints = group_keypoints(all_keypoints_by_type, pafs)
        for kpt_id in range(all_keypoints.shape[0]):
            all_keypoints[kpt_id, 0] = (all_keypoints[kpt_id, 0] * stride / upsample_ratio - pad[1]) / scale
            all_keypoints[kpt_id, 1] = (all_keypoints[kpt_id, 1] * stride / upsample_ratio - pad[0]) / scale
        current_poses = []

        rects = []
        for n in range(len(pose_entries)):
            if len(pose_entries[n]) == 0:
                continue
            pose_keypoints = np.ones((num_keypoints, 2), dtype=np.int32) * -1
            valid_keypoints = []
            for kpt_id in range(num_keypoints):
                if pose_entries[n][kpt_id] != -1.0:  # keypoint was found
                    pose_keypoints[kpt_id, 0] = int(all_keypoints[int(pose_entries[n][kpt_id]), 0])
                    pose_keypoints[kpt_id, 1] = int(all_keypoints[int(pose_entries[n][kpt_id]), 1])
                    valid_keypoints.append([pose_keypoints[kpt_id, 0], pose_keypoints[kpt_id, 1]])
            valid_keypoints = np.array(valid_keypoints)

            if pose_entries[n][10] != -1.0 or pose_entries[n][13] != -1.0:
              pmin = valid_keypoints.min(0)
              pmax = valid_keypoints.max(0)

              center = (0.5 * (pmax[:2] + pmin[:2])).astype(np.int)
              radius = int(0.65 * max(pmax[0]-pmin[0], pmax[1]-pmin[1]))
            elif pose_entries[n][10] == -1.0 and pose_entries[n][13] == -1.0 and pose_entries[n][8] != -1.0 and pose_entries[n][11] != -1.0:
              # if leg is missing, use pelvis to get cropping
              center = (0.5 * (pose_keypoints[8] + pose_keypoints[11])).astype(np.int)
              radius = int(1.45*np.sqrt(((center[None,:] - valid_keypoints)**2).sum(1)).max(0))
              center[1] += int(0.05*radius)
            else:
              center = np.array([img.shape[1]//2,img.shape[0]//2])
              radius = max(img.shape[1]//2,img.shape[0]//2)

            x1 = center[0] - radius
            y1 = center[1] - radius

            rects.append([x1, y1, 2*radius, 2*radius])

        np.savetxt(rect_path, np.array(rects), fmt='%d')
- 使用姿态估计得到 人体信息
net = PoseEstimationWithMobileNet()
checkpoint = torch.load('checkpoint_iter_370000.pth', map_location='cpu')
load_state(net, checkpoint)

print(image_path)
print(os.path.exists(image_path))
get_rect(net.cuda(), [image_path], 512)
5. 下载预训练模型
cd /content/pifuhd/
sh ./scripts/download_trained_model.sh
控制台打印信息:
+ mkdir -p checkpoints
+ cd checkpoints
+ wget https://dl.fbaipublicfiles.com/pifuhd/checkpoints/pifuhd.pt pifuhd.pt
--2021-02-14 12:53:44--  https://dl.fbaipublicfiles.com/pifuhd/checkpoints/pifuhd.pt
Resolving dl.fbaipublicfiles.com (dl.fbaipublicfiles.com)... 104.22.74.142, 172.67.9.4, 104.22.75.142, ...
Connecting to dl.fbaipublicfiles.com (dl.fbaipublicfiles.com)|104.22.74.142|:443... connected.
HTTP request sent, awaiting response... 200 OK
Length: 1548375177 (1.4G) [application/octet-stream]
Saving to: ‘pifuhd.pt’

pifuhd.pt           100%[===================>]   1.44G  23.8MB/s    in 63s

2021-02-14 12:54:48 (23.4 MB/s) - ‘pifuhd.pt’ saved [1548375177/1548375177]

--2021-02-14 12:54:48--  http://pifuhd.pt/
Resolving pifuhd.pt (pifuhd.pt)... failed: Name or service not known.
wget: unable to resolve host address ‘pifuhd.pt’
FINISHED --2021-02-14 12:54:48--
Total wall clock time: 1m 3s
Downloaded: 1 files, 1.4G in 1m 3s (23.4 MB/s)
6. 执行 PIFuHD 程序
# Warning: all images with the corresponding rectangle files under -i will be processed.
# seems that 256 is the maximum resolution that can fit into Google Colab.
# If you want to reconstruct a higher-resolution mesh, please try with your own machine.
!python -m apps.simple_test -r 256 --use_rect -i $image_dir
执行的控制台打印信息:
Resuming from  ./checkpoints/pifuhd.pt
Warning: opt is overwritten.
test data size:  1
initialize network with normal
initialize network with normal
generate mesh (test) ...
  0% 0/1 [00:00<?, ?it/s]./results/pifuhd_final/recon/result_jpg_52_256.obj
100% 1/1 [00:07<00:00,  7.43s/it]
结果保存到./results/pifuhd_final/recon/下面 result_jpg_52_256.obj. 这个obj 文件就可以通过MeshLab或者 blender 打开。
7. 渲染出mesh图像
pip install pytorch3d
使用 lib.colab_util 通过 obj 文件生成 video
from lib.colab_util import generate_video_from_obj, set_renderer, video

renderer = set_renderer()
generate_video_from_obj(obj_path, out_img_path, video_path, renderer)

# we cannot play a mp4 video generated by cv2
!ffmpeg -i $video_path -vcodec libx264 $video_display_path -y -loglevel quiet
video(video_display_path)
8. 结果图
图片原图,是从网上随便找的一张模特图。如果要图像生成质量好的话,最好不是裙子,背景比较单一的那种。
Mesh 图:

生成的Mesh图,基本上就可以3D打印出来做手办了。
9. 参考信息
Paper
Repo
Project Page
Google Colab