CocosCreator3.8研究笔记(八)CocosCreator 节点和组件的使用
我们知道,在CocosCreator 节点和组件的修改有两种方法:
- 属性检查器中的设置
- 脚本中的动态修改
脚本中动态修改,能实现各种各样的游戏逻辑,例如响应玩家输入,删除、修改、销毁节点或组件。
不过想要实现这些游戏逻辑,需要在脚本中访问这些组件或节点。
一、访问节点
1、获得组件所在的节点
只要在组件方法里访问 this.node 变量。
onLoad() {

   let node = this.node;
   node.setPosition(0.0,0.0,0.0);
}
2、获得同一个节点上的其它组件
使用 getComponent 查找需要的组件,传入类型,例如:
this.sprite = this.getComponent(Sprite);
还可以通过传入类名来获取,对于自定义的组件,类名就是脚本的文件名,并且 区分大小写:
this.testSprite = this.getComponent("TestSprite");
节点上也有一个 getComponent 方法, 作用一样:
console.log( this.node.getComponent(Label) === this.getComponent(Label) ); // true
如果在节点上找不到组件,getComponent 会返回 null,访问 null 值,会在运行时抛出 “TypeError” 错误,
如果不确定组件是否存在,需要判断一下:
 this.label = this.getComponent(Label);
 if (this.label) {
 		this.label.string = "test";
 } else {
 		console.error("this.label is null");
 }
3、属性检查器中设置节点及使用
这里以Node节点为例:
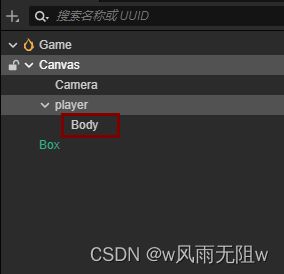
(1)、层级管理器中添加Node 节点,名字为Body
(2)、声明一个 type 为 Node 的属性
例如:
@property({type:Node})
private Body = null;
此时,属性检查器中的body节点如下:
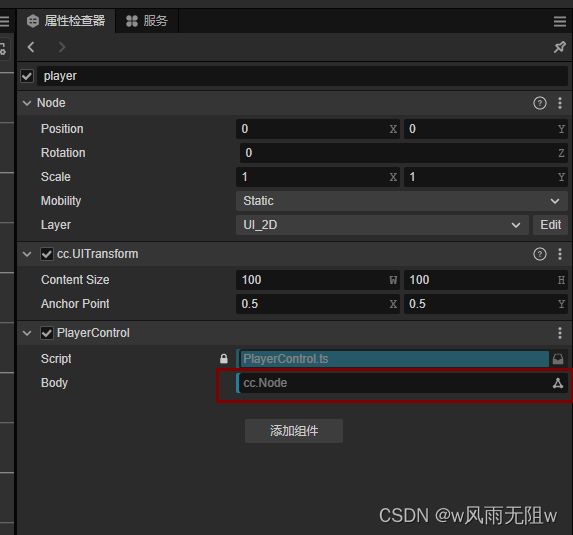
( 3)、将层级管理器中的Body节点拖入 右侧 属性检查器对应的Node
拖入后,显示如下:
这样操作后, Body 属性就会被设置成功,我们可以在脚本里访问 Body。
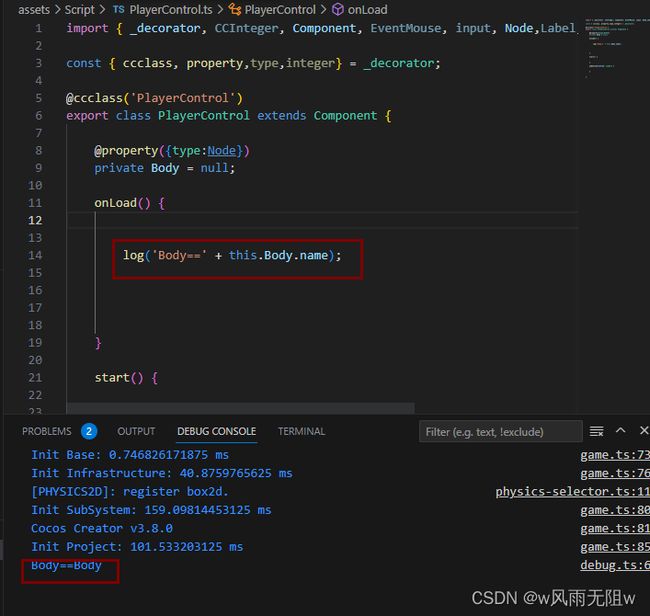
(4)、在脚本里访问 Body 节点
log('Body==' + this.Body.name);
4、属性检查器中设置组件及使用
这里以player组件为例:
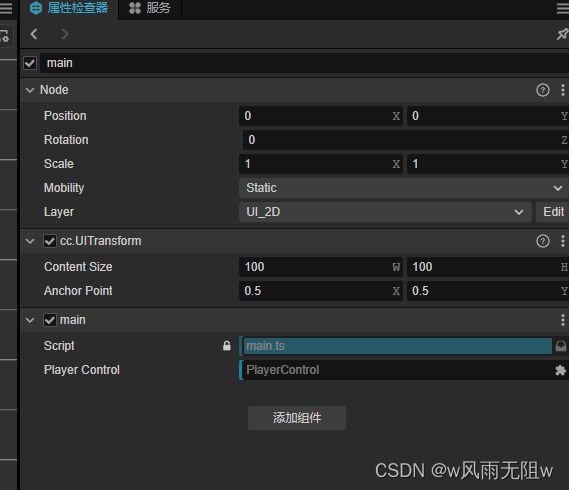
(1)、层级管理器中添加一个 main 节点,同时在资源管理器中添加main.ts 脚本 ,
并在属性检查器中,将main.ts 脚本 拖入,绑定在main 节点上。
如图:
(2)、在main.ts 中添加type为playercontrol的属性
    @property({type:PlayerControl})
    private PlayerControl = null;
(3)、将层级管理器中的Player节点拖入 右侧 属性检查器对应的PlayerControl
通过以上设置后,我们可以在脚本里访问 PlayerControl。
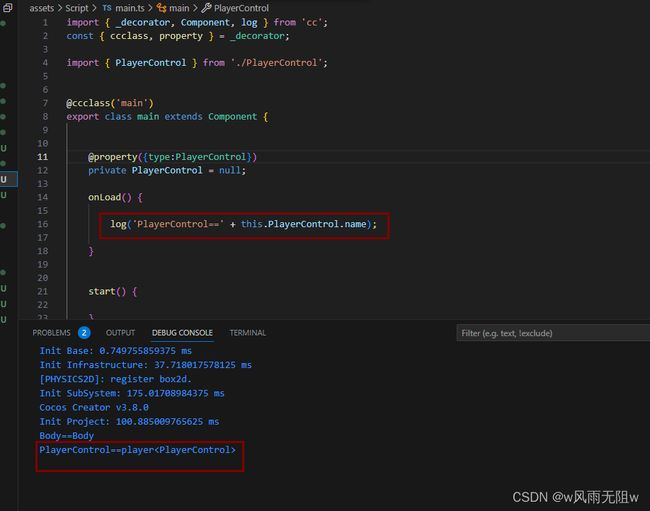
(4)、在脚本里访问 PlayerControl
这样就不需要再自己调用 getComponent 来获取 PlayerControl。
5、查找子节点
有时场景里面的组件比较多,需要有一个脚本来统一管理,如上的main.ts 的作用。
如果用 属性检查器 来一个一个将它们关联到这个脚本上,工作量就非常大。
为了更好地统一管理这些对象,我们可以把它们放到一个父节点下,然后通过父节点来获得所有的子节点:
let cannons = this.node.children;
还可以通过子节点的名字来获取:
this.node.getChildByName("child name");
如果子节点的层次较深,还可以使用 find根据传入的路径进行逐级查找:
find("a/b/c", this.node);
二、访问已有变量里的值
可以使用 import 来实现脚本的跨文件操作。
每个脚本都能用 import{ } from + 文件名(不含路径) 来获取到对方 exports 的对象。
例如:有一个 utils.ts 脚本
// , now the filename matters
import { _decorator, Component, Node } from 'cc';
const { ccclass, property } = _decorator;

@ccclass("utils")
export class utils extends Component {

    public static utilsNode: any = null;
    public static utilsLabel: any = null;
}
在user.ts 中使用 utils.ts ,访问 utils.utilsNode \utils.utilsNode bi
import { _decorator, Component, Node, Label } from 'cc';
const { ccclass, property } = _decorator;
// this feels more safe since you know where the object comes from
import{utils}from "./utils";

@ccclass("user")
export class user extends Component {
    onLoad() {
        utils.utilsNode = this.node;
        utils.utilsLabel = this.getComponent(Label);
    }
}
三、节点常用接口
1、创建新节点
let node =new Node('a');
node.setPosition(0,0,-10);
2、节点激活与关闭
this.node 访问当前脚本所在节点。
this.node.active 表示该节点 自身的 激活状态,这个节点 当前 是否可被激活则取决于它的父节点。
判断节点当前是否已经激活:
activeInHierarchy
激活节点
this.node.active = true;
若节点原先就处于 可被激活 状态,修改 active 为 true 就会立即触发激活操作:
- 在场景中重新激活该节点和节点下所有 active 为 true 的子节点。
- 该节点和所有子节点上的所有组件都会被启用,它们中的
update方法之后每帧会执行。 - 这些组件上如果有
onEnable方法,这些方法将被执行。
一个节点是关闭状态时,它的所有组件都将被禁用, 它所有子节点,以及子节点上的组件也会跟着被禁用。
3、索引子节点
this.node.children:返回节点的所有子节点数组。this.node.children.length:返回节点的子节点数量。
注意:以上两个 API 都只会返回节点的直接子节点,不会返回子节点的子节点。
4、更改节点位置
有以下两种方法:
-
使用
setPosition方法:this.node.setPosition(1, 1, 0); this.node.setPosition(new Vec3(1, 1, 0)) -
设置
position变量:this.node.position = new Vec3(1, 1, 0);
5、更改节点旋转
this.node.setRotation(90, 90, 0);
通过欧拉角设置本地旋转:
this.node.setRotationFromEuler(90, 90, 0);
6、更改节点缩放
this.node.setScale(1, 1, 0);
7、更改节点的父节点
假设父节点为 parentNode,子节点为 this.node。
可以通过以下两种方法调整:
this.node.parent = parentNode;
this.node.removeFromParent();
parentNode.addChild(this.node);
8、克隆节点
克隆节点 通过 instantiate 完成。
import { _decorator, Component, Node,instantiate, director } from 'cc';
const { ccclass, property } = _decorator;

@ccclass("testClone")
export class testClone extends Component {

    @property({type:Node})
    private target: Node = null;

    start(){
        let scene = director.getScene();
        let node = instantiate(this.target);

        scene.addChild(node);
        node.setPosition(0, 0,-10);
    }
}
9、销毁节点
销毁节点 可以使用 node.destroy() 和 node.removeFromParent()。
两者的区别:
-
通过调用
node.destroy()函数,销毁节点并不会立刻被移除,在当前帧逻辑更新结束后才会执行。当一个节点销毁后,该节点就处于无效状态,可以通过
isValid判断当前节点是否已经被销毁。 -
通过调用`node.removeFromParent()函数,节点并不会从内存中释放,因为引擎内部仍会持有它的数据。
import { _decorator, Component, Node } from 'cc';
const { ccclass, property } = _decorator;

@ccclass("testDestroy")
export class testDestroy extends Component {

    @property({type:Node})
    private target: Node = null;

    private positionz: number = -20;

    start(){
        // 10秒后销毁节点
        setTimeout(function () {
            this.target.destroy();
          }.bind(this), 10000);
    }
    update(deltaTime: number){
        console.info(this.target.isValid);
        this.positionz += 1*deltaTime;
        if (this.target.isValid) {
            this.target.setPosition(0.0,0.0,this.positionz);
          }
    }
}
总结:
如果一个节点不再使用,直接调用它的 destroy 而不是 removeFromParent,也不需要设置 parent 为 null,否则会导致内存泄漏。
四、组件常用接口
Component 是所有组件的基类,任何组件都包括如下的常见接口:
this.node:该组件所属的节点实例this.enabled:是否每帧执行该组件的update方法,同时也用来控制渲染组件是否显示update(deltaTime: number):作为组件的成员方法,在组件的enabled属性为true时,其中的代码会每帧执行。onLoad():组件所在节点进行初始化时执行。start():会在该组件第一次update之前执行,通常用于需要在所有组件的onLoad初始化完毕后执行的逻辑。
