centos安装部署elasticsearch集群
两台centos7.9服务器
master:47.94.214.196
node:59.110.222.6
集群前置条件(必做):
部署OS
1、安装部署centos 7
2、设置IP
3、修改hostname、hosts文件
hosts文件中加入两个主机节点的IP与主机名映射:
# 修改hosts文件
vim /etc/hosts
# 添加
47.94.214.196    elas-A
59.110.222.6    elas-B
4、修改系统配置文件
vim /etc/sysctl.conf
# 在/etc/sysctl.conf中添加
vm.max_map_count=655360
5、在/etc/security/limits.conf中添加
vim /etc/security/limits.conf

# 以下内容添加到末行

*       soft    nofile  655350
*       hard    nofile  655350
*       soft    nproc   102400
*       soft    memlock unlimited
*       hard    memlock unlimited
1、下载jdk17
#在 /ope 目录下安装jdk
cd /opt
wget https://download.oracle.com/java/17/latest/jdk-17_linux-x64_bin.tar.gz
tar -zxvf jdk-17_linux-x64_bin.tar.gz
# 将jdk-17改名为java
mv jdk-17 java
1.1添加环境变量
# 进入profile文件,按i进入编辑模式
vim /etc/profile
# 在文件最下方添加
export JAVA_HOME=/opt/java
export PATH=$PATH:$JAVA_HOME/bin;
export CLASSPATH=.:$JAVA_HOME/lib/dt.jar:$JAVA_HOME/lib/tools.jar;
# 按下Esc退出编辑模式
# 下一步按住shift 再按俩次 z 键,保存配置文件信息
# 重新加载环境变量
source /etc/profile
# 查看jdk版本
java -version
2、下载elasticsearch,本项目使用的是7.15.1。
切换非root用户下载解压,本项目使用的是www用户
su www
cd /home/www/
mkdir els
cd els
# 下载 elasticsearch-7.15.1
wget https://artifacts.elastic.co/downloads/elasticsearch/elasticsearch-7.15.1-linux-x86_64.tar.gz
# 解压elasticsearch-7.15.1
tar -zxvf elasticsearch-7.15.1-linux-x86_64.tar.gz
2.1部署master节点
更改elasticsearch.yml配置文件,该文件在本项目位于
vim /home/www/els/elasticsearch-7.15.1/config/elasticsearch.yml2.3在elasticsearch.yml最下方添加
http.cors.enabled: true
http.cors.allow-origin: "*"
bootstrap.memory_lock: false
bootstrap.system_call_filter: false
##集群名称,每个节点配置成一样的名称才能形成正确的集群
cluster.name: gfb
###节点名称,每个节点配置不同名称
node.name: master
###是否主节点
node.master: true
###集群主节点node名称
cluster.initial_master_nodes: ["master"]
###是否数据节点
node.data: true
###单机最大节点数
node.max_local_storage_nodes: 1
###索引数据的存储路径
path.data: /home/www/elasticsearch/elasticsearch-7.15.1/date
###日志文件的存储路径
path.logs: /home/www/elasticsearch/elasticsearch-7.15.1/log
###绑定的ip地址,外网也可以访问
network.host: 0.0.0.0
###设置对外服务的http端口,默认为9200
http.port: 9200
### 设置节点间交互的tcp端口
transport.tcp.port: 9300
transport.tcp.compress: true
### 设置集群中节点的初始列表,可以通过这些节点来自动发现新加入集群的节点
discovery.zen.ping.unicast.hosts: ["47.94.214.196:9300","59.110.222.6:9300"]
discovery.zen.minimum_master_nodes: 1
###防止同一个shard的主副本存在同一个物理机上
cluster.routing.allocation.same_shard.host: true
根据注释更改所需内容
2.4启动elasticsearch
# -d为后台启动
./home/www/elasticsearch/elasticsearch-7.15.1/bin/elasticsearch -d
报错:
因elasticsearch所占内存较多,启动时可能会遇到内存不足报错
解决方法:
# 修改elasticsearch安装目录下的config里的jvm.options
vim /home/www/elasticsearch/elasticsearch-7.15.1/config/jvm.options
在最下方添加jvm.options
# 把每个elasticsearch都修改为340m  让它们平均分配虚拟机的内存,当然你也可以增大自己的虚拟机内存
-Xms340m
-Xmx340m
再次启动elasticsearch
启动后web端访问 master公网IP:9200查看启动状态
3、部署node节点
复制master节点的jdk包和elasticsearch包至node节点相同目录
步骤与master一致
3.1、重点:
修改elasticsearch.yml配置文件
node.name
network.host
以下为我本项目node节点配置
http.cors.enabled: true
http.cors.allow-origin: "*"
bootstrap.memory_lock: false
bootstrap.system_call_filter: false
##集群名称,每个节点配置成一样的名称才能形成正确的集群
cluster.name: gfb
####节点名称,每个节点配置不同名称
node.name: node1
####是否主节点
node.master: false
####集群主节点node名称
cluster.initial_master_nodes: ["master"]
####是否数据节点
node.data: true
####单机最大节点数
node.max_local_storage_nodes: 1
####索引数据的存储路径
path.data: /home/www/elasticsearch/elasticsearch-7.15.1/date
####日志文件的存储路径
path.logs: /home/www/elasticsearch/elasticsearch-7.15.1/log
####绑定的ip地址,外网也可以访问
network.host: 0.0.0.0
####设置对外服务的http端口,默认为9200
http.port: 9200
#### 设置节点间交互的tcp端口
transport.tcp.port: 9300
transport.tcp.compress: true
#### 设置集群中节点的初始列表,可以通过这些节点来自动发现新加入集群的节点
discovery.zen.ping.unicast.hosts: ["47.94.214.196:9300","59.110.222.6:9300"]
discovery.zen.minimum_master_nodes: 1
####防止同一个shard的主副本存在同一个物理机上
cluster.routing.allocation.same_shard.host: true
3.2、node节点后台启动elasticsearch
# -d为后台启动
./home/www/elasticsearch/elasticsearch-7.15.1/bin/elasticsearch -d
此时我遇到报错提示vm.max_map_count [65530]过小,但实际上已经更改了。
[www@elas-B bin]$ ./elasticsearch -d
[www@elas-B bin]$ WARNING: A terminally deprecated method in java.lang.System has been called
WARNING: System::setSecurityManager has been called by org.elasticsearch.bootstrap.Elasticsearch (file:/home/www/els/elasticsearch-7.15.1/lib/elasticsearch-7.15.1.jar)
WARNING: Please consider reporting this to the maintainers of org.elasticsearch.bootstrap.Elasticsearch
WARNING: System::setSecurityManager will be removed in a future release
WARNING: A terminally deprecated method in java.lang.System has been called
WARNING: System::setSecurityManager has been called by org.elasticsearch.bootstrap.Security (file:/home/www/els/elasticsearch-7.15.1/lib/elasticsearch-7.15.1.jar)
WARNING: Please consider reporting this to the maintainers of org.elasticsearch.bootstrap.Security
WARNING: System::setSecurityManager will be removed in a future release

ERROR: [1] bootstrap checks failed. You must address the points described in the following [1] lines before starting Elasticsearch.
bootstrap check failure [1] of [1]: max virtual memory areas vm.max_map_count [65530] is too low, increase to at least [262144]
ERROR: Elasticsearch did not exit normally - check the logs at /home/www/elasticsearch/elasticsearch-7.15.1/log/gfb.log
reboot重启后解决,再次执行./elasticsearch -d启动成功
[www@elas-B bin]$ ./elasticsearch -d
warning: usage of JAVA_HOME is deprecated, use ES_JAVA_HOME
warning: usage of JAVA_HOME is deprecated, use ES_JAVA_HOME
[www@elas-B bin]$ WARNING: A terminally deprecated method in java.lang.System has been called
WARNING: System::setSecurityManager has been called by org.elasticsearch.bootstrap.Elasticsearch (file:/home/www/els/elasticsearch-7.15.1/lib/elasticsearch-7.15.1.jar)
WARNING: Please consider reporting this to the maintainers of org.elasticsearch.bootstrap.Elasticsearch
WARNING: System::setSecurityManager will be removed in a future release
WARNING: A terminally deprecated method in java.lang.System has been called
WARNING: System::setSecurityManager has been called by org.elasticsearch.bootstrap.Security (file:/home/www/els/elasticsearch-7.15.1/lib/elasticsearch-7.15.1.jar)
WARNING: Please consider reporting this to the maintainers of org.elasticsearch.bootstrap.Security
WARNING: System::setSecurityManager will be removed in a future release
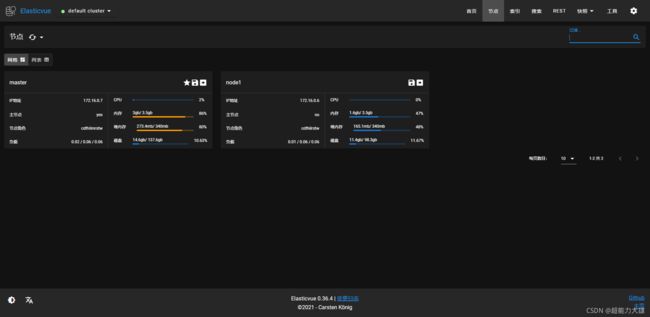
4、客户端安装集群管理工具
Edge或Chrome浏览器,安装Elasticvue扩展。下载链接:https://elasticvue.com
安装完扩展后,可通过浏览器的elasticvue扩展程序查看elasticsearch的运行状态,并可测试REST API。

