rabbitMq实现延迟队列
文章目录
- 业务场景:
- 1 安装rabbitMq
- 2 添加maven依赖
- 3 在application.properties配置
- 4 具体的实现
-
- 4.1 Dead Letter Exchanges
- 4.2 实现延迟队列
-
- 代码
- 4.3 RabbitMq的优化
- 4.4 利用插件实现延迟队列
-
- 4.4.1 下载插件
- 4.4.2 编写代码
- 5.总结
业务场景:
1.生成订单30分钟未支付,则自动取消,我们该怎么实现呢?
2.生成订单60秒后,给用户发短信
1 安装rabbitMq
windows安装
ubuntu中安装
2 添加maven依赖
        <dependency>
            <groupId>org.springframework.bootgroupId>
            <artifactId>spring-boot-starter-amqpartifactId>
        dependency>
3 在application.properties配置
spring.application.name=rabbitmq-hello
# 配置rabbbitMq
spring.rabbitmq.host=localhost
spring.rabbitmq.port=5672
spring.rabbitmq.username=springCloud
spring.rabbitmq.password=123456
4 具体的实现
rabbitmq本身是没有延迟发送的功能,但是我们通过消息的TTL(Time To Live)来实现,所谓TTL就是指消息的存活时间,RabbitMQ可以对队列和消息分别设置TTL。
对队列设置就是队列没有消费者连着的保留时间,也可以对每一个单独的消息做单独的设置。超过了这个时间,我们认为这个消息就死了,称之为死信。如果队列设置了,消息也设置了,那么会取小的。所以一个消息如果被路由到不同的队列中,这个消息死亡的时间有可能不一样(不同的队列设置)。这里单讲单个消息的TTL,因为它才是实现延迟任务的关键。
我们可以通过设置消息的expiration字段或者x-message-ttl属性来设置时间,两者是一样的效果。只是expiration字段是字符串参数,所以要写个int类型的字符串:
byte[] messageBodyBytes = "Hello, world!".getBytes();
AMQP.BasicProperties properties = new AMQP.BasicProperties();
properties.setExpiration("60*1000");
channel.basicPublish("my-exchange", "routing-key", properties, messageBodyBytes);
当上面的消息扔到队列中后,过了60秒,如果没有被消费,它就死了。不会被消费者消费到。
这个消息后面的,没有“死掉”的消息对顶上来,被消费者消费。死信在队列中并不会被删除和释放,它会被统计到队列的消息数中去。单靠死信还不能实现延迟任务,还要靠Dead Letter Exchange。
下面我大致解释一下Dead Letter Exchanges
4.1 Dead Letter Exchanges
一个消息在满足如下条件下,会进死信路由,记住这里是路由而不是队列,一个路由可以对应很多队列。
- 1.一个消息被Consumer拒收了,并且reject方法的参数里requeue是false。也就是说不会被再次放在队列里,被其他消费者使用。
- 2.上面的消息的TTL到了,消息过期了。
- 3.队列的长度限制满了。排在前面的消息会被丢弃或者扔到死信路由上。
Dead Letter Exchange其实就是一种普通的exchange,和创建其他exchange没有两样。只是在某一个设置Dead Letter Exchange的队列中有消息过期了,会自动触发消息的转发,发送到Dead Letter Exchange中去。
4.2 实现延迟队列
延迟任务通过消息的TTL和Dead Letter Exchange来实现。我们需要建立2个队列,一个用于发送消息,一个用于消息过期后的转发目标队列,大致原理如下图所示。

生产者输出消息到Queue1,并且这个消息是设置有有效时间的,比如60s。消息会在Queue1中等待60s,如果没有消费者收掉的话,它就是被转发到Queue2,Queue2有消费者,收到,处理延迟任务。
接下来正式进入代码阶段
代码
- 声明交换机、队列以及他们的绑定关系:
import org.springframework.amqp.core.*;
import org.springframework.beans.factory.annotation.Qualifier;
import org.springframework.context.annotation.Bean;
import org.springframework.context.annotation.Configuration;

import java.util.HashMap;
import java.util.Map;

@Configuration
public class RabbitMQConfig {

    public static final String DELAY_EXCHANGE_NAME = "delay.queue.demo.business.exchange";//普通的交换机
    public static final String DELAY_QUEUEA_NAME = "delay.queue.demo.business.queuea";//声明两个队列 A B
    public static final String DELAY_QUEUEB_NAME = "delay.queue.demo.business.queueb";
    public static final String DELAY_QUEUEA_ROUTING_KEY = "delay.queue.demo.business.queuea.routingkey";
    public static final String DELAY_QUEUEB_ROUTING_KEY = "delay.queue.demo.business.queueb.routingkey";
    public static final String DEAD_LETTER_EXCHANGE = "delay.queue.demo.deadletter.exchange";//Dead Letter Exchanges
    public static final String DEAD_LETTER_QUEUEA_ROUTING_KEY = "delay.queue.demo.deadletter.delay_10s.routingkey";//死信交换机
    public static final String DEAD_LETTER_QUEUEB_ROUTING_KEY = "delay.queue.demo.deadletter.delay_60s.routingkey";
    public static final String DEAD_LETTER_QUEUEA_NAME = "delay.queue.demo.deadletter.queuea";
    public static final String DEAD_LETTER_QUEUEB_NAME = "delay.queue.demo.deadletter.queueb";

    // 声明延时Exchange
    @Bean("delayExchange")
    public DirectExchange delayExchange() {
        return new DirectExchange(DELAY_EXCHANGE_NAME);
    }

    // 声明死信Exchange
    @Bean("deadLetterExchange")
    public DirectExchange deadLetterExchange() {
        return new DirectExchange(DEAD_LETTER_EXCHANGE);
    }

    // 声明延时队列A 延时10s
    // 并绑定到对应的死信交换机
    @Bean("delayQueueA")
    public Queue delayQueueA() {
        Map<String, Object> args = new HashMap<>(2);
        // x-dead-letter-exchange    这里声明当前队列绑定的死信交换机
        args.put("x-dead-letter-exchange", DEAD_LETTER_EXCHANGE);
        // x-dead-letter-routing-key  这里声明当前队列的死信路由key
        args.put("x-dead-letter-routing-key", DEAD_LETTER_QUEUEA_ROUTING_KEY);
        // x-message-ttl  声明队列的TTL
        args.put("x-message-ttl", 1000 * 10);
        return QueueBuilder.durable(DELAY_QUEUEA_NAME).withArguments(args).build();
    }

    // 声明延时队列B 延时 60s
    // 并绑定到对应的死信交换机
    @Bean("delayQueueB")
    public Queue delayQueueB() {
        Map<String, Object> args = new HashMap<>(2);
        // x-dead-letter-exchange    这里声明当前队列绑定的死信交换机
        args.put("x-dead-letter-exchange", DEAD_LETTER_EXCHANGE);
        // x-dead-letter-routing-key  这里声明当前队列的死信路由key
        args.put("x-dead-letter-routing-key", DEAD_LETTER_QUEUEB_ROUTING_KEY);
        // x-message-ttl  声明队列的TTL
        args.put("x-message-ttl", 60000);
        return QueueBuilder.durable(DELAY_QUEUEB_NAME).withArguments(args).build();
    }

    // 声明死信队列A 用于接收延时10s处理的消息
    @Bean("deadLetterQueueA")
    public Queue deadLetterQueueA() {
        return new Queue(DEAD_LETTER_QUEUEA_NAME);
    }

    // 声明死信队列B 用于接收延时60s处理的消息
    @Bean("deadLetterQueueB")
    public Queue deadLetterQueueB() {
        return new Queue(DEAD_LETTER_QUEUEB_NAME);
    }

    // 声明延时队列A绑定关系
    @Bean
    public Binding delayBindingA(@Qualifier("delayQueueA") Queue queue,
                                 @Qualifier("delayExchange") DirectExchange exchange) {
        return BindingBuilder.bind(queue).to(exchange).with(DELAY_QUEUEA_ROUTING_KEY);
    }

    // 声明业务队列B绑定关系
    @Bean
    public Binding delayBindingB(@Qualifier("delayQueueB") Queue queue,
                                 @Qualifier("delayExchange") DirectExchange exchange) {
        return BindingBuilder.bind(queue).to(exchange).with(DELAY_QUEUEB_ROUTING_KEY);
    }

    // 声明死信队列A绑定关系
    @Bean
    public Binding deadLetterBindingA(@Qualifier("deadLetterQueueA") Queue queue,
                                      @Qualifier("deadLetterExchange") DirectExchange exchange) {
        return BindingBuilder.bind(queue).to(exchange).with(DEAD_LETTER_QUEUEA_ROUTING_KEY);
    }

    // 声明死信队列B绑定关系
    @Bean
    public Binding deadLetterBindingB(@Qualifier("deadLetterQueueB") Queue queue,
                                      @Qualifier("deadLetterExchange") DirectExchange exchange) {
        return BindingBuilder.bind(queue).to(exchange).with(DEAD_LETTER_QUEUEB_ROUTING_KEY);
    }
}
- 消息的生产者
import org.springframework.amqp.rabbit.core.RabbitTemplate;
import org.springframework.beans.factory.annotation.Autowired;
import org.springframework.stereotype.Component;
import org.springframework.stereotype.Service;

import static com.talent.infocenter.rabbitmq.RabbitMQConfig.*;

@Service
public class DelayMessageSender {

    @Autowired
    private RabbitTemplate rabbitTemplate;

    public enum DelayTypeEnum {
        DELAY_10s, DELAY_60s;
    }

    public static DelayTypeEnum getByIntValue(int value) {
        switch (value) {
            case 10:
                return DelayTypeEnum.DELAY_10s;
            case 60:
                return DelayTypeEnum.DELAY_60s;
            default:
                return null;
        }
    }

    public void sendMsg(String msg, DelayTypeEnum type) {
        switch (type) {
            case DELAY_10s:
                rabbitTemplate.convertAndSend(DELAY_EXCHANGE_NAME, DELAY_QUEUEA_ROUTING_KEY, msg);
                break;
            case DELAY_60s:
                rabbitTemplate.convertAndSend(DELAY_EXCHANGE_NAME, DELAY_QUEUEB_ROUTING_KEY, msg);
                break;
        }
    }
}
- 消费者
我们创建两个消费者,分别消费10s和60s的订单
import com.rabbitmq.client.Channel;
import lombok.extern.slf4j.Slf4j;
import org.springframework.amqp.core.Message;
import org.springframework.amqp.rabbit.annotation.RabbitListener;
import org.springframework.stereotype.Component;

import java.io.IOException;
import java.util.Date;

import static com.talent.infocenter.rabbitmq.RabbitMQConfig.DEAD_LETTER_QUEUEA_NAME;
import static com.talent.infocenter.rabbitmq.RabbitMQConfig.DEAD_LETTER_QUEUEB_NAME;

@Slf4j
@Component
public class DeadLetterQueueConsumer {

    @RabbitListener(queues = DEAD_LETTER_QUEUEA_NAME)
    public void receiveA(Message message, Channel channel) throws IOException {
        String msg = new String(message.getBody());
        log.info("当前时间:{},死信队列A收到消息:{}", new Date().toString(), msg);
        channel.basicAck(message.getMessageProperties().getDeliveryTag(), false);
    }

    @RabbitListener(queues = DEAD_LETTER_QUEUEB_NAME)
    public void receiveB(Message message, Channel channel) throws IOException {
        String msg = new String(message.getBody());
        log.info("当前时间:{},死信队列B收到消息:{}", new Date().toString(), msg);
        channel.basicAck(message.getMessageProperties().getDeliveryTag(), false);
    }
}
- 创建一个接口进行测试
import com.talent.infocenter.rabbitmq.DelayMessageSender;
import lombok.extern.slf4j.Slf4j;
import org.springframework.beans.factory.annotation.Autowired;
import org.springframework.web.bind.annotation.RequestMapping;
import org.springframework.web.bind.annotation.RequestMethod;
import org.springframework.web.bind.annotation.RequestParam;
import org.springframework.web.bind.annotation.RestController;

import java.util.Date;
import java.util.Objects;

@Slf4j
@RestController
public class RabbitMQMsgController {

    @Autowired
    private DelayMessageSender sender;

    @RequestMapping(value = "sendmsg", method = RequestMethod.GET)
    public void sendMsg(@RequestParam(value = "msg") String msg, @RequestParam(value = "delayType") Integer delayType) {
        log.info("当前时间:{},收到请求,msg:{},delayType:{}", new Date(), msg, delayType);
        sender.sendMsg(msg, Objects.requireNonNull(DelayMessageSender.getByIntValue(delayType)));
    }
}
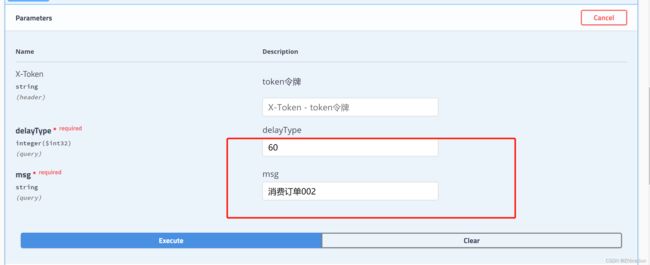
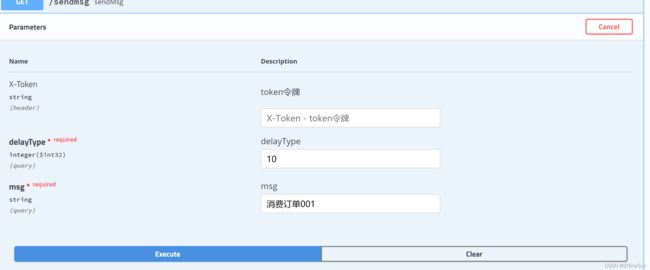
接下来开始测试,我用的是swagger,大家可以用postman等其他方法自行测试
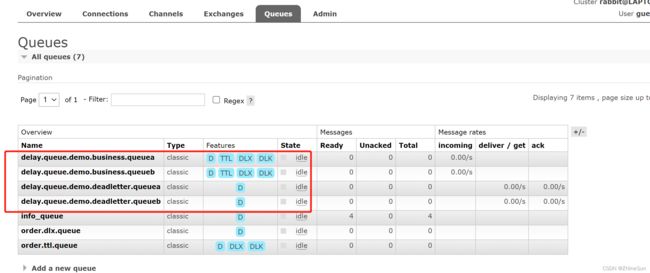
打开我们的rabbitmq后台就可以看到我们交换机和队列信息
上面的实现仅能设置两个指定的时间10s和60s,接下来我们设置任意时间的延迟队列
4.3 RabbitMq的优化
我们需要一种更通用的方案才能满足需求,那么就只能将TTL设置在消息属性里了,只有如此我们才能更加灵活的实现延迟队列的具体业务开发,方法也很简单,我们只需要增加一个延时队列,用于接收设置为任意延时时长的消息,同时增加一个相应的死信队列和routingkey,但是该方法有个极大的弊端就是如果使用在消息属性上设置TTL的方式,消息可能并不会按时“死亡“,因为RabbitMQ只会检查第一个消息是否过期,如果过期则丢到死信队列,所以如果第一个消息的延时时长很长,而第二个消息的延时时长很短,则第二个消息并不会优先得到执行,此处则不再进行编写代码,但是为了解决这个问题,我们将利用rabbitMq插件实现延迟队列。
4.4 利用插件实现延迟队列
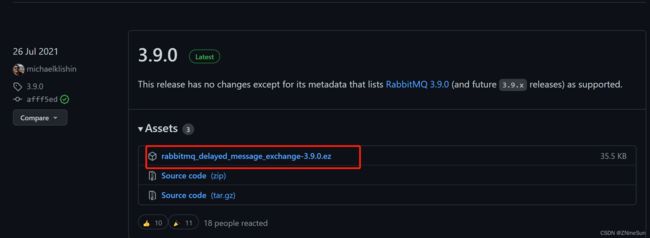
4.4.1 下载插件
下载完成之后进行解压,此处推荐bandzip进行解压,并且将解压之后的文件夹放到rabbitmq的安装目录下的plugins目录下
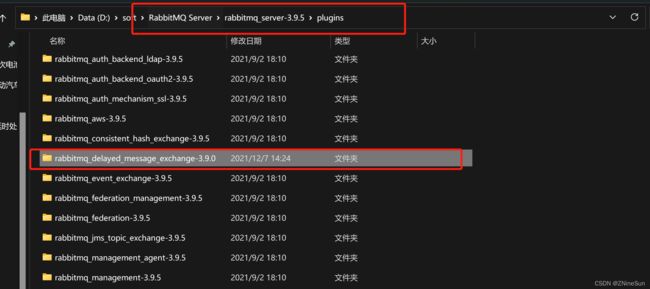
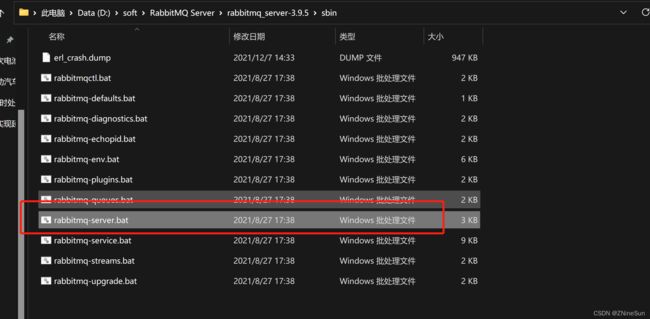
进入到sbin目录下使用cmd执行以下指令来启用插件
rabbitmq-plugins enable rabbitmq_delayed_message_exchange
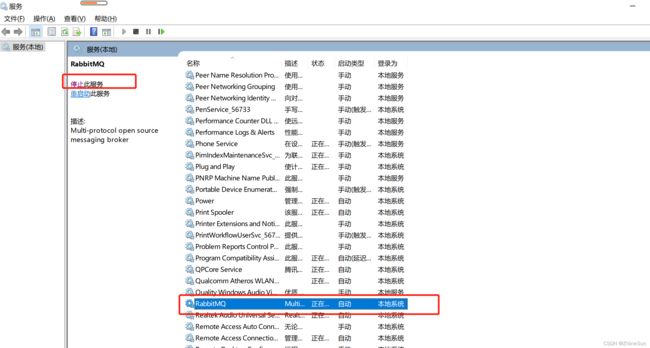
执行以上步骤之后开始重启我们的rabbitmq服务
验证是否重启成功访问http://localhost:15672
如果能够访问成功说明重启成功
4.4.2 编写代码
重新创建一个配置类
import org.springframework.amqp.core.Binding;
import org.springframework.amqp.core.BindingBuilder;
import org.springframework.amqp.core.CustomExchange;
import org.springframework.amqp.core.Queue;
import org.springframework.beans.factory.annotation.Qualifier;
import org.springframework.context.annotation.Bean;
import org.springframework.context.annotation.Configuration;

import java.util.HashMap;
import java.util.Map;

@Configuration
public class DelayedRabbitMQConfig {
    public static final String DELAYED_QUEUE_NAME = "delay.queue.demo.delay.queue";
    public static final String DELAYED_EXCHANGE_NAME = "delay.queue.demo.delay.exchange";
    public static final String DELAYED_ROUTING_KEY = "delay.queue.demo.delay.routingkey";

    @Bean
    public Queue immediateQueue() {
        return new Queue(DELAYED_QUEUE_NAME);
    }

    @Bean
    public CustomExchange customExchange() {
        Map<String, Object> args = new HashMap<>();
        args.put("x-delayed-type", "direct");
        return new CustomExchange(DELAYED_EXCHANGE_NAME, "x-delayed-message", true, false, args);
    }

    @Bean
    public Binding bindingNotify(@Qualifier("immediateQueue") Queue queue,
                                 @Qualifier("customExchange") CustomExchange customExchange) {
        return BindingBuilder.bind(queue).to(customExchange).with(DELAYED_ROUTING_KEY).noargs();
    }
}
新建一个消息的发送者
import org.springframework.amqp.rabbit.core.RabbitTemplate;
import org.springframework.beans.factory.annotation.Autowired;
import org.springframework.stereotype.Service;

import static com.talent.infocenter.rabbitMq.DelayedRabbitMQConfig.DELAYED_EXCHANGE_NAME;
import static com.talent.infocenter.rabbitMq.DelayedRabbitMQConfig.DELAYED_ROUTING_KEY;

@Service
public class Provider {
    @Autowired
    private RabbitTemplate rabbitTemplate;


    public void sendDelayMsg(String msg, Integer delayTime) {
        rabbitTemplate.convertAndSend(DELAYED_EXCHANGE_NAME, DELAYED_ROUTING_KEY, msg, a -> {
            a.getMessageProperties().setDelay(delayTime*1000);
            return a;
        });
    }
}
新建一个消息的消费者
import com.rabbitmq.client.Channel;
import lombok.extern.slf4j.Slf4j;
import org.springframework.amqp.core.Message;
import org.springframework.amqp.rabbit.annotation.RabbitListener;
import org.springframework.stereotype.Component;

import java.io.IOException;
import java.util.Date;

import static com.talent.infocenter.rabbitMq.DelayedRabbitMQConfig.DELAYED_QUEUE_NAME;

@Slf4j
@Component
public class Consumer {

    @RabbitListener(queues = DELAYED_QUEUE_NAME)
    public void receiveD(Message message, Channel channel) throws IOException {
        String msg = new String(message.getBody());
        log.info("当前时间:{},延时队列收到消息:{}", new Date().toString(), msg);
        channel.basicAck(message.getMessageProperties().getDeliveryTag(), false);
    }
}
修改我们之前的接口
import com.talent.api.utils.RedisUtils;
import com.talent.infocenter.rabbitMq.Provider;
import lombok.extern.slf4j.Slf4j;
import org.springframework.beans.factory.annotation.Autowired;
import org.springframework.web.bind.annotation.RequestMapping;
import org.springframework.web.bind.annotation.RequestMethod;
import org.springframework.web.bind.annotation.RequestParam;
import org.springframework.web.bind.annotation.RestController;

import java.util.Date;
import java.util.Objects;

@Slf4j
@RestController
public class RabbitMQMsgController {

    @Autowired
    private Provider provider;

    @RequestMapping(value = "sendmsg", method = RequestMethod.GET)
    public void sendMsg(@RequestParam(value = "msg") String msg, @RequestParam(value = "delayTime") Integer delayTime) {
        log.info("当前时间:{},收到请求,msg:{},delayTime:{}", new Date(), msg, delayTime);
        provider.sendDelayMsg(msg, delayTime);
    }
}
再接着测试一下我们不同顺序的订单是否是按照时间顺序进行消费的
我们将订单0002设置为60s,订单0003设置为15s,看看订单0003能否在0002之前消费

结果显而易见订单0003确实在第15s的时候被消费掉
5.总结
延时队列在需要延时处理的场景下非常有用,而且十分稳定,使用RabbitMQ来实现延时队列可以很好的利用RabbitMQ的特性,如:消息可靠发送、消息可靠投递、死信队列来保障消息至少被消费一次以及未被正确处理的消息不会被丢弃。另外,通过RabbitMQ集群的特性,可以很好的解决单点故障问题,不会因为单个节点挂掉导致延时队列不可用或者消息丢失。
当然,延时队列还有很多其它选择,比如利用Java的DelayQueu,利用Redis的zset,利用Quartz或者利用kafka的时间轮,这些方式各有特点。

