1. 默认无参构造
User:其中User为默认无参构造
public class User {
    private String name;

    public String getName() {
        return name;
    }

    public void setName(String name) {
        this.name = name;
    }
}
beans.xml:(这样不会出错)
若是User没有了无参构造,只有有参构造,beans.xml 那样机会出错:
public class User {
    private String name;

    public User(String name) {
        this.name = name;
    }

    public String getName() {
        return name;
    }

    public void setName(String name) {
        this.name = name;
    }
}
beans.xml:(默认无参构造,这样会出错)
2. 无参构造怎么实现的值的注入?
答:通过 setter
如没有setter, 也会出错。(可以将 setter注释掉,就会出错)、
3. 有参数构造
若是没有无参构造,只有有参构造,那怎么实现属性值的注入?可以通过:constructor-arg 标签
User:
    private String name;
    public int age;

    public User(String name, int age) {
        this.name = name;
        this.age = age;
    }
   // Setter and Getter, toString
1)通过index 注入:
2)通过 type 注入:
缺点:全局只能存在唯一的类型
3)通过参数名注入:
4. Spring 其它一些配置
1)alias标签:可以取别名
2)bean中的name属性,可以取多个别名
3)import 标签,多人协同开发:
5. 多种类型的依赖注入
这里主要依赖于无参注入
Student:
public class Address {
    private String address;
    //下面是Setter and Getter , toString
}
public class Student {
    private String name;
    private Address address;
    private String[] texts;
    private List hobbys;
    private Map card;
    private Set games;
    private Properties info;
    private String graduate;
    //下面是Setter and Getter , toString
}
在Beans.xml 注入
....
对Student各种类型的值进行注入:
普通值类型:name
引用类型:address
数组类型:texts
          西游记
          活着
          游记
List类型:hobbys
         上网
         看书
         打游戏
Map类型:card
Set类型:games
       LoL
       王者
null类型:graduate
property类型:info
          男
          China
         Nopu
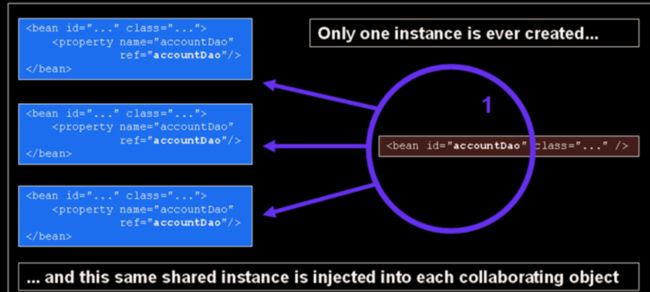
6. Bean的作用域
通过 Bean里面的 scope属性来确定
scope="singleton | prototype | request | session | application | websocket"
例如:scope = "singleton"
Singleton :单例模式

Prototype 原型模式
Request
Session
Application
WebSocket
7. Bean的自动装配
7.1 Bean中autowire属性值实现
在类中,若是有其它的引用对象,Bean可以上下文自己寻找。Spring IoC 容器在上下文中自己寻找Bean, 并进行匹匹配。通过 Bean的autowire属性
- autowire = "byName" or
- autowire = "byType"
代码:
public class Cat {
    public void shout(){
        System.out.println("喵喵喵...");
    }
}
public class Dog {
    public void shout(){
        System.out.println("汪汪汪");
    }
}

public class Zoo {
    private Cat cat;
    private Dog dog;
    //下面是Setter Getter and toString
}
其中Zoo有Dog 和Cat 引用值
在Bean,原本应该写为:
我们通过autowire 自动装配后:
7.2 @Autowired注解实现
在Zoo类中,引用类型的定义上面添加@Autowired,就可以自动装配(赋值)
单需要需要注意的是:需要在 xml 中添加相关的依赖:
public class Zoo {
    @Autowired
    private Cat cat;
    @Autowired
    private Dog dog;
 //下面是Setter ,Getter and toString
}
在Bean.xml:
注意:1)
2)@Autowired 默认通过byName来实现的
3) @Autowired(Required=false)则允许该对象为Null
8. 注解开发
8.1. 确保使用注解开发必须保证相应的包导入:
![]()
8.2. 导入bens中相应的约束:
8.3 若是要指定范围下的注解生效:
8.4注解
8.4.1 @Component
@Componet: 在类上面添加,使其为组件(一个beans),就可以不同在配置文件中注册。id默认为类名的小写
若是有这样一个类:
public class User {
    private String name;
    public int age;
}
一般而言,需要在beans.xml 中注入到IoC容器中:
可以使用下面的注解:
@Component
id : 默认为类名的小写
8.4.2 @Value
@Value:在类中属性上面或者对应的Setter上面,给属性赋值
public class User {
    @Value("Bob")
    private String name;
    @Value("25")
    public int age;
}
Setter上:
    @Value("Bob")
    public void setName(String name) {
        this.name = name;
    }
    @Value("25")
    public void setAge(int age) {
        this.age = age;
    }
等效于:
复杂类型@Value有限,还是得配置文件实现。
8.4.3 @Component 的衍生注解
为了更好的进行分层,Spring可以使用其它三个注解,功能一样,目前使用哪一个功能都一样。
- @Repository ::dao层
- @Service :service层
- @Controller :web层
** @Component 虽然可以直接在类的定义出将其托管给Spring 容器(bean), 但必须在XML配置文件加上支持注解的语句:
,还无法完全脱离配置文件
8.4.4 @Scope
在类上面添加,同 bean标签中的 scope 属性一样,规定作用域的
8.4.5 @Configuration
使用 @Component 时候,必须在XML申明支持注解,而使用@Configuration 就可以脱离配置文件。
定义 User:
@Component
public class User {
    @Value("LiSi")
    private String name;

    public String getName() {
        return name;
    }

    public void setName(String name) {
        this.name = name;
    }
}
定义 配置类
@Configuration
public class Config {

    @Bean
    // 方法的名字就相当于 Bean中的id
    // 返回值相当于 class
    public User getUser(){
        return new User();
    }
}
这样,就脱离了配置文件。
Test:
        ApplicationContext  context = new AnnotationConfigApplicationContext(Config.class);
        User user = (User) context.getBean("getUser");
        System.out.println(user.getName());
注意:
- 这里使用new AnnotationConfigApplicationContext(Config.class); 去获取配置类
- Bean的id就是@Bean下面函数的名字