Spring-MVC的文件上传,下载的技术攻克
目录
一.前言
二.文件上传
文件上传的步骤:
三.文件下载
四.多文件上传
一.前言
SpringMVC的文件上传下载的主要作用是让用户能够将文件上传到服务器或从服务器下载文件。这对于许多 Web 应用程序来说是非常重要的功能,例如,当用户需要上传头像或其他文件时,或者当需要在 Web 应用程序中提供可下载的文件时,都需要使用文件上传下载的功能。Spring MVC提供了方便的机制来实现文件上传和下载的功能。
二.文件上传
文件上传的步骤:
- 导入pom.xml依赖
- spring-mvc.xml,配置多功能视图解析器
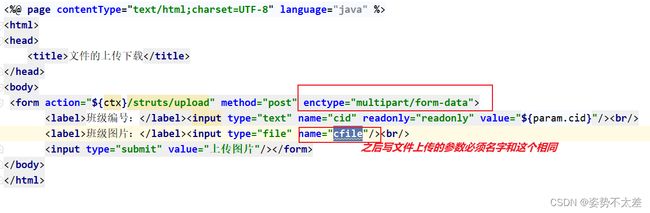
- 前端在表单标记为多功能表单 enctype=" mutipart/form=data"
- 后端利用mutipartFile类,接受前端传递到后台的文件
- 将文件转成流,然后写入到服务器(某一个硬盘)
- 做硬盘与网络地址的映射(服务器配置)
第一步,先导入pom.xml依赖文件
    commons-fileupload
    commons-fileupload
    1.3.3
第二步,配置多功能视图解析器
第三步 ,前端在表单标记为多功能表单 enctype=" mutipart/form=data"
第四步 :
建立一个通用跳转页面的,这样就可以不用再去写一个方法了
package com.yinzi.web;

import org.springframework.stereotype.Controller;
import org.springframework.web.bind.annotation.PathVariable;
import org.springframework.web.bind.annotation.RequestMapping;

/**
 * @author yinzi
 * @create 2023-09-09 14:50
 */
@Controller
public class PageController {
    @RequestMapping("/page/{page}")
    public String toPage(@PathVariable("page") String page){
        return page;
    }


    @RequestMapping("/page/{dir}/{page}")
    public String toDirPage(@PathVariable("dir") String dir,
                            @PathVariable("page") String page){
        return dir + "/" + page;
    }
}
在建立一个upload的文件上传的配置文件

读取配置文件,下载到数据库中
package com.yinzi.util;

import java.io.IOException;
import java.io.InputStream;
import java.util.Properties;

public class PropertiesUtil {
	public static String getValue(String key) throws IOException {
		Properties p = new Properties();
		InputStream in = PropertiesUtil.class.getResourceAsStream("/upload.properties");
		p.load(in);
		return p.getProperty(key);
	}

}
后台核心代码
/**
 * @author yinzi
 * @create 2023-09-09 14:07
 */
@Controller  //代替之前的自定义mvc的ActionSupport
@RequestMapping("/struts")
public class StrutsController {

    @Autowired
    private StrutsBiz strutsBiz;

    @RequestMapping("/list")
    public String list(Struts struts, HttpServletRequest request){
        //分页
        PageBean pageBean=new PageBean();
        pageBean.setRequest(request);
        //调用查询方法
        List struts1 = strutsBiz.selectList(struts, pageBean);
        request.setAttribute("list",struts1);
        request.setAttribute("pageBean",pageBean);
        return "list";
    }
     @RequestMapping("/upload")
    public String upload(Struts struts ,MultipartFile cfile) throws IOException {
        //图片存放的地址
        String dir= PropertiesUtil.getValue("dir");
        //网络访问地址
        String server=PropertiesUtil.getValue("server");
        String filename = cfile.getOriginalFilename();
        FileUtils.copyInputStreamToFile(cfile.getInputStream(),new File(dir+filename));
       //保存
        struts.setPic(server+filename);
        strutsBiz.updateByPrimaryKeySelective(struts);

        return "redirect:list";
    }

}
前台核心代码
ID
班级
教员
图片
操作
${b.cid }
${b.cname }
${b.cteacher }

<%-- 修改
删除--%>
图片上传
测试结果:

三.文件下载
文件下载就是照猫画虎
后台核心代码:
/*文件下载*/
@RequestMapping(value="/download")
public ResponseEntity download(Struts struts, HttpServletRequest req){

    try {
        //先根据文件id查询对应图片信息
        Struts struts1 = this.strutsBiz.selectByPrimaryKey(struts.getCid());
        String diskPath = PropertiesUtil.getValue("dir");
        String reqPath = PropertiesUtil.getValue("server");
        String realPath = struts1.getPic().replace(reqPath,diskPath);
        String fileName = realPath.substring(realPath.lastIndexOf("/")+1);
        //下载关键代码
        File file=new File(realPath);
        HttpHeaders headers = new HttpHeaders();//http头信息
        String downloadFileName = new String(fileName.getBytes("UTF-8"),"iso-8859-1");//设置编码
        headers.setContentDispositionFormData("attachment", downloadFileName);
        headers.setContentType(MediaType.APPLICATION_OCTET_STREAM);
        //MediaType:互联网媒介类型  contentType:具体请求中的媒体类型信息
        return new ResponseEntity(FileUtils.readFileToByteArray(file),headers, HttpStatus.OK);
    }catch (Exception e){
        e.printStackTrace();
    }
    return null;
}
在前台就一个文件下载的按钮即可
测试结果: 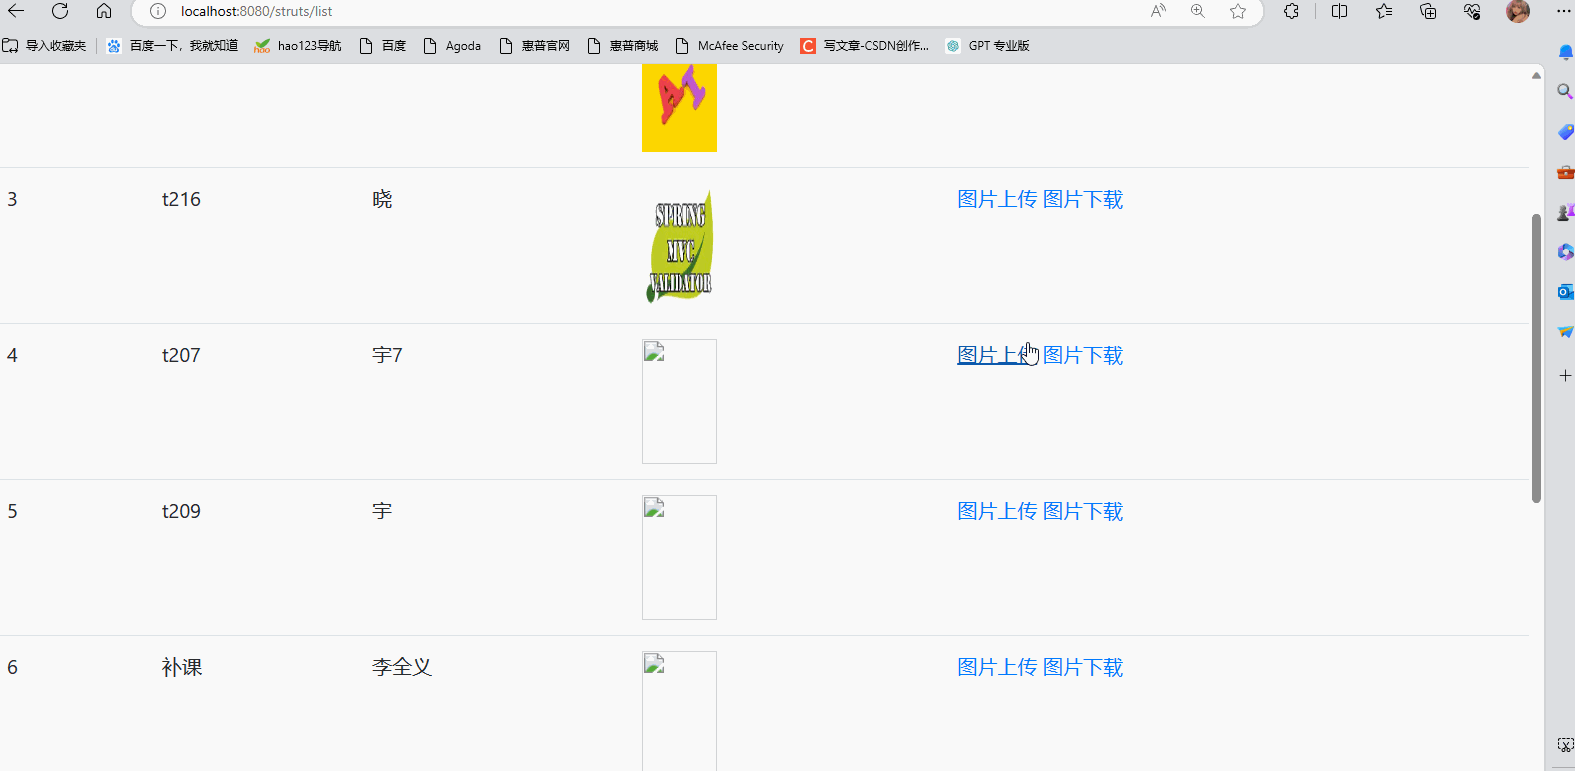
四.多文件上传
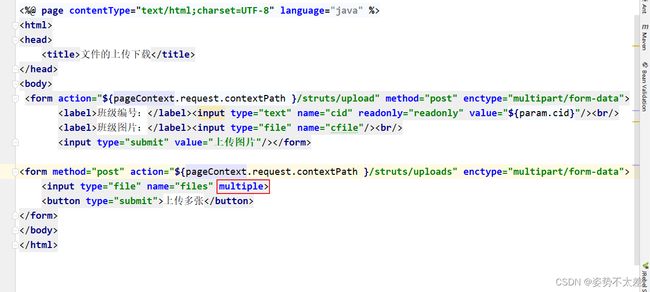
和上面的区别就是在表单里面加一个属性 multiple即可
前端核心代码:
后端核心代码:
/*多文件*/
    @RequestMapping("/uploads")
    public String uploads(HttpServletRequest req, Struts struts, MultipartFile[] files){
        try {
            StringBuffer sb = new StringBuffer();
            for (MultipartFile cfile : files) {
                //思路:
                //1) 将上传图片保存到服务器中的指定位置
                String dir = PropertiesUtil.getValue("dir");
                String server = PropertiesUtil.getValue("server");
                String filename = cfile.getOriginalFilename();
                FileUtils.copyInputStreamToFile(cfile.getInputStream(),new File(dir+filename));
                sb.append(filename).append(",");
            }
            System.out.println(sb.toString());

        } catch (Exception e) {
            e.printStackTrace();
        }
        return "redirect:list";
    }


}
测试结果:

今天的分享就到这啦!!