RabbitMQ高级特性_消费端限流 , [解耦, 限流,降低压力,发送消息]

通过消费端限流的 方式限制消息的拉取速度,达到保护消费端的目的。
下面我们新建springboot项目进行测试:
新建项目myproducer
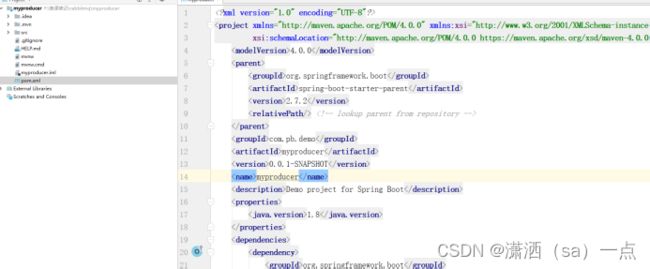
依赖:
            org.springframework.boot
            spring-boot-starter-web


            org.springframework.boot
            spring-boot-starter-amqp


            org.projectlombok
            lombok
            true


            org.springframework.boot
            spring-boot-starter-test
            test


                org.springframework.boot
                spring-boot-maven-plugin


                            org.projectlombok
                            lombok
对application.yml进行配置:
| # 配置RabbitMQ
spring:
rabbitmq:
host: 127.0.0.1
port: 5672
username: guest
password: guest
virtual-host: /
# 开启确认模式
publisher-confirm-type: correlated
# 开启退回模式
publisher-returns: true |
先手动创建一个交换机(代码创建在下面)
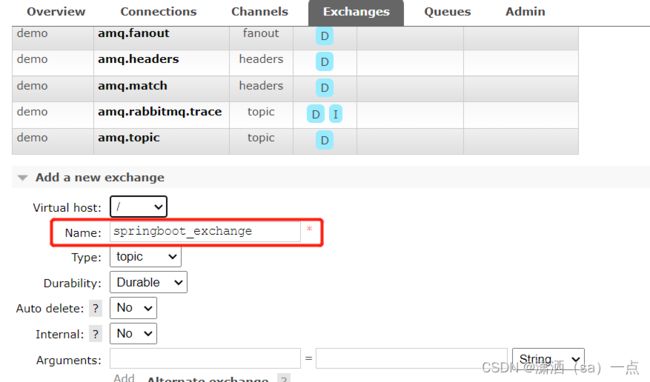
我们先做个不做任何限流的操作进行查看
| package com.pb.demo;
import org.junit.jupiter.api.Test;
import org.springframework.amqp.rabbit.core.RabbitTemplate;
import org.springframework.beans.factory.annotation.Autowired;
import org.springframework.boot.test.context.SpringBootTest;、
@SpringBootTest
class MyproducerApplicationTests {
@Autowired
private RabbitTemplate rabbitTemplate;
@Test
public void testSearchBatch() {
for(int i = 1; i <=10; i++) {
rabbitTemplate.convertAndSend("springboot_exchange", "my_routing", "send message....." + i);
}
}
} |
然后创建交换机 springboot_exchange
创建队列my_queue 并绑定路由my_routing
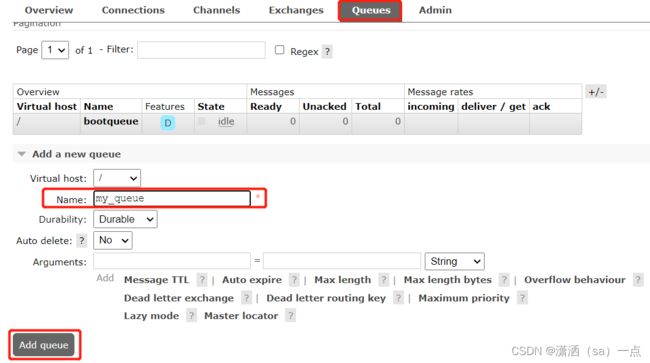
绑定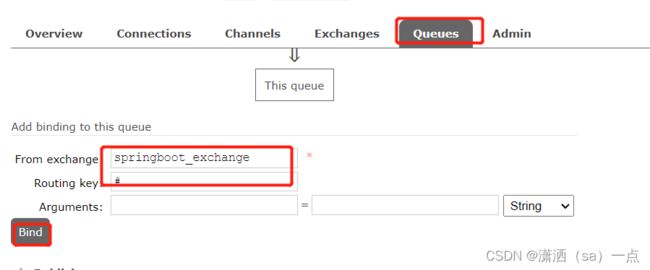
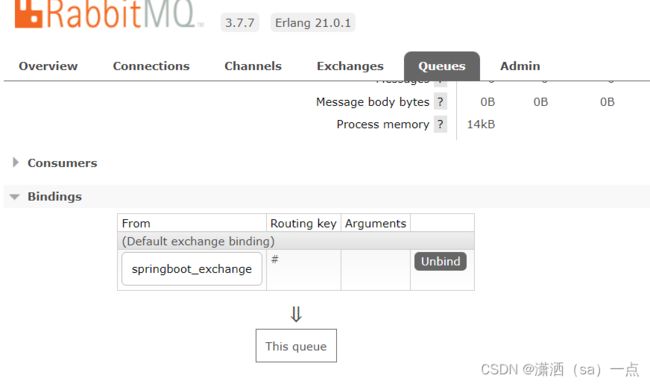
然后启动测试看看数据能不能发送到队列中去

然后创建消费端项目myconsumer
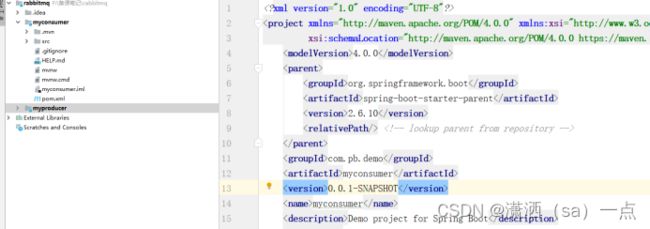
对application.yml配置文件进行配置
| # 配置RabbitMQ
spring:
rabbitmq:
host: 127.0.0.1
port: 5672
username: guest
password: guest
virtual-host: /
listener:
simple:
# 限流机制必须开启手动签收
acknowledge-mode: manual |
创建包myconsumer并新建类OosConsumer我们来消费消息
| package com.pb.demo.myconsumer;
import com.rabbitmq.client.Channel;
import org.springframework.amqp.core.Message;
import org.springframework.amqp.rabbit.annotation.Queue;
import org.springframework.amqp.rabbit.annotation.RabbitListener;
import org.springframework.stereotype.Component;
import java.io.IOException;
@Component
public class OosConsumer {
@RabbitListener(queues = "my_queue")
public void linsenerConsumer(Message message, Channel channel) throws IOException, InterruptedException {
System.out.println("收到了消息:" + new String(message.getBody()));
//睡眠下
Thread.sleep(3000L);
//签收
channel.basicAck(message.getMessageProperties().getDeliveryTag(), false);
}
} |
启动主启动类进行测试:
我们可以看rabbitmq的控制台

启动Consumer的启动类 在启动producer的测试类 可以看到 上面的情况
我么发现消息已经被消费掉了
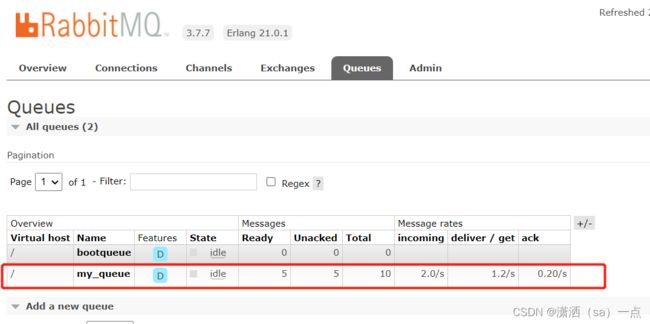
我们会发现他把所有的消息都堆到unacked中,那么就说明所有的消息都会堆到消费者中,因为我们这里并没有开启限流操作,如果我们有10万条消息那么就会造成消费者的内存溢出或者内存泄漏的问题
下面我们来开启限流注意如果我们开启限流必须是手动签收
修改application.yml在消费者的项目中:
| # 配置RabbitMQ
spring:
rabbitmq:
host: 127.0.0.1
port: 5672
username: guest
password: guest
virtual-host: /
listener:
simple:
# 限流机制必须开启手动签收
acknowledge-mode: manual
# 消费端最多拉取5条消息进行消费,签收后消费端不满5条才会继续拉取消息
prefetch: 5 |
RabbitMQ高级特性_利用限流实现不公平分发
在RabbitMQ中,多个消费者监听同一条队列,则队列默认采用的轮询分发。但是在某种场景下这种策略并不是很好,例如消费者1处 理任务的速度非常快,而其他消费者处理速度却很慢。此时如果采 用公平分发,则消费者1有很大一部分时间处于空闲状态。此时可以 采用不公平分发,即谁处理的快,谁处理的消息多。
首先我们模拟公平分发的操作,或者说看看平均分发的弊端
项目myproducer中的生产者的代码不需要动
我们只需要改变项目myconsumer的代码,在myconsumer包中创建类UnfairConsumer,在内部创建两个消费者
记得把OosConsumer类中的消费者注释掉
| package com.pb.demo.myconsumer;
import com.rabbitmq.client.Channel;
import org.springframework.amqp.core.Message;
import org.springframework.amqp.rabbit.annotation.RabbitListener;
import org.springframework.stereotype.Component;
import java.io.IOException;
@Component
public class UnfairConsumer {
// 消费者1
@RabbitListener(queues = "my_queue")
public void listenMessage1(Message message, Channel channel) throws IOException, InterruptedException {
// 1.获取消息
System.out.println("消费者1:"+new String(message.getBody()));
// 2.模拟业务处理
Thread.sleep(500); // 消费者1处理快
// 3.签收消息
channel.basicAck(message.getMessageProperties().getDeliveryTag(), true);
}
// 消费者2
@RabbitListener(queues = "my_queue")
public void listenMessage2(Message message, Channel channel) throws IOException, InterruptedException {
// 1.获取消息
System.out.println("消费者2:"+new String(message.getBody()));
// 2.模拟业务处理
Thread.sleep(3000); // 消费者2处理快
// 3.签收消息
channel.basicAck(message.getMessageProperties().getDeliveryTag(), true);
}
} |
我们要消费端的限流prefetch: 5 先注释掉
| # 配置RabbitMQ
spring:
rabbitmq:
host: 127.0.0.1
port: 5672
username: guest
password: guest
virtual-host: /
listener:
simple:
# 限流机制必须开启手动签收
acknowledge-mode: manual
# 消费端最多拉取5条消息进行消费,签收后消费端不满5条才会继续拉取消息
#prefetch: 5 |
好启动所有项目进行对消费者控制台的查看
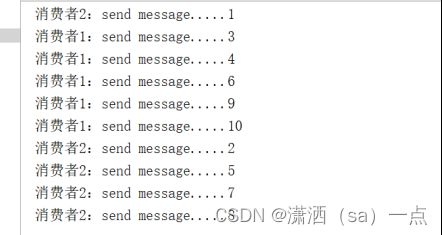
我们来实现不公平分发,谁处理的快就让他多处理
在消费端项目中修改application.yml配置文件:
| # 配置RabbitMQ
spring:
rabbitmq:
host: 127.0.0.1
port: 5672
username: guest
password: guest
virtual-host: /
listener:
simple:
# 限流机制必须开启手动签收
acknowledge-mode: manual
# 消费端最多拉取5条消息进行消费,签收后消费端不满5条才会继续拉取消息
#prefetch: 5
# 消费端最多拉取1条消息进行消费,这样谁处理的快谁拉取下一条消息,实现了不公平分发
prefetch: 1 |
从新启动项目进行测试:
来查看消费者的控制台:
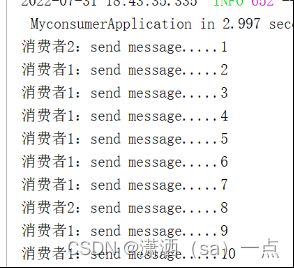
RabbitMQ高级特性_消息存活时间
RabbitMQ可以设置消息的存活时间(Time To Live,简称TTL), 当消息到达存活时间后还没有被消费,会被移出队列。RabbitMQ 可以对队列的所有消息设置存活时间【需要在创建队列的时候操作】,也可以对某条消息设置存活时间【需要在发送的的时候进行设置】。
设置队列所有消息存活时间
在这里我们需要创建新的交换机和队列:
在项目myproducer中创建配置类在包com.pb.demo下新建配置类RabbitConfig
| package com.pb.demo;
import org.springframework.amqp.core.*;
import org.springframework.beans.factory.annotation.Qualifier;
import org.springframework.context.annotation.Bean;
import org.springframework.context.annotation.Configuration;
@Configuration
public class RabbitConfig {
private final String EXCHANGE_NAME="my_topic_exchange2";
private final String QUEUE_NAME="my_queue2";
// 1.创建交换机
@Bean("bootExchange2")
public Exchange getExchange(){
return ExchangeBuilder
.topicExchange(EXCHANGE_NAME) // 交换机类型
.durable(true) // 是否持久化
.build();
}
@Bean("bootExchange2")
public Exchange getExchange() {
return ExchangeBuilder.topicExchange(EXCHANGE_NAME).durable(true).build();
}
// 2.创建队列
@Bean("bootQueue2")
public Queue getMessageQueue(){
return QueueBuilder
.durable(QUEUE_NAME) // 队列持久化
.ttl(10000) //对了的存活时间
.build();
}
// 3.将队列绑定到交换机
@Bean
public Binding bindMessageQueue(@Qualifier("bootExchange2") Exchange exchange, @Qualifier("bootQueue2") Queue queue){
return BindingBuilder.bind(queue).to(exchange).with("my_routing").noargs();
}
} |
然后在myproducer项目的测试类发送10条信息
| @Test
public void testSearchBatch2() {
for(int i = 1; i <=10; i++) {
rabbitTemplate.convertAndSend("my_topic_exchange2", "my_routing", "send message....." + i);
}
} |
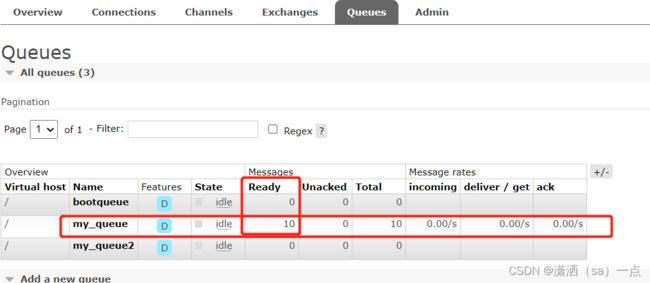
没有消费 的情况下:
设置单条消息存活时间【主要是在发送消息的时候设置单条消息的存活时间即可】
在myproducer项目的测试类进行操作:
| @Test
public void testSendMessage() {
// 1.创建消息属性
MessageProperties messageProperties = new MessageProperties();
// 2.设置存活时间
messageProperties.setExpiration("10000");
// 3.创建消息对象
Message message = new Message("send message...".getBytes(), messageProperties);
// 4.发送消息
rabbitTemplate.convertAndSend("springboot_exchange", "my_routing", message);
} |
然后测试该方法看看能不能给发送的单个消息设置时间

10秒再次查看

我们发现消息已经被清除掉了
注意:
| 1 如果设置了单条消息的存活时间,也设置了队列的存活时 间,以时间短的为准。
2 消息过期后,并不会马上移除消息,只有消息消费到队列顶端时,才会移除该消息。 |
下面我们来测试下
生产者写
| @Test
public void testSendMessage2() {
for(int i = 0; i < 10; i++) {
//当i==5的时候我们来设置单条信息的时间
if(i == 5) {
// 1.创建消息属性
MessageProperties messageProperties = new MessageProperties();
// 2.设置存活时间
messageProperties.setExpiration("10000");
// 3.创建消息对象
Message message = new Message("send message...".getBytes(), messageProperties);
// 4.发送消息
rabbitTemplate.convertAndSend("springboot_exchange", "my_routing", message);
}
else { //否则发送普通消息
rabbitTemplate.convertAndSend("springboot_exchange" , "my_routing", "send message" + i);
}
}
} |

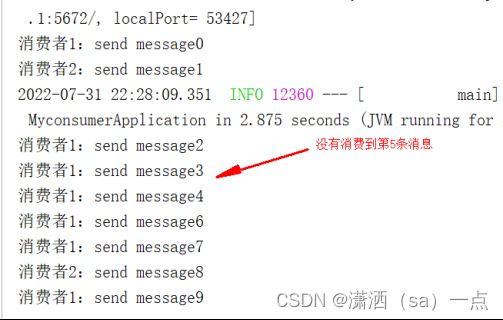
发现并没有被立即删除,但是我们一定要注意第5条消息现在已经不能被消费了,因为mq默认他已经被删除了如果在10秒以后,因为他已经过期了
我们测试下,启动任何一个消费端进行查看:
@Component
public class MyConsumer3 {
    @RabbitListener(queues="my_queue")
    public void getMsge(Message message, Channel channel) throws IOException, InterruptedException {
        System.out.println("my_queue1收到了消息:" + new String(message.getBody()));
        //签收
        //睡眠下    Thread.sleep(500L);
        channel.basicAck(message.getMessageProperties().getDeliveryTag(), false);
    }
}
//因为网络问题致使我在点击添加过程中有可能多次发送消息,那么数据库可能添加多个数据怎么保证唯一性
//幂等性,乐观锁
RabbitMQ高级特性_优先级队列
假设在电商系统中有一个订单催付的场景,即客户在一段时间内未付款会给用户推送一条短信提醒,但是系统中分为大型商家和小型 商家。比如像苹果,小米这样大商家一年能给我们创造很大的利润,所以在订单量大时,他们的订单必须得到优先处理,此时就需 要为不同的消息设置不同的优先级,此时我们要使用优先级队列。
优先级队列用法如下:
创建队列和交换机
在项目myproducer中创建配类我们来创建交换机和队列
| package com.pb.demo;
import org.springframework.amqp.core.*;
import org.springframework.beans.factory.annotation.Qualifier;
import org.springframework.context.annotation.Bean;
import org.springframework.context.annotation.Configuration;
@Configuration
public class RabbitConfig1 {
private final String EXCHANGE_NAME="priority_exchange";
private final String QUEUE_NAME="priority_queue";
// 1.创建交换机
@Bean(EXCHANGE_NAME)
public Exchange getExchange(){
return ExchangeBuilder
.topicExchange(EXCHANGE_NAME) // 交换机类型
.durable(true) // 是否持久化
.build();
}
// 2.创建队列
@Bean(QUEUE_NAME)
public Queue getMessageQueue(){
return QueueBuilder
.durable(QUEUE_NAME) // 队列持久化
.maxPriority(10) // 设置队列的最大优先级,最大可以设置255,但官网推荐不超过10,太高比较浪费资源
.build();
}
// 3.将队列绑定到交换机
@Bean
public Binding bindMessageQueue(@Qualifier(EXCHANGE_NAME) Exchange exchange, @Qualifier(QUEUE_NAME) Queue queue){
return BindingBuilder.bind(queue).to(exchange).with("my_routing").noargs();
}
} |
在项目myproducer中添加测试类中添加方法
| //优先级操作
@Test
public void testSendMessage3() {
for(int i = 0; i < 10; i++) {
if(i == 5) { //i == 5的时候优先级比较高
// 1.创建消息属性
MessageProperties messageProperties = new MessageProperties();
// 2.设置优先级
messageProperties.setPriority(9);
// 3.创建消息对象
Message message = new Message("send message...".getBytes(), messageProperties);
// 4.发送消息
rabbitTemplate.convertAndSend("priority_exchange", "my_routing", message);
}
else { //否则发送普通消息
rabbitTemplate.convertAndSend("priority_exchange" , "my_routing", "send message" + i);
}
}
} |
启动生产者,先发送消息
我们通过浏览器查看已经有了10条消息了

在项目myconsumer的包myconsumer下新建类PriorityConsumer进行消费
| package com.pb.demo.myconsumer;
import com.rabbitmq.client.Channel;
import org.springframework.amqp.core.Message;
import org.springframework.amqp.rabbit.annotation.RabbitListener;
import org.springframework.stereotype.Component;
import java.io.IOException;
@Component
public class PriorityConsumer {
@RabbitListener(queues = "priority_queue")
public void listenMessage(Message message, Channel channel) throws IOException {
// 获取消息
System.out.println(new String(message.getBody()));
// 手动签收
channel.basicAck(message.getMessageProperties().getDeliveryTag(),true);
}
} |
然后我们再启动消费者我们进行测试:
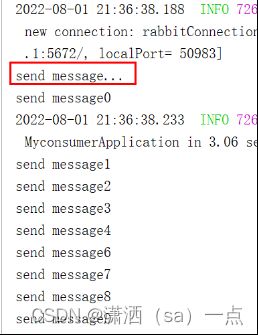
我们发现第5条信息被提前消费了
这里最好把生产者的数据先放到队列中然后在启动消费者,否则效果不明显
RabbitMQ死信队列_概念
在MQ中,当消息成为死信(Dead message)后,消息中间件可以 将其从当前队列发送到另一个队列中,这个队列就是死信队列【死信队列就是回收没有用的文件,就是mq的回收站】。而 在RabbitMQ中,由于有交换机的概念,实际是将死信发送给了死 信交换机(Dead Letter Exchange,简称DLX)。死信交换机和死信队列和普通的没有区别。

消息成为死信的情况:
1 队列消息长度到达限制。
2 消费者拒签消息,并且不把消息重新放入原队列。
3 消息到达存活时间未被消费。
RabbitMQ死信队列_代码实现
创建死信队列
首先清理mq的队列和交换机把所有的交换机和队列全部删除
在项目myproducer的com.pb.demo包下创建创建配置类RabbitConfig2
| package com.pb.demo;
import org.springframework.amqp.core.*;
import org.springframework.beans.factory.annotation.Qualifier;
import org.springframework.context.annotation.Bean;
import org.springframework.context.annotation.Configuration;
@Configuration
public class RabbitConfig2 {
private final String DEAD_EXCHANGE = "dead_exchange"; //死信交换机
private final String DEAD_QUEUE = "dead_queue"; //死信队列
private final String NORMAL_EXCHANGE = "normal_exchange"; //普通交换机
private final String NORMAL_QUEUE = "normal_queue"; //普通队列
// 死信交换机
@Bean(DEAD_EXCHANGE)
public Exchange deadExchange(){
return ExchangeBuilder
.topicExchange(DEAD_EXCHANGE)
.durable(true)
.build();
}
// 死信队列
@Bean(DEAD_QUEUE)
public Queue deadQueue(){
return QueueBuilder
.durable(DEAD_QUEUE)
.build();
}
/**
* 死信交换机绑定死信队列
* @param exchange
* @param queue
* @return
*/
@Bean
public Binding bindDeadQueue(@Qualifier(DEAD_EXCHANGE) Exchange exchange,@Qualifier(DEAD_QUEUE)Queue queue){
return BindingBuilder
.bind(queue)
.to(exchange)
.with("dead_routing")
.noargs();
}
// 普通交换机
@Bean(NORMAL_EXCHANGE)
public Exchange normalExchange(){
return ExchangeBuilder
.topicExchange(NORMAL_EXCHANGE)
.durable(true)
.build();
}
// 普通队列
@Bean(NORMAL_QUEUE)
public Queue normalQueue(){
return QueueBuilder
.durable(NORMAL_QUEUE)
.deadLetterExchange(DEAD_EXCHANGE) // 绑定死信
.deadLetterRoutingKey("dead_routing") // 死信队列路由关键字
.ttl(10000) // 消息存活10s
.maxLength(10) // 队列最大长度 为10
.build();
}
// 普通交换机绑定普通队列
@Bean
public Binding
bindNormalQueue(@Qualifier(NORMAL_EXCHANGE)Exchange exchange,@Qualifier(NORMAL_QUEUE)Queue queue){
return BindingBuilder
.bind(queue)
.to(exchange)
.with("my_routing")
.noargs();
}
} |
测试死信队列
生产者发送消息
在项目myproducer的测试类中创建方法并测试死信队列
| /**
* 测试死信队列
* 测试3钟情况可能回把消息放入死信队列中
*/
@Test
public void testDealque() {
// 存活时间过期后变成死信
rabbitTemplate.convertAndSend("normal_exchange","my_routing","测试死信");
// 超过队列长度后变成死信
//消息拒签但不返回原队列后变成死信
} |
然后启动生产者进行测试

然后等待10秒钟:

会发现直接把为消费的数据放入了死信队列中
然后修改测试类代码测试第二种放入死信队列的方式
| /**
* 测试死信队列
* 测试3钟情况可能回把消息放入死信队列中
*/
@Test
public void testDealque() {
// 存活时间过期后变成死信
//rabbitTemplate.convertAndSend("normal_exchange","my_routing","测试死信");
// 超过队列长度后变成死信
for (int i = 0; i < 20; i++) {
rabbitTemplate.convertAndSend("normal_exchange","my_routing","测试死信");
}
//消息拒签但不返回原队列后变成死信
} |

我们发现我们发送了20条消息,有10条消息立刻就跑到了死信队列
然后过10秒钟我们再看

因为没有消费者,我们的另外10条消息也跑到了死信队列中
继续修改测试代码:
| /**
* 测试死信队列
* 测试3钟情况可能回把消息放入死信队列中
*/
@Test
public void testDealque() {
// 存活时间过期后变成死信
//rabbitTemplate.convertAndSend("normal_exchange","my_routing","测试死信");
// 超过队列长度后变成死信
/*for (int i = 0; i < 20; i++) {
rabbitTemplate.convertAndSend("normal_exchange","my_routing","测试死信");
}*/
//消息拒签但不返回原队列后变成死信
rabbitTemplate.convertAndSend("normal_exchange","my_routing","测试死信");
} |
这里需要创建一个消费者:
在项目myconsumer的包myconsumer下创建类DealConsumer
| package com.pb.demo.myconsumer;
import com.rabbitmq.client.Channel;
import org.springframework.amqp.core.Message;
import org.springframework.amqp.rabbit.annotation.RabbitListener;
import org.springframework.stereotype.Component;
import java.io.IOException;
/**
* 拒签操作
*/
@Component
public class DealConsumer {
@RabbitListener(queues = "normal_queue")
public void listenMessage(Message message, Channel channel) throws IOException {
// 拒签消息
channel.basicNack(message.getMessageProperties().getDeliveryTag(),true,false);
}
} |
先来看下队列的状态:

然后先启动消费者,再启动生产者看看拒收后的状态

我们看到因为消费者的拒收直接把消息放入了死信队列中
RabbitMQ延迟队列_概念 【延迟队列插件,linxu版本是有的,交换机的名称,队列名称】
延迟队列,即消息进入队列后不会立即被消费,只有到达指定时间 后,才会被消费。
例如:用户下单后,30分钟后查询订单状态,未支付则会取消订 单。

但RabbitMQ中并未提供延迟队列功能,我们可以使用死信队列实现延迟队列的效果。

RabbitMQ延迟队列_死信队列实现
接下来我们使用死信队列实现延迟队列
创建SpringBoot订单模块,添加SpringMVC、RabbitMQ、 lombok依赖。
新建项目myorder
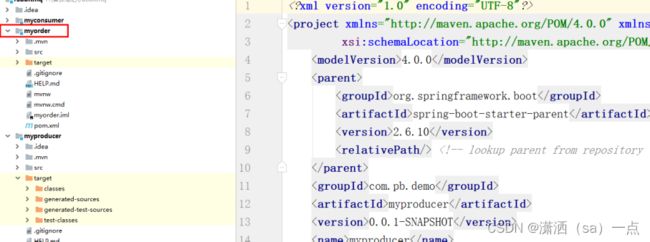
Pom.xml:
| xml version="1.0" encoding="UTF-8"?>
<project xmlns="http://maven.apache.org/POM/4.0.0" xmlns:xsi="http://www.w3.org/2001/XMLSchema-instance"
xsi:schemaLocation="http://maven.apache.org/POM/4.0.0 https://maven.apache.org/xsd/maven-4.0.0.xsd">
<modelVersion>4.0.0modelVersion>
<parent>
<groupId>org.springframework.bootgroupId>
<artifactId>spring-boot-starter-parentartifactId>
<version>2.6.10version>
<relativePath/>
parent>
<groupId>com.pb.demogroupId>
<artifactId>myproducerartifactId>
<version>0.0.1-SNAPSHOTversion>
<name>myproducername>
<description>Demo project for Spring Bootdescription>
<properties>
<java.version>1.8java.version>
properties>
<dependencies>
<dependency>
<groupId>org.springframework.bootgroupId>
<artifactId>spring-boot-starter-amqpartifactId>
dependency>
<dependency>
<groupId>org.springframework.bootgroupId>
<artifactId>spring-boot-starter-webartifactId>
dependency>
<dependency>
<groupId>org.projectlombokgroupId>
<artifactId>lombokartifactId>
<optional>trueoptional>
dependency>
<dependency>
<groupId>org.springframework.bootgroupId>
<artifactId>spring-boot-starter-testartifactId>
<scope>testscope>
dependency>
<dependency>
<groupId>org.springframework.amqpgroupId>
<artifactId>spring-rabbit-testartifactId>
<scope>testscope>
dependency>
dependencies>
<build>
<plugins>
<plugin>
<groupId>org.springframework.bootgroupId>
<artifactId>spring-boot-maven-pluginartifactId>
<configuration>
<excludes>
<exclude>
<groupId>org.projectlombokgroupId>
<artifactId>lombokartifactId>
exclude>
excludes>
configuration>
plugin>
plugins>
build>
project> |
Yml文件:
|
spring:
rabbitmq:
host: localhost
port: 5672
username: guest
password: guest
virtual-host: /
|
新建包config,并新建类RabbitConfig
| package com.pb.demo.config;
import org.springframework.amqp.core.*;
import org.springframework.beans.factory.annotation.Qualifier;
import org.springframework.context.annotation.Bean;
import org.springframework.context.annotation.Configuration;
@Configuration
public class RabbitConfig {
// 订单交换机和队列
private final String ORDER_EXCHANGE = "order_exchange";
private final String ORDER_QUEUE = "order_queue";
// 过期订单交换机和队列【这里就是我们所说的死信队列】
private final String EXPIRE_EXCHANGE = "expire_exchange";
private final String EXPIRE_QUEUE = "expire_queue";
// 过期订单交换机
@Bean(EXPIRE_EXCHANGE)
public Exchange deadExchange(){
return ExchangeBuilder.topicExchange(EXPIRE_EXCHANGE).durable(true).build();
}
// 过期订单队列
@Bean(EXPIRE_QUEUE)
public Queue deadQueue(){
return QueueBuilder.durable(EXPIRE_QUEUE).build();
}
// 将过期订单队列绑定到交换机
@Bean
public Binding bindDeadQueue(@Qualifier(EXPIRE_EXCHANGE) Exchange exchange,
@Qualifier(EXPIRE_QUEUE) Queue queue){
return BindingBuilder.bind(queue).to(exchange).with("expire_routing").noargs();
}
// 订单交换机
@Bean(ORDER_EXCHANGE)
public Exchange normalExchange(){
return ExchangeBuilder.topicExchange(ORDER_EXCHANGE).durable(true).build();
}
// 订单队列
@Bean(ORDER_QUEUE)
public Queue normalQueue(){
return QueueBuilder
.durable(ORDER_QUEUE)
.ttl(10000) // 存活时间为 10s,模拟30min
.deadLetterExchange(EXPIRE_EXCHANGE) // 绑定死信交换机
.deadLetterRoutingKey("expire_routing") //死信交换机的路由关键字
.build();
}
// 将订单队列绑定到交换机
@Bean
public Binding
bindNormalQueue(@Qualifier(ORDER_EXCHANGE) Exchange exchange,
@Qualifier(ORDER_QUEUE) Queue queue){
return BindingBuilder
.bind(queue)
.to(exchange)
.with("order_routing")
.noargs();
}
} |
创建消费者:新建包com.pb.demo.consumer并新建类ExpireOrderConsumer
| package com.pb.demo.consumer;
import org.springframework.amqp.rabbit.annotation.RabbitListener;
import org.springframework.stereotype.Component;
@Component
public class ExpireOrderConsumer {
@RabbitListener(queues = "expire_queue")
public void listenMessage(String orderId){
/* try {
Thread.sleep(20000);
} catch (InterruptedException e) {
e.printStackTrace();
}*/
System.out.println("查询"+orderId+"号订单的状态,如果已支付则无需处理, 如果未支付则需要回退库存");
}
} |
创建controller:com.pb.demo.controller,并创建类OrderController
| package com.pb.demo.controller;
import org.springframework.amqp.rabbit.core.RabbitTemplate;
import org.springframework.beans.factory.annotation.Autowired;
import org.springframework.web.bind.annotation.GetMapping;
import org.springframework.web.bind.annotation.PathVariable;
import org.springframework.web.bind.annotation.RestController;
@RestController
public class OrderController {
@Autowired
private RabbitTemplate rabbitTemplate;
@GetMapping("/place/{orderId}")
public String placeOrder(@PathVariable String orderId) {
System.out.println("正在处理订单数据。。。。。");
//讲订单id发送给订单队列
rabbitTemplate.convertAndSend("order_exchange", "order_routing", orderId);
return "下单成功,修改库存";
}
} |
浏览器测试就好
![]()
![]()
![]()
![]()


