WSL2 Ubuntu安装Qt(包括QtCreator)
最近因为需要在Linux下使用qtcreator做一些界面开发的预研和学习,主要是因为要交叉编译Qt。但又不想再使用虚拟机了, 真的太消耗内存了。
于是就想着直接使用Windows10 下面的WSL2。 怎么安装WSL2这里就不展开了,有兴趣的朋友,问问度娘就什么都知道了。
在网上查了不少资料,但感觉都不全面,有一些细节和基本点没有说到,这样实际安装起来就会遇到不少坑, 所以笔者就想着自己整理一篇。 如果以后需要在其他电脑上再次安装的话,也好有个参考。
笔者的环境:
- 宿主系统: Windows10
- 虚拟环境: WSL2
- 系统环境:Ubuntu 20.04
首先是参考了这篇文章:https://blog.csdn.net/u013841997/article/details/104747482
将的就是在WSL2的Ubuntu环境下如何安装Qt以及QtCreator,核心内容就是如下几条命令:
sudo apt-get update
sudo apt-get install build-essential
sudo apt-get install qtcreator
sudo apt-get install qt5-default
sudo apt-get install libfontconfig1
sudo apt-get install mesa-common-dev
sudo apt-get upgrade
这一套操作完运行时间稍微有点久,因为除了安装这些应用本身,会需要一些基本的依赖库,所以体积和时间都稍微有点大。
完成之后,就是运行。 当然这个时候直接运行是不行的, 以上文章就说到,还需要:
export DISPLAY=:0
笔者同样跟着做,接着就运行qtcreator, 然而并没有什么暖用,直接提示
qt.qpa.xcb: could not connect to display :0
qt.qpa.plugin: Could not load the Qt platform plugin "xcb" in "" even though it was found.
This application failed to start because no Qt platform plugin could be initialized. Reinstalling the application may fix this problem.

Available platform plugins are: eglfs, linuxfb, minimal, minimalegl, offscreen, vnc, xcb.

Aborted
所以接着研究,发现,还需要xserver/xclient。 所以在Windows10上下载安装xming。
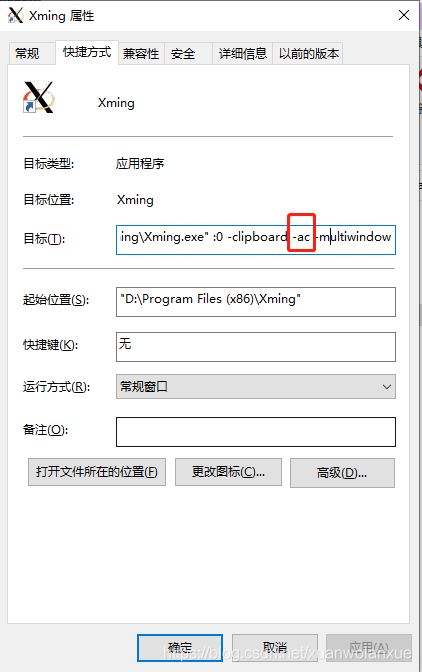
接着就是启动xming了, 说到这里,就有一个小坑, 安装完xming之后,可以直接点击xming启动,也可以点击xlaunch以向导的形式一步一步配置来启动。
这里有两种方案:
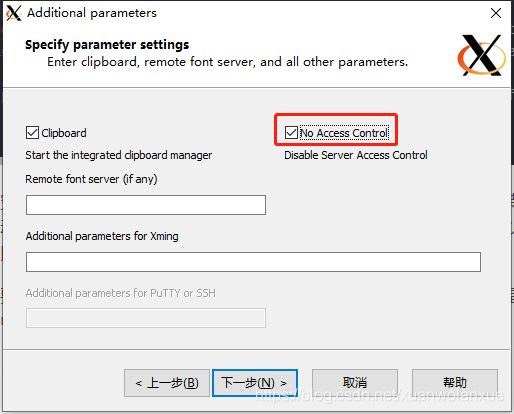
- 其一:需要用过xlauch来启动,基本上默认的下一步,下一步就可以,但是重点是,需要在如下界面中勾选“no access control”。
一定要勾选,不然就会出现如下错误(这里多了一句: No protocol specified):
No protocol specified
qt.qpa.xcb: could not connect to display 172.22.0.1:0.0
qt.qpa.plugin: Could not load the Qt platform plugin "xcb" in "" even though it was found.
This application failed to start because no Qt platform plugin could be initialized. Reinstalling the application may fix this problem.

Available platform plugins are: eglfs, linuxfb, minimal, minimalegl, offscreen, vnc, xcb.

Aborted
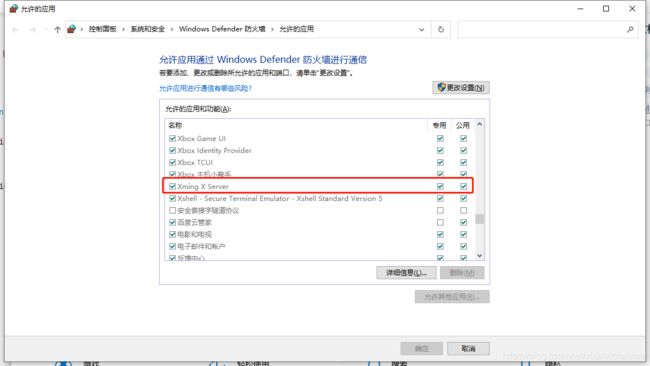
接下来还要确认的一个点就是Windows10的防火墙,一定要确保红线框中的都是勾选上的。

接下来还有一个坑,就是设置:export DISPLAY=:0 这一句,直接这样设置是没法工作的。
这个DISPLAY的设置规则如下:
export DISPLAY=[HOST]:[DISPLAY NUMBER]
也就是说需要确定两个点:
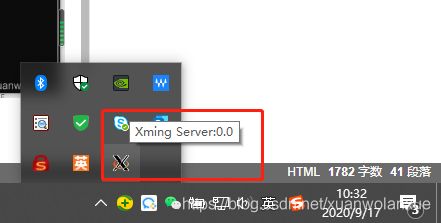
- 其一: 在Windows10 桌面的任务栏中,鼠标放在xming的图标上(注: 不用点击),查看具体的DISPLAY NUMBER:

- 其二: 在Windows10 powershell中使用ipconfig查看WSL网卡的ip地址,这个就是DISPLAY设置规则中HOST部分:

为了方便,可以将export DISPLAY这个动作放到 .bashrc 文件中。
echo "export DISPLAY=172.22.0.1:0.0" >> ~/.bashrc
这样每次进入WSL2的Ubuntu终端的时候,就已经自动设置了DISPLAY这个环境变量了。
注: 上面写入 设置DISPLAY环境变量的语句到.bashrc文件中时,一定要使用 ‘>>’ 而不是 ‘>’ , “>>” 这个表示在文件的末尾添加一行,而使用“>” 这个的话只是将那个字符串 重定向输出到.bashrc文件,操作之后 .bashrc文件中就是有字符串部分的内容了。 切记,切记
最后需要说明一点的是,笔者在操作时,一开始没整通, 所以就在网上查资料,然后按照资料操作,所以就安装的xfce4。 也就是说,笔者这里不确定是否需要xfce4。 所以,如果读者按照以上操作之后,还是无法启动qtcreator,那么,就安装一下xfce4 试试:
sudo apt install xfce4

