前端模板-2【vue部分小功能、bug处理】
前端模板【vue部分小功能】
1 Vue部分模板
1.1 vue实现store【存储当前选中页面】
我的习惯用法,大家可自行调整【以存储当前页面名称为例】
①在src下新建文件夹store,并创建configure.js、index.js
configure.js
const configure = {
    state: {
        HOST: 'http://127.0.0.1:8090', //后台访问地址
        activeName: '' //存放当前选中的页面名称
    },
    getters:{
        activeName: state => {
            let activeName = state.activeName
            if(!activeName){
                activeName = JSON.parse(window.sessionStorage.getItem('activeName'))
            }
            return activeName
        }
    },
    //更新store中的状态
    mutations: {
        setActiveName: (state, activeName) => {
            state.activeName = activeName
            window.sessionStorage.setItem('activeName', JSON.stringify(activeName))
        }
    },
}

export default configure
index.js
引入configure.js
import Vue from 'vue'
import Vuex from 'vuex'
import configure from './configure'

Vue.use(Vuex)

const store = new Vuex.Store({
    modules: {
        configure
    }
})

export default store
主要是用index.js【configure.js相当于是index.js中的一个部分】
②在main.js中引用index.js
import Vue from 'vue'
import App from './App'
import router from './router'
import store from './store/index'
import './assets/css/index.scss'
import ElementUI from 'element-ui'
import 'element-ui/lib/theme-chalk/index.css'
import '@/assets/js/iconfont.js'
import '@/assets/js/iconfont1.js'
import '@/assets/js/iconfont2.js'
import '@/assets/js/iconfont3.js'
Vue.use(ElementUI)
Vue.config.productionTip = false
/* eslint-disable no-new */
new Vue({
el: '#app',
router,
store,
components: { App },
template: '③TheHeader.vue页面中引入,并且,每次更新store
TheHeader.vue:
<template>
    <div class="the-header">
        <div class="header-logo" @click="goHome">
            <svg class="icon">
                <use xlink:href = "#icon-erji"></use>
            </svg>
            <span>music</span>
        </div>
        <ul class="navbar">
            <li :class="{active: item.name == activeName}" v-for="item in navMsg" :key="item.path" @click="goPage(item.path, item.name)">
                {{item.name}}
            </li>
        </ul>
    </div>
</template>

<script>
import {mapGetters} from 'vuex'
import {navMsg} from '../assets/data/header'

export default {
    name: 'the-header', //在App.vue中引入,整体有效【公共页面】
    data(){
        return {
            navMsg: [] //导航栏
        }
    },
    computed:{
        ...mapGetters([
            'activeName'
        ])
    },
    created(){
        this.navMsg = navMsg
    },
    methods:{
        goHome(){
            this.$router.push({path: "/"});
        },
        //根据路径跳转到对应页面
        goPage(path, name){
            //更新store
            this.$store.commit('setActiveName', name);
            this.$router.push({path: path});
        }
    }
}
</script>

<style lang="scss" scoped>
@import '../assets/css/the-header.scss';
</style>
1.2 实现回到顶部按钮
①编写页面,ScrollTop.vue
<template>
    <div class="scroll-top" @click="returnTop">
        <div class="box-in"></div>
    </div>
</template>
<script>
export default {
    name: 'scroll-top',
    methods:{
        //回到顶部
        returnTop(){
            //documentElement或者body【为了兼容浏览器】
            document.documentElement.scrollTop = document.body.scrollTop = 0;
        }
    }
}
</script>

<style lang="scss" scoped>
@import '../assets/css/scroll-top.scss'
</style>
scroll-top.css
@import "var.scss";
@import "global.scss";

.scroll-top {
  position: fixed;
  width: 50px;
  height: 30px;
  right: 10px;
  bottom: 80px;
  padding-top: 20px;
  text-align: center;
  background-color: $color-white;
  border-radius: 20%;
  overflow: hidden;
  @include box-shadow(0 0 4px 3px rgba(0, 0, 0, 0.2));
  &:hover:before {
    top: 50%;
  }
  &:hover .box-in {
    visibility: hidden;
  }
  &:before {
    content: "回到顶部";
    position: absolute;
    font-weight: bold;
    width: 30px;
    top: -50%;
    left: 50%;
    transform: translate(-50%, -50%);
  }
}

.box-in {
  visibility: visible;
  display: inline-block;
  height: 15px;
  width: 15px;
  border: 1px solid $color-black;
  border-color: $color-black transparent transparent $color-black;
  transform: rotate(45deg);
}
②因为是所有页面都要实现该功能,所以直接写在App.vue中
如果是公用的就在App.vue中引入,否则就在指定页面引入【如:下图引入ScrollTop】
<template>
  <div id="app">
    <the-header/>
    <router-view class="music-content"/>
    <!-- 名称与ScrollTop.vue的name对应 -->
    <scroll-top/>
  </div>
</template>

<script>
import TheHeader from './components/TheHeader.vue'
import ScrollTop from '@/components/ScrollTop'
export default {
  name: 'App',
  components: {
    TheHeader,
    ScrollTop //名称与import上面的对应

  }
}
</script>

<style  lang="scss" scoped>
@import './assets/css/app.scss';
</style>
1.3 刷新页面
watch:{
        $route(to, from){
            this.$router.go(0)
        }
    }
Vue 路由 跳转【返回、刷新、跳转】
this. r o u t e r . g o ( − 1 ) t h i s . router.go(-1) this. router.go(−1)this.router.back()
this. r o u t e r . p u s h t h i s . router.push this. router.pushthis.router.replace
Vue路由跳转:
- this.$router.go()
原页面表单中的内容会丢失;
向前或者向后跳转n个页面,n可为正整数或负整数
this.$router.go(-1):后退+刷新

this.$router.go(0):刷新;

this.$router.go(1) :前进
- this.$router.back()
原页表表单中的内容会保留
this.$router.back():后退 ;

this.$router.back(0) 刷新;

this.$router.back(1):前进
- this.$router.push
跳转到指定url路径,并想history栈中添加一个记录,点击后退会返回到上一个页面
具体用法:
- 不带参数
this.$router.push(’/home’)
this.$router.push({name:‘home’})
this.$router.push({path:’/home’})
- query传参
this.$router.push({name:‘home’,query: {id:‘1’}})
this.$router.push({path:’/home’,query: {id:‘1’}})
html 取参 $route.query.id
script 取参 this.$route.query.id
- params传参
this.$router.push({name:‘home’,params: {id:‘1’}}) // 只能用 name
路由配置 path: “/home/:id” 或者 path: “/home:id” ,
不配置path ,第一次可请求,刷新页面id会消失
配置path,刷新页面id会保留
html 取参 $route.params.id
script 取参 this.$route.params.id
- query和params区别
query类似 get, 跳转之后页面 url后面会拼接参数,类似?id=1, 非重要性的可以这样传,
params类似 post, 跳转之后页面 url后面不会拼接参数 , 但是刷新页面id 会消失,密码之类还是用params
- this.$router.replace【刷新页面】
跳转到指定url路径,但是history栈中不会有记录,点击返回会跳转到上上个页面 (就是直接替换了当前页面)【A----->B----->C 结果B被C替换 A----->C)】
用法同 this.$router.push
1.4 点击登录与回车都实现功能
- 表单最后输入框实现事件
@keyup.enter.native="handleLoginIn"回车事件添加handleLoginIn方法
<el-form :model="loginForm" ref="loginForm" label-width="70px" class="demo-ruleForm" :rules="rules">
  <el-form-item prop="username" label="用户名">
    <el-input v-model="loginForm.username" placeholder="用户名"></el-input>
  </el-form-item>
  <el-form-item prop="password" label="密码">
    <el-input type="password" v-model="loginForm.password" placeholder="密码"  @keyup.enter.native="handleLoginIn"></el-input>
  </el-form-item>

  <div class="login-btn">
    <el-button @click="goSignUp">注册</el-button>
    <el-button type="primary" @click="handleLoginIn" >登录</el-button>
  </div>
</el-form>
- 点击事件添加方法
<el-button type="primary" @click="handleLoginIn" >登录</el-button>
总结:
@keyup(键盘事件)是需要绑定在v-input中;
@click需要绑定在button上
详细文章:https://blog.csdn.net/estrusKing/article/details/123675632
1.5 实现图片自适应填充
①直接设置img标签【主要针对img由class控制】
![]() "item-img" :src="attachImgUrl(item.pic)">
"item-img" :src="attachImgUrl(item.pic)">
具体图片大小可以自行修改
img {
  width: 100%;
  height: 200px;
  object-fit: cover;
}
②CSS将img图片填满父容器div,自适应容器大小【针对div下的img】
 "引入的图片地址" alt="">
- 对img元素垂直居中,并将它的高度和宽度设置一个最小满屏值
div{
    position:relative;
  width: 100px;
    height: 100px;
    overflow:hidden;
}
 div img{
    position: absolute;
    top: 50%;
    left: 50%;
    display: block;
    min-width: 100%;
    min-height: 100%;
    transform:translate(-50%,-50%);
}
- 设置img的css样式增加 object-fit:cover 类似于css3中背景图片的background-size: cover;
div{
  width: 100px;
  height: 100px;

}
div img{
    width: 100%;
    height: 100%;
    object-fit:cover;
}
详情:https://www.cnblogs.com/926803/p/12664771.html
1.6 解决刷新页面vuex数据消失
- 通常在vue项目中使用vuex做全局的状态管理,但是刷新之后,vuex中的数据会丢失,这是因为store是存储在运行内存中,当浏览器刷新时,会重新加载vue实例,store也会重新赋值。
- 为了防止刷新数据丢失,我们可以将一些数据保存在localstorage、sessionstorage或cookie中,可以保证页面刷新数据不丢失且易于读取。
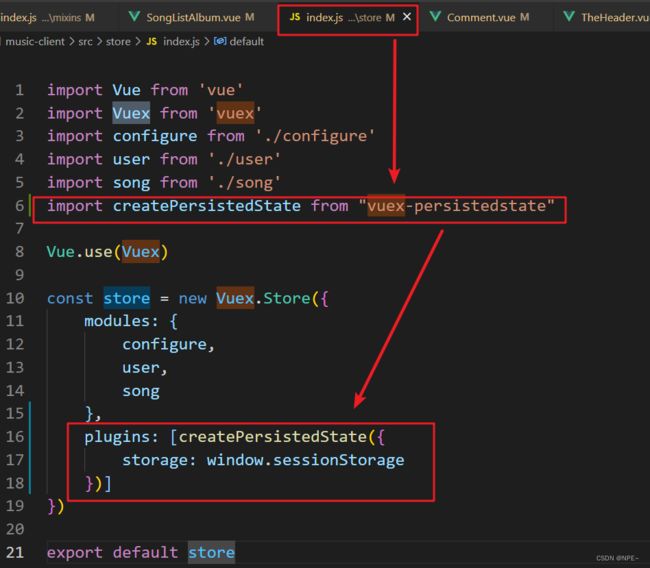
解决方式【通过vuex-persistedstate插件】
①下载插件
npm install vuex-persistedstate --save
②引入插件
- 在不进行其他设置的情况下,
默认是将数据存储在localstorage中的
import createPersistedState from "vuex-persistedstate"
const store = new Vuex.Store({
	//......
	//你自己的数据和代码
  plugins: [createPersistedState()]
})
- 通过设置,将
数据存储到sessionstorage中
import createPersistedState from "vuex-persistedstate"
const store = new Vuex.Store({
	//......
	//这中间是你的数据和代码
  plugins: [createPersistedState({
		storage: window.sessionStorage
	})]
})
但是以上的方式会将所有的数据都保存下来,我们可以进行选择性的保存:
import createPersistedState from "vuex-persistedstate"
const store = new Vuex.Store({
	//......
	//这中间是你的数据和代码
  plugins: [createPersistedState({
		storage: window.sessionStorage,
		reducer(val) {
          return {
          // 只储存state中的pic
          pic: val.pic
        }
     }
	})]
})
但是这样还会遇到一种情况,数据存储在sessionstorage中用户时可以看到并修改的。这样会涉及到安全问题
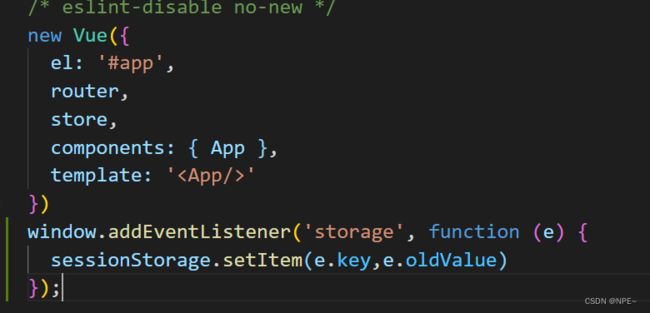
- 为了解决这种情况我们可以在main.js中加入以下代码,从而防止用户修改数据
window.addEventListener('storage', function (e) {
  sessionStorage.setItem(e.key,e.oldValue)
});

参考:https://blog.csdn.net/qq_28594645/article/details/119981977
1.7 el-pagination点击下一页没反应
bug:我在使用el-pagination的时候发现只要新增数据,就会出现点击下一页或者点击其他页码不跳转的情况,需要点击两次之后才会有效果
解决办法:
直接在current-page后面加上.sync即可
<el-pagination
    background
    layout="total, prev, pager, next"
    :current-page.sync="currentPage"
    :page-size="pageSize"
    :total="tableData.length"
    @current-change="handleCurrent"
>el-pagination>
1.8 vue打包:Warning: Accessing non-existent property xxxx of module exports inside circular dependency
原因:node版本过高
- 方式一:
找到
\node_modules\stylus\lib\nodes\index.js文件,在代码前面添加:
exports.lineno = null;
exports.column = null;
exports.filename = null;
- 方式二:
可切换node至v10.版本
- 方式三:
升级shelljs到 v0.8.4 即可解决
npm install [email protected] --save
1.9 vue实现路由守卫
①单个路由限制
实现单个路由的限制,同时设置提醒【beforeEnter+Notification】
index.js:
import {Notification} from 'element-ui'

	//你的代码
{
  path: '/Singer',
  component: resolve => require(['../pages/SingerPage.vue'], resolve),
  beforeEnter: (to, from, next) => {
    let privilege = localStorage.getItem('privilege');
    if(privilege < '2'){
      Notification({ type: 'error', message: '暂无权限' })
      next('/Home')
    }else{
      next();
    }
  }
},
②配置所有路由都生效
const router = new Router({
	routes
})

router.beforeEach((to,from,next)=>{
	if(to === '/Login'){
		next()	//对登录页面放行
	}else{
		//进行权限校验【next('/Home')】
	}
})

export default router;
vue守卫分类:
- 全局守卫:
beforeEach(to,from, next)
beforeResolve(to,from, next)
afterEach(to,from)
- 路由守卫(单个儿生效)
beforeEnter(to,from, next)
- 组件守卫
beforeRouteEnter(to,from, next)
beforeRouteUpdate(to,from, next)
beforeRouteLeave(to,from, next)
1.10 vue实现分页
- 在div中引入el-table
el-table中添加column(对应后端返回对象的属性)
 "mini"
    border
    style="width: 100%"
    height="680px"
    :data="data"
  >
    "singerName" label="歌手名" width="180">

    "songName" label="歌曲名" width="180">

    "album" label="专辑">
    "remark" label="备注">
- 引入分页组件
与el-table同级
"pagination">
  "total, prev, pager, next"
    :current-page.sync="currentPage"
    :page-size="pageSize"
    :total="tableData.length"
    @current-change="handleCurrent"
  >
- script部分
调用API获取后端数据
<script>
import { getAllFeedback } from "../api/index";
export default {
  data() {
    return {
      tableData: [], //反馈信息
      pageSize: 5, //每页大小
      currentPage: 1, //当前页
      select_word: "",
    };
  },
  computed: {
    //计算当前搜索表里的数据
    data() {
      return this.tableData.slice(
        (this.currentPage - 1) * this.pageSize,
        this.currentPage * this.pageSize
      );
    },
  },
  created() {
    this.getData();
  },
  methods: {
    //获取当前页
    handleCurrent(val) {
      this.currentPage = val;
    },
    //获取反馈数据
    getData() {
      this.tableData = [];
      getAllFeedback().then((res) => {
        this.tableData = res;
        this.currentPage = 1;
      });
    },
  },
};
</script>
效果:

拓展:添加其他【删除按钮】
①在el-table下新增column
<el-table-column label="操作" width="150" align="center">
    <template slot-scope="scope">
        <el-button size="mini" type="danger" @click="handleDelete(scope.row.id)">删除</el-button>
    </template>
</el-table-column>
②el-table同级部分添加el-dialog弹出框
"删除反馈" :visible.sync="delVisiable" width="400px" center>
  "center">删除不可恢复,是否确定删除?
  "footer">
      "mini" @click="delVisiable = false">取消
      "mini" @click="delRow">确定
③vue的data部分新增delVisiable标志
  data() {
    return {
      delVisiable: false, //删除对话框
    };
  },
④vue的methods中新增方法
原本是可以直接引入mixins,但是因为vue组件原因,引入的mixins不生效,因此只有重新在该页面中自己添加对应方法【如:notify】
    //提示信息
    notify(title,type) {
      this.$notify({
        title: title,
        type: type
      })
    },
    //删除一条反馈记录
    delRow(){
        delFeedback(this.idx)
        .then(res =>{
            if(res.code == 1){
                this.getData();
                this.notify("删除成功", "success");
            }else{
                this.notify("删除失败", "error");
            }
        })
        .catch(err =>{
            console.log(err);
        });
        this.delVisiable = false;
    },
    handleDelete(id){
      this.idx = id;
      this.delVisiable = true;
    },
  },
1.11 BUG:watch监视报错
今天使用vue的watch组件,监听select_word属性报错:
Error in callback for watcher “select_word”: “TypeError: __WEBPACK_IMPORTED_MODULE_0_babel_runtime_core_js_get_iterator___default(…) is not a function”
排查:
- 箭头函数原因
- 操作结果时,遍历方式是否正确(数组、对象)
- 遍历对象的属性值是否正确
export default {
  data() {
    return {
      tableData: [], //反馈信息
      tempData: [],
      pageSize: 5, //每页大小
      currentPage: 1, //当前页
      select_word: "",
      delVisiable: false, //删除对话框
    };
  },
  //模糊搜索反馈信息【监控搜索栏变化】
    watch:{
        select_word: function(){
          let _this = this;
          console.log(this.select_word);
            if(this.select_word == ''){
                this.tableData = this.tempData;
            }else{
                this.tableData = [];
                for(var i = 0; i < this.tempData.length; i++){
                  let item = this.tempData[i]
                  if(item.singerName.includes(this.select_word)){
                    this.tableData.push(item);
                  }
                }
            }
        }
    },
}
1.12 BUG:yarn serve报错
npm与yarn:都是包管理工具,yarn是为了弥补npm的缺陷而出现的
部署前端项目的时候:
npm install yarn
yarn serve
以上命令执行完成后,控制台报错
Error: The project seems to require yarn but it’s not installed.
查看是否有yarn.lock配置文件:
![]()
方法一:
删除yarn.lock文件,执行
npm install -g yarn,然后重新执行yarn serve
方法二:
如果有,执行:
npm install -g yarn
将C:\Users\xxx\AppData\Local\Yarn\Data\global\node_modules.bin添加到path环境变量中重新执行
如果找不到的话,就执行以下命令:
yarn global add @vue/cli
yarn serve
如果实在是yarn serve启动不了,可以用npm run serve替代执行
1.13 BUG:node.js:npm安装错误4058
- 是否是没有到项目根路径下执行npm命令
进入到项目根目录,执行npm命令
1.14 BUG:`webpack-dev-server --inline --progress --config build/webpack.dev.conf.js
从公司的GitLab上拉取下来项目之后启动报错
解决办法:
①删除node_modules目录,再重新安装依赖包npm install -S【费时】
②更换webpack-dev-server版本
# 删除当前webpack版本
npm uninstall webpack-dev-server
# 下载对应版本webpack,例如
npm install [email protected]
③启动路由更换
将config/index.js中的host换成自己的ip地址
host: 'localhost',
1.14 Vue通过$router.push传送信息
this.$router.params
①通过path
- 最常用
- 传递的参数会显示到path中
- 刷新页面时数据不丢失
- 常用于数据的新增、编辑、查看详情
路由配置(router/index.js):
import NewPwd from '@/pages/NewPwd'
...
 {
   path: "/newPwd/:id",
   name: "newPwd",
   component: NewPwd
 }
ForgetPwd.vue页面传输id:
this.$router.push({path: `newPwd/${res.consumer.id}`})
在NewPwd.vue获取值
mounted(){
  this.consumerId = this.$route.params.id
},
②通过params
- 不会显示在path上
- 页面刷新数据会丢失
通过路由name匹配路由
let data={
         name:'zhangsan',
         age:18
     }
     this.$router.push({
         name:'RoutePushEdit',
         params:{
             id:id,
             data:data
         }
     })
路由配置
{
    path: '/pushEdit',
    name: 'RoutePushEdit',
    component: () => import('@/views/$routePush/edit'),
},
参数获取:
this.$route.params.id;
this.$route.params.data;
③通过query
- 会显示在path上
- 页面刷新数据不丢失
通过name匹配路由
let data={
    name:'zhangsan',
    age:18
}
this.$router.push({
    name:'RoutePushEdit',
    query:data
})
路由配置
{
    path: '/pushEdit',
    name: 'RoutePushEdit',
    component: () => import('@/views/$routePush/edit'),
},
Path:
![]()
参数获取:
this.$route.query
问题:ForgetPwd.vue查询出来的用户id,如何通过router.push传送到NewPwd.vue
- 在 ForgetPwd.vue 中,在查询出来的用户 ID 后添加以下代码:
// 在 ID 变量定义后
this.$router.push({ name: 'new-pwd', params: { userId: ID } })

例如:
this.$router.push({path: "/new-pwd", params:{userId: res.consumer.id}})
在上述代码中,this.$router.push 将根据 name 属性的值跳转到名为 new-pwd 的路由,其中 params 属性包含一个名为 userId 的参数,值为查询出来的用户 ID。
- 在 NewPwd.vue 中,可以通过 $route.params.userId 访问到传递过来的该用户的 ID。例如,可以将其保存到组件的 userId 变量中:
export default {
  data() {
    return {
      userId: this.$route.params.userId
    }
  }
  // ...
}
通过以上的方式,从 ForgetPwd.vue 中查询出来的用户 ID 就可以被传递到 NewPwd.vue 中,并在该组件中进行后续的操作。需要注意的是,在进行路由跳转时,需要确保路由名称(如 new-pwd)和组件名称(如 NewPwd.vue)一致,并将该路由添加到路由表中。
参考:
https://juejin.cn/post/6844903924760051725
https://blog.csdn.net/qq_41206305/article/details/121494328


