【项目测试报告】博客系统 + 在线聊天室
文章目录
- 一、项目介绍
-
- 1.1 核心技术
- 1.2 核心功能
- 1.3 技术亮点
- 1.4 前端页面设计
-
- 登录页面
- 注册页面
- 博客广场页面
- 搜索结果页面
- 个人博客页面
- 个人中心页面
- 我的关注/粉丝页面
- 聊天室页面
- 写博客页面
- 我的草稿
- 修改博客页面
- 博客详情页
- 他人博客主页
- 二、功能测试
-
- 2.1 登录测试用例
- 2.2 注册测试用例
- 2.3 博客广场测试用例
- 2.4 新增博客测试用例
- 2.5 个人博客页面测试用例
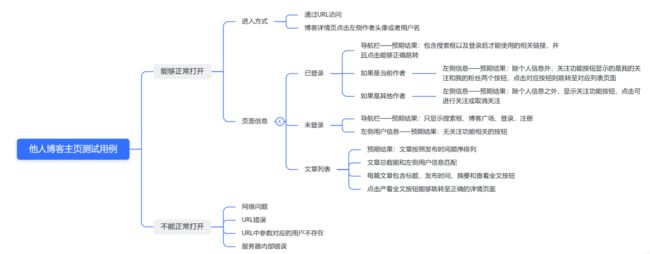
- 2.6 其他用户博客主页测试用例
- 2.7 草稿列表页面测试用例
- 2.8 搜索功能测试用例
- 2.9 我的关注/粉丝页面测试用例
- 2.10 聊天室页面测试用例
- 2.11 个人中心页面测试用例
- 2.12 博客详情页面测试用例
- 2.13 评论模块测试用例
- 三、自动化测试
-
- 3.1 单例驱动工具类
- 3.2 注册页面自动化测试
- 3.3 登录页面自动化测试
- 3.4 博客管理自动化测试
- 3.5 搜索功能自动化测试
- 3.6 我的关注/粉丝页面自动化测试
- 3.7 聊天室自动化测试
- 3.8 博客详情页 + 评论功能自动化测试
- 3.9 Junit 测试套件
- 3.10 自动化测试总结
- 四、性能测试
-
- 4.1 LoadRunner 工具说明
- 4.2 录制登录测试脚本
- 4.3 在测试脚本中增加事务、集合点、参数化
- 4.4 创建性能测试场景
- 4.5 生成并分析测试报告
一、项目介绍
本项目是一个小型的 Web 项目,包括了博客系统和在线聊天室两个主要模块。其中博客系统主要用于文章的发布、管理和浏览博客文章等;而在线聊天室则提供实时的双向通信功能,使得互相关注的作者之间能够实时的进行交流。
1.1 核心技术
Spring Boot、Spring MVC、MyBatis、Java 8、MySQL、Lombok、WebSocket、Redis、Git、HTML、CSS、Javascript、JQuery 等
1.2 核心功能
博客系统模块:
- 用户注册、登录、注销。
- 已登录用户可以新增、保存草稿、定时发布、修改、删除自己的博客、修改自己的个人资料,也可以查看其他作者发布的博客、根据标题搜索博客、其他作者的博客主页、在具体的博客下面查看、发表评论以及删除自己的评论、关注其他作者、查看自己关注的作者和粉丝、与互相关注的作者发起在线聊天。
- 未登录用户可以注册、登录、查看所有作者发布的博客、查看具体博客下面的评论。
在线聊天模块(面向已登录):
- 在聊天室中查看已经建立会话(互相关注)的会话列表。
- 查看与具体用户之间的历史消息。
- 与在线的用户进行实时交流。
1.3 技术亮点
- 对用户的密码实现了自定义的加盐加密算法,一定程度上保证了用户信息的安全性。
- 使用 Hutool 工具,实现了登录时的图形验证码验证,增加了系统的安全性。
- 登录后使用 Redis 实现对 HttpSession 的分布式储存,一定程度上提升了程序的性能。
- 具体博客下查看、发表评论以及对自己评论的删除。
- 实现了文章保存草稿、定时发布(线程池优化)等。
- 实现了用户互相关注功能,查看自己的关注列表、粉丝列表。
- 用户个人中心:使用 MultipartFile 实现头像的上传、设置昵称、 Gitee 地址等。
- 使用统一异常的处理。
- 使用 ResponseBodyAdvice 实现统一数据格式返回。
- 使用 HandlerInterceptor 实现统一登录的拦截器。
- 登录输入密码错误次数超过三次,冻结该用户一段时间(线程池优化)。
1.4 前端页面设计
整个系统的前端页面分为页面:
- 登录页面(任意用户)
- 注册页面(任意用户)
- 博客广场页面(任意用户)
- 搜索结果页面(任意用户)
- 个人博客页面(当前登录用户)
- 个人中心页面(当前登录用户)
- 我的关注/粉丝页面(当前登录用户)
- 聊天室页面(当前登录用户)
- 写博客页面(当前登录用户)
- 我的草稿页面(当前登录用户)
- 修改博客页面(当前登录用户)
- 博客详情页面(任意用户)
- 他人博客主页页面(任意用户)
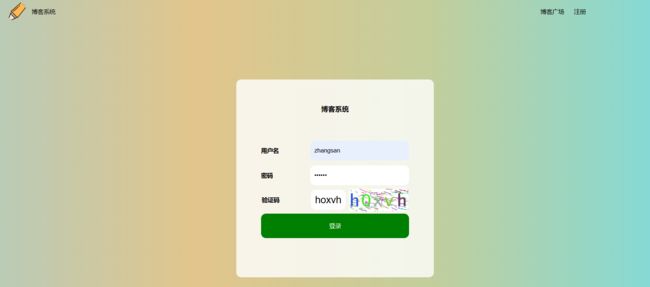
登录页面
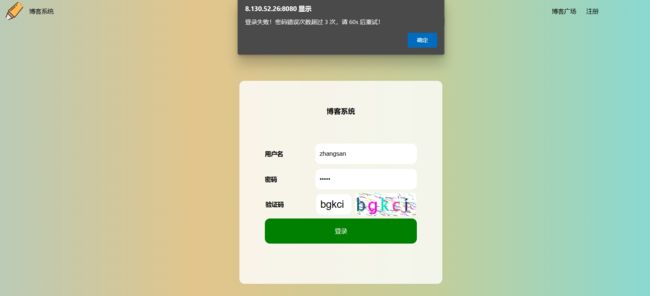
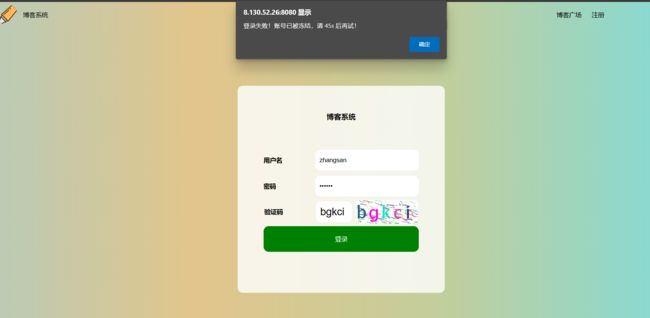
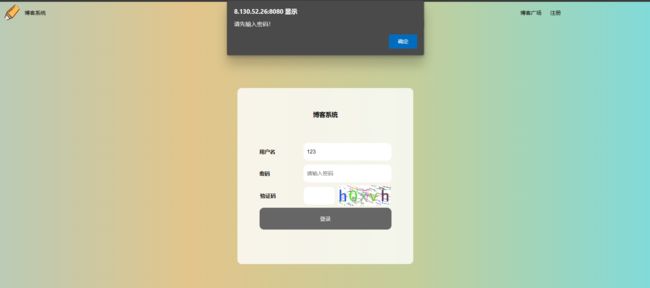
- 该页面用于用户登录,登录需要输入用户名、密码、验证码。
- 当其中任意一个没有输入的时候都会弹窗提醒输入;
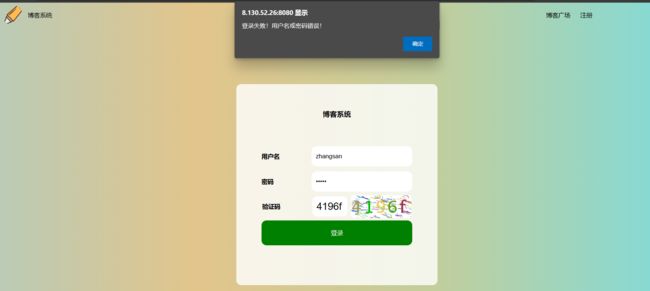
- 如果登录失败,则会提示相应的失败原因;
- 如果密码错误次数超过三次,就会将该用户冻结一段时间;
- 登录时会根据数据库中的用户信息进行对比,并且输入的密码会被加密解密算法中的解密算法解密,然后再进行对比;
- 如果正确则登录成功,并且会将 Session 持久化存储到 Redis 中;
- 登录成功后,会跳转至个人博客页面。
注册页面
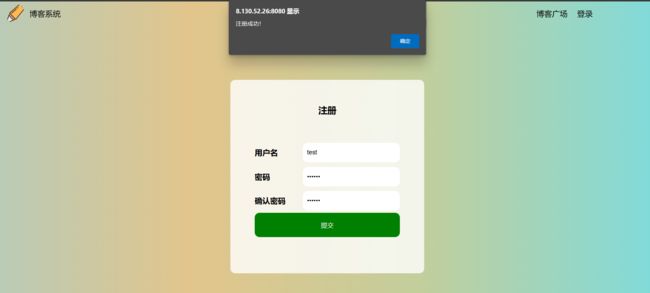
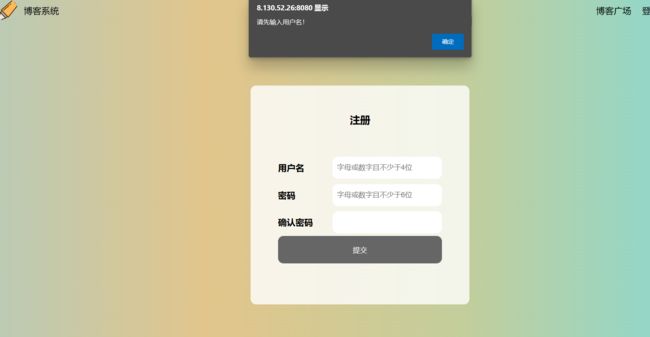
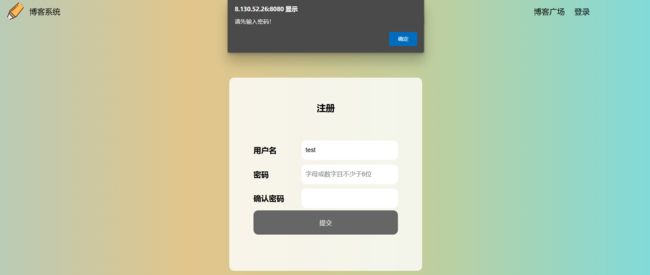
- 该页面用于注册,包含用户名、密码和确认密码;
- 注册的时候要求用户名不少于四位,密码不少于六位,并且均为数字或者字母,如果不符合要求则会弹窗提示;
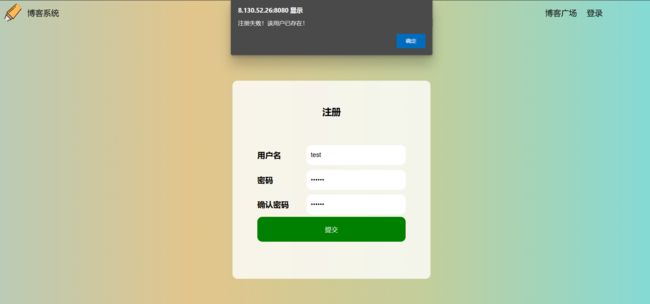
- 注册的时候如果用户名已经存在于数据库中,则提示“注册失败!该用户已存在”。
- 如果密码和确认密码不同,则会弹窗提醒;
- 注册提交的密码会进行加盐加密操作;
- 注册成功后会调整至登录页面。
博客广场页面
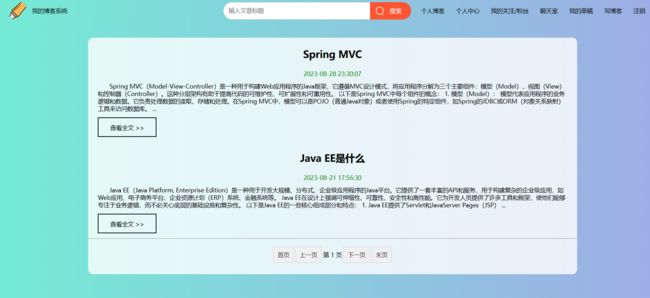
- 未登录时可以查看所有用户发布的博客;
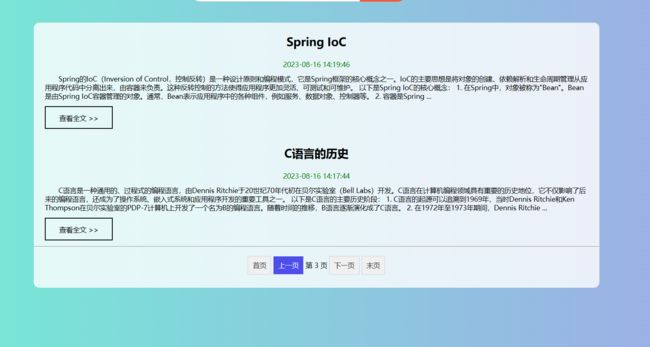
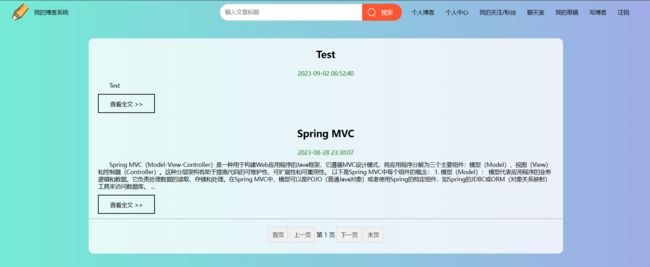
- 所有的博客列表分页显示,分为首页、上一页、下一页和末页,中间显示当前页码;
- 当进入该页面的时候默认显示首页;
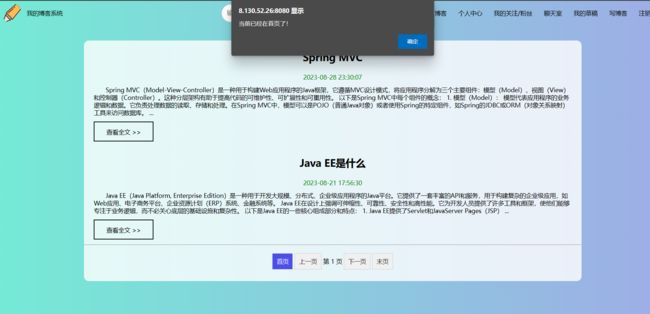
- 如果已经在首页了,点击首页和上一页则会弹窗提示“当前已经在首页了!”;
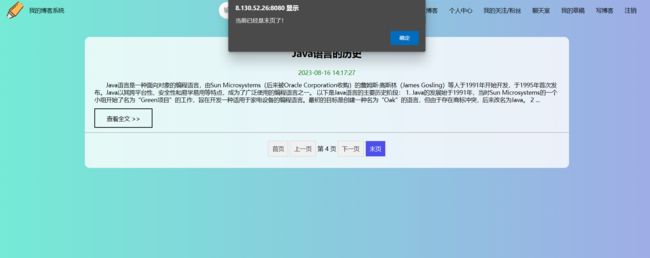
- 如果已经在末页了,点击下一页和末页则会弹窗提示“当前已经是末页了!”;
- 每篇博客会显示其标题、发布时间、摘要;
- 可以点击“查看全文”查看具体博客的内容;
- 可根据文章标题进行模糊搜索;
- 可根据上方的导航栏选择登录和注册。
登录后:
- 登录后除了未登录时的功能之外,导航栏增加了已登录才能使用的功能;
- 如个人博客、个人中心、我的关注/粉丝、聊天室、我的草稿、写博客、注销;
- 点击其中的任意一个则会调整至相应的页面。
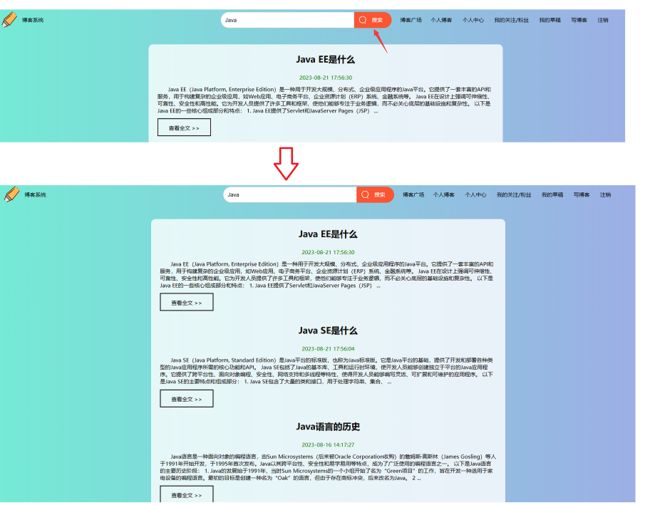
搜索结果页面
搜索结果页面同样也会因为登录和未登录显示不同的导航栏状态,除此之外显示的内容一样,以登录后为例:
搜索到结果:
无结果:
- 搜索时会根据输入的内容模糊匹配数据库中的文章标题;
- 如果存在,则按发布时间由上到下依次展示;
- 展示内容包括标题、发布时间、文章摘要;
- 可选择想要查看的文章,点击“查看全文”查看具体的文章内容;
- 若无搜索结果,则在页面显示“无搜索结果”;
- 可在搜索框中继续属于要搜索的内容进行搜索。
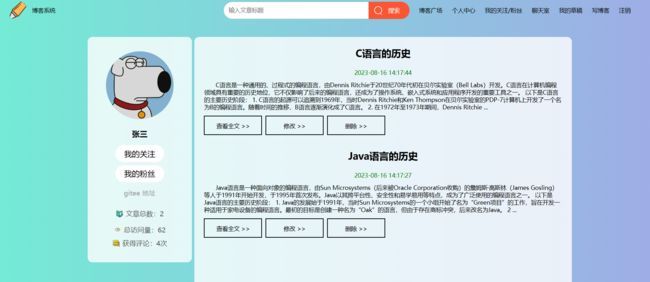
个人博客页面
- 个人博客页面导航栏显示了主页功能,点击则跳转至对应页面;
- 该页面左侧显示了个人的基本信息,如头像、昵称、我的关注/粉丝按钮、gitee地址、文章总数、总访问量、获得的评论数量;
- 右侧展示了个人的所有博客,按照发布时间由上到下展示;
- 每篇博客显示了标题、发布时间、摘要、查看全文、删除、修改按钮;
个人中心页面
- 个人中心页面包含导航栏和个人信息的显示;
- 显示了用户的头像,点击头像可进行修改;
- 显示了用户名、昵称和 Gitee 地址;
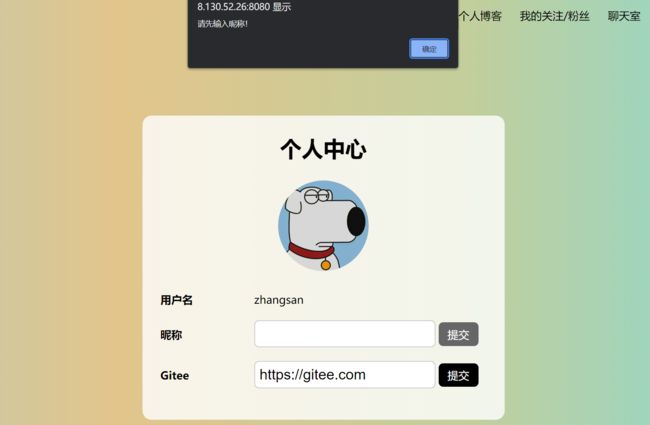
- 可对昵称和 Gitee 地址进行修改。
我的关注/粉丝页面
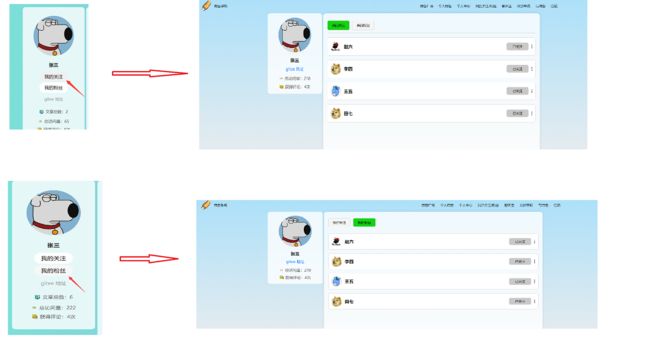
这个页面主要分为两部分:我的关注和粉丝。
我的关注:

我的粉丝:
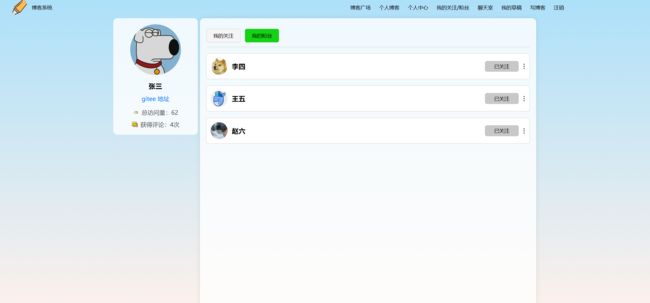
- 两个页面的右侧展示了自己的个人信息;
- 我的关注页面展示了自己关注的作者列表;
- 粉丝页面则展示了关注自己的粉丝列表;
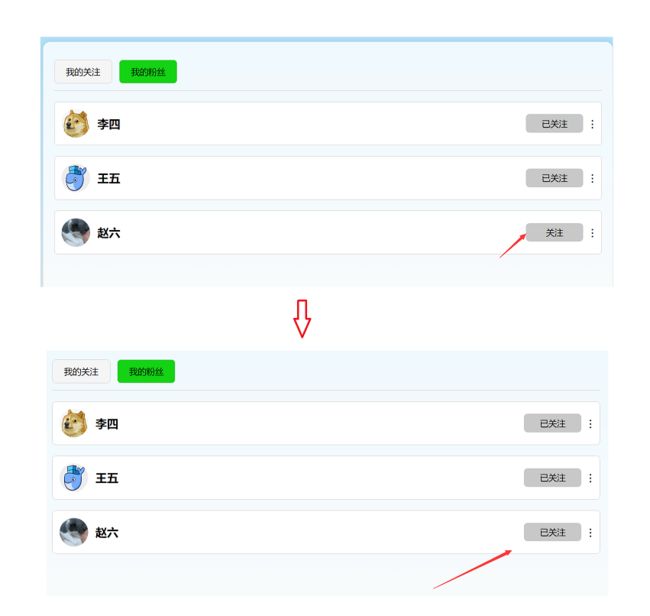
- 列表的每条信息展示了关注/粉丝的头像、用户名、关注按钮和更多;
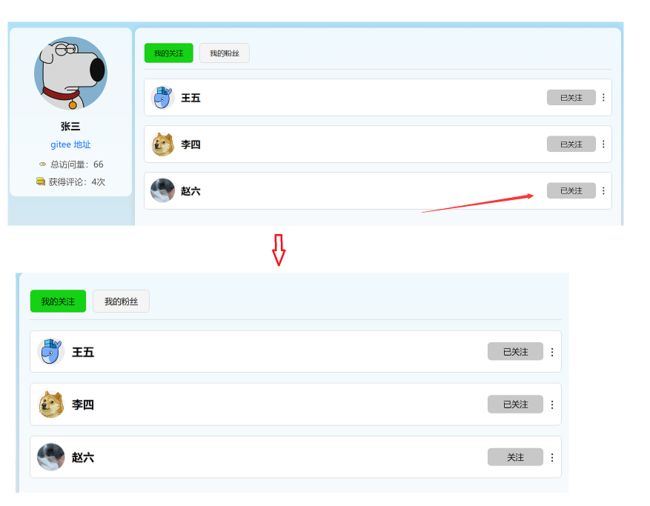
- 点击右侧的按钮,可以实现对用户的取消关注和关注;
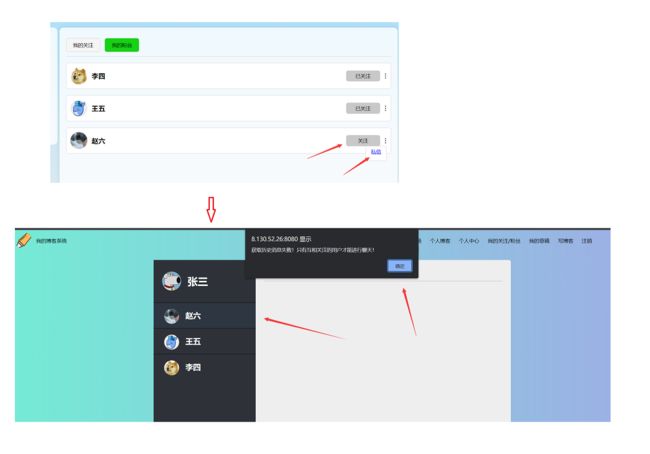
- 点击更多,则可以向互相关注的作者发起在线聊天。
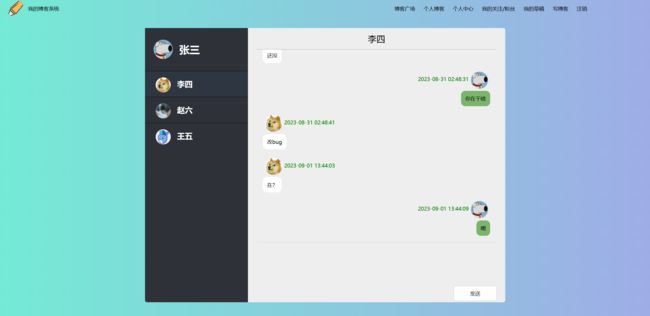
聊天室页面
- 该页面左侧展示了自己的头像和昵称以及已经存在的会话列表;
- 点击列表中的一个就可以产看到历史消息以及发起会话;
- 如果对方在线,则可以实时接收到发送的消息;
- 并且自己也能实时接收到别人发送的消息。
写博客页面
- 该页面用来编辑博客,只有包含标题部分,内容部分,定时发布、发布文章、保存草稿三个按钮;
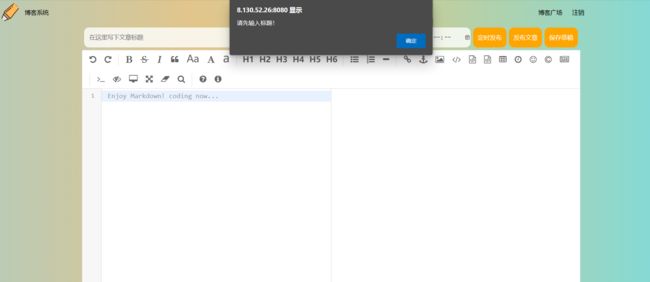
- 当提交博客内容给后端时,标题和正文部分都不能为空,否则就会弹窗提示;
- 定时发布的博客会在指定的时间自动发布;
- 发布的文章会被展示到博客广场和自己博客列表中;
- 保存草稿则会展示到草稿页面中。
我的草稿
- 该页面展示了所有的草稿列表;
- 列表中的每条记录都有标题、保存时间、继续编写和删除按钮;
- 点击继续编写则会跳转到博客编辑页;
- 点击删除按钮则会从数据库中删除对应草稿文章记录;
- 数据库中无草稿时,则会在页面显示 “暂无草稿!”。
修改博客页面
- 该页面和新增博客页面类似;
- 同样标题和正文不能为空;
- 可以保存草稿,也可以发布文章。
博客详情页
未登录:
已登录:
- 该页面显示的是具体的博客内容,左边是作者信息,右边则是文章内容;
- 文章内容显示了标题、作者、阅读量、发布时间、文章正文;
- 文章内容过长,会进行折叠,展开更多之后,也可以点击收起;
- 文章内容下面显示了所有用户最该文章的评论,登录和未登录用户都可以查看;
- 未登录和已登录的区别在于导航栏的显示不同、已登录用户可关注该作者;
- 已登录还可以发表评论、删除自己的评论。
他人博客主页
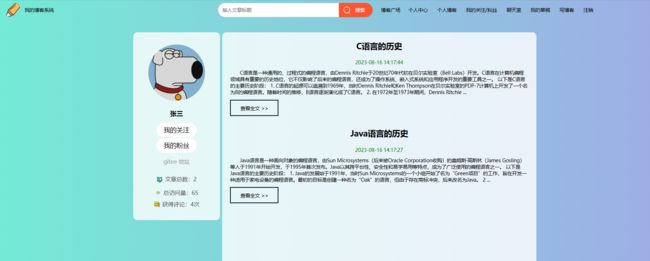
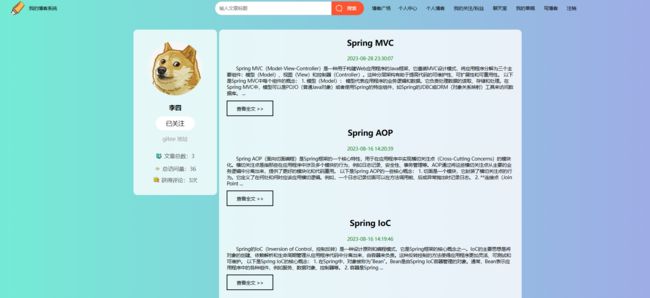
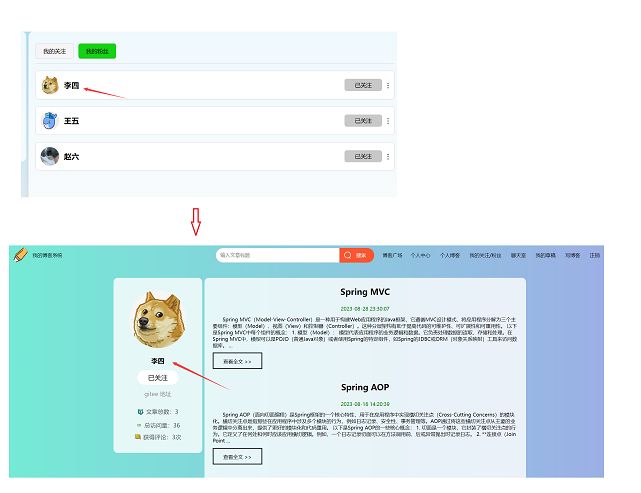
在博客详情页面点击作者的头像或者用户名则会跳转到该作者的博客主页,同样存在未登录和已登录的差别,其差别基本上与博客详情页相同,这里以已登录为例:
- 除了导航栏之外,左侧显示了作者的基本信息;
- 右侧显示的是该作者的所有文章列表,根据发布的时间从上到下排列;
- 每条记录包含了改文章的标题、发布时间、摘要、查看全文按钮;
二、功能测试
2.1 登录测试用例
输入正确的用户名、密码、验证码:
用户名/密码/验证码为空:


用户名密码出现中文或其他符号:

用户名/密码输入错误:

2.2 注册测试用例
用户名/密码/确认密码为空:
用户名或密码中包含中文或其他字符:
2.3 博客广场测试用例
位于末页时点击末页和下一页:
非首页和末页时点击上一页或下一页
2.4 新增博客测试用例
2.5 个人博客页面测试用例
删除按钮:
2.6 其他用户博客主页测试用例
2.7 草稿列表页面测试用例
2.8 搜索功能测试用例
2.9 我的关注/粉丝页面测试用例

访问我的关注和我的粉丝页面结果展示:

关注功能相关按钮功能测试:
点击用户名跳转至对应用户博客主页功能测试:
发送私信按钮测试:

2.10 聊天室页面测试用例
进入聊天室后显示的页面:

点击任一会话显示的页面:
发送功能测试:

2.11 个人中心页面测试用例

修改头像——上传图片文件:

修改昵称——内容为空:
修改昵称——内容不为空:

2.12 博客详情页面测试用例
未登录详情页展示:
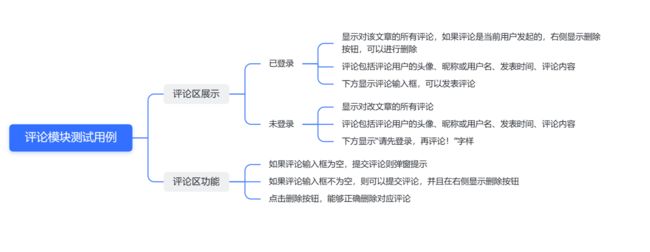
2.13 评论模块测试用例
已登录评论区显示内容:
删除评论功能测试:
三、自动化测试
3.1 单例驱动工具类
由于在自动化程序中会非常频繁地使用到浏览器驱动类,如果每个测试类中都频繁地创建和销毁驱动对象的话,会给系统带来大量的资源消耗,因此我们可以定义一个懒汉模式的单例驱动类,从而避免了不必要的系统开销。这个工具类的主要功能有获取单例驱动对象、获取网页截图、关闭浏览器等,后续的测试类可通过继承该类获取这些功能。
获取单例驱动: 在这个类中,定义了一个静态未初始化的 WebDriver 对象,以及获取这个对象的方法 getWebDriver ,如果单例对象未被创建,将在第一次调用这个方法的时候进行创建。此外,这个单例使用了 双重 if 判断 + synchronized + volatile 解决了线程安全问题。
获取屏幕截图: 在页面加载完成之后,通过getScreenshotAs获取当前页面的截图,并一个时间 + 类名作为图片存放包名以及文件名。在其他测试类中,只有在合适的时间调用该方法,并传入其类名即可进行截图操作。
import org.apache.commons.io.FileUtils;
import org.openqa.selenium.OutputType;
import org.openqa.selenium.TakesScreenshot;
import org.openqa.selenium.WebDriver;
import org.openqa.selenium.chrome.ChromeDriver;
import org.openqa.selenium.chrome.ChromeOptions;

import java.awt.*;
import java.io.File;
import java.io.IOException;
import java.text.SimpleDateFormat;
import java.util.ArrayList;
import java.util.List;
import java.util.concurrent.TimeUnit;

/**
 * 单例浏览器驱动类
 */
public class WebDriverSingleton {
    private static volatile WebDriver webDriver;

    private static final Object locker = new Object();

    /**
     * 获取 单例的 WebDriver
     * @return WebDriver
     */
    public static WebDriver getWebDriver() {
        // 处理多线程并发问题
        if (webDriver == null) {
            synchronized (locker) {
                if (webDriver == null) {
                    // 配置Chrome WebDriver 选项
                    ChromeOptions options = new ChromeOptions();
                    // options.setHeadless(true); // 无头模式

                    // 获取当前屏幕分辨率
                    Dimension screenSize = Toolkit.getDefaultToolkit().getScreenSize();
                    int screenWidth = (int) screenSize.getWidth();
                    int screenHeight = (int) screenSize.getHeight();

                    // 设置浏览器窗口大小为屏幕大小
                    options.addArguments("--window-size=" + screenWidth + "," + screenHeight);

                    // 创建 Chrome WebDriver 实例
                    webDriver = new ChromeDriver(options);
                    // 设置等待时间
                    webDriver.manage().timeouts().implicitlyWait(10, TimeUnit.SECONDS);
                }
            }
        }
        return webDriver;
    }

    public void getScreenShot(String src) throws IOException {

        // 获取时间
        List<String> times = getTime();
        // 构建文件路径 + 文件名
        String fileName = "./src/out/" + times.get(0) + "/" + src + "/" + times.get(1) + ".png";

        // 获取屏幕截图
        File srcFile = ((TakesScreenshot) getWebDriver()).getScreenshotAs(OutputType.FILE);
        // 保存图片
        FileUtils.copyFile(srcFile, new File(fileName));
    }

    /**
     * 获取当前时间
     * @return 日期 + 时间
     */
    private List<String> getTime(){
        // 保存目录名格式:年月日
        SimpleDateFormat sdf1 = new SimpleDateFormat("yyyyMMdd");
        // 保存文件名格式:年月日+具体时间
        SimpleDateFormat sdf2 = new SimpleDateFormat("yyyyMMdd-HHmmssSS");

        // 目录名
        String dirName = sdf1.format(System.currentTimeMillis());
        // 文件名
        String filename = sdf2.format(System.currentTimeMillis());

        List<String> list = new ArrayList<>();
        list.add(dirName);
        list.add(filename);
        return list;
    }

    /**
     * 关闭浏览器
     */
    public static void shutWebDriver(){
        if(webDriver != null){
            webDriver.quit();
            webDriver = null;
        }
    }
}
3.2 注册页面自动化测试
RegTest 类的作用是完成注册页面的自动化测试,这个类首先继承了 WebDriverSingleton 类并获取了单例驱动对象。另外通过@TestMethodOrder注解,设置其中的测试方法按照 @Order 注解指定的顺序执行。
@BeforeAll 和 @AfterAll 注解: 其中 @BeforeAll 注解的 openWebpage 方法用于打开网页,该方法会在该类中的所有的测试方法执行之前执行;@AfterAll 注解的方法则用于关闭当前测试类打开的页面,会在所有的测试方法执行完成之间执行。
webpageComp方法: 该方法用于打开页面之间进行截图操作,可通过截取得到的图片来判断页面是否正常打开。
regTest方法: 该方法用户测试注册功能,通过 @ParameterizedTest 注解实现参数化,并通过@CsvSource 注解设置多组参数进行测试。
import com.myblog.utils.WebDriverSingleton;
import org.junit.jupiter.api.*;
import org.junit.jupiter.params.ParameterizedTest;
import org.junit.jupiter.params.provider.CsvSource;
import org.openqa.selenium.Alert;
import org.openqa.selenium.By;
import org.openqa.selenium.WebDriver;
import org.openqa.selenium.WebElement;

import java.io.IOException;

/**
 * 注册页面自动化测试
 */

// 设置执行顺序按 @Order 注解设置的顺序执行
@TestMethodOrder(MethodOrderer.OrderAnnotation.class)
public class RegTest extends WebDriverSingleton {

    // 获取单例驱动
    private static final WebDriver webDriver = getWebDriver();

    /**
     * 打开网页
     */
    @BeforeAll
    public static void openWebpage(){
        webDriver.get("http://8.130.52.26:8081/reg.html");
    }

    /**
     * 验证网页是否正常打开
     */
    @Test
    @Order(1)
    public void WebpageComp() throws IOException {
        webDriver.findElement(By.cssSelector("#username"));
        webDriver.findElement(By.cssSelector("body > div.login-container > div > div:nth-child(3) > span"));
        webDriver.findElement(By.xpath("//*[@id=\"submit\"]"));

        // 获取屏幕截图,参数为当前类名
        getScreenShot(getClass().getSimpleName());
    }

    /**
     * 验证注册功能
     */
    @ParameterizedTest
    @CsvSource({"zhangsan, 123456, 123457", "李四, 123456, 123456", "test, 123456, 123456"})
    @Order(2)
    public void regTest(String username, String password, String confirmPassword) throws IOException, InterruptedException {
        // 获取元素
        WebElement inputUsername = webDriver.findElement(By.cssSelector("#username"));
        WebElement inputPassword = webDriver.findElement(By.cssSelector("#password1"));
        WebElement inputConfirmPassword = webDriver.findElement(By.cssSelector("#password2"));
        WebElement submit = webDriver.findElement(By.cssSelector("#submit"));

        // 清楚输入框
        inputUsername.clear();
        inputPassword.clear();
        inputConfirmPassword.clear();

        // 输入测试用例
        inputUsername.sendKeys(username);
        inputPassword.sendKeys(password);
        inputConfirmPassword.sendKeys(confirmPassword);

        // 提交
        submit.click();


        // 处理弹窗 alter
        Thread.sleep(1000);
        Alert alert = webDriver.switchTo().alert();
        System.out.println("弹窗内容:" + alert.getText());
        alert.accept();

        // 截图
        getScreenShot(getClass().getSimpleName());
    }
}
3.3 登录页面自动化测试
LoginTest 类实现了对登录功能的自动化测试,在该测试类中设置了三个测试方法,分别是webpageComp验证页面是否正常打开、abnormalLoginTest异常登录测试,normalLoginTest正常登录测试。
在异常登录测试中,使用@ParameterizedTest注解实现参数化,并且通过@CsvSource注解设置了多组参数,测试对象分别有验证码错误、用户名出现中文、密码为空。
在正常登录测试中,为了方便测试,在后端程序中增加了一个admin的特殊用户,将其验证码code也设置为了admin以方便进行测试。
import com.myblog.utils.WebDriverSingleton;
import org.junit.jupiter.api.*;
import org.junit.jupiter.params.ParameterizedTest;
import org.junit.jupiter.params.provider.CsvSource;
import org.openqa.selenium.Alert;
import org.openqa.selenium.By;
import org.openqa.selenium.WebDriver;
import org.openqa.selenium.WebElement;

import java.io.IOException;
import java.util.concurrent.TimeUnit;

/**
 * 登录页面自动化测试
 */

// 设置执行顺序按 @Order 注解设置的顺序执行
@TestMethodOrder(MethodOrderer.OrderAnnotation.class)
public class LoginTest extends WebDriverSingleton {
    // 获取单例驱动
    private static final WebDriver webDriver = getWebDriver();

    /**
     * 打开登录页面
     */
    @BeforeAll
    public static void openWebPage(){
        webDriver.get("http://8.130.52.26:8081/login.html");
        // 设置等待时间
        webDriver.manage().timeouts().implicitlyWait(10, TimeUnit.SECONDS);
    }

    /**
     * 验证登录页面是否打开成功
     */
    @Test
    @Order(1)
    public void webpageComp() throws IOException, InterruptedException {
        // 等待验证码加载完毕
        Thread.sleep(1000);
        // 验证页面是否能找到这些元素
        webDriver.findElement(By.cssSelector("#username"));
        webDriver.findElement(By.cssSelector("body > div.login-container > div > div:nth-child(3) > span"));
        webDriver.findElement(By.cssSelector("body > div.login-container > div > div:nth-child(4) > span"));
        webDriver.findElement(By.xpath("//*[@id=\"submit\"]"));

        // 获取当前页面截图
        getScreenShot(getClass().getSimpleName());
    }

    /**
     * 异常登录测试
     * @param username 用户名
     * @param password 密码
     * @param confirmCode 验证码
     */
    @Order(2)
    @ParameterizedTest
    @CsvSource({"zhangsan, 123457, abcde", "李四, 123456, abcde", "wangwu, '', 123456"})
    public void abnormalLoginTest(String username, String password, String confirmCode) throws InterruptedException, IOException {
        // 获取元素
        WebElement inputUsername = webDriver.findElement(By.cssSelector("#username"));
        WebElement inputPassword = webDriver.findElement(By.cssSelector("#password"));
        WebElement inputConfirmCode = webDriver.findElement(By.cssSelector("#code"));
        WebElement submit = webDriver.findElement(By.cssSelector("#submit"));
        // 清除用户名、密码、验证码
        inputUsername.clear();
        inputPassword.clear();
        inputConfirmCode.clear();
        // 输入用户名、密码、验证码
        inputUsername.sendKeys(username);
        inputPassword.sendKeys(password);
        inputConfirmCode.sendKeys(confirmCode);
        // 提交
        submit.click();

        // 处理弹窗
        // 等待弹窗加载完毕
        Thread.sleep(1000);
        Alert alert = webDriver.switchTo().alert();
        System.out.println("弹窗内容:" + alert.getText());
        alert.accept();

        // 截图
        getScreenShot(getClass().getSimpleName());
    }


    /**
     * 正常登录成功测试
     * @param username 用户名
     * @param password 密码
     * @param confirmCode 验证码
     * @throws IOException
     * @throws InterruptedException
     */
    @Order(3)
    @ParameterizedTest
    @CsvSource("admin, 123456, admin")
    public void normalLoginTest(String username, String password, String confirmCode) throws IOException, InterruptedException {
        // 获取元素
        WebElement inputUsername = webDriver.findElement(By.cssSelector("#username"));
        WebElement inputPassword = webDriver.findElement(By.cssSelector("#password"));
        WebElement inputConfirmCode = webDriver.findElement(By.cssSelector("#code"));
        WebElement submit = webDriver.findElement(By.cssSelector("#submit"));
        // 清除用户名、密码、验证码
        inputUsername.clear();
        inputPassword.clear();
        inputConfirmCode.clear();
        // 输入用户名、密码、验证码
        inputUsername.sendKeys(username);
        inputPassword.sendKeys(password);
        inputConfirmCode.sendKeys(confirmCode);

        // 获取页面截图
        Thread.sleep(1000);
        getScreenShot(getClass().getSimpleName());

        // 提交
        submit.click();

        // 设置等待时间
        Thread.sleep(1000);

        // 获取截图
        getScreenShot(getClass().getSimpleName());
    }
}
3.4 博客管理自动化测试
CtrlBlogTest测试类基本实现了对文章操作的整体流程,在这个测试类中设置的测试方法流程为:
新增文章 =》修改文章 =》保存草稿 =》继续编写 =》发布文章 =》删除文章
其中没一个流程就代表了一个测试方法,按照顺序依次执行,完成测试需求。
import com.myblog.utils.WebDriverSingleton;
import org.junit.jupiter.api.*;
import org.openqa.selenium.Alert;
import org.openqa.selenium.By;
import org.openqa.selenium.WebDriver;

import java.io.IOException;
import java.util.concurrent.TimeUnit;

/**
 * 博客管理自动化测试
 * 测试内容:
 * 新增文章 =》修改文章 =》保存草稿 =》继续编写 =》发布文章 =》删除文章
 */

// 设置方法执行顺序
@TestMethodOrder(MethodOrderer.OrderAnnotation.class)
public class CtrlBlogTest extends WebDriverSingleton {
    // 获取单例驱动
    private static final WebDriver webDriver = getWebDriver();

    /**
     * 打开个人博客页面
     * 由于登录测试运行过,已经存在 Session,不必再登录
     */
    @BeforeAll
    public static void openWebpage(){
        webDriver.get("http://8.130.52.26:8081/myblog_list.html");
    }

    /**
     * 检查当前页面是否打开成功
     */
    @Test
    @Order(1)
    public void webpageComp() throws IOException, InterruptedException {
        // 等待页面加载完成
        Thread.sleep(1000);
        // 验证在当前页面是否能够找到下面的元素
        webDriver.findElement(By.cssSelector("body > div.nav > a:nth-child(5)"));
        webDriver.findElement(By.cssSelector("body > div.nav > a:nth-child(6)"));
        webDriver.findElement(By.xpath("//*[@id=\"author2\"]"));
        webDriver.findElement(By.xpath("/html/body/div[2]/div[1]/div/button[1]"));

        // 截图
        getScreenShot(getClass().getSimpleName());
    }

    /**
     * 新增文章
     */
    @Test
    @Order(2)
    public void addBlogTest() throws IOException, InterruptedException {
        // 找到写博客连接,并点击
        webDriver.findElement(By.cssSelector("body > div.nav > a:nth-child(10)")).click();
        // 等待页面加载完毕
        webDriver.manage().timeouts().implicitlyWait(10, TimeUnit.SECONDS);
        // 获取当前页面截图
        getScreenShot(getClass().getSimpleName());

        // 获取标题输入框并输入内容
        webDriver.findElement(By.cssSelector("#title")).sendKeys("Test");

        Thread.sleep(1000);
        // 截取当前页面
        getScreenShot(getClass().getSimpleName());

        // 获取发布按钮,并发布
        webDriver.findElement(By.cssSelector("body > div.blog-edit-container > div.title > button:nth-child(4)")).click();

        // 处理弹窗
        Thread.sleep(1000);
        Alert alert = webDriver.switchTo().alert();
        System.out.println("弹窗内容:" + alert.getText());
        alert.dismiss();

        Thread.sleep(1000);
        // 获取当前页面截图
        getScreenShot(getClass().getSimpleName());
    }

    /**
     * 修改文章
     */
    @Test
    @Order(3)
    public void alterBlogTest() throws InterruptedException, IOException {
        // 获取修改文章按钮并点击
        webDriver.findElement(By.cssSelector("#artlist > div:nth-child(1) > a:nth-child(5)")).click();
        // 等待页面加载
        Thread.sleep(1000);
        // 获取截图
        getScreenShot(getClass().getSimpleName());

        // 获取标题按钮并修改
        webDriver.findElement(By.cssSelector("#title")).clear();
        webDriver.findElement(By.cssSelector("#title")).sendKeys("Test2");

        Thread.sleep(1000);
        // 获取当前页面截图
        getScreenShot(getClass().getSimpleName());
    }

    /**
     * 保存草稿
     */
    @Test
    @Order(4)
    public void saveDraftTest() throws InterruptedException, IOException {
        // 获取保存草稿按钮并点击
        webDriver.findElement(By.cssSelector("body > div.blog-edit-container > div.title > button:nth-child(2)")).click();
        // 处理弹窗
        Thread.sleep(1000);
        Alert alert = webDriver.switchTo().alert();
        System.out.println("弹窗内容:" + alert.getText());
        alert.accept();

        // 获取当前页面截图
        Thread.sleep(1000);
        getScreenShot(getClass().getSimpleName());
    }


    /**
     * 继续编写
     */
    @Test
    @Order(5)
    public void continueEditBlogTest() throws InterruptedException, IOException {
        // 找到继续编写按钮并点击
        webDriver.findElement(By.cssSelector("#artlist > div > a:nth-child(4)")).click();
        // 获取页面截图
        Thread.sleep(1000);
        getScreenShot(getClass().getSimpleName());

        // 获取标题按钮并修改
        webDriver.findElement(By.cssSelector("#title")).clear();
        webDriver.findElement(By.cssSelector("#title")).sendKeys("Test3");

        // 获取页面截图
        Thread.sleep(1000);
        getScreenShot(getClass().getSimpleName());
    }


    /**
     * 发布文章
     */
    @Test
    @Order(6)
    public void postBlogTest() throws InterruptedException, IOException {
        // 找到发布按钮并点击
        webDriver.findElement(By.cssSelector("body > div.blog-edit-container > div.title > button:nth-child(3)")).click();
        // 处理弹窗
        Thread.sleep(1000);
        Alert alert = webDriver.switchTo().alert();
        System.out.println("弹窗内容:" + alert.getText());
        alert.accept();

        // 获取页面截图
        Thread.sleep(1000);
        getScreenShot(getClass().getSimpleName());
    }

    /**
     * 删除文章
     */
    @Test
    @Order(7)
    public void delBlogTest() throws InterruptedException, IOException {
        // 找到删除按钮并点击
        webDriver.findElement(By.cssSelector("#artlist > div:nth-child(1) > a:nth-child(6)")).click();

        // 处理弹窗
        // 确认删除弹窗
        Thread.sleep(1000);
        Alert alert = webDriver.switchTo().alert();
        System.out.println("弹窗内容:" + alert.getText());
        alert.accept();

        // 删除成功弹窗
        Thread.sleep(1000);
        alert = webDriver.switchTo().alert();
        System.out.println("弹窗内容:" + alert.getText());
        alert.accept();

        // 获取页面截图
        Thread.sleep(1000);
        getScreenShot(getClass().getSimpleName());

    }
}
3.5 搜索功能自动化测试
SearchTest 测试类的作用是对搜索功能进行测试,在该测试类中同样设置了三个测试方法:webpageComp验证页面是否正常打开、searchEmptyTest当输入框内容为空时的搜索测试、searchTest输入框中存在内容的搜索测试。
在 searchTest 同样使用了@ParameterizedTest 注解实现参数化,通过@CsvSource注解设置了多组参数,其中包含了可以搜到和搜索不到结果的搜索关键字。
在搜索功能中值得注意的一点是,当点击搜索按钮的时候,会创建一个新的标签页来展示搜索结果。因此在该测试方法中,首先通过 WebDriver 中的 getWindowHandle 方法获取了当前标签页的句柄 currentHandle,然后通过 getWindowHandles 的方法获取所有的标签页句柄,循环判断,如果遍历到的句柄值不等于currentHandle,则为新打开的标签页,然后通过webDriver.switchTo().window(handle) 切换至这个新标签页,在搜索结果页面中截图之后,关闭这个页面,再切回currentHandle原标签页。
import com.myblog.utils.WebDriverSingleton;
import org.junit.jupiter.api.*;
import org.junit.jupiter.params.ParameterizedTest;
import org.junit.jupiter.params.provider.CsvSource;
import org.openqa.selenium.Alert;
import org.openqa.selenium.By;
import org.openqa.selenium.WebDriver;
import org.openqa.selenium.WebElement;

import java.io.IOException;
import java.util.Set;
import java.util.concurrent.TimeUnit;

/**
 * 搜索功能自动化测试
 */

// 设置测试方法的运行顺序
@TestMethodOrder(MethodOrderer.OrderAnnotation.class)
public class SearchTest extends WebDriverSingleton {
    // 获取单例驱动
    private static final WebDriver webDriver = getWebDriver();

    /**
     * 打开博客页面
     */
    @BeforeAll
    public static void openWebpage() {
        webDriver.get("http://8.130.52.26:8081/blog_list.html");
        // 等待页面加载完毕
        webDriver.manage().timeouts().implicitlyWait(10, TimeUnit.SECONDS);
    }

    /**
     * 判断页面是否正常打开
     */
    @Test
    @Order(1)
    public void webpageComp() throws IOException {
        // 如果在当前页面找到以下元素,则测试通过
        webDriver.findElement(By.cssSelector("#pageDiv > button:nth-child(1)"));
        webDriver.findElement(By.cssSelector("#pageDiv > button:nth-child(5)"));
        // 使用断言判断当前页面的标题是否是 “博客列表”
        boolean flag = webDriver.getTitle().equals("博客列表");
        Assertions.assertTrue(flag);

        // 截取当前页面
        getScreenShot(getClass().getSimpleName());
    }


    /**
     * 搜索框中无内容
     */
    @Test
    @Order(2)
    public void searchEmptyTest() throws InterruptedException, IOException {
        // 获取搜索输入框
        WebElement searchInput = webDriver.findElement(By.cssSelector("#search-input"));
        // 获取搜索按钮
        WebElement button = webDriver.findElement(By.cssSelector("body > div.nav > div > button"));

        // 清除输入框内容
        searchInput.clear();
        // 输入内容
        searchInput.sendKeys("");
        // 点击搜索按钮
        button.click();

        // 处理弹窗
        Thread.sleep(1000);
        Alert alert = webDriver.switchTo().alert();
        System.out.println("弹窗内容:" + alert.getText());
        alert.accept();

    }

    /**
     * 搜索框中输入内容。
     * 实现多参数,每次搜索都会打开新页面,先获得当前页面以及所有页面的句柄,先切换至新页面,截图后关闭该页面,然后再切换回原页面
     * @param searchKey 搜索关键字
     */

    @ParameterizedTest
    @CsvSource({"Java", "123", "Spring"})
    @Order(3)
    public void searchTest(String searchKey) throws InterruptedException, IOException {
        // 获取搜索输入框
        WebElement searchInput = webDriver.findElement(By.cssSelector("#search-input"));
        // 获取搜索按钮
        WebElement button = webDriver.findElement(By.cssSelector("body > div.nav > div > button"));

        // 清除输入框内容
        searchInput.clear();
        // 输入内容
        searchInput.sendKeys(searchKey);
        // 点击搜索按钮
        button.click();

        // 获取当前窗口句柄
        String currentHandle = webDriver.getWindowHandle();


        // 获取所有窗口句柄
        Set<String> allHandles = webDriver.getWindowHandles();

        // 遍历窗口句柄,找到新标签页的句柄
        for (String handle : allHandles) {
            if (!handle.equals(currentHandle)) {
                webDriver.switchTo().window(handle);
                // 搜索结果截图
                Thread.sleep(1000);
                getScreenShot(getClass().getSimpleName());

                // 关闭这个新窗口
                webDriver.close();

                // 切换会原窗口
                webDriver.switchTo().window(currentHandle);
            }
        }
    }
}
3.6 我的关注/粉丝页面自动化测试
FollowRelationTest 该测试类的作用是实现对我的关注/粉丝页面的测试,主要实现了四个测试方法:webpageComp测试页面是否正常打开、switchToFollowsTest切换至粉丝页面测试、switchBackToFollowingTest切换会关注页面测试、gotoOtherPageTest前往其他用户博客主页测试。
在通过点击用户名前往对应用户博客主页的功能中,同样会打开一个新的标签页,这里的处理方法和上述搜索功能测试时的做法一样。
import com.myblog.utils.WebDriverSingleton;
import org.junit.jupiter.api.*;
import org.openqa.selenium.By;
import org.openqa.selenium.WebDriver;

import java.io.IOException;
import java.util.Set;

/**
 * 我的关注和粉丝页面自动化测试
 */
@TestMethodOrder(MethodOrderer.OrderAnnotation.class)
public class FollowRelationTest extends WebDriverSingleton {

    // 获取单例驱动对象
    private static final WebDriver webDriver = getWebDriver();

    /**
     * 打开页面
     */
    @BeforeAll
    public static void openWebpage() {
        webDriver.get("http://8.130.52.26:8081/my_relation_following.html");
    }


    /**
     * 验证页面是否正常打开
     */
    @Test
    @Order(1)
    public void webpageComp() throws InterruptedException, IOException {
        // 如果获取到下面的元素,则说明页面正常打开了
        webDriver.findElement(By.cssSelector("#relationship > div.relation-tab > div.following-tab"));
        webDriver.findElement(By.cssSelector("#relationship > div.relation-tab > div.follows-tab.active"));
        // 判断网页标题
        boolean flag = webDriver.getTitle().equals("我的关注");
        Assertions.assertTrue(flag);

        // 获取截图
        Thread.sleep(1000);
        getScreenShot(getClass().getSimpleName());
    }

    /**
     * 切换至粉丝页面测试
     */
    @Test
    @Order(2)
    public void switchToFollowsTest() throws InterruptedException, IOException {
        // 点击我的粉丝按钮
        webDriver.findElement(By.cssSelector("#relationship > div.relation-tab > div.follows-tab.active")).click();

        // 判断页面标题
        boolean flag = webDriver.getTitle().equals("我的粉丝");
        Assertions.assertTrue(flag);

        // 获取当前页面截图
        Thread.sleep(1000);
        getScreenShot(getClass().getSimpleName());
    }

    /**
     * 切换会我的关注页面测试
     */
    @Test
    @Order(3)
    public void switchBackToFollowingTest() throws InterruptedException, IOException {
        // 点击我的关注按钮
        webDriver.findElement(By.cssSelector("#relationship > div.relation-tab > div.following-tab.active")).click();
        // 判断页面标题
        boolean flag = webDriver.getTitle().equals("我的关注");
        Assertions.assertTrue(flag);

        // 获取页面截图
        Thread.sleep(1000);
        getScreenShot(getClass().getSimpleName());
    }

    /**
     * 点击一个关注用户的用户名,跳转至其主页测试
     */
    @Test
    @Order(4)
    public void gotoOtherPageTest() throws IOException, InterruptedException {
        // 点击关注列表中的第一个用户的用户名或昵称
        webDriver.findElement(By.cssSelector("#following-list > div:nth-child(1) > h3")).click();

        // 获取当前页面句柄
        String currentHandle = webDriver.getWindowHandle();
        // 获取所有页面句柄
        Set<String> handles = webDriver.getWindowHandles();

        // 切换至新页面截图,然后关闭该页面并跳转回原页面
        for (String handle : handles) {
            if (!handle.equals(currentHandle)) {
                webDriver.switchTo().window(handle);

                // 获取当前页面截图
                Thread.sleep(1000);
                getScreenShot(getClass().getSimpleName());

                // 关闭当前页面
                webDriver.close();
                // 切换会原页面
                webDriver.switchTo().window(currentHandle);
            }
        }
    }
}
3.7 聊天室自动化测试
ChatOnlineTest 测试类的作用是完成对聊天室的自动化测试。在该测试类中,实现了三个测试方法:webpageComp测试页面是否正常打开、clickSessionTest测试会话列表的切换功能、postMessageTest测试消息的发送功能。
在postMessageTest测试方法中,使用了 @ParameterizedTest 注解实现参数化,并通过 @CsvSource 注解以实现发送一组消息。
import com.myblog.utils.WebDriverSingleton;
import org.junit.jupiter.api.*;
import org.junit.jupiter.params.ParameterizedTest;
import org.junit.jupiter.params.provider.CsvSource;
import org.openqa.selenium.By;
import org.openqa.selenium.WebDriver;
import org.openqa.selenium.WebElement;

import java.io.IOException;

/**
 * 在线聊天室自动化测试
 */

@TestMethodOrder(MethodOrderer.OrderAnnotation.class)
public class ChatOnlineTest extends WebDriverSingleton {
    // 获取单例驱动对象
    private static final WebDriver webDriver = getWebDriver();

    /**
     * 打开网页
     */
    @BeforeAll
    public static void openWebpage(){
        webDriver.get("http://8.130.52.26:8081/private_message.html");
    }

    /**
     * 验证页面是否正常打开
     */
    @Test
    @Order(1)
    public void webpageComp() throws InterruptedException, IOException {
        // 如果找到下面元素则说明打开页面成功
        String text = webDriver.findElement(By.cssSelector("body > div.chat-container > div > div.right > div.title")).getText();
        Assertions.assertEquals("在线聊天室", text);
        webDriver.findElement(By.cssSelector("#author"));

        // 获取页面截图
        Thread.sleep(1000);
        getScreenShot(getClass().getSimpleName());
    }

    /**
     * 点击会话列表测试
     */
    @Test
    @Order(2)
    public void clickSessionTest() throws InterruptedException, IOException {
        // 点击会话列表中的第二个会话
        webDriver.findElement(By.cssSelector("#session-list > li:nth-child(2)")).click();
        // 获取并判断会话列表中的用户名与会话标题是否相等
        String sessionUsername = webDriver.findElement(By.cssSelector("#session-list > li:nth-child(2) > h3")).getText();
        String sessionTitle = webDriver.findElement(By.cssSelector("body > div.chat-container > div > div.right > div.title")).getText();
        Assertions.assertEquals(sessionTitle, sessionUsername);

        // 获取截图
        Thread.sleep(1000);
        getScreenShot(getClass().getSimpleName());

        // 点击会话列表中的第一个会话
        webDriver.findElement(By.cssSelector("#session-list > li:nth-child(1)")).click();

        // 获取页面截图
        Thread.sleep(1000);
        getScreenShot(getClass().getSimpleName());
    }

    /**
     * 发送消息测试
     */
    @ParameterizedTest
    @CsvSource({"在的!", "怎么了?", "还不睡觉。"})
    @Order(3)
    public void postMessageTest(String message) throws InterruptedException, IOException {
        // 获取聊天输入框
        WebElement textareaInput = webDriver.findElement(By.cssSelector("body > div.chat-container > div > div.right > textarea"));
        // 输入消息内容
        textareaInput.sendKeys(message);
        // 获取发送按钮并发送
        Thread.sleep(1000);
        webDriver.findElement(By.cssSelector("body > div.chat-container > div > div.right > div.ctrl > button")).click();

        // 获取页面截图
        Thread.sleep(1000);
        getScreenShot(getClass().getSimpleName());
    }
}
3.8 博客详情页 + 评论功能自动化测试
BlogContentAndCommentTest测试类的功能是对博客详情页和评论区相关功能进行自动化测试,在该类中实现了4个测试方法:webpageComp测试页面是否正常打开,checkFirstBlogTest测试博客广场中的第一篇博客内容以及该博客的评论区展示,postCommentTest测试评论的发表功能,deleteCommentTest测试当前用户发表的评论的删除功能。
在checkFirstBlogTest测试方法中,获取评论区截图时首先需要使用 Javascript 将页面右侧详情部分滑动到最底部,再进行页面内容的截取;在postCommentTest测试方法中,使用@ParameterizedTest注解实现参数化,通过 @CsvSource 注解传递多个参数。
import com.myblog.utils.WebDriverSingleton;
import org.junit.jupiter.api.*;
import org.junit.jupiter.params.ParameterizedTest;
import org.junit.jupiter.params.provider.CsvSource;
import org.openqa.selenium.*;

import java.io.IOException;
import java.util.concurrent.TimeUnit;

/**
 * 博客详情页 + 评论功能自动化测试
 */

@TestMethodOrder(MethodOrderer.OrderAnnotation.class)
public class BlogContentAndCommentTest extends WebDriverSingleton {
    // 获取单例驱动对象
    private static final WebDriver webDriver = getWebDriver();

    // 打开博客列表页
    @BeforeAll
    public static void openWebpage() {
        webDriver.get("http://8.130.52.26:8081/blog_list.html");
        // 等待页面加载完毕
        webDriver.manage().timeouts().implicitlyWait(10, TimeUnit.SECONDS);
    }

    /**
     * 测试页面是否打开成功
     */
    @Test
    @Order(1)
    public void webpageComp() throws InterruptedException, IOException {
        // 如果找到了以下元素,则说明打开页面成功
        webDriver.findElement(By.cssSelector("#userLoginElement > a:nth-child(1)"));
        webDriver.findElement(By.cssSelector("#pageDiv > button:nth-child(1)"));
        // 验证页面标题
        boolean flag = webDriver.getTitle().equals("博客广场");
        Assertions.assertTrue(flag);

        // 获取当前页面截图
        Thread.sleep(1000);
        getScreenShot(getClass().getSimpleName());
    }

    /**
     * 点击查看第一篇博客
     */
    @Test
    @Order(2)
    public void checkFirstBlogTest() throws InterruptedException, IOException {
        // 点击查看全文
        webDriver.findElement(By.cssSelector("#artlist > div:nth-child(1) > a")).click();

        // 等待页面加载
        webDriver.manage().timeouts().implicitlyWait(10, TimeUnit.SECONDS);


        // 获取页面截图
        Thread.sleep(1000);
        getScreenShot(getClass().getSimpleName());

        // 找到右侧内容区域的元素
        WebElement rightContentElement = webDriver.findElement(By.cssSelector(".container-right"));

        // 创建一个 JavascriptExecutor 对象
        JavascriptExecutor jsExecutor = (JavascriptExecutor) webDriver;

        // 使用 JavaScript 将右侧内容滚动到最底部
        jsExecutor.executeScript("arguments[0].scrollTo(0, arguments[0].scrollHeight);", rightContentElement);

        // 获取评论区截图
        Thread.sleep(1000);
        getScreenShot(getClass().getSimpleName());
    }

    /**
     * 评论区发表评论测试
     */
    @ParameterizedTest
    @CsvSource({"666", "泰裤辣!"})
    @Order(3)
    public void postCommentTest(String comment) throws InterruptedException, IOException {
        // 获取评论输入框
        webDriver.findElement(By.cssSelector("#inputText")).sendKeys(comment);

        // 获取发表评论按钮并点击
        webDriver.findElement(By.cssSelector("#userLoginElement2 > div > div > button")).click();

        // 获取截图
        Thread.sleep(1000);
        getScreenShot(getClass().getSimpleName());
    }


    /**
     * 删除评论自动化测试
     */
    @Test
    @Order(4)
    public void deleteCommentTest() throws InterruptedException, IOException {
        // 获取删除按钮
        webDriver.findElement(By.cssSelector("#commentList > div:nth-child(4) > div.delete > button")).click();

        // 处理弹窗
        Thread.sleep(1000);
        Alert alert = webDriver.switchTo().alert();
        System.out.println("弹窗内容:" + alert.getText());
        alert.accept();

        // 获取页面截图
        Thread.sleep(1000);
        getScreenShot(getClass().getSimpleName());
    }
}
3.9 Junit 测试套件
RunSuite是一个 Junit 测试套件,用于将上面的测试类组织在一起。在进行自动化测试时,只需要运行这个测试套件,就能够运行到所有的自动化测试代码。该类通过 @Suite 注解和 @SelectClasses 指定测试代码的顺序按照测试类的顺序来执行,这种方式有助于组织和管理多个测试类,可以一次性运行它们,以确保你的应用程序在不同方面都正常工作。
import com.myblog.test.*;
import org.junit.platform.suite.api.SelectClasses;
import org.junit.platform.suite.api.Suite;

/**
 * 测试套件
 */
@Suite
@SelectClasses({
        RegTest.class, LoginTest.class, CtrlBlogTest.class, SearchTest.class,
        FollowRelationTest.class, ChatOnlineTest.class, BlogContentAndCommentTest.class,
        QuitDriveTest.class})
public class RunSuite {}
3.10 自动化测试总结
测试结果:
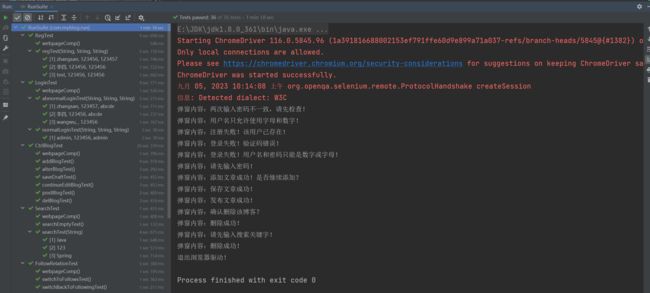
通过运行 RunSuite 套件,最终发现,上面所有的测试方法通过了测试,并且获取了相应页面的截图,方便对测试结果进行对比。
在上述的测试过程中:
- 通过创建单例驱动对象的方式,只创建了一次浏览器驱动对象,保持了代码的简洁性,同时也一定程度上减少了系统不必要的开销。
- 使用 Junit5 编写和管理测试用例,相比于 Junit4 拥有更多的注解功能、更简单的参数化方法、更灵活的断言等等。
- 在自动化测试中,部分测试使用了参数化,使得代码更加整洁、具有更高的可读性。
- 使用隐式等待,这种智能化等待方式提高自动化运行的效率和稳定性。
- 使用了屏幕截图,方便在测试之后,与预期结果进行对比,方便溯源。
四、性能测试
4.1 LoadRunner 工具说明
LoadRunner 是一款性能测试工具,用于测试应用程序、网站和服务的性能和可伸缩性。它由三个主要组件组成,每个组件都有其特定的功能和用途:

-
Virtual User Generator (VUGen):
- VUGen 是 LoadRunner 中的第一个组件,用于创建虚拟用户脚本。虚拟用户脚本定义了用户在应用程序上执行的操作,包括浏览网页、填写表单、执行搜索等。VUGen 提供了一个录制功能,可以录制用户在应用程序上的操作,并将其转化为脚本。还可以手动编写脚本,以模拟不同的用户行为。
-
Controller:
- Controller 是 LoadRunner 的第二个组件,用于管理和执行性能测试。可以在 Controller 中创建测试场景,将多个虚拟用户脚本组合在一起,并模拟多个用户同时访问应用程序。Controller 还允许配置虚拟用户的数量、设置测试持续时间、调整负载模式,并监视测试的性能指标。一旦测试场景配置完成,可以启动测试并收集性能数据。
-
Analysis:
- Analysis 是 LoadRunner 的第三个组件,用于分析和可视化性能测试结果。一旦性能测试完成,Analysis 允许导入和分析收集的性能数据,以便评估应用程序的性能表现。可以生成图表、报告和趋势分析,以帮助识别性能瓶颈和问题。Analysis 提供了丰富的工具和选项,用于深入了解应用程序在不同负载下的行为。
这三个组件共同组成了 LoadRunner 的核心功能,能够创建、执行和分析性能测试,以评估应用程序在不同负载下的性能和可伸缩性。LoadRunner 还提供了许多其他功能,如监控、自动化、报告生成等,以支持更复杂的性能测试需求。
4.2 录制登录测试脚本
- 创建测试项目
由于现在需要测试的是一个Web项目,因此在创建测试脚本的时候,选择的协议是 Web-HTTP/HTML:
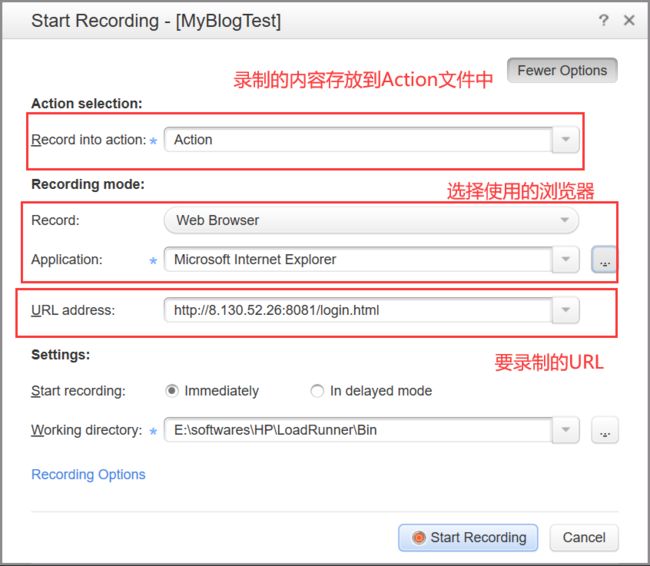
- 当创建好测试项目之后,点击录制,配置录制相关规则
- 点击开始录制,进行录制脚本
其实所谓的录制脚本,就是监视电脑上的网络流量并记录与应用程序的交互,以便后续能够模拟这个场景进行性能测试。这些记录包括HTTP请求、响应、页面浏览以及其他用户与应用程序的交互操作。一旦录制完成,就可以使用这些记录生成性能测试脚本,然后在不同的负载条件下运行这些脚本,以评估应用程序的性能和稳定性。
在此处,我录制的是登录这个场景,将录制结果裁剪掉不必要的代码后如下所示:
Action()
{
	web_url("login.html",
		"URL=http://8.130.52.26:8081/login.html",
		"Resource=0",
		"Referer=",
		"Snapshot=t53.inf",
		"Mode=HTML",
		EXTRARES,
		"Url=/login.html", ENDITEM,
		"Url=/image/d6bfc596-1b3c-41aa-ac57-0c59e8f5fbbe.png", ENDITEM,
		LAST);


	web_custom_request("getcode",
		"URL=http://8.130.52.26:8081/user/getcode",
		"Method=POST",
		"Resource=0",
		"RecContentType=application/json",
		"Referer=http://8.130.52.26:8081/login.html",
		"Snapshot=t56.inf",
		"Mode=HTML",
		"EncType=",
		EXTRARES,
		"Url=http://t.wg.360-api.cn/api/helpgame?app=hotrank", "Referer=", ENDITEM,
		"Url=http://t.wg.360-api.cn/ap/tips/browse?cver=&mid=9202afc53bcc84de173ca76f798bad1c", "Referer=", ENDITEM,
		"Url=http://t.wg.360-api.cn/ap/tips/guess?sence=browse_ai&mid=9202afc53bcc84de173ca76f798bad1c&cver=9.1.2.1018&gver=", "Referer=", ENDITEM,
		LAST);


	web_submit_data("login",
		"Action=http://8.130.52.26:8081/user/login",
		"Method=POST",
		"RecContentType=application/json",
		"Referer=http://8.130.52.26:8081/login.html",
		"Snapshot=t57.inf",
		"Mode=HTML",
		ITEMDATA,
		"Name=username", "Value=admin", ENDITEM,
		"Name=password", "Value=123456", ENDITEM,
		"Name=code", "Value=q43py", ENDITEM,
		LAST);


	web_url("myblog_list.html",
		"URL=http://8.130.52.26:8081/myblog_list.html",
		"Resource=0",
		"Referer=http://8.130.52.26:8081/login.html",
		"Snapshot=t61.inf",
		"Mode=HTML",
		LAST);


	web_custom_request("getuserinfo",
		"URL=http://8.130.52.26:8081/user/getuserinfo",
		"Method=POST",
		"Resource=0",
		"RecContentType=application/json",
		"Referer=http://8.130.52.26:8081/myblog_list.html",
		"Snapshot=t63.inf",
		"Mode=HTML",
		"EncType=",
		LAST);

	web_custom_request("mylist",
		"URL=http://8.130.52.26:8081/art/mylist",
		"Method=POST",
		"Resource=0",
		"RecContentType=application/json",
		"Referer=http://8.130.52.26:8081/myblog_list.html",
		"Snapshot=t64.inf",
		"Mode=HTML",
		"EncType=",
		LAST);


	web_submit_data("get_total_rcount_and_comment",
		"Action=http://8.130.52.26:8081/user/get_total_rcount_and_comment",
		"Method=POST",
		"RecContentType=application/json",
		"Referer=http://8.130.52.26:8081/myblog_list.html",
		"Snapshot=t67.inf",
		"Mode=HTML",
		ITEMDATA,
		"Name=uid", "Value=3", ENDITEM,
		LAST);

	return 0;
}
4.3 在测试脚本中增加事务、集合点、参数化
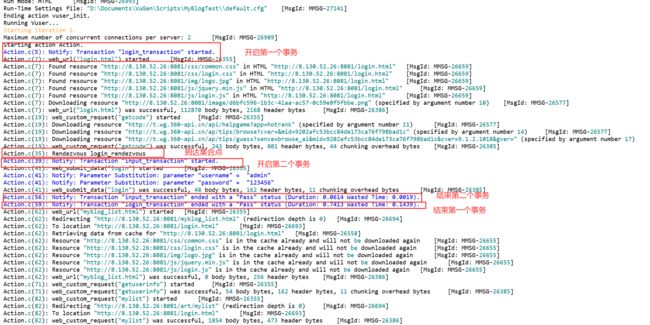
为了更好地在进行性能测试的时候收集相关数据,因此我们在录制的脚步中增加一些额外的东西:
-
事务: 事务的响应时间和每秒事务通过数是衡量服务器性能的重要指标;
-
集合点: 让所有的虚拟用户的都运行到集合点后,再一起运行。插入集合点是为了衡量在加重负载的情况下服务器的性能情况。
-
参数化: 提供参数化可以传递不同的用户数据,同时也可以使得脚本运动更多的次数。
下面的修改的脚本代码:
Action()
{

	// 开启关于整个登录的事务
	lr_start_transaction("login_transaction");

	web_url("login.html",
		"URL=http://8.130.52.26:8081/login.html",
		"Resource=0",
		"Referer=",
		"Snapshot=t53.inf",
		"Mode=HTML",
		EXTRARES,
		"Url=/login.html", ENDITEM,
		"Url=/image/d6bfc596-1b3c-41aa-ac57-0c59e8f5fbbe.png", ENDITEM,
		LAST);


	web_custom_request("getcode",
		"URL=http://8.130.52.26:8081/user/getcode",
		"Method=POST",
		"Resource=0",
		"RecContentType=application/json",
		"Referer=http://8.130.52.26:8081/login.html",
		"Snapshot=t56.inf",
		"Mode=HTML",
		"EncType=",
		EXTRARES,
		"Url=http://t.wg.360-api.cn/api/helpgame?app=hotrank", "Referer=", ENDITEM,
		"Url=http://t.wg.360-api.cn/ap/tips/browse?cver=&mid=9202afc53bcc84de173ca76f798bad1c", "Referer=", ENDITEM,
		"Url=http://t.wg.360-api.cn/ap/tips/guess?sence=browse_ai&mid=9202afc53bcc84de173ca76f798bad1c&cver=9.1.2.1018&gver=", "Referer=", ENDITEM,
		LAST);

	// 设置登录集合点
	lr_rendezvous("login_rendezvous");


	// 开启登录操作事务
	lr_start_transaction("input_transaction");

	web_submit_data("login",
		"Action=http://8.130.52.26:8081/user/login",
		"Method=POST",
		"RecContentType=application/json",
		"Referer=http://8.130.52.26:8081/login.html",
		"Snapshot=t57.inf",
		"Mode=HTML",
		ITEMDATA,
		// 用户名和密码参数化
		"Name=username", "Value={username}", ENDITEM,
		"Name=password", "Value={password}", ENDITEM,
		"Name=code", "Value=q43py", ENDITEM,
		LAST);

	// 结束登录操作事务
	lr_end_transaction("input_transaction", LR_AUTO);

	// 结束登录事务
	lr_end_transaction("login_transaction", LR_AUTO);


	web_url("myblog_list.html",
		"URL=http://8.130.52.26:8081/myblog_list.html",
		"Resource=0",
		"Referer=http://8.130.52.26:8081/login.html",
		"Snapshot=t61.inf",
		"Mode=HTML",
		LAST);


	web_custom_request("getuserinfo",
		"URL=http://8.130.52.26:8081/user/getuserinfo",
		"Method=POST",
		"Resource=0",
		"RecContentType=application/json",
		"Referer=http://8.130.52.26:8081/myblog_list.html",
		"Snapshot=t63.inf",
		"Mode=HTML",
		"EncType=",
		LAST);

	web_custom_request("mylist",
		"URL=http://8.130.52.26:8081/art/mylist",
		"Method=POST",
		"Resource=0",
		"RecContentType=application/json",
		"Referer=http://8.130.52.26:8081/myblog_list.html",
		"Snapshot=t64.inf",
		"Mode=HTML",
		"EncType=",
		LAST);


	web_submit_data("get_total_rcount_and_comment",
		"Action=http://8.130.52.26:8081/user/get_total_rcount_and_comment",
		"Method=POST",
		"RecContentType=application/json",
		"Referer=http://8.130.52.26:8081/myblog_list.html",
		"Snapshot=t67.inf",
		"Mode=HTML",
		ITEMDATA,
		"Name=uid", "Value=3", ENDITEM,
		LAST);

	return 0;
}
通过运行可以发现:
4.4 创建性能测试场景
创建性能测试场景使用到的工具是 Controller,设置步骤如下:
3. 设置开始运行的虚拟用户
当设置完所有的策略之后,可以发现右侧的交互式进度图如下图所示:

前面部分上升梯形代码虚拟用户陆续上台运行,而后面的下降梯形则代表虚拟用户陆续退出运行,每个间隔大概是3s,而中间平稳的线条则代表每个虚拟用户运行的时长,大概是5分钟。
运行场景:
当所有策略设置完成之后,切换至 Run,然后点击 Start Scenario 运行,然后等待结束:

4.5 生成并分析测试报告
但这种的场景结束之后,可以通过 Analysis 工具自动生成性能测试报告。
1. 总体报告
2. 运行虚拟用户数

通过显示的虚拟用户数量可以判断出哪个时间段服务器负载最大(上图00:25 ~ 05:20负载最大)。
3. 每秒点击数折线图

每秒点击数代表用户每秒向 Web 服务器提交的 HTTP 请求数。点击率越大,服务器压力越大。这里的点击并不是鼠标的一次点击,一次点击可能有多次 HTTP 请求。
4. 吞吐量折现图
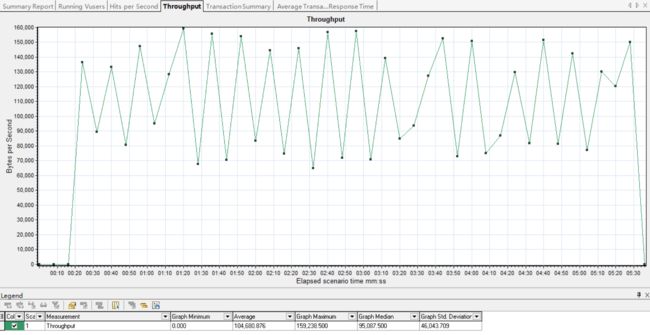
吞吐量曲线的走势大致无点击数走势相同,原因是点击之后就会产生请求与响应,通过吞吐量就可以判断出服务器的承受能力。
6. 平均每秒事务

TPS 是指每秒系统能够处理的事务数。它是衡量系统处理能力的重要指标。当压力加大时,TPS曲线如果变化缓慢或者有平坦的趋势,很有可能是服务器开始出现瓶颈了。如果环境没有发生大的变化,对于同一系统会存在一个最大处理事务能力,它并不随着并发用户的增减而改
变。
7. 平均事务响应时间

平均事务响应时间反应了系统处理事务的能力,同样也是衡量系统性能的重要指标。
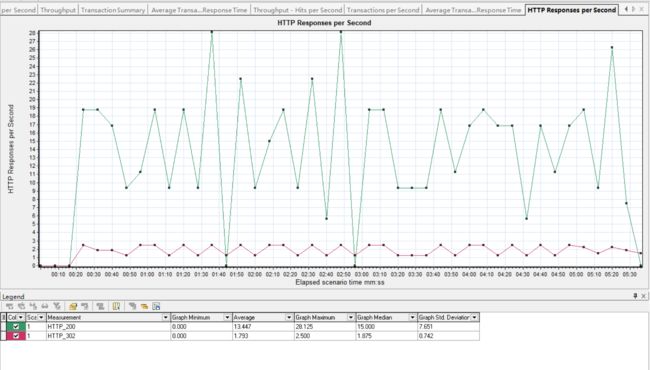
8. HTTP每秒响应

