OpenCV之SSD目标检测
- 个人主页:风间琉璃
- 版权: 本文由【风间琉璃】原创、在CSDN首发、需要转载请联系博主
- 如果文章对你有帮助、欢迎关注、点赞、收藏(一键三连)和订阅专栏哦
目录
前言
一、SSD网络简介
二、加载网络模型
三、预处理
四、执行推理
五、解析输出
前言
SSD(Single Shot MultiBox Detector)是作者Wei Liu在ECCV 2016上发表的论文提出的。对于输入尺寸300*300的SSD网络使用Nvidia Titan X在VOC 2007测试集上达到74.3%mAP以及59FPS(每秒可以检测59张图片);对于输入512*512的SSD网络,达到了76.9%mAP,超越了当时最强的Faster RCNN(73.2%mAP),达到真正的实时检测。
一、SSD网络简介
这里简单介绍一下RCNN系列和YOLO系列。基于”Proposal + Classification”的Object Detection的方法,RCNN系列(R-CNN、SPPnet、Fast R-CNN以及Faster R-CNN)取得了非常好的效果,因为这一类方法先预先回归一次边框,然后再进行骨干网络训练,所以精度要高,这类方法被称为two stage的方法。
但也正是由于此,这类方法在速度方面还有待改进。由此,YOLO应运而生,YOLO系列只做了一次边框回归和打分,所以相比于RCNN系列被称为one stage的方法,这类方法的最大特点就是速度快。但是YOLO虽然能达到实时的效果,但是由于只做了一次边框回归并打分,这类方法导致了小目标训练非常不充分,对于小目标的检测效果非常的差。简而言之,YOLO系列对于目标的尺度比较敏感,而且对于尺度变化较大的物体泛化能力比较差。
针对YOLO和Faster R-CNN的各自不足与优势,WeiLiu等人提出了Single Shot MultiBox Detector,简称为SSD。SSD整个网络采取了one stage的思想,以此提高检测速度。并且网络中融入了Faster R-CNN中的anchors思想,并且做了特征分层提取并依次计算边框回归和分类操作,由此可以适应多种尺度目标的训练和检测任务。SSD的出现使得大家看到了实时高精度目标检测的可行性。
网络结构如下:
SSD网络主体设计的思想是特征分层提取,并依次进行边框回归和分类。因为不同层次的特征图能代表不同层次的语义信息,低层次的特征图能代表低层语义信息(含有更多的细节),能提高语义分割质量,适合小尺度目标的学习。高层次的特征图能代表高层语义信息,能光滑分割结果,适合对大尺度的目标进行深入学习。所以作者提出的SSD的网络理论上能适合不同尺度的目标检测。
所以SSD网络中分为了6个stage,每个stage能学习到一个特征图,然后进行边框回归和分类。SSD网络以VGG16的前5层卷积网络作为第1个stage,然后将VGG16中的fc6和fc7两个全连接层转化为两个卷积层Conv6和Conv7作为网络的第2、第3个stage。接着在此基础上,SSD网络继续增加了Conv8、Conv9、Conv10和Conv11四层网络,用来提取更高层次的语义信息。如下图所示就是SSD的网络结构。在每个stage操作中,网络包含了多个卷积层操作,每个卷积层操作基本上都是小卷积。
骨干网络:SSD前面的骨干网络选用的VGG16的基础网络结构,如上图所示,虚线框内的是VGG16的前5层网络。然后后面的Conv6和Conv7是将VGG16的后两层全连接层网络(fc6, fc7)转换而来。
另外:在此基础上,SSD网络继续增加了Conv8和Conv9、Conv10和Conv11四层网络。图中所示,立方体的长高表示特征图的大小,厚度表示是channel。
二、加载网络模型
这里使用Caffe深度学习框架中已经预训练好的SSD网络,需要相应的模型权重文件(.caffemodel)以及模型配置文件(.prototxt)。
加载模型和配置文件如下所示:
String model = "F:/data/CQU/VS/SSD_Object_Detection/VGG_ILSVRC2016_SSD_300x300_iter_440000.caffemodel";
String config = "F:/data/CQU/VS/SSD_Object_Detection/deploy.prototxt";

//加载ssd网络模型
Net net = readNetFromCaffe(config, model);
与前面加载网络模型是一样的,都是通过dnn模块的readNet、readNetFromCaffe()根据模型文件和配置文件加载网络。
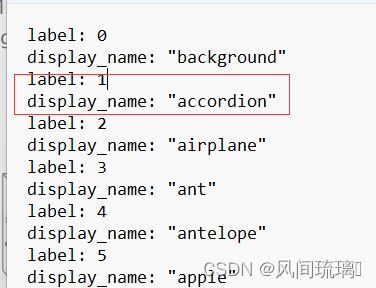
同时,需要将SSD网络对应的目标检测分类标签(200个类别)调入内存这样便于访问它们,通常这些类别信息存储在txt文件中。
文件的每两行包含一个标签索引和标签名称,除了第一行和第二行(背景)。
String label = "F:/data/CQU/VS/SSD_Object_Detection/labelmap_det.txt";

//从标签文件中获取目标名称
vector readLabels(string label_path)
{
	vector objNames;
	ifstream fp(label_path);
	if (!fp.is_open())
	{
		printf("could not open the file...\n");
		exit(-1);
	}
	string name;
	while (!fp.eof())
	{
		//读取每一行
		getline(fp, name);
		if (name.length() && (name.find("display_name:") == 0)) //每一行不为空,其包含display_name
		{
			//从"后复制标签名,此时后面还有一个"
			string temp = name.substr(15);
			//去掉最后面的"
			temp.replace(temp.end() - 1, temp.end(), "");
			objNames.push_back(temp);
		}
	}
	return objNames;
} 三、预处理
通过 OpenCV中的 imread() 函数读入图片。注意,有些细节需要我们关注。使用DNN 模块载入的预训练好的模型并不能够直接使用读入图像数据。需要预先进行预处理一下。
预处理主要要使输入图像尺寸满足网络输入的大小,网络输入的大小可以在配置文件prototxt中查看。
(1)使用OpenCV处理
const size_t width = 300;
const size_t height = 300;

//三通道数值
const int meanValues[3] = { 104, 117, 123 };

//获取均值
static Mat getMean(const size_t& w, const size_t& h)
{
	Mat mean;
	vector channels;
	for (int i = 0; i < 3; i++)
	{
		//创建Mat,并且像素值为meanValues
		Mat channel(h, w, CV_32F, Scalar(meanValues[i]));
		channels.push_back(channel);
	}

	//三通道合成图片
	merge(channels, mean);
	return mean;
}

//图像预处理
static Mat preprocess(const Mat& frame)
{
	Mat preprocessed;
	//图片类型转为浮点数
	frame.convertTo(preprocessed, CV_32F);
	// 300x300 image
	resize(preprocessed, preprocessed, Size(width, height));
	//得到均值图像
	Mat mean = getMean(width, height);
	//图像-均值
	subtract(preprocessed, mean, preprocessed);
	return preprocessed;
}

//输入图像预处理,这些操作也可以使用blobblobFromImage完成
Mat input_image = preprocess(frame);
Mat blobImage = blobFromImage(input_image);

//构建输入
net.setInput(blobImage, "data");
(2)用DNN处理
上面的预处理操作可以直接调用dnn中的blobFromImage()函数完成。
Mat blobImage = blobFromImage(frame,1.0,Size(300,300),Scalar(104, 117, 123));四、执行推理
图片预处理完成,就可以利用网络进行预测,这个过程也是把输入图像在网络各层中前向进行传播。
//向前推理
Mat detection = net.forward("detection_out");
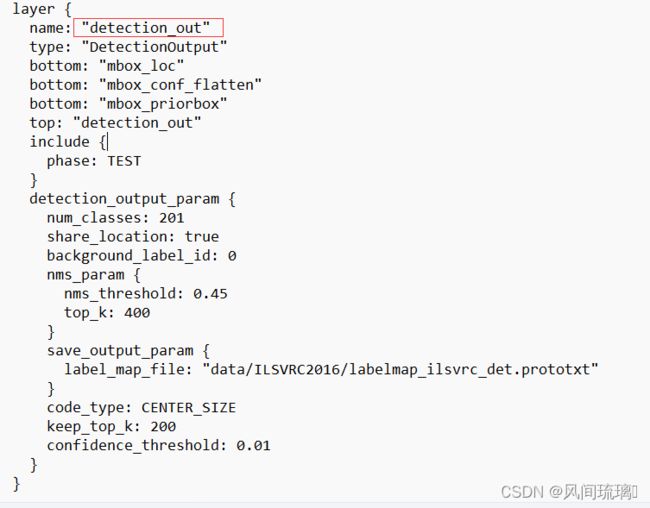
这里的detection_out是网络的输出层的名称。
五、解析输出
在 detection中存储着网络的所有输出。在获得正确的分类类别之前,还有一些需要与处理得步骤。
//获取结果的分类索引+置信度+目标边框
Mat detectionMat(detection.size[2], detection.size[3], CV_32F, detection.ptr());

//设置置信度阈值,官方默认为0.01
float confidence_threshold = 0.2;
for (int i = 0; i < detectionMat.rows; i++)
{
	//获取置信度
	float confidence = detectionMat.at(i, 2);
	if (confidence > confidence_threshold)
	{
		//获取目标标签的索引值
		size_t objIndex = (size_t)(detectionMat.at(i, 1));
		//获取目标边框
		float tl_x = detectionMat.at(i, 3) * frame.cols;
		float tl_y = detectionMat.at(i, 4) * frame.rows;
		float br_x = detectionMat.at(i, 5) * frame.cols;
		float br_y = detectionMat.at(i, 6) * frame.rows;

		Rect object_box((int)tl_x, (int)tl_y, (int)(br_x - tl_x), (int)(br_y - tl_y));
		rectangle(frame, object_box, Scalar(0, 0, 255), 2, 8, 0);
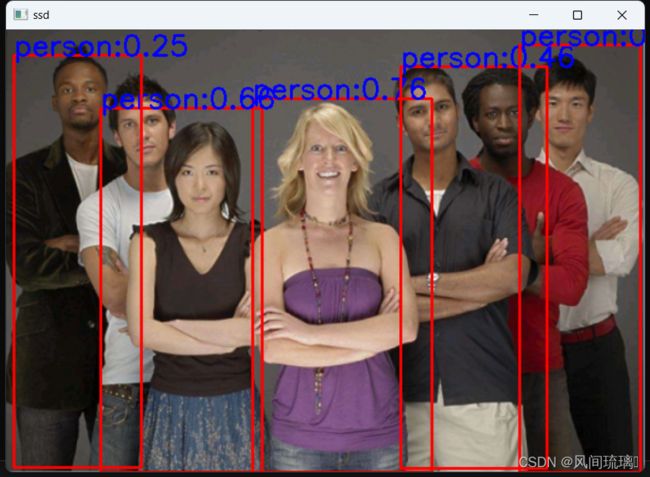
		putText(frame, format("%s:%.2f", objNames[objIndex].c_str(), confidence), Point(tl_x, tl_y), FONT_HERSHEY_SIMPLEX, 1.0, Scalar(255, 0, 0), 2);
	}
}
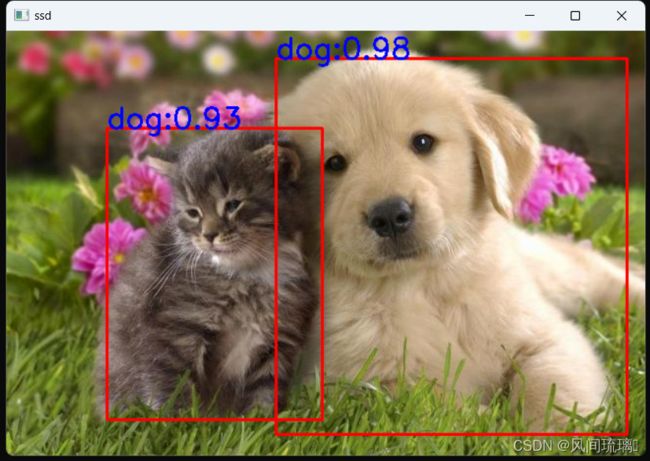
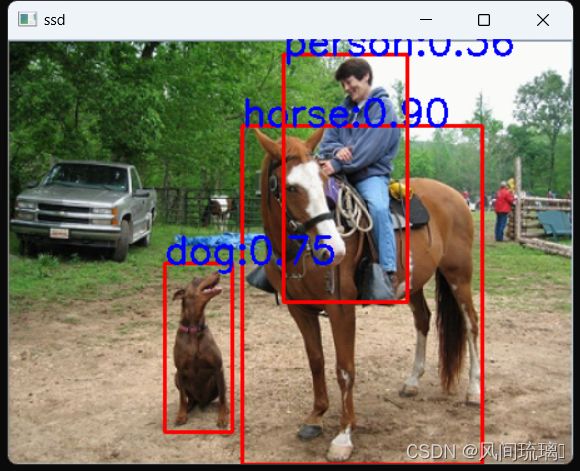
运行结果:
源码:资源下载链接:https://download.csdn.net/download/qq_53144843/88330242
// SSD_Object_Detection.cpp : 此文件包含 "main" 函数。程序执行将在此处开始并结束。
//

#include
#include
#include
#include
#include
#include
#include


using namespace cv;
using namespace cv::dnn;
using namespace std;

const size_t width = 300;
const size_t height = 300;

String label = "F:/data/CQU/VS/SSD_Object_Detection/labelmap_det.txt";
String model = "F:/data/CQU/VS/SSD_Object_Detection/VGG_ILSVRC2016_SSD_300x300_iter_440000.caffemodel";
String config = "F:/data/CQU/VS/SSD_Object_Detection/deploy.prototxt";


//从标签文件中获取目标名称
vector readLabels(string label_path)
{
	vector objNames;
	ifstream fp(label_path);
	if (!fp.is_open())
	{
		printf("could not open the file...\n");
		exit(-1);
	}
	string name;
	while (!fp.eof())
	{
		//读取每一行
		getline(fp, name);
		if (name.length() && (name.find("display_name:") == 0)) //每一行不为空,其包含display_name
		{
			//从"后复制标签名,此时后面还有一个"
			string temp = name.substr(15);
			//去掉最后面的"
			temp.replace(temp.end() - 1, temp.end(), "");
			objNames.push_back(temp);
		}
	}
	return objNames;
}

//三通道数值
const int meanValues[3] = { 104, 117, 123 };

//获取均值
static Mat getMean(const size_t& w, const size_t& h)
{
	Mat mean;
	vector channels;
	for (int i = 0; i < 3; i++)
	{
		//创建Mat,并且像素值为meanValues
		Mat channel(h, w, CV_32F, Scalar(meanValues[i]));
		channels.push_back(channel);
	}

	//三通道合成图片
	merge(channels, mean);
	return mean;
}

//图像预处理
static Mat preprocess(const Mat& frame)
{
	Mat preprocessed;
	//图片类型转为浮点数
	frame.convertTo(preprocessed, CV_32F);
	// 300x300 image
	resize(preprocessed, preprocessed, Size(width, height));
	//得到均值图像
	Mat mean = getMean(width, height);
	//图像-均值
	subtract(preprocessed, mean, preprocessed);
	return preprocessed;
}

int main()
{
	Mat frame = imread("F:/data/CQU/VS/SSD_Object_Detection/persons.png");
	if (frame.empty())
	{
		printf("could not load image...\n");
		return -1;
	}


	//读取检测目标标签
	vector objNames = readLabels(label);

	//加载ssd网络模型
	Net net = readNetFromCaffe(config, model);

	//输入图像预处理,这些操作也可以使用blobblobFromImage完成
	Mat input_image = preprocess(frame);
	Mat blobImage = blobFromImage(input_image);
	//Mat blobImage = blobFromImage(frame,1.0,Size(300,300),Scalar(104, 117, 123));

	//构建输入
	net.setInput(blobImage, "data");
	//向前推理
	Mat detection = net.forward("detection_out");
	//获取结果的分类索引+置信度+目标边框
	Mat detectionMat(detection.size[2], detection.size[3], CV_32F, detection.ptr());

	//设置置信度阈值,官方默认为0.01
	float confidence_threshold = 0.2;
	for (int i = 0; i < detectionMat.rows; i++)
	{
		//获取置信度
		float confidence = detectionMat.at(i, 2);
		if (confidence > confidence_threshold)
		{
			//获取目标标签的索引值
			size_t objIndex = (size_t)(detectionMat.at(i, 1));
			//获取目标边框
			float tl_x = detectionMat.at(i, 3) * frame.cols;
			float tl_y = detectionMat.at(i, 4) * frame.rows;
			float br_x = detectionMat.at(i, 5) * frame.cols;
			float br_y = detectionMat.at(i, 6) * frame.rows;

			Rect object_box((int)tl_x, (int)tl_y, (int)(br_x - tl_x), (int)(br_y - tl_y));
			rectangle(frame, object_box, Scalar(0, 0, 255), 2, 8, 0);
			putText(frame, format("%s:%.2f", objNames[objIndex].c_str(), confidence), Point(tl_x, tl_y), FONT_HERSHEY_SIMPLEX, 1.0, Scalar(255, 0, 0), 2);
		}
	}
	imshow("ssd", frame);
	waitKey(0);
	return 0;
}
结束语
感谢你观看我的文章呐~本次航班到这里就结束啦
希望本篇文章有对你带来帮助 ,有学习到一点知识~
躲起来的星星也在努力发光,你也要努力加油(让我们一起努力叭)。
最后,博主要一下你们的三连呀(点赞、评论、收藏),不要钱的还是可以搞一搞的嘛~
不知道评论啥的,即使扣个666也是对博主的鼓舞吖 感谢

