【Java面试题】《尚硅谷经典Java面试题第一季(java面试精讲)》学习笔记
文章目录
- 尚硅谷经典Java面试题第一季(java面试精讲)
-
-
- 01_尚硅谷_JavaSE面试题:自增变量
-
- 题目
- 解释:
- 总结:
- 02_尚硅谷_JavaSE面试题:单例设计模式
-
- 概述
- 饿汉式
- 懒汉式
- 03_尚硅谷_JavaSE面试题:类初始化和实例初始化等
-
- 题目
- 类初始过程与实例初始化过程
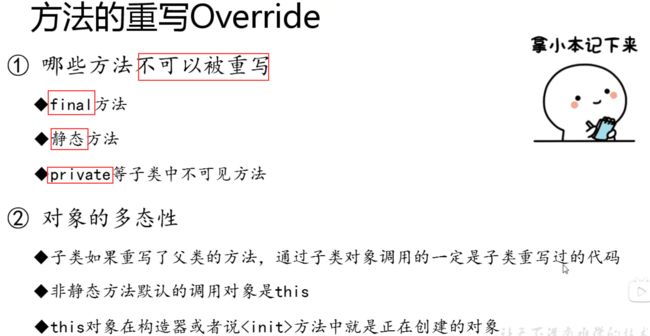
- 方法的重写 Override
- Overload与Override
- 04_尚硅谷_JavaSE面试题:方法的参数传递机制
-
- 题目:
- 解释:
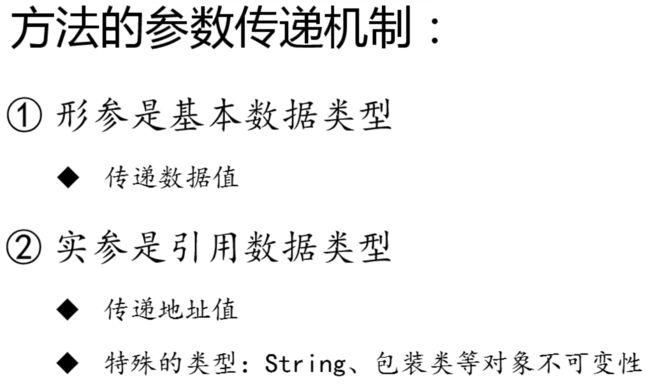
- 方法的参数传递机制
- 05_尚硅谷_JavaSE面试题:递归与迭代
-
- 题目
- 分析:
- 代码实现:
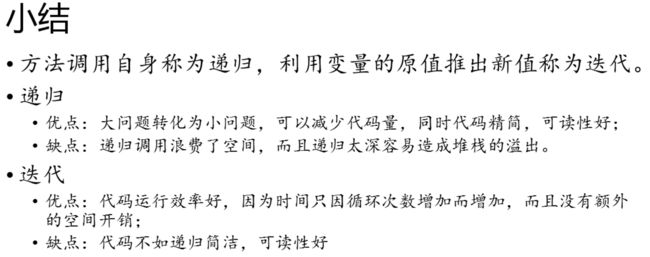
- 小结
- 06_尚硅谷_JavaSE面试题:成员变量与局部变量
-
- 问题:
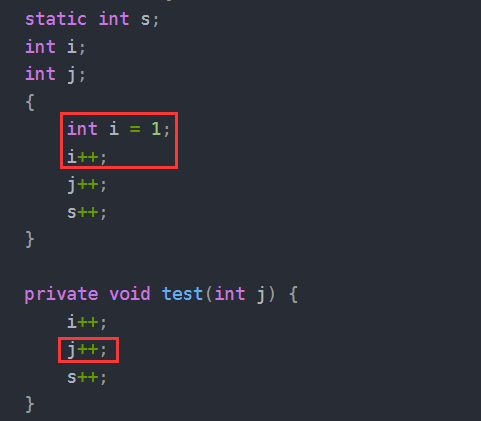
- 局部变量与成员变量的区别
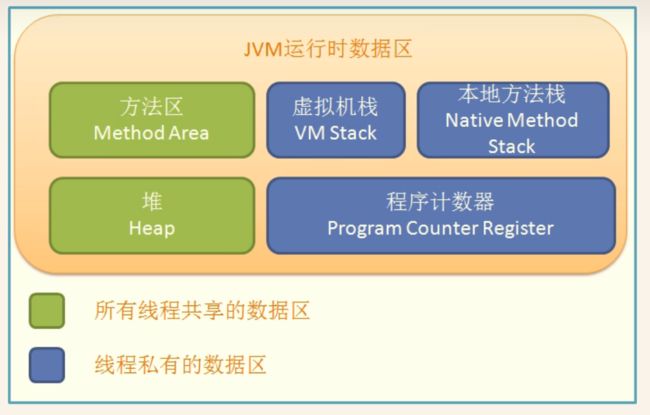
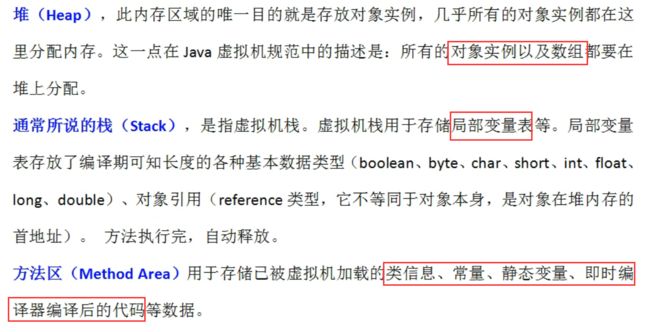
- 堆、栈、方法区
- 07_尚硅谷_SSM面试题_Spring Bean的作用域之间有什么区别
-
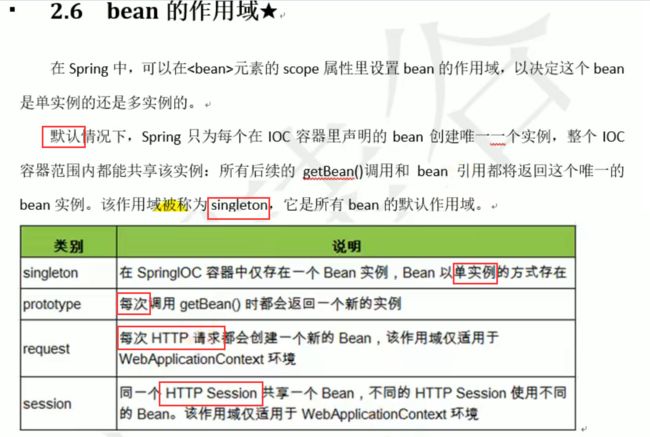
- singleton与prototype
- 总结
- 08_尚硅谷_SSM面试题_Spring支持的常用数据库事务传播属性和...
-
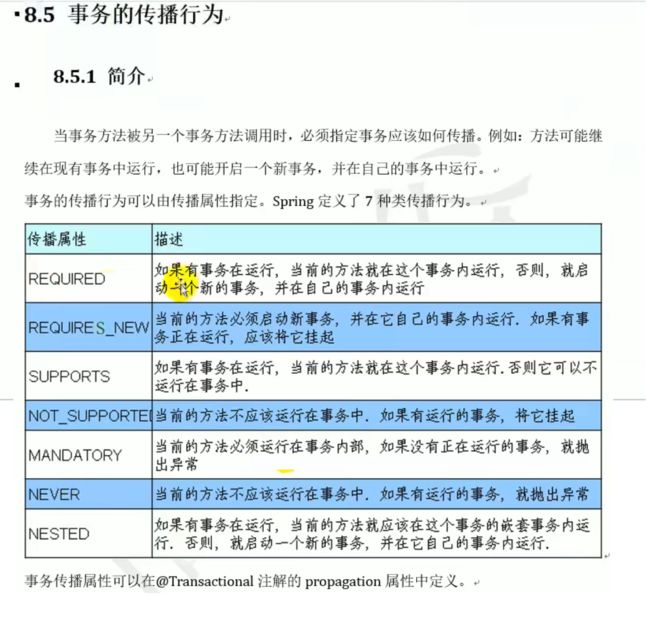
- 事务传播行为
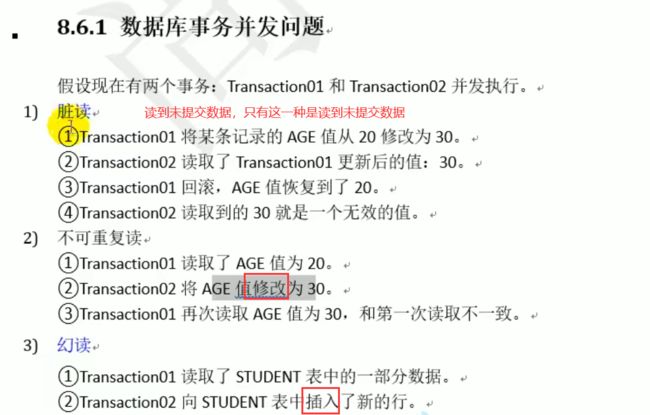
- 数据库事务并发问题
- 隔离级别
- 09_尚硅谷_SSM面试题_SpringMVC中如何解决POST请求中文乱码问...
-
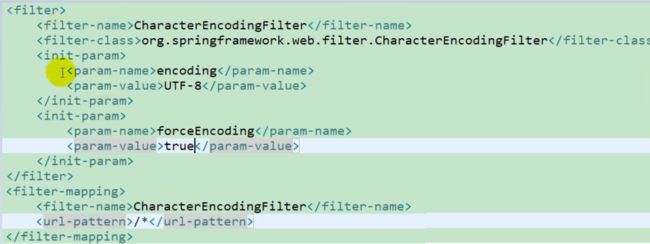
- 解决post中文乱码:
- 解决get中文乱码
- 10_尚硅谷_SSM面试题_简单的谈一下SpringMVC的工作流程
-
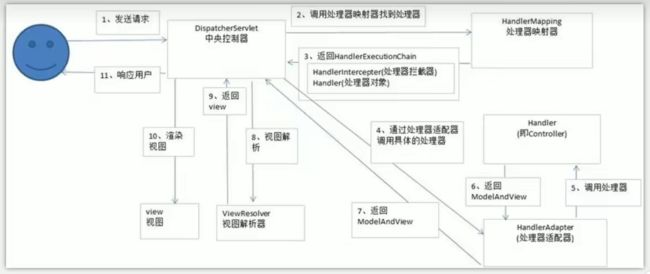
- 流程图
- doDispatch方法源码
- 流程描述
- 11_尚硅谷_SSM面试题_MyBatis中当实体类中的属性名和表中的字段不一致
-
- 方式1:改sql
- 方式2:启动驼峰名法
- 方式3:resultMap
- 12_尚硅谷_Java高级_Linux常用服务类相关命令
-
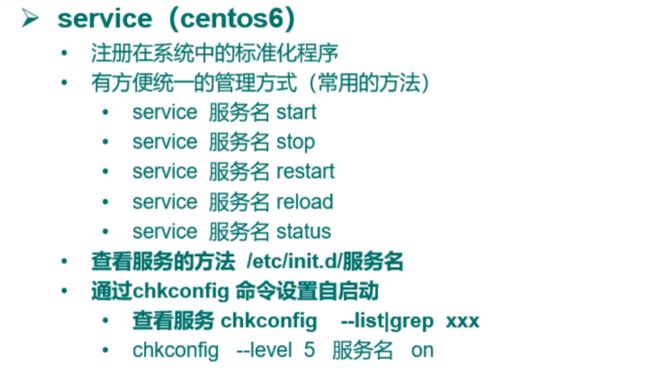
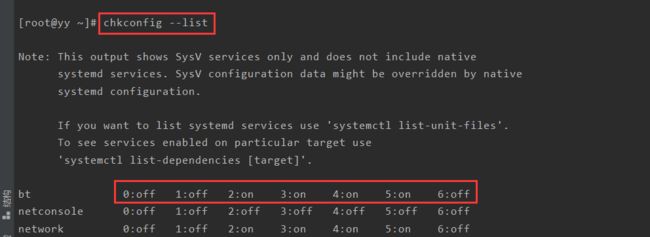
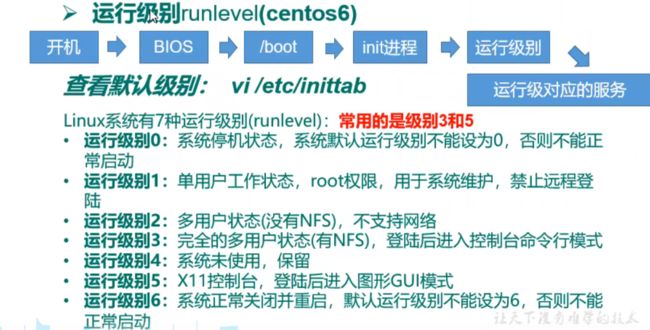
- centos 6
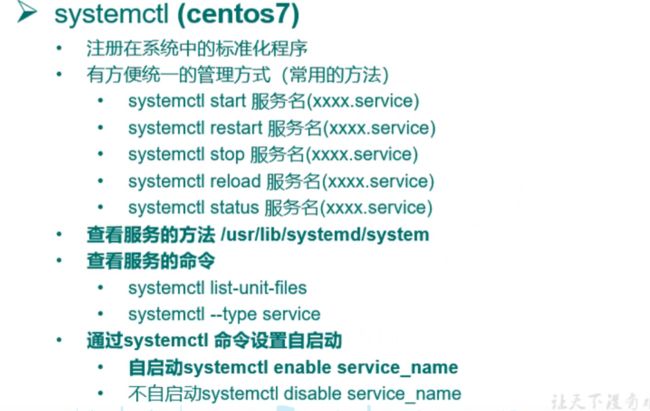
- centos 7
- 13_尚硅谷_Java高级_git分支相关命令
-
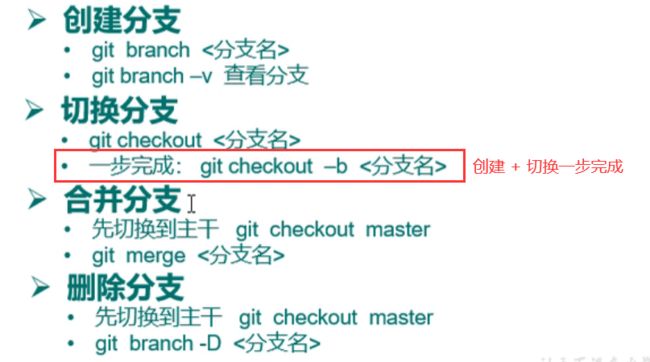
- 基本命令
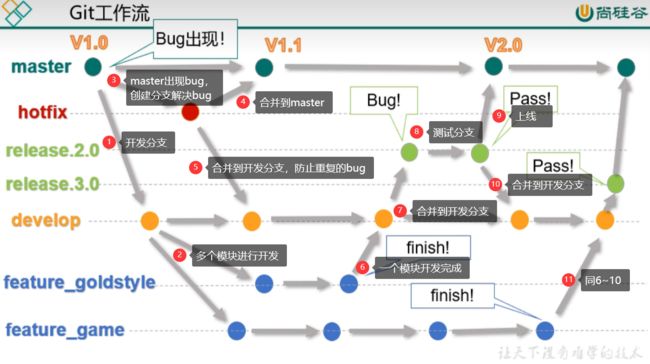
- Git工作流
- 14_尚硅谷_Java高级_redis持久化
-
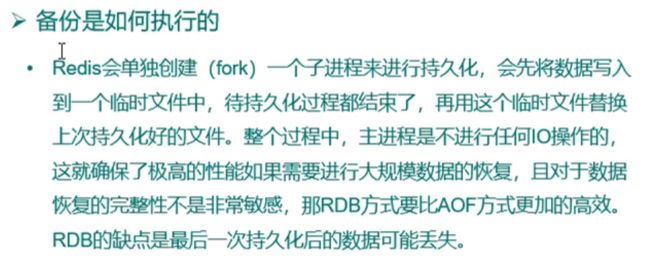
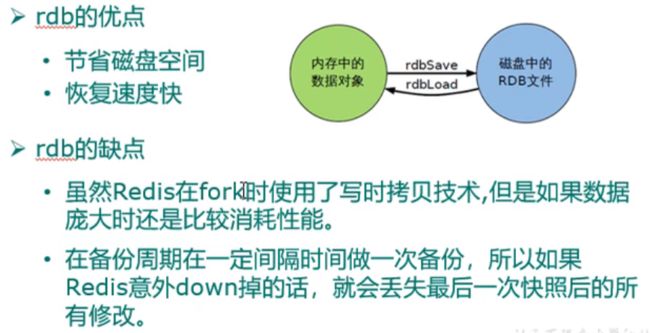
- RDB优缺点
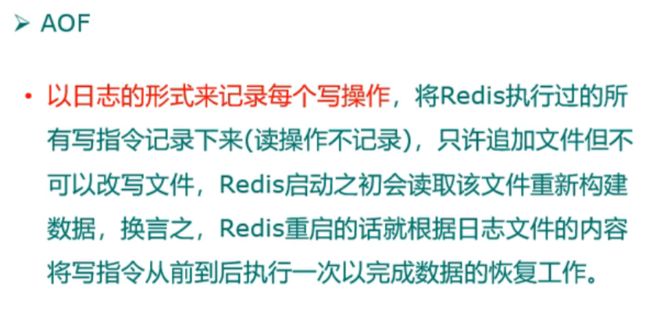
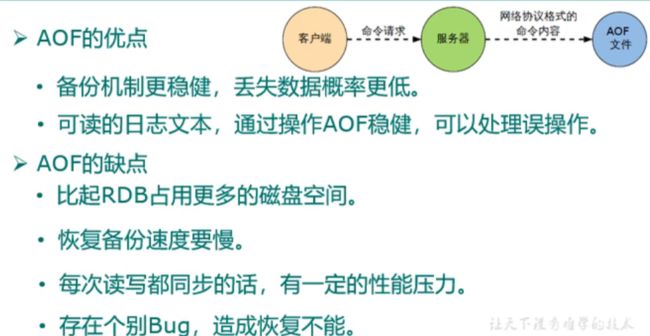
- AOF优缺点
- 15_尚硅谷_Java高级_Mysql什么时候建索引
- 16_尚硅谷_Java高级_JVM垃圾回收机制
-
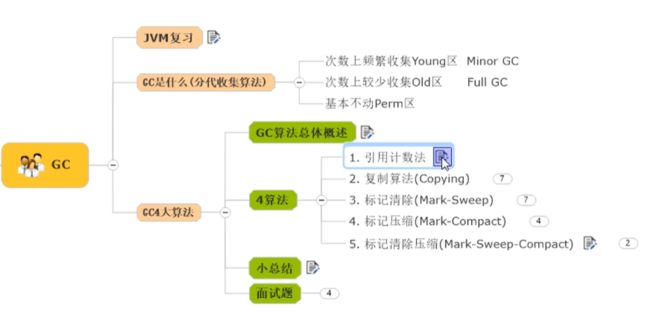
- 发生时期
- GC算法
-
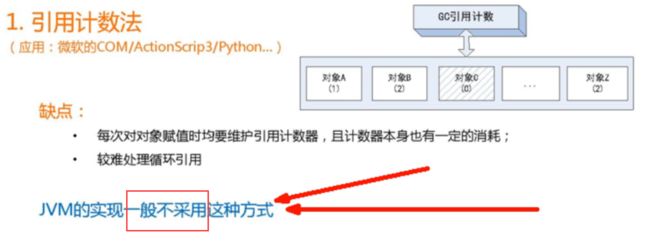
- 1. 引用计数算法:(不能处理循环引用,基本被淘汰了)
- 2. 复制算法:年轻代使用的是Minor GC,这种gc算法采用的是复制算法
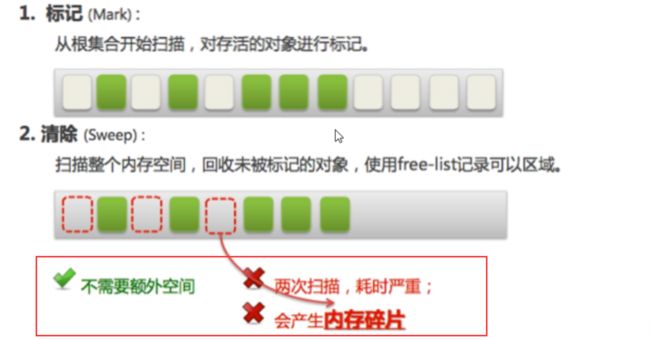
- 3. 标记清除:老年代一般是由标记清除或者是标记清除与标记整理混合实现
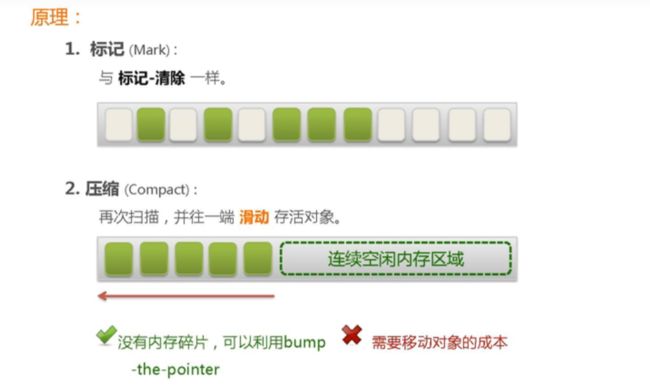
- 4. 标记压缩:老年代一般是由标记清除或者是标记清除与标记整理混合实现
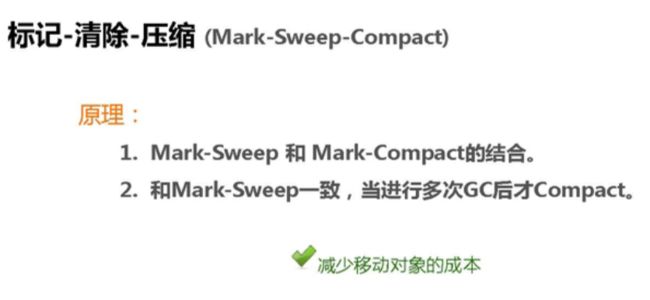
- 5. 标记清除压缩
- 17_尚硅谷_项目面试题_redis 在项目中的使用场景
-
- redis 数据类型元使用场景
- 18_尚硅谷_项目面试题_es与solr的区别
-
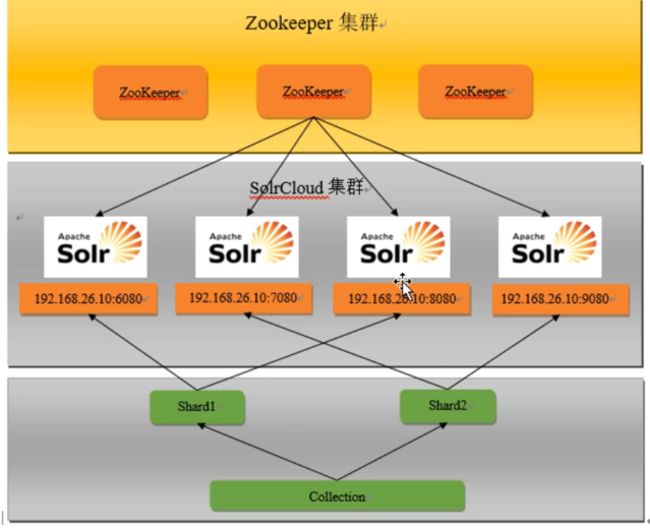
- es与solr的区别
- 19_尚硅谷_项目面试题_单点登录
-
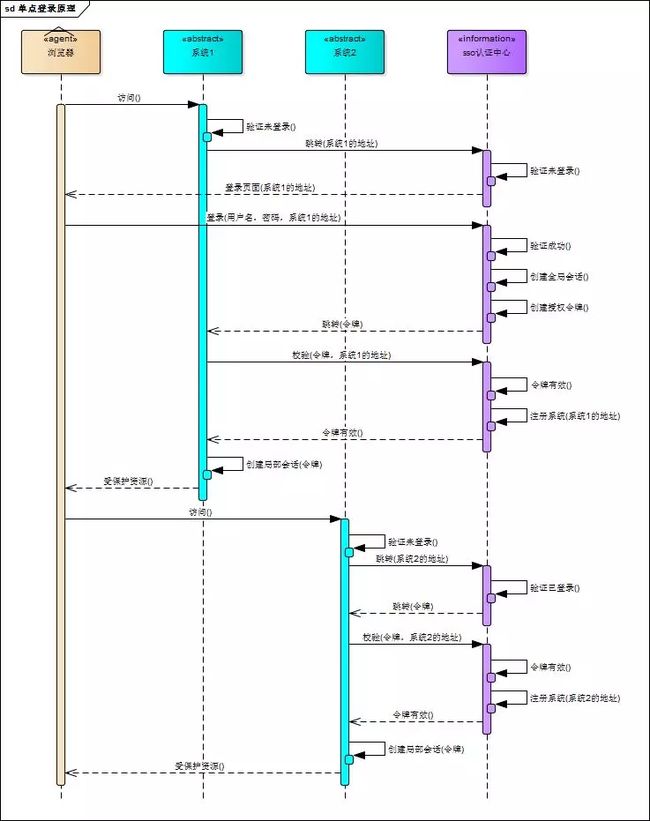
- 流程图:
- 20_尚硅谷_项目面试题_购物车
-
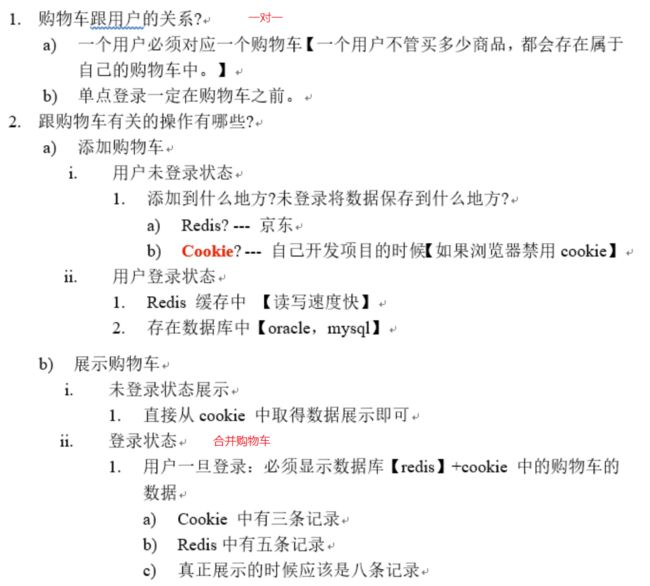
- 购物车
- 21_尚硅谷_项目面试题_消息队列
-
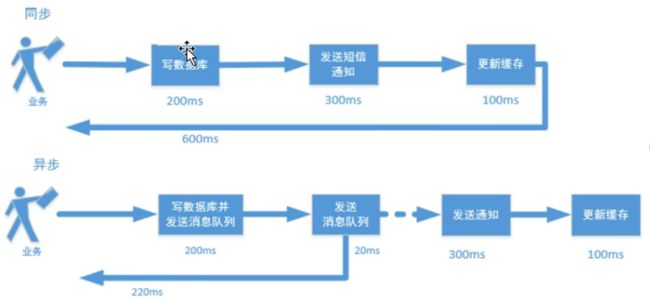
- 处理高并发
- 电商项目使用场景
-
尚硅谷经典Java面试题第一季(java面试精讲)
视频地址:https://www.bilibili.com/video/BV1Eb411P7bP
01_尚硅谷_JavaSE面试题:自增变量
题目
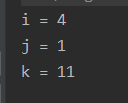
代码:问输出的 i、j、k 的值
        int i = 1;
        i = i++;
        int j = i++;
        int k = i + ++i * i++;
        System.out.println("i = " + i);
        System.out.println("j = " + j);
        System.out.println("k = " + k);
解释:

关于int k = i + ++i * i++;我认为是:int k =(i++) + i * i++;,例如,不妨把中间的i换成j,再看一下字节码文件:
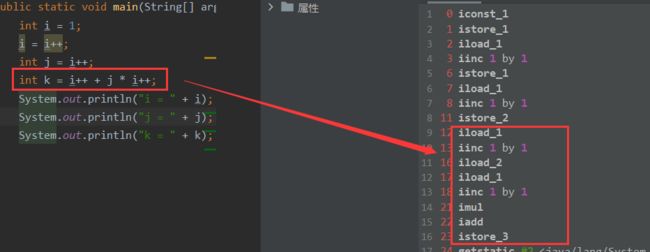
是给第一个变量i++了,而不是++j
总结:
02_尚硅谷_JavaSE面试题:单例设计模式
概述
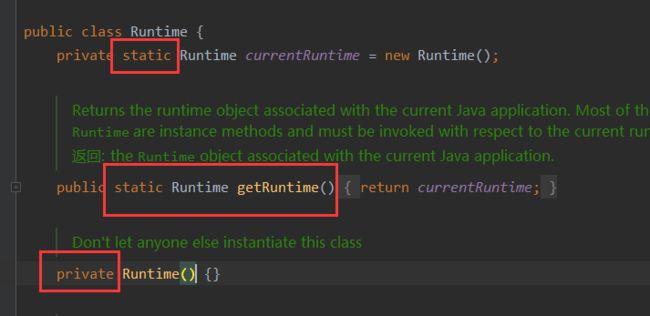
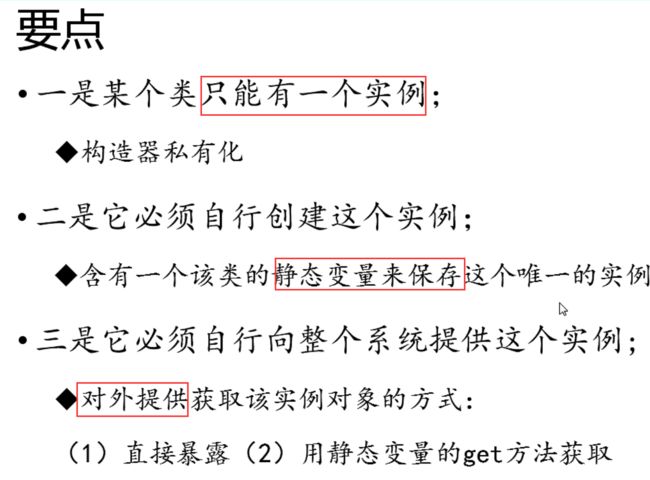
singleton 单例:一个系统中只有一个实例对象可以被获取和使用,例如,jvm运行环境的Runtime类:
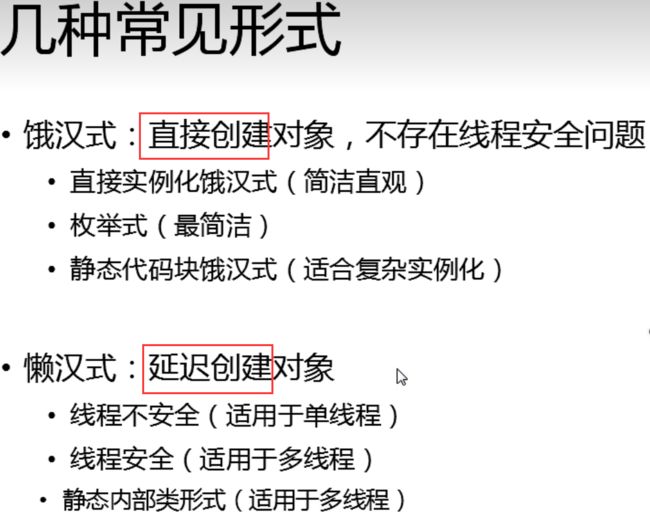
饿汉式
饿,急于创建,在类初始化就创建了
public class SingletonHungry {
    public static void main(String[] args) {
        System.out.println(SH01.INSTANCE);
        System.out.println(SH02.INSTANCE);
        System.out.println(SH03.INSTANCE);
    }
}

/**
 * 方式1:直接实例化
 */
class SH01{
    /**
     * 使用final强调这是一个单例
     */
    public static final SH01 INSTANCE = new SH01();

    private SH01(){ }
}

/**
 * 方式2:使用枚举类
 */
enum SH02{
    /**
     * 只有一个可用的变量,达到单例的效果
     */
    INSTANCE;
}

/**
 * 方式3:静态代码块
 */
class SH03{
    public static final SH03 INSTANCE;
    String name;
    static {
        // 例如,要从配置文件获取值
        String config = null;
        try {
            Properties properties = new Properties();
            properties.load(SH03.class.getClassLoader().getResourceAsStream("application.properties"));
            config = properties.getProperty("spring.application.name");
        } catch (IOException e) {
            e.printStackTrace();
        }

        //创建对象
        INSTANCE = new SH03(config);
    }

    private SH03(String name){
        this.name = name;
    }
}
懒汉式
public class SingletonLazy {
    public static void main(String[] args)  {
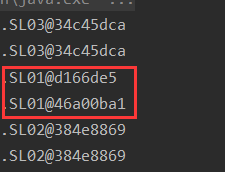
        //方式1在多线程的情况下是不安全的:
        Runnable runnable = () -> System.out.println(SL01.getInstance());
        new Thread(runnable).start();
        new Thread(runnable).start();

        //方式2在多线程的情况下是安全的:
        runnable = () -> System.out.println(SL02.getInstance());
        new Thread(runnable).start();
        new Thread(runnable).start();

		//方式3
        System.out.println(SL03.getInstance());
        System.out.println(SL03.getInstance());
    }
}

/**
 * 方式1:线程不安全版
 */
class SL01{
    /**
     * 静态变量私有化,防止直接用类名获取到null
     */
    private static SL01 instance;
    private SL01(){}

    public static SL01 getInstance(){
        if (instance == null){
            try {
                Thread.sleep(100);
            } catch (InterruptedException e) {
                e.printStackTrace();
            }
            instance = new SL01();
        }

        return instance;
    }
}

/**
 * 方式2:线程安全版
 *
 * 为什么用volatile ?
 * 		instance = new Singleton(); 这段代码其实是分为三步执行
 * 		1. 为 instance 分配内存空间
 * 		2. 初始化 instance
 * 		3. 将 instance 指向分配的内存地址
 * 		但是由于 JVM 具有指令重排的特性,会使执行顺序有可能变成 1 3 2,指令重排在单线程环境下不会出现问题,但是在多线程环境下会导致一个线程获得一个还没有初始化的实例。比如线程 T1 执行了 1、3,此时线程 T2 获取 instance 发现不为空,但是 instance 还未被初始化。
 * 		使用 volatile 可以禁止 JVM 指令重排,保证在多线程环境下也能正常运行。
 */
class SL02{
    /**
     * 静态变量私有化,防止直接用类名获取到null
     */
    private volatile static SL02 instance;
    private SL02(){}

    public static SL02 getInstance(){
        // 判断是否为null,为null才加锁创建,提升性能
        if (instance == null){
            synchronized (SL02.class){
                // 即使进来了,可能前一个刚好创建好了
                if (instance == null){
                    try {
                        Thread.sleep(100);
                    } catch (InterruptedException e) {
                        e.printStackTrace();
                    }
                    instance = new SL02();
                }
            }
        }

        return instance;
    }
}

/**
 * 方式3:内部类
 */
class SL03{
    /**
     * 静态变量私有化,防止直接用类名获取到null
     */
    private static SL03 instance;
    private SL03(){}

    private static class Inner{
        // 静态内部类不会自动随着外部类的加载和初始化而初始化,而是要单独的加载和初始化,而且只会被加载一次
        private static final SL03 INSTANCE = new SL03();
    }
    public static SL03 getInstance()  {
        return Inner.INSTANCE;
    }
}
部分结果:结果显示,第一种方式在多线程情况下是不安全的,获取到两个实例:
03_尚硅谷_JavaSE面试题:类初始化和实例初始化等
题目
题目:输出结果是?
class Father {
    private int i = method();
    private static int j = staticMethod();

    static {
        System.out.print(1 + " ");
    }

    Father() {
        System.out.print(2 + " ");
    }

    {
        System.out.print(3 + " ");
    }

    public int method() {
        System.out.print(4 + " ");
        return 1;
    }

    public static int staticMethod() {
        System.out.print(5 + " ");
        return 1;
    }
}

public class Son extends Father {
    private int i = method();
    private static int j = staticMethod();

    static {
        System.out.print(6 + " ");
    }

    Son() {
        System.out.print(7 + " ");
    }

    {
        System.out.print(8 + " ");
    }

    @Override
    public int method() {
        System.out.print(9 + " ");
        return 1;
    }

    public static int staticMethod() {
        System.out.print(10 + " ");
        return 1;
    }

    public static void main(String[] args) {
        new Son();
        System.out.println();
        new Son();
    }
}
5 1 10 6 9 3 2 9 8 7
9 3 2 9 8 7
分析:
-
先进行类初始化,也即执行
()方法,(只会被初始化一次) - 如果有
父类先对父类进行类初始化 静态代码块、静态变量初始化(谁在前,谁先进行)
- 如果有
-
再进行实例初始化,也即执行
()方法,(每一次创建实例对象都会被执行) - 如果有
父类,先对父类进行类初始化;如果父类的方法在当前类被重写,则使用被重写后的方法 非静态代码块、非静态变量的初始化(谁在前,谁先进行)- 对应
构造器方法
- 如果有
类初始过程与实例初始化过程
方法的重写 Override
Overload与Override
-
overload是方法重载
- 同一个类
- 方法名相同
- 方法参数个数、顺序不同
- 与修饰符、返回值无关
-
override是方法重写,要求以下内容相同:
- 方法名
- 形参列表
- 返回值类型
- 抛出的异常
- 修饰符
04_尚硅谷_JavaSE面试题:方法的参数传递机制
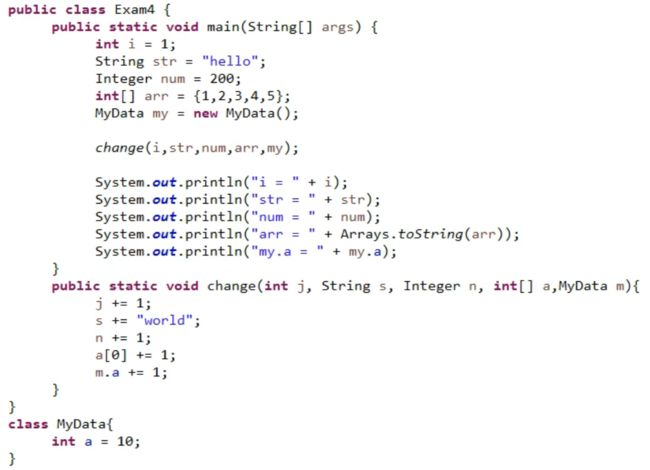
题目:
运行结果?
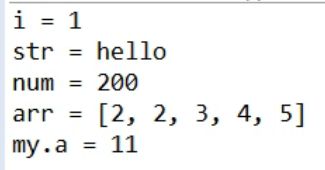
运行结果:
解释:
- int 是基本类型,只传值,因此 i 的值不会变。基本类型包括:byte、char、short、boolean、int、float、long、double八种
- String传地址,但是String是不可变的,拼接字符串实际指向常量池中新的地址,并且只是change中的局部变量指向新的地址,并不影响main方法中字符串的值
- Array数组类型传地址,并且把这个地址中的数字改了,因此mian方法中arr的值会变
- 对象也传地址,把地址中的变量改了
方法的参数传递机制
05_尚硅谷_JavaSE面试题:递归与迭代
题目
分析:
想要跳到第n步台阶,只能是从第n-1或者n-2跳上来的,要求跳到第n机有多少种走法,只需知道跳到第n-1步和n-2步有多少种走法,求和即可。即:
- f(n) = f(n-1) + f(n-2)
代码实现:
public class P05 {
    public static void main(String[] args) {
        int n = 20;

        //秒表统计运行时间
        StopWatch watch = new StopWatch();

        watch.start();
        int res = method1(n);
        System.out.println("res1 = " + res);
        watch.stop();

        watch.start();
        res = method2(n);
        System.out.println("res2 = " + res);
        watch.stop();

        //查看运行时间
        StopWatch.TaskInfo[] taskInfo = watch.getTaskInfo();
        for (StopWatch.TaskInfo info : taskInfo) {
            System.out.println(info.getTimeNanos());
        }
    }

    /**
     * 迭代实现
     * @param n
     * @return
     */
    private static int method2(int n) {
        if (n == 1 || n == 2){
            return n;
        }

        // i1表示跳到n-2的走法,i2表示跳到n-1的走法
        int i1 = 1, i2 = 2;
        int tmp;

        for (int i = 3; i <= n; i++) {
            //新的i2
            tmp = i1 + i2;
            //新的i1
            i1 = i2;

            i2 = tmp;
        }

        return i2;
    }

    /**
     * 递归实现
     * @param n
     * @return
     */
    private static int method1(int n) {
        if (n == 1 || n == 2){
            return n;
        }

        return method1(n - 1) + method1(n -2);
    }
}
小结
06_尚硅谷_JavaSE面试题:成员变量与局部变量
问题:
public class P06 {
    static int s;
    int i;
    int j;
    {
        int i = 1;
        i++;
        j++;
        s++;
    }

    private void test(int j) {
        i++;
        j++;
        s++;
    }

    public static void main(String[] args) {
        P06 problem1 = new P06();
        P06 problem2 = new P06();

        problem1.test(100);
        problem1.test(200);

        problem2.test(300);

        System.out.println("i = " + problem1.i + ", j = " + problem1.j + ", s = " + problem1.s);
        System.out.println("i = " + problem2.i + ", j = " + problem2.j + ", s = " + problem2.s);
    }
}
局部变量与成员变量的区别
堆、栈、方法区
07_尚硅谷_SSM面试题_Spring Bean的作用域之间有什么区别
singleton与prototype
代码:
//简单的创建两类A、B
class A{ }
class B{ }

//将A、B两个类加入容器,分别设置为单例和多例
@Configuration
class Config{
    @Bean
    @Scope(ConfigurableBeanFactory.SCOPE_SINGLETON)
    public A a(){
        return new A();
    }

    @Bean
    @Scope(ConfigurableBeanFactory.SCOPE_PROTOTYPE)
    public B b(){
        return new B();
    }
}

//多次获取A、B
@SpringBootApplication
public class JavaInterviewQuestionsApplication {
    public static void main(String[] args) {
        ConfigurableApplicationContext run = SpringApplication.run(JavaInterviewQuestionsApplication.class, args);

        System.out.println(run.getBean(A.class));
        System.out.println(run.getBean(A.class));

        System.out.println(run.getBean(B.class));
        System.out.println(run.getBean(B.class));
    }
}
总结
08_尚硅谷_SSM面试题_Spring支持的常用数据库事务传播属性和…
事务传播行为
REQUIRED:A和B都定义事务,A调用B,则B的事务不生效REQUIRED_NEW:A和B都定义事务,A调用B,B的事务生效
设置示例: @Transactional(propagation = Propagation.REQUIRED)
数据库事务并发问题
隔离级别
例如:可设置事务的隔离级别为可重复读,则在它管辖范围内的代码,多次读取相同数据获得的结果是一致的:@Transactional(isolation = Isolation.REPEATABLE_READ)
![]()
09_尚硅谷_SSM面试题_SpringMVC中如何解决POST请求中文乱码问…
解决post中文乱码:
解决get中文乱码
10_尚硅谷_SSM面试题_简单的谈一下SpringMVC的工作流程
流程图
doDispatch方法源码
- 从doDispatch方法的角度看执行流程
    protected void doDispatch(HttpServletRequest request, HttpServletResponse response) throws Exception {

        // 1、找controller
        // 2、找interceptor
        HandlerExecutionChain mappedHandler = getHandler(processedRequest);

        // 找HandlerAdapter(哪个HandlerAdapter能处理当前handle?遍历所有HandlerAdapter的supports方法)
        HandlerAdapter ha = getHandlerAdapter(mappedHandler.getHandler());

        // 执行拦截器preHandle方法
        if (!mappedHandler.applyPreHandle(processedRequest, response)) {
            return;
        }

        // 执行HandlerAdapter的handle方法;解析参数、执行controller、解析返回值、返回ModelAndView
        ModelAndView mv = ha.handle(processedRequest, response, mappedHandler.getHandler());

        // 倒序执行拦截器postHandle方法
        mappedHandler.applyPostHandle(processedRequest, response, mv);

        // 1、视图解析器解析出view
        // 2、渲染
        // 3、倒序执行拦截器的afterCompletion方法
        processDispatchResult(processedRequest, response, mappedHandler, mv, dispatchException);
    }
其中,doDispatch完整源码:
protected void doDispatch(HttpServletRequest request, HttpServletResponse response) throws Exception {
		HttpServletRequest processedRequest = request;
		HandlerExecutionChain mappedHandler = null;
		boolean multipartRequestParsed = false;

		WebAsyncManager asyncManager = WebAsyncUtils.getAsyncManager(request);

		try {
			ModelAndView mv = null;
			Exception dispatchException = null;

			try {
				processedRequest = checkMultipart(request);
				multipartRequestParsed = (processedRequest != request);

				// Determine handler for the current request.
				mappedHandler = getHandler(processedRequest);
				if (mappedHandler == null) {
					noHandlerFound(processedRequest, response);
					return;
				}

				// Determine handler adapter for the current request.
				HandlerAdapter ha = getHandlerAdapter(mappedHandler.getHandler());

				// Process last-modified header, if supported by the handler.
				String method = request.getMethod();
				boolean isGet = "GET".equals(method);
				if (isGet || "HEAD".equals(method)) {
					long lastModified = ha.getLastModified(request, mappedHandler.getHandler());
					if (new ServletWebRequest(request, response).checkNotModified(lastModified) && isGet) {
						return;
					}
				}

				if (!mappedHandler.applyPreHandle(processedRequest, response)) {
					return;
				}

				// Actually invoke the handler.
				mv = ha.handle(processedRequest, response, mappedHandler.getHandler());

				if (asyncManager.isConcurrentHandlingStarted()) {
					return;
				}

				applyDefaultViewName(processedRequest, mv);
				mappedHandler.applyPostHandle(processedRequest, response, mv);
			}
			catch (Exception ex) {
				dispatchException = ex;
			}
			catch (Throwable err) {
				// As of 4.3, we're processing Errors thrown from handler methods as well,
				// making them available for @ExceptionHandler methods and other scenarios.
				dispatchException = new NestedServletException("Handler dispatch failed", err);
			}
			processDispatchResult(processedRequest, response, mappedHandler, mv, dispatchException);
		}
		catch (Exception ex) {
			triggerAfterCompletion(processedRequest, response, mappedHandler, ex);
		}
		catch (Throwable err) {
			triggerAfterCompletion(processedRequest, response, mappedHandler,
					new NestedServletException("Handler processing failed", err));
		}
		finally {
			if (asyncManager.isConcurrentHandlingStarted()) {
				// Instead of postHandle and afterCompletion
				if (mappedHandler != null) {
					mappedHandler.applyAfterConcurrentHandlingStarted(processedRequest, response);
				}
			}
			else {
				// Clean up any resources used by a multipart request.
				if (multipartRequestParsed) {
					cleanupMultipart(processedRequest);
				}
			}
		}
	}
流程描述
- 用户发送请求至前端控制器DispatcherServlet
- DispatcherServlet收到请求调用处理器映射器HandlerMapping。
- 处理器映射器根据请求url找到具体的处理器,生成处理器执行链HandlerExecutionChain(包括处理器对象和处理器拦截器)一并返回给DispatcherServlet。
- DispatcherServlet根据处理器Handler获取处理器适配器HandlerAdapter执行HandlerAdapter处理一系列的操作,如:参数封装,数据格式转换,数据验证等操作
- 执行处理器Handler(Controller,也叫页面控制器)。
- Handler执行完成返回ModelAndView
- HandlerAdapter将Handler执行结果ModelAndView返回到DispatcherServlet
- DispatcherServlet将ModelAndView传给ViewReslover视图解析器
- ViewReslover解析后返回具体View
- DispatcherServlet对View进行渲染视图(即将模型数据model填充至视图中)。
- DispatcherServlet响应用户。
11_尚硅谷_SSM面试题_MyBatis中当实体类中的属性名和表中的字段不一致
方式1:改sql
- 例如:给user_id起别名为userId:
select user_id userId, money from account;
方式2:启动驼峰名法
mapUnderscoreToCamelCase = true
方式3:resultMap
- 例如:
<resultMap id="BaseResultMap" type="com.ljy.domain.Account">
        <id property="id" column="id" jdbcType="INTEGER"/>
        <result property="userId" column="user_id" jdbcType="INTEGER"/>
        <result property="money" column="money" jdbcType="DOUBLE"/>
resultMap>
12_尚硅谷_Java高级_Linux常用服务类相关命令
centos 6
centos 7
13_尚硅谷_Java高级_git分支相关命令
基本命令
Git工作流
14_尚硅谷_Java高级_redis持久化
两种持久化方式:RDB (Redis DataBase) 、AOF (Append Only File);
RDB优缺点
AOF优缺点
15_尚硅谷_Java高级_Mysql什么时候建索引
mysql官方对索引的定义为:索引是帮助mysql高效获取数据的数据结构。可也得出索引的本质是数据结构。
优势:
- 提高检索效率,降低数据库的io成本
- 通过索引列对数据进行排序,降低数据排序成本,减低cpu消耗
劣势:
- 降低更新表的速度,因为不仅要保存数据,还要维护索引
- 索引也是一张表,占用空间
适合创建索引的情况:
- 主键自动建立唯一索引
- 频繁作为查询条件的字段
- 外键
- 单键、组合索引的选择问题,组合索引性价比更高
- 排序字段
- 查询统计或者分组字段
不适合建索引:
- 表记录太少
- 经常增删改的表或字段
- where条件用不到的字段
- 过滤性不好的(例如:性别;过滤性好的如:身份证号)
16_尚硅谷_Java高级_JVM垃圾回收机制
发生时期
GC算法
1. 引用计数算法:(不能处理循环引用,基本被淘汰了)
2. 复制算法:年轻代使用的是Minor GC,这种gc算法采用的是复制算法
3. 标记清除:老年代一般是由标记清除或者是标记清除与标记整理混合实现
4. 标记压缩:老年代一般是由标记清除或者是标记清除与标记整理混合实现
5. 标记清除压缩
17_尚硅谷_项目面试题_redis 在项目中的使用场景
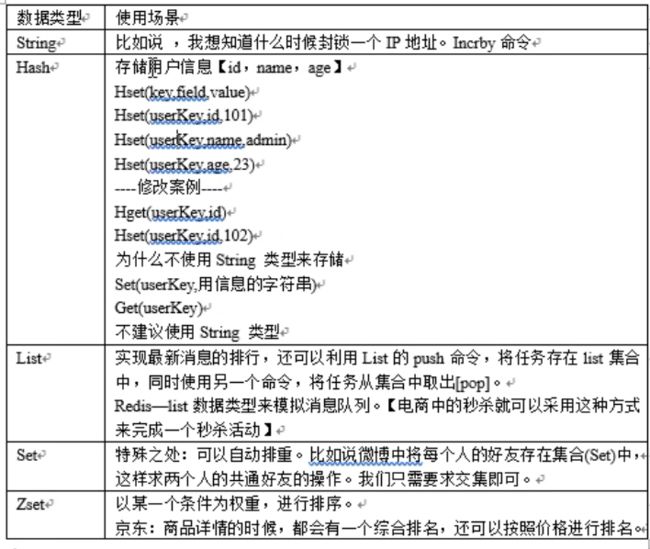
redis 数据类型元使用场景
- String:用户登录之后
- Hash:
- 上述表中的存用户(经常修改,可能新注册的?);
- 购物车;用户id作为K,商品id作为HK,商品信息作为HV
- List:秒杀
- Set:自动排重,上架商品,可用来避免重复上架同一商品
- ZSet:做销量、好评等排序
18_尚硅谷_项目面试题_es与solr的区别
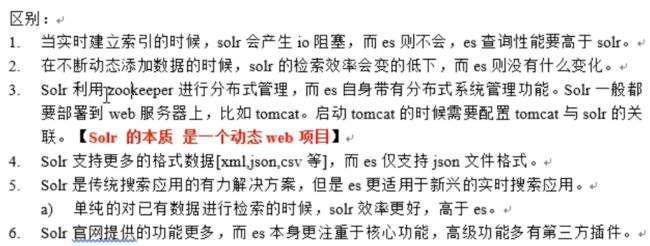
es与solr的区别
19_尚硅谷_项目面试题_单点登录
- 单点登录:一处登录多处使用
- 前提:单点登录多使用在分布式系统中
流程图:
20_尚硅谷_项目面试题_购物车
购物车
21_尚硅谷_项目面试题_消息队列
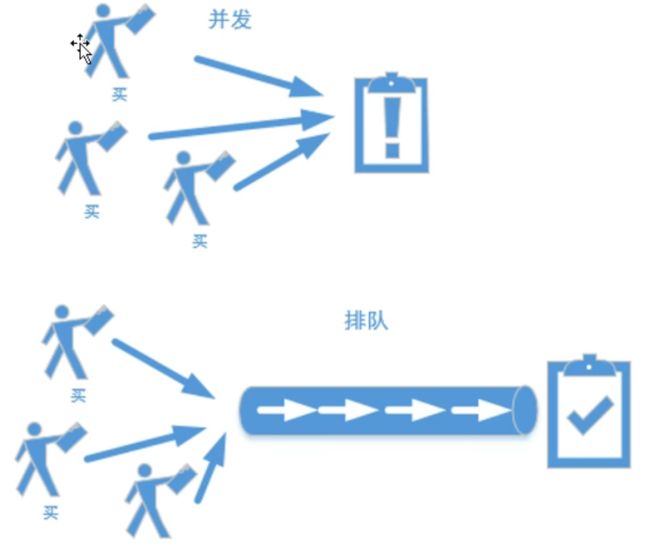
处理高并发
电商项目使用场景
支付宝支付成功后,会有回调通知(如果支付宝未收到success,会继续发送回调通知),支付模块收到支付宝的回调通知,一边通过 消息队列 给订单模块通知支付完成,一边响应success

弊端:
- 消息的不确定性:使用延迟队列或者轮询技术解决
- 例如:上图中,既可以支付模块成功后通知订单模块,也可订单模块设置延迟队列主动去查询支付宝的支付状态
