有关卷积的认识(python)
之前一直都只是知道卷积这个概念,也听说过最近卷积很牛,但是一直没有去尝试过了解他,上大三之后做项目终于有了个机会来认识这个东西,下面主要用代码和注释来记录卷积到底是个什么操作
#卷积使用示例
import torch
from torch import nn
"""
 使用神经网络大致框架:写一个class
 继承nn.Module类的话,两个函数很重要:
       一个是__init__函数,这个是必须重写的
       另一个是一个是forward函数或backWord函数,前者通过输入推输出,后者通过输出推输入

"""
class MyNN(nn.Module):
    def __init__(self):
        super().__init__()

    def forward(self, input):
        output = input + 1
        return output


# 实例化MyNN类
mynn = MyNN()
x = torch.tensor(1.1)
output = mynn(x)
print(output)
# 卷积操作
# 这串代码主要是表示卷积是什么,是怎么进行操作的
import torch
import torch.nn.functional as F
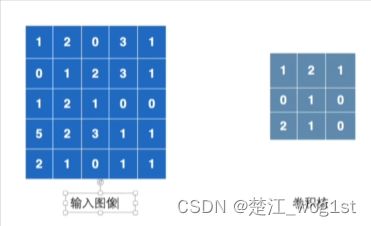
input = torch.tensor([[1, 2, 0, 3, 1],
[0, 1, 2, 3, 1],
[1, 2, 1, 0, 0],
[5, 2, 3, 1, 1],
[2, 1, 0, 1, 1]
])
kernel = torch.tensor([[1, 2, 1],
[0, 1, 0],
[2, 1, 0]
])
print(input.shape)#torch.Size([5, 5])
print(kernel.shape)#torch.Size([3, 3])
# 对shape进行一个转换
input = torch.reshape(input, (1, 1, 5, 5))
kernel = torch.reshape(kernel, (1, 1, 3, 3))
print(input.shape)#torch.Size([1, 1, 5, 5])
print(kernel.shape)#torch.Size([1, 1, 3, 3])
output_1 = F.conv2d(input, kernel, stride=1)
print(output_1)
"""tensor([[[[10, 12, 12],
[18, 16, 16],
[13, 9, 3]]]])
"""
output_2 = F.conv2d(input, kernel, stride=2)
print(output_2)
"""
tensor([[[[10, 12],
[13, 3]]]])
"""
output_3 = F.conv2d(input, kernel, stride=1, padding=1)
print(output_3)
"""tensor([[[[ 1, 3, 4, 10, 8],
[ 5, 10, 12, 12, 6],
[ 7, 18, 16, 16, 8],
[11, 13, 9, 3, 4],
[14, 13, 9, 7, 4]]]])
"""
# inChannel 输入图像通道数
# outChannel 输出的通道数
# Kernel_size 定义卷积核的尺寸
# stride 步径大小
# padding 在输入图像边缘进行填充的空行个数
# padding_mode 以什么样的方式进行填充
# dilation 定义卷积核之间的距离 不常用
# bias 偏置,一般为true卷积过程
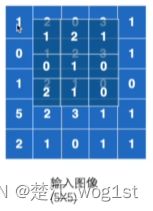
首先会有两个数学矩阵,其中一个是输入值,另一个是卷积核。然后,将卷积核移到输入值上,进行各个位置相对的乘法,再将各个位置相乘得到的结果做一个加法,得到一个结果。
如图所示,此处会有
$$
1*1+2*2+0*1+0*0+1*1+2*0+2*1+1*2+0*1=10
$$
于是我们得到了一个结果10,将其写入答案中
再将卷积核右移一位
此时得到结果12
在卷积核走到了最右端之后,便回到最左端并向下走一位,以此推类,我们可以得到一个3×3的矩阵
示例
import torch
import torchvision
from torch.utils.data import DataLoader
from torch import nn
from torch.nn import Conv2d
from torch.utils.tensorboard import SummaryWriter

# 导入一个测试集
dataset = torchvision.datasets.CIFAR10("data", train=False, transform=torchvision.transforms.ToTensor(), download=True)
# 从dataset测试集中读取数据,每次读取64个图片,规格是8*8
dataloader = DataLoader(dataset, batch_size=64)

# 实现nn.Module接口,重写__init__()和forward()函数
class Mynn(nn.Module):
    def __init__(self):
        super(Mynn, self).__init__()
        self.conv1 = Conv2d(in_channels=3, out_channels=6, kernel_size=3, stride=1, padding=0)

    def forward(self, x):
        x = self.conv1(x)
        return x


ans = Mynn()
# print(ans)

step = 0
writer = SummaryWriter("logs")

for data in dataloader:
    imgs, targets = data
    output = ans(imgs)
    # print(imgs.shape)
    # print(output.shape)
    writer.add_images("input", imgs, step)

    # torch.Size([64, 6, 30, 30]) -> [xxx, 3, 30, 30]
    # 在我们更改通道数的时候,我们不知道更改通道之后图片的大小会是什么样子的,于是我们就在
    output = torch.reshape(output, (-1, 3, 30, 30))
    writer.add_images("output", output, step)
    step += 1
writer.close()


