springboot整合actuator、admin对应用程序进行监控
Spring Boot Actuator 是 Spring Boot 的一个子项目,可以对 Spring Boot 应用程序进行监控和管理,并对外提供了大量的端点,可以选择使用 HTTP 端点或 JMX 来管理和监控应用程序。
这篇文章主要介绍我们的应用程序中怎么加入actuator来对应用进行监控。
首先,需要通过Spring官网访问我们应用程序使用的Springboot版本对应的actutor版本的文档,本篇文章使用Springboot版本为2.3.4.RELEASE,通过以下链接查看文档。
spring boot actuator 2.3.4.RELEASE https://docs.spring.io/spring-boot/docs/2.3.4.RELEASE/reference/html/production-ready-features.html#production-ready
目录
1、创建Springboot项目
2、整合Spring Boot Actuator
3、暴露所有端点
4、整合Spring Boot Admin
搭建Spring Boot Admin Server
创建Spring Boot Admin Client
5、整合Spring Security
1、创建Springboot项目
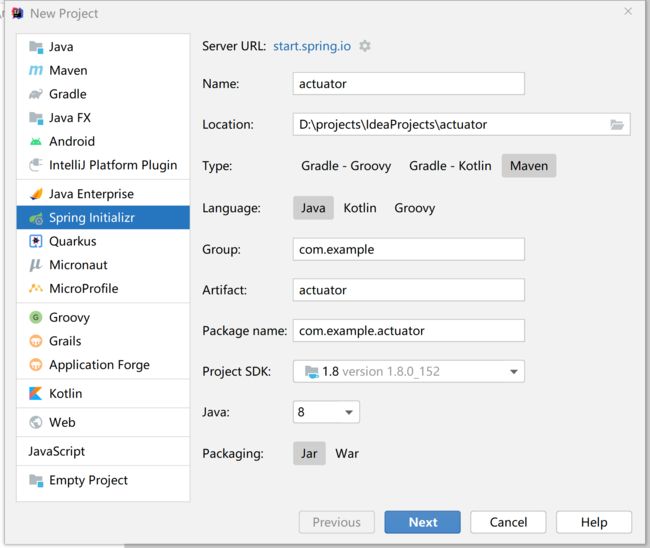
通过IntelliJ IDEA创建一个名为actuator项目
然后修改pom.xml文件,将spring boot的版本修改为2.3.4.RELEASE。
    org.springframework.boot
    spring-boot-starter-parent
    2.3.4.RELEASE
2、整合Spring Boot Actuator
根据Spring官网的文档,在我们的springboot应用中加入actuator非常简单,只需要一个maven依赖:
    org.springframework.boot
    spring-boot-starter-actuator
完整的项目依赖如下
    4.0.0


        org.springframework.boot
        spring-boot-starter-parent
        2.3.4.RELEASE


    com.example
    actuator
    0.0.1-SNAPSHOT


        1.8


            org.springframework.boot
            spring-boot-starter-web


            org.springframework.boot
            spring-boot-starter-test
            test


            org.springframework.boot
            spring-boot-starter-actuator


                org.springframework.boot
                spring-boot-maven-plugin
最后设置一下启动端口,修改application.yml配置文件,添加端口配置:
server:
  port: 8077
然后访问localhost:端口号/actuator,可以看到返回了很多个http链接地址,这些就是actuator默认提供给我们获取应用信息的端点。
http://localhost:8077/actuator/info用于获取应用的信息,这个端点默认返回空数据,这个是需要我们自己配置的。
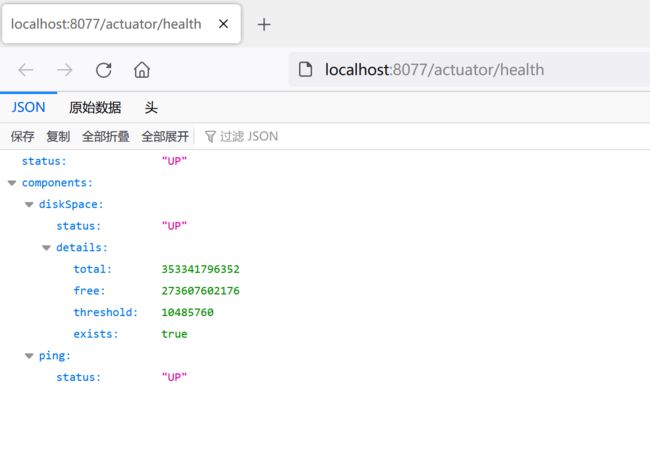
http://localhost:8077/actuator/health用于获取服务的健康状态,如果服务依赖的所有中间件都是正常状态,这里会返回一个UP,表示在线状态。

health端点默认只返回了一个状态,可以通过以下配置,让端点返回详细的信息。
management:
  endpoint:
    health:
      show-details: always
然后重启项目,再次访问health端点:
3、暴露所有端点
上一步中,我们访问actuator只返回了两个端点:health和info,其实actuator提供的端点远不止这些,官网提供的jmx环境和web环境下各个端点的开放情况。
| ID | JMX | Web |
|---|---|---|
|
|
Yes |
No |
|
|
Yes |
No |
|
|
Yes |
No |
|
|
Yes |
No |
|
|
Yes |
No |
|
|
Yes |
No |
|
|
Yes |
No |
|
|
Yes |
Yes |
|
|
N/A |
No |
|
|
Yes |
No |
|
|
Yes |
Yes |
|
|
Yes |
No |
|
|
N/A |
No |
|
|
N/A |
No |
|
|
Yes |
No |
|
|
Yes |
No |
|
|
Yes |
No |
|
|
Yes |
No |
|
|
N/A |
No |
|
|
Yes |
No |
|
|
Yes |
No |
|
|
Yes |
No |
|
|
Yes |
No |
那么,其他端点怎么暴露出来呢,让我们访问http://localhost:8077/actuator就能得到所有可用端点。
步骤:修改application.yml,添加暴露所有端点的配置
server:
  port: 8077

management:
  endpoint:
    health:
      show-details: always # 显示健康状态详情
  endpoints:
    web:
      exposure:
        include: "*" # 暴露所有端点
      base-path: /actuator
这里的端点endpoint可以理解为Controller接口,通过端点可以获取应用的详细信息,包括实例健康状态、配置信息、映射信息、缓存信息等等。
关于具体每个端点的功能,就不一一介绍了,可以通过页面进行查看。

这是Springboot Actuator 2.3.4.RELEASE版本返回的所有端点。
{
  "_links": {
    "self": {
      "href": "http://localhost:8091/actuator",
      "templated": false
    },
    "beans": {
      "href": "http://localhost:8091/actuator/beans",
      "templated": false
    },
    "caches-cache": {
      "href": "http://localhost:8091/actuator/caches/{cache}",
      "templated": true
    },
    "caches": {
      "href": "http://localhost:8091/actuator/caches",
      "templated": false
    },
    "health-path": {
      "href": "http://localhost:8091/actuator/health/{*path}",
      "templated": true
    },
    "health": {
      "href": "http://localhost:8091/actuator/health",
      "templated": false
    },
    "info": {
      "href": "http://localhost:8091/actuator/info",
      "templated": false
    },
    "conditions": {
      "href": "http://localhost:8091/actuator/conditions",
      "templated": false
    },
    "configprops": {
      "href": "http://localhost:8091/actuator/configprops",
      "templated": false
    },
    "env": {
      "href": "http://localhost:8091/actuator/env",
      "templated": false
    },
    "env-toMatch": {
      "href": "http://localhost:8091/actuator/env/{toMatch}",
      "templated": true
    },
    "loggers": {
      "href": "http://localhost:8091/actuator/loggers",
      "templated": false
    },
    "loggers-name": {
      "href": "http://localhost:8091/actuator/loggers/{name}",
      "templated": true
    },
    "heapdump": {
      "href": "http://localhost:8091/actuator/heapdump",
      "templated": false
    },
    "threaddump": {
      "href": "http://localhost:8091/actuator/threaddump",
      "templated": false
    },
    "metrics-requiredMetricName": {
      "href": "http://localhost:8091/actuator/metrics/{requiredMetricName}",
      "templated": true
    },
    "metrics": {
      "href": "http://localhost:8091/actuator/metrics",
      "templated": false
    },
    "scheduledtasks": {
      "href": "http://localhost:8091/actuator/scheduledtasks",
      "templated": false
    },
    "mappings": {
      "href": "http://localhost:8091/actuator/mappings",
      "templated": false
    }
  }
}
4、整合Spring Boot Admin
那么,actuator提供给我们那么多端点,不可能每次都通过这些端点来获取应用信息吧,太麻烦了,有没有一种更好的方式可以方便又快捷的查看应用程序的状态信息呢。
这个时候就需要引入Spring Boot Admin了,github可能访问缓慢或者无法访问,这里提供了gitee的仓库地址。
Spring Boot Adminhttps://gitee.com/pujiaolin/spring-boot-admin介绍:什么是Spring Boot Admin?
Spring Boot Admin 是一款用于管理和监控 Spring Boot 应用程序的简单应用程序。应用程序可在我们的 Spring Boot 管理客户端(通过 http)注册,也可使用 Spring Cloud(如 Eureka)发现。用户界面只是 Spring Boot Actuator 端点之上的一个 Angular.js 应用程序。
搭建Spring Boot Admin Server
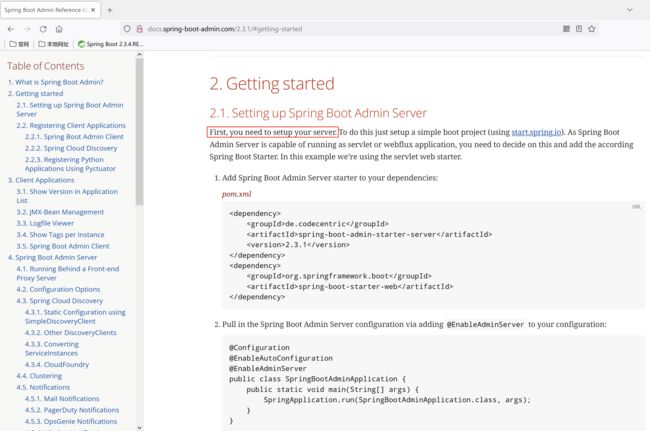
接下来开始整合Spring Boot Admin,根据官网介绍,要先设置admin的服务器
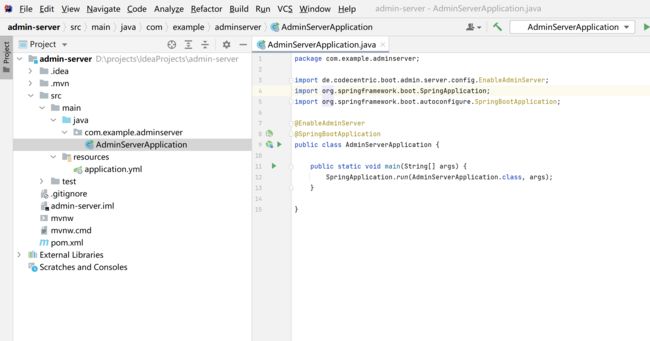
通过idea创建一个Springboot项目,取名为admin-server
然后修改pom.xml,添加相关依赖
    4.0.0


        org.springframework.boot
        spring-boot-starter-parent
        2.3.4.RELEASE


    com.example
    admin-server
    0.0.1-SNAPSHOT


        1.8


            org.springframework.boot
            spring-boot-starter-web


            org.springframework.boot
            spring-boot-starter-test
            test


            de.codecentric
            spring-boot-admin-starter-server
            2.3.1


                org.springframework.boot
                spring-boot-maven-plugin
并在启动类上添加@EnableAdminServer注解
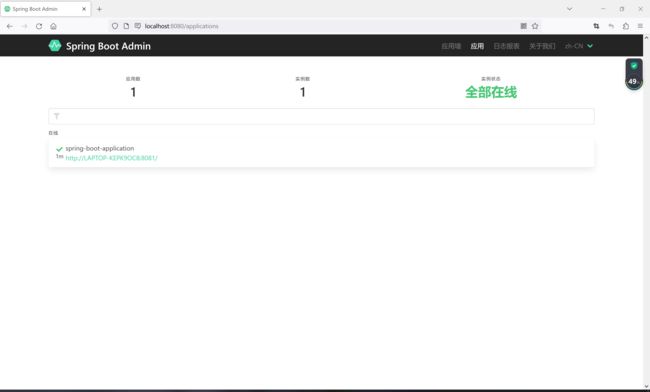
这样,admin的服务端就搭建好了,然后访问localhost:8080,看到的就是admin的界面,因为还没有客户端注册,所以应用数为0

创建Spring Boot Admin Client
创建完服务器,需要往服务器注册客户端应用程序。
同样的,通过idea创建一个Springboot应用,取名为admin-client
修改pom.xml,添加admin客户端的依赖
    4.0.0


        org.springframework.boot
        spring-boot-starter-parent
        2.3.4.RELEASE


    com.example
    admin-client
    0.0.1-SNAPSHOT


        1.8


            org.springframework.boot
            spring-boot-starter-web


            org.springframework.boot
            spring-boot-starter-test
            test


            de.codecentric
            spring-boot-admin-starter-client
            2.3.1


            org.springframework.boot
            spring-boot-starter-security


                org.springframework.boot
                spring-boot-maven-plugin
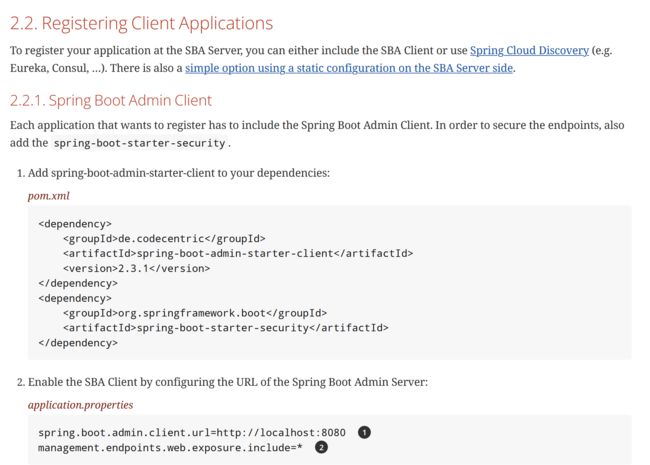
然后修改配置文件application.yml,配置admin服务器的URL,因为admin-server没有配置端口,默认是8080,并把第一步actuator服务的配置复制过来。
server:
port: 8081
spring:
boot:
admin:
client:
url: http://localhost:8080
management:
endpoints:
web:
exposure:
include: "*"
base-path: /actuator
endpoint:
health:
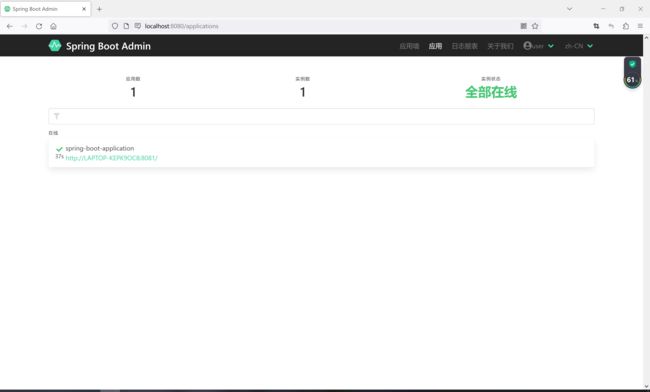
show-details: always启动客户端服务admin-client,再次访问localhost:8080,可以看到,客户端已经注册到了服务器
5、整合Spring Security
通过第四步,已经搭建好了admin,但是存在很严重的安全问题,任何人都可以访问程序的运行状态和信息,这个章节通过整合Spring Security来解决这个问题,配置登录才能访问。
点击Spring Boot Admin官网左边的目录链接,直接跳转到Security
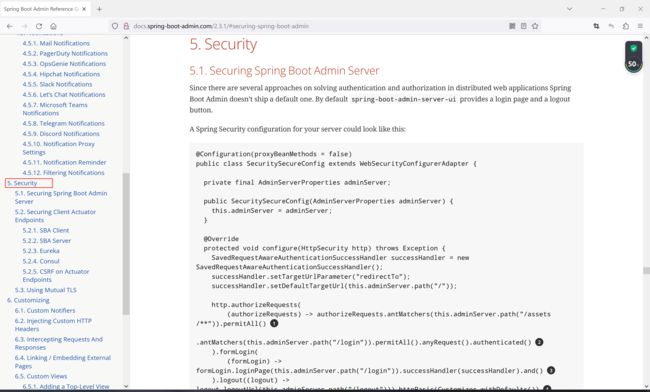
根据要求,在admin-server端添加一个配置类,按需修改用户名和密码
package com.example.adminserver.config;

import de.codecentric.boot.admin.server.config.AdminServerProperties;
import org.springframework.context.annotation.Configuration;
import org.springframework.http.HttpMethod;
import org.springframework.security.config.Customizer;
import org.springframework.security.config.annotation.authentication.builders.AuthenticationManagerBuilder;
import org.springframework.security.config.annotation.web.builders.HttpSecurity;
import org.springframework.security.config.annotation.web.configuration.WebSecurityConfigurerAdapter;
import org.springframework.security.web.authentication.SavedRequestAwareAuthenticationSuccessHandler;
import org.springframework.security.web.csrf.CookieCsrfTokenRepository;
import org.springframework.security.web.util.matcher.AntPathRequestMatcher;

import java.util.UUID;

/**
 * @author heyunlin
 * @version 1.0
 */
@Configuration(proxyBeanMethods = false)
public class SecuritySecureConfig extends WebSecurityConfigurerAdapter {

    private final AdminServerProperties adminServer;

    public SecuritySecureConfig(AdminServerProperties adminServer) {
        this.adminServer = adminServer;
    }

    @Override
    protected void configure(HttpSecurity http) throws Exception {
        SavedRequestAwareAuthenticationSuccessHandler successHandler = new SavedRequestAwareAuthenticationSuccessHandler();
        successHandler.setTargetUrlParameter("redirectTo");
        successHandler.setDefaultTargetUrl(this.adminServer.path("/"));

        http.authorizeRequests(
                (authorizeRequests) -> authorizeRequests.antMatchers(this.adminServer.path("/assets/**")).permitAll()
                        .antMatchers(this.adminServer.path("/login")).permitAll().anyRequest().authenticated()
        ).formLogin(
                (formLogin) -> formLogin.loginPage(this.adminServer.path("/login")).successHandler(successHandler).and()
        ).logout((logout) -> logout.logoutUrl(this.adminServer.path("/logout"))).httpBasic(Customizer.withDefaults())
                .csrf((csrf) -> csrf.csrfTokenRepository(CookieCsrfTokenRepository.withHttpOnlyFalse())
                        .ignoringRequestMatchers(
                                new AntPathRequestMatcher(this.adminServer.path("/instances"),
                                        HttpMethod.POST.toString()),
                                new AntPathRequestMatcher(this.adminServer.path("/instances/*"),
                                        HttpMethod.DELETE.toString()),
                                new AntPathRequestMatcher(this.adminServer.path("/actuator/**"))
                        ))
                .rememberMe((rememberMe) -> rememberMe.key(UUID.randomUUID().toString()).tokenValiditySeconds(1209600));
    }

    // Required to provide UserDetailsService for "remember functionality"
    @Override
    protected void configure(AuthenticationManagerBuilder auth) throws Exception {
        auth.inMemoryAuthentication().withUser("user").password("12345").roles("USER");
    }

}
然后重启admin-server,再次访问localhost:8080的时候,发现要登录

输入刚刚设置的用户名/密码:user/12345,点击登录按钮
这时候发现页面只是刷新了一下,并没有跳转到首页,这里也是个坑。
查看服务器报错信息

点第二行的matches()方法进去看看

很显然,就是因为这里主动抛出的异常导致的登录失败,往鼠标上面滚动,这是一个PasswordEncoder的实现类
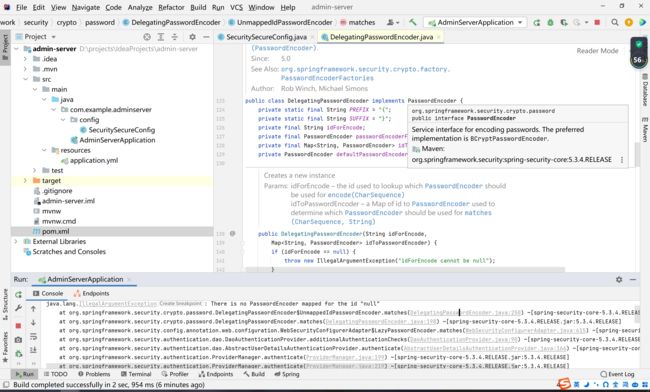
由此可见,这是默认调用的这个实现类的matches()方法,为了解决这个异常问题,我们需要在admin-server自己创建一个org.springframework.security.crypto.password.PasswordEncoder的实现类,并声明为bean,然后重写matches()方法,直接通过equals()比较即可。
package com.example.adminserver;

import org.springframework.security.crypto.password.PasswordEncoder;
import org.springframework.stereotype.Component;

/**
 * @author heyunlin
 * @version 1.0
 */
@Component
public class MyPasswordEncoder implements PasswordEncoder {

    @Override
    public String encode(CharSequence rawPassword) {
        return null;
    }

    @Override
    public boolean matches(CharSequence rawPassword, String encodedPassword) {
        return rawPassword.equals(encodedPassword);
    }

}
然后再次重启admin-server,这一次输入user/12345点击登录,成功进到了首页,但是,客户端怎么没了,居然没有注册进来。

接着看文档,后面还有很关键的说明,需要在客户端添加下面这个配置,用户名密码就是刚刚设置的用户名user和密码12345。

修改admin-client的application.yml,添加用户名和密码的配置,然后重启一下admin-client服务
server:
  port: 8081

spring:
  boot:
    admin:
      client:
        username: user
        password: 12345
        url: http://localhost:8080

management:
  endpoints:
    web:
      exposure:
        include: "*"
      base-path: /actuator
  endpoint:
    health:
      show-details: always
这时候再看刚才的页面,已经成功注册进来了
最后,因为用户名密码是写死在代码里的,一般希望能过通过配置文件动态修改。
在配置文件中配置用户名和密码
server:
  port: 8080

spring:
  security:
    user:
      name: user
      password: 12345
修改一下配置类,从配置中读取用户名和密码
package com.example.adminserver.config;

import de.codecentric.boot.admin.server.config.AdminServerProperties;
import org.springframework.boot.autoconfigure.security.SecurityProperties;
import org.springframework.context.annotation.Configuration;
import org.springframework.http.HttpMethod;
import org.springframework.security.config.Customizer;
import org.springframework.security.config.annotation.authentication.builders.AuthenticationManagerBuilder;
import org.springframework.security.config.annotation.web.builders.HttpSecurity;
import org.springframework.security.config.annotation.web.configuration.WebSecurityConfigurerAdapter;
import org.springframework.security.web.authentication.SavedRequestAwareAuthenticationSuccessHandler;
import org.springframework.security.web.csrf.CookieCsrfTokenRepository;
import org.springframework.security.web.util.matcher.AntPathRequestMatcher;

import java.util.UUID;

/**
 * @author heyunlin
 * @version 1.0
 */
@Configuration(proxyBeanMethods = false)
public class SecuritySecureConfig extends WebSecurityConfigurerAdapter {

    private final AdminServerProperties adminServer;
    private final SecurityProperties securityProperties;

    public SecuritySecureConfig(AdminServerProperties adminServer, SecurityProperties securityProperties) {
        this.adminServer = adminServer;
        this.securityProperties = securityProperties;
    }

    @Override
    protected void configure(HttpSecurity http) throws Exception {
        SavedRequestAwareAuthenticationSuccessHandler successHandler = new SavedRequestAwareAuthenticationSuccessHandler();
        successHandler.setTargetUrlParameter("redirectTo");
        successHandler.setDefaultTargetUrl(this.adminServer.path("/"));

        http.authorizeRequests(
                (authorizeRequests) -> authorizeRequests.antMatchers(this.adminServer.path("/assets/**")).permitAll()
                        .antMatchers(this.adminServer.path("/login")).permitAll().anyRequest().authenticated()
        ).formLogin(
                (formLogin) -> formLogin.loginPage(this.adminServer.path("/login")).successHandler(successHandler).and()
        ).logout((logout) -> logout.logoutUrl(this.adminServer.path("/logout"))).httpBasic(Customizer.withDefaults())
                .csrf((csrf) -> csrf.csrfTokenRepository(CookieCsrfTokenRepository.withHttpOnlyFalse())
                        .ignoringRequestMatchers(
                                new AntPathRequestMatcher(this.adminServer.path("/instances"),
                                        HttpMethod.POST.toString()),
                                new AntPathRequestMatcher(this.adminServer.path("/instances/*"),
                                        HttpMethod.DELETE.toString()),
                                new AntPathRequestMatcher(this.adminServer.path("/actuator/**"))
                        ))
                .rememberMe((rememberMe) -> rememberMe.key(UUID.randomUUID().toString()).tokenValiditySeconds(1209600));
    }

    // Required to provide UserDetailsService for "remember functionality"
    @Override
    protected void configure(AuthenticationManagerBuilder auth) throws Exception {
        auth.inMemoryAuthentication().withUser(securityProperties.getUser().getName())
                .password(securityProperties.getUser().getPassword()).roles("USER");
    }

}
6、注册到注册中心
以admin-server为例,将其注册到nacos。
添加nacos相关依赖,注册中心和配置中心的依赖都加进来,统一管理配置信息。
    4.0.0


        org.springframework.boot
        spring-boot-starter-parent
        2.3.4.RELEASE


    com.example
    admin-server
    0.0.1-SNAPSHOT


        1.8
        2.3.1
        2.2.0.RELEASE


            org.springframework.boot
            spring-boot-starter-web


            org.springframework.boot
            spring-boot-starter-test
            test


            org.springframework.boot
            spring-boot-starter-security


            de.codecentric
            spring-boot-admin-starter-server
            ${admin.version}


            com.alibaba.cloud
            spring-cloud-starter-alibaba-nacos-discovery
            ${nacos.version}


            com.alibaba.cloud
            spring-cloud-starter-alibaba-nacos-config
            ${nacos.version}


                org.springframework.boot
                spring-boot-maven-plugin
然后创建bootstrap.yml,添加nacos注册中心和配置中心配置
nacos:
  url: localhost:8848
  namespace: 0df4345c-cf1e-4af4-9501-d4be92ca6fda

spring:
  cloud:
    nacos:
      discovery:
        register-enabled: true
        server-addr: ${nacos.url}
        namespace: ${nacos.namespace}
      config:
        file-extension: yaml
        server-addr: ${nacos.url}
        namespace: ${nacos.namespace}
最后,需要设置spring.application.name,否则不会注册到nacos
server:
  port: 8080

spring:
  security:
    user:
      name: user
      password: 12345
  application:
    name: admin-server
启动nacos服务,然后再启动admin-server,在nacos控制台的服务列表,成功看到了注册进来的的admin-server

admin-server注册到注册中心之后,会自动拉取添加了spring-boot-starter-admin-client依赖的服务,所以需要删除客户端配置,否则将会有两个同一服务的实例注册到admin服务器。
修改admin-client服务的配置文件application.yml,删除之前添加的admin客户端配置。
server:
  port: 8081


management:
  endpoints:
    web:
      exposure:
        include: "*"
      base-path: /actuator
  endpoint:
    health:
      show-details: always
关于nacos如何使用,可以参考博主的另一篇文章:
nacos作为注册中心和配置中心https://blog.csdn.net/heyl163_/article/details/128536799好了,以上就是本篇文章要分享的全部内容了,看完不要忘了点赞+收藏哦~
文章中涉及的项目均已上传到gitee,需要的可以下载到本地:
actuatorhttps://gitee.com/he-yunlin/actuator.gitspring boot整合admin实现对应用监控服务器项目https://gitee.com/he-yunlin/admin-server.gitSpring Boot Admin Client项目https://gitee.com/he-yunlin/admin-client.git