iOS组件化与私有库构建流程总结,含.framework与源码兼容问题及常见错误解决方案
组件分类
- 基础组件
基础、公共 - 功能组件
- 业务组件
依赖关系
——> 指向为依赖方向,—/—> 表不可依赖
业务 ——> 基础
业务 ——> 功能
功能—/—> 基础
组件化流程
- 创建远程私有索引库
- 添加新本地私有索引库
pod repo add索引库名称索引库url - 创建
组件的远程私有仓库 本地组件pod私有库模板- pod lib create
(工程名称)
回答完问题,模板工程会自动生成 - 将待组件化的文件替换 classes -> iosreplaceMe文件
pod intall- 编写 .podspec(描述文件)
- pod lib create
- 向私有索引库提交组件的 .podspec
pod repo push 远程仓库名称 私有库名称.spec
.podspec编写
这里列举常见字段,以及如何做源码与.framework静态库兼容的配置:
     s.branch = '分支名'
	 s.summary = 'xxx'
	 # 本地组件库,可以不处理 s.homepage
	 s.homepage = '组件主页地址'
	 s.description  = <<-DESC
	 "xxxxxx字数要比s.summary多"
	 # 本地组件库,可以不处理 s.source
	 s.source = {:git => '组件远程仓库地址' }
	 # 添加依赖库
	 	# 没有拆分出子库情况下的写法
		# s.dependency 'AFNetworking'
		# s.dependency 'SDWebImage'

	# 如果添加子库,要修改source_files
	# s.source_files = 'TestRepo/source/**/*'

 	# 指定库的最低swift版本
 	# s.swift_version='5.0'

	# 源码与.framework静态库兼容,使用环境变量参数处理,这里根据if else判断得知,默认会下载TestRepo.framework

	if ENV['is_source'] || ENV['TestRepo_source']
		# 添加子库
		# Base=>子库名,b=>子库别名
		s.subspec 'Base' do |b|
			b.source_files = 'TestRepo/classes/Base/**/*'
		end
		# 在子库中声明依赖
		s.subspec 'Tool' do |t|
			t.source_files = 'TestRepo/classes/Tool/**/*'
			t.dependency 'AFNetworking'
		end
		s.subspec 'Categray' do |c|
			c.source_files = 'TestRepo/classes/Categray/**/*'
			c.dependency 'SDWebImage'
		end
		s.subspec 'Business' do |b|
			b.source_files = 'TestRepo/classes/Business/**/*'
		end

	else
		# 指定 .a 库
		# s.vandored_libraries = 'libName'
		s.source_files = 'TestRepo/classes/TestRepo/**/*.h'
		# vandored_frameworks .framework 库
		# 仅仅是针对编译后的是framework的库起作用,当依赖于某个.framework三方库,或者项目不暴露源码时,启用该选项
		s.vandored_frameworks = 'TestRepo/Products/TestRepo.framework'
		# 启用静态库
		s.static_framework = true
		# 指定 framework 的 bundle 资源
		# s.resource_bundles = {
	    # 	 'TestRepo' => ['TestRepo/Assets/**/*.png']
	    # }
.framework静态库创建
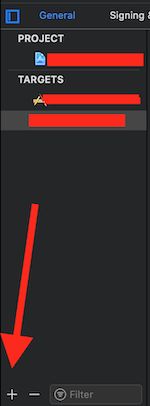
- 复合工程,点击 “ + ”,新建framework
- 引入待编译文件
- 如果不使用
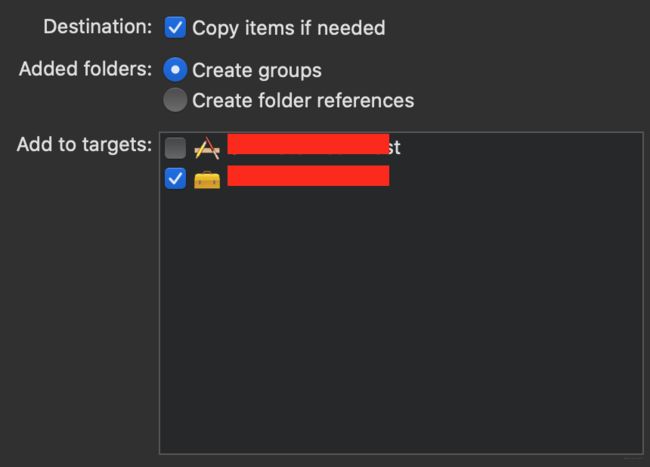
pod lib create,建议将资源文件自己放入.bundle文件中保存,一定程度保护文件名不被随意修改 - 引入待编译文件后,查看整个工程中是否仅有一份待编译文件(目的是保证修改完的bug不用再改一遍)
如果有两份,Add folders选项改为Create folder references。
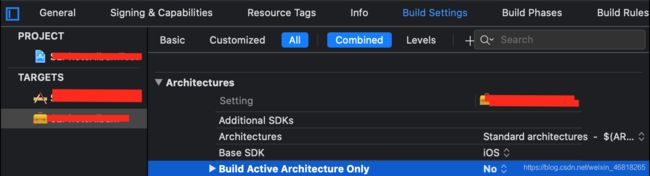
- builde setting 设置
添加armv7s的方式 (armv7也是兼容armv7s的)
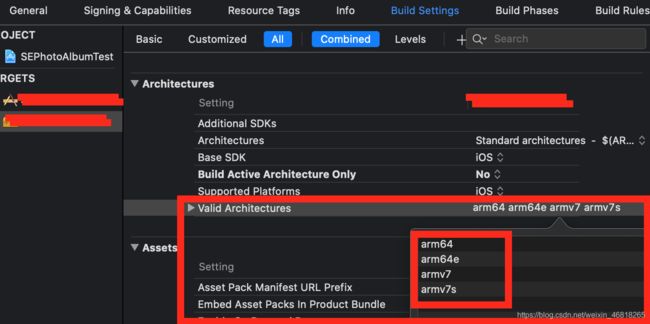
build active architecture only -> NO (关闭仅编译活跃架构)
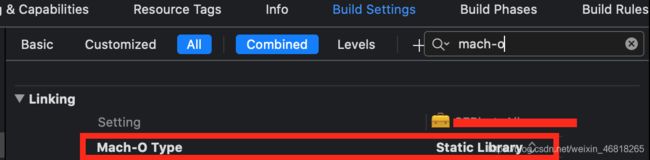
mach-o改为静态库
加载组件时的常见问题:
- pod install 环境变量使用
ENV['']
变量使用方式:pod install时,在命令前指定指定变量。例如:
is_source=1 pod install
- 图片资源
s.resource_bundles
组件引入图片资源文件方式发生改变,图片会存在于app->组件名.bundle文件中。
swift引入图片写法举例:
extension UIImage {

    convenience init?(imageName: String, currentClass: AnyClass) {
        let codeBundlePath = (Bundle(for: currentClass).path(forResource: "TestRepo.bundle", ofType: nil) ?? "") as NSString
        let filePath = codeBundlePath.appendingPathComponent((imageName + "@2x.png"))
        self.init(contentsOfFile: filePath)
    }
}
处理Assets中的图片资源工具
提取Assets.car中的图片
- podfile子库 与 swift 版本声明
- 子库的声明与使用
s.subspec
使用子库, podfile文件中写法:
pod 'TestRepo', :subspecs=> ['Categray','Business']
或者
'pod 'TestRepo/Categray' - podfile 中 swift 版本声明:
post_install do |installer| installer.pods_project.targets.each do |target| target.build_configurations.each do |config| config.build_settings['SWIFT_VERSION'] = '5.0' config.build_settings['ONLY_ACTIVE_ARCH'] = 'NO' end end end - 子库的声明与使用
上传代码到组件的远程私有仓库
git add .本地添加修改git commit -m ""本地提交git branch -M master建立分支git remote -v查看远程地址(选用)git remote rm origin删除远程地址(选用)git remote add origin 组件的远程私有仓库url添加新的远程地址git push -u origin master提交到远程git tag "版本号"
(版本号与spec文件中的版本号一致)# .podspec文件中的版本号 s.version = '1.0.0'- git tag 查看已有标签
git push --tags( 指定标签推送 git push origin xxx) - 删除标签
git tag -d 要删除的标签(删除本地)
git push origin :标签名(删除远程 )
- git tag 查看已有标签
提交组件.podspec到私有索引库
pod lib lint(本地验证)pod spec lint(远程验证)pod repo push 远程仓库名称 私有库名称.spec
通过 pod spec lint 验证后,执行第三步,第三步会自动再次验证
具体操作:
- cd 到待上传
.podspec的文件夹下 pod lib lint(本地验证)pod spec lint(远程验证)- 上传.spec到远程仓库
pod repo push 远程仓库名称 私有库名称.spec
添加后缀--allow-warnings可以忽略提交时的校验警告(最好不要有警告,有时导致使用私有库时偶尔出现编译报错)
push成功后,对应远程索引库也会自动更新
:pod repo push TestRepo TestComponent.spec --allow-warnings
查看本地索引库列表:
pod repo
podspec私有索引库创建
- 在github或者其他托管平台,新建一个空的远程仓库,用于存放.podspec文件
添加readme文件,根据需要选择public或者private(例:公司使用) - 本地添加远程库
pod repo add 自定义空的远程仓库名称 远程库地址
pod repo add TestRepo https://github.com/xxx/TestRepo.git
删除指定私有库: pod repo remove
库名称
使用私有库组件
要在Podfile文件中,注明组件库对应的source
# platform对应组件版本
platform :ios, '9.0'
# 官方source
source 'https://github.com/CocoaPods/Specs.git'
# 自己的source
source '组件对应的索引库地址'

pod '组件名称'
报错解决
pod install时, 警告[Xcodeproj] Generated duplicate UUIDs xxxxxx
原因:工程不同文件夹下有同名文件。
解决:检查工程中的重复文件,并删除或处理同名文件。
warning: Could not find or use auto-linked library ‘xxx’
-
方案一:
直接忽略警告
pod repo push TestRepo TestComponent.spec --allow-warnings -
方案二:

在 .podspec 的.frameworks字段补充library,具体需要填写的frameworks名称,参考测试组件工程生成的.app包中framework文件夹。


示例:
s.frameworks = 'libswiftCore','libswiftCoreFoundation','libswiftCoreGraphics','libswiftCoreImage','libswiftDarwin','libswiftDispatch','libswiftFoundation','libswiftMetal','libswiftObjectiveC','libswiftos','libswiftQuartzCore','libswiftUIKit'
匹配资源失败
- 查看远程对应tag对应工程是否有资源,无资源重新 git push
- `pod cache clean --all`(清除本地缓存)
pod search 组件库错误:找不到库- 前往——>个人——>资源库——>caches——>CocoaPods,删除search_index.json(search_index.json是缓存文件,新上传的库不会主动存入缓存)
- 重新
pod search 组件库,生成新的缓存,可匹配新的库
该错误并不影响正常安装和使用
创建一个完成空的索引库,git pull/push 报错:
Your configuration specifies to merge with the ref 'refs/heads/master' from the remote, but no such ref was fetched.
如果在新建一个空的远程仓库,
没有添加readme文件,这个报错正常,此时在本地目录添加一个readme文件,commit 后 push 即可。
tag不变,如何重新下载相同tag的组件?
- 首先明确重新上传tag的命令:
# 上传tag,以版本0.1.0为例:
git tag 0.1.0
git push --tags
# 删除tag
git tag -u 0.1.0
git push origin :0.1.0
# 重新上传tag
git tag 0.1.0
git push --tags
- 如何重新下载相同tag组件(即组件版本不改变情况下更新组件)?
清理 pod 缓存后,update
pod cache clean --all
# 使用更新命令
pod update --no-repo-update
# 如果无效,使用
pod update
上传.podspec时编译不通过
ERROR | [iOS] unknown: Encountered an unknown error (/Applications/Xcode.app/Contents/Developer/usr/bin/xcrun simctl list devices
这个错误是因为依赖库(s.dependency)包含了.a静态库造成的。虽然这并不影响Pod的使用,但是验证是无法通过的。可以通过–use-libraries来让验证通过。解决方法:
pod spec lint xxx.podspec --verbose --use-libraries
在push的时候使用:
pod trunk push xxx.podspec --allow-warnings --use-libraries
clang: error: linker command failed with exit code 1 (use -v to see invocation) ID file not found
使用 pod lib lint --verbose 命令得知错误详情,私有库中的静态库不支持i386架构:
** BUILD FAILED **

The following build commands failed:
    	Ld /Users/xxx/Library/Developer/Xcode/DerivedData/App-eirdvplvkjwfajgnpucugqsajotp/Build/Intermediates.noindex/App.build/Release-iphonesimulator/App.build/Objects-normal/i386/Binary/App normal i386
lib验证
pod lib lint --verbose --use-libraries --allow-warnings
亲测有效的方案:
-
在 podspec 文件中添加
s.pod_target_xcconfig = { 'VALID_ARCHS[sdk=iphonesimulator*]' => '' }另一种写法,也可指定支持的架构:
s.pod_target_xcconfig = { 'VALID_ARCHS' => 'x86_64 armv7 arm64' }
如果项目已经设置 pod_target_xcconfig,添加到已有值的后面。设置此处将在 模拟器编译时不产生二进制文件。
- VALID_ARCHS 的描述
pod lint 命令添加 --skip-import-validation 参数,lint 将跳过验证 pod 是否可以导入。
pod repo lint --skip-import-validation
- pod lint 命令详情链接
pod repo push 命令添加 --skip-import-validation 参数,push 将跳过验证 pod 是否可以导入。
pod repo push --skip-import-validation
-
pod repo push 命令详情链接
-
参考:文章链接