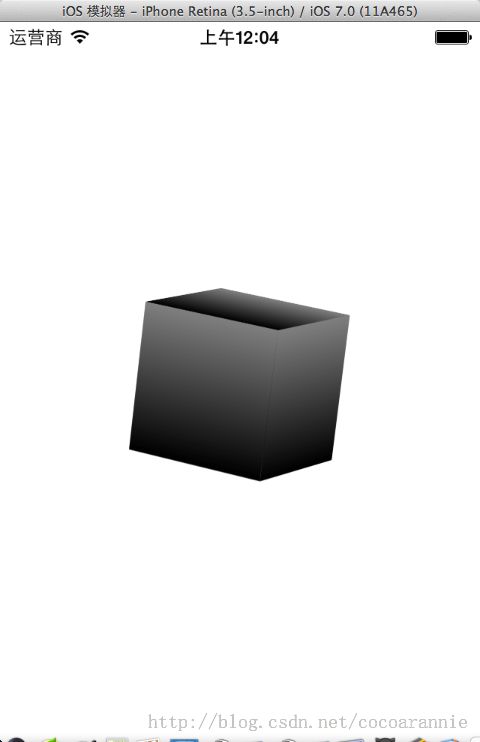
【iOS】用Layer创建一个三维模型以及拖动
关于CALayer的介绍以及基本属性,在这篇博客中有交代:CoreAnimation —— CALayer
这篇博客讲述简单的通过对layer的transform属性的设置一个CATransform3D来进行自定义三维图形,甚至后续的处理。
通常简单的仿射变换我们也是通过对其的transform属性进行设置。不过这里设置的是一个3D变换类。如果线性代数很好的话,那应该能够理解内部具体做了如何的矩阵运算。
首先我子类化一个UIView对象,把图形的绘制在这个自定义View上进行。
接口方面
@property (nonatomic, assign, readonly) CGFloat side;

@property (nonatomic, assign, readonly) BOOL autoAnimate;


/**

 *  创建一个正方体对象

 *

 *  @param frame   位置

 *  @param side    边长

 *  @param animate 创建后是否自动旋转展示

 *

 *  @return 正方体对象视图

 */

+ (HRCube *)cube3DWithFrame:(CGRect)frame side:(CGFloat)side autoAnimate:(BOOL)animate;
工厂方法的实现就是快速实例化并设置属性
+ (HRCube *)cube3DWithFrame:(CGRect)frame side:(CGFloat)side autoAnimate:(BOOL)animate

{

    HRCube *cube3D = [[HRCube alloc] initWithFrame:frame];

    cube3D.side = side;

    cube3D.autoAnimate = animate;


    return cube3D;

}
类别中有两个内部成员
CALayer *_cubeLayer; //main layer
GLKMatrix4 _rotMatrix;
第一个是我们需要绘制正方体的layer。
第二个是在导入GLKit框架后,从中引入的一个矩阵变换类,我们在触摸屏幕拖动时,需要使用到这个类对正方体进行旋转处理。
初始化主layer
- (id)initWithFrame:(CGRect)frame

{

    self = [super initWithFrame:frame];

    if (self) {

        _cubeLayer = [CALayer layer];

        _cubeLayer.frame = self.bounds;

        _cubeLayer.contentsScale = [UIScreen mainScreen].scale;

    }

    return self;

}
正式绘制正方体
- (void)setSide:(CGFloat)side

{

    _side = side;


//    NSLog(@"%@", NSStringFromCGRect(_cubeLayer.bounds));


    //正

    [self addCubeLayer:@[@0, @0, @(_side/2), @0, @0, @0, @0]];

    //背

    [self addCubeLayer:@[@0, @0, @(-_side/2), @(M_PI), @0, @0, @0]];

    //左

    [self addCubeLayer:@[@(-_side/2), @0, @0, @(-M_PI_2), @0, @1, @0]];

    //右

    [self addCubeLayer:@[@(_side/2), @0, @0, @(M_PI_2), @0, @1, @0]];

    //上

    [self addCubeLayer:@[@0, @(-_side/2), @0, @(-M_PI_2), @1, @0, @0]];

    //下

    [self addCubeLayer:@[@0, @(_side/2), @0, @(M_PI_2), @1, @0, @0]];


    CATransform3D transform3D = CATransform3DIdentity;

    transform3D.m34 = -1.0/2000;

    _cubeLayer.sublayerTransform = transform3D;


    [self.layer addSublayer:_cubeLayer];

}
这里的m34不是星体- -,3D变形矩阵的m34通常应该设置为-1/EYE_DISTANCE,这里设置为2000已经足够好。
addCubeLayer的实现
//添加sublayers

- (void)addCubeLayer:(NSArray *)params

{

    CAGradientLayer *gradient = [CAGradientLayer layer];

    gradient.contentsScale = [UIScreen mainScreen].scale;

    gradient.bounds = CGRectMake(0, 0, _side, _side);

    gradient.position = self.center;

    gradient.colors = @[(id)kGrayColor, (id)kBlackColor];

    gradient.locations = @[@0, @1];

    gradient.startPoint = CGPointMake(0, 0);

    gradient.endPoint = CGPointMake(0, 1);

    //抗锯齿

    gradient.shouldRasterize = YES;


    CATransform3D trans3D = CATransform3DMakeTranslation([params[0] floatValue], [params[1] floatValue], [params[2] floatValue]);

    CATransform3D rotate3D = CATransform3DRotate(trans3D , [params[3] floatValue], [params[4] floatValue], [params[5] floatValue], [params[6] floatValue]);

    CATransform3D transform3D = rotate3D;

//    CATransform3D transform3D = CATransform3DRotate(trans3D, [params[3] floatValue], [params[4] floatValue], [params[5] floatValue], [params[6] floatValue]);


    gradient.transform = transform3D;


    [_cubeLayer addSublayer:gradient];

}
这里为了更方便观察,使用的是渐变Layer,颜色为宏,可以自由修改。
注意给其抗锯齿设为了YES。通常我们还可以在整个项目的info.plist文件中设置该内容,不过设置会对整个项目的性能产生不好的影响,所以一般来说,需要的时候再设置也是一个不错的选择。
这样我们就简单的创建好了一个正方体,不过当前摆放很正,所以只能看到一个正方形平面,下面我们给他设置自动旋转后给他一个沿着坐标轴的角度偏转,再无限围着y轴转就OK了。
//添加自定义旋转展示动画

- (void)addAnimation

{

    _cubeLayer.sublayerTransform = CATransform3DRotate(_cubeLayer.sublayerTransform, M_PI/9.0, 0.5, 0.5, 0.5);


    CABasicAnimation *animation = [CABasicAnimation animationWithKeyPath:@"sublayerTransform.rotation.y"];

    animation.toValue = @(MAXFLOAT);

    animation.duration = MAXFLOAT;

    [_cubeLayer addAnimation:animation forKey:@"rotation"];

}
这时运行程序我们就能看到一个旋转的三维正方体了

下面给其扩展一个拖动收拾旋转功能
首先给view增加一个拖动收拾,然后在Action中实现
#pragma mark - PanGesture

- (void)panRotate:(UIPanGestureRecognizer *)ges

{

    static CGPoint start;

    if (ges.state == UIGestureRecognizerStateBegan) {

        start = [ges locationInView:self];

    } else if (ges.state == UIGestureRecognizerStateChanged) {

        CATransform3D transform = _cubeLayer.sublayerTransform;

        _rotMatrix = GLKMatrix4MakeWithArray((void *)&transform);


        CGPoint loc = [ges locationInView:self];

        CGPoint diff = CGPointMake(start.x-loc.x, start.y-loc.y);


        float rotX = 1 * GLKMathDegreesToRadians(diff.y/2.0);

        float rotY = -1 * GLKMathDegreesToRadians(diff.x/2.0);


        bool isInvertible;

        GLKVector3 xAxis = GLKMatrix4MultiplyVector3(GLKMatrix4Invert(_rotMatrix, &isInvertible),

                                                     GLKVector3Make(1, 0, 0));

        _rotMatrix = GLKMatrix4Rotate(_rotMatrix, rotX, xAxis.x, xAxis.y, xAxis.z);

        GLKVector3 yAxis = GLKMatrix4MultiplyVector3(GLKMatrix4Invert(_rotMatrix, &isInvertible),

                                                     GLKVector3Make(0, 1, 0));

        _rotMatrix = GLKMatrix4Rotate(_rotMatrix, rotY, yAxis.x, yAxis.y, yAxis.z);


        _cubeLayer.sublayerTransform = *((CATransform3D *)&_rotMatrix);


        start = loc;

    }

}
经过对矩阵的实时处理后,我们可以使用拖动收拾来在视图中实时的调整3D正方体的旋转了。
Demo源码:
CSDN:点击打开链接
GitHub:Rannie / HRCube3D
喜欢的话可以去点个星:)
以上就是本篇博客全部内容,欢迎指正和交流。转载注明出处~