Prometheus监控+grafana出图
Linux高级—Prometheus监控+grafana出图
一、Prometheus架构
1、Prometheus架构图
2、Prometheus组件
采集数据:exporter   pushgateway  中间件(代理)
存储数据:tsdb
提供数据:http server
显示数据: grafana
告警、报警:alertmanager
组件:
	1.tsdb   time series database  时序数据库 --》hdd/ssd   hdd机械磁盘 hard disk drive  ssd固态磁盘 -->solid state drive
		promQL : select ,insert等
	2.http server  web服务
	3.pushgateway  中间件(代理)
	4.alertmanager  告警的软件
	5.exporter 收集数据,采集数据  木马程序 : 安装到被监控的机器上
- Prometheus Server
Prometheus Server是Prometheus组件中的核心部分,负责实现对监控数据的获取,存储以及查询。 Prometheus Server可以通过静态配置管理监控目标,也可以配合使用Service Discovery的方式动态管理监控目标,并从这些监控目标中获取数据。其次Prometheus Server需要对采集到的监控数据进行存储,Prometheus Server本身就是一个时序数据库,将采集到的监控数据按照时间序列的方式存储在本地磁盘当中。最后Prometheus Server对外提供了自定义的PromQL语言,实现对数据的查询以及分析。 Prometheus Server内置的Express Browser UI,通过这个UI可以直接通过PromQL实现数据的查询以及可视化。 Prometheus Server的联邦集群能力可以使其从其他的Prometheus Server实例中获取数据,因此在大规模监控的情况下,可以通过联邦集群以及功能分区的方式对Prometheus Server进行扩展。
- Exporters
理解为植入客户机的一个程序,程序专门收集客户机的数据,发送给prometheus 服务器
          相当于一个间谍(地下党),收集情报,发送中央
Exporter将监控数据采集的端点通过HTTP服务的形式暴露给Prometheus Server,Prometheus
Server通过访问该Exporter提供的Endpoint端点,即可获取到需要采集的监控数据。 一般来说可以将Exporter分为2类:
直接采集:这一类Exporter直接内置了对Prometheus监控的支持,比如cAdvisor,Kubernetes,Etcd,Gokit等,都直接内置了用于向Prometheus暴露监控数据的端点。
间接采集:间接采集,原有监控目标并不直接支持Prometheus,因此我们需要通过Prometheus提供的Client Library编写该监控目标的监控采集程序。例如: Mysql Exporter,JMX Exporter,Consul Exporter等
- PushGateway
在Prometheus Server中支持基于PromQL创建告警规则,如果满足PromQL定义的规则,则会产生一条告警,而告警的后续处理流程则由AlertManager进行管理。在AlertManager中我们可以与邮件,Slack等等内置的通知方式进行集成,也可以通过Webhook自定义告警处理方式。
3、数据获取
获取数据的方式:
	1.pull  server --》pull ---》client   主动的获取数据,避免大并发
	2.push  client --->push---》server   client 主动送数据过来,数据会非常新,会出现大量的数据同时push过来
二、Prometheus的安装和配置
1、安装
a、使用容器安装
[root@docker1 ~]#  docker run -d -p 9090:9090 --name sc-prom-1   prom/prometheus
Unable to find image 'prom/prometheus:latest' locally
latest: Pulling from prom/prometheus
50783e0dfb64: Pull complete
daafb1bca260: Pull complete
bafa8e139cea: Pull complete
0d2e6df8577f: Pull complete
e3d4e14499bc: Pull complete
a3f71f7c721c: Pull complete
aca108eacfe0: Pull complete
b6aee8ea9d2f: Pull complete
950d9a06ee14: Pull complete
d009d09c576e: Pull complete
50100a62d658: Pull complete
34487f1a8146: Pull complete
Digest: sha256:aa1687dd552ed98df598cc0fed2effbc62a0f05236bc2253c65520ddd4f2afce
Status: Downloaded newer image for prom/prometheus:latest
70732675d454a3ee21cb037e78e19745a0ad05a394f89b874073e8664fe96c56
[root@docker1 ~]# docker ps
CONTAINER ID   IMAGE                  COMMAND                  CREATED         STATUS         PORTS             NAMES
70732675d454   prom/prometheus        "/bin/prometheus --c…"   7 seconds ago   Up 5 seconds   0.0.0.0:9090->9090/tcp, :::9090->9090/tcp   sc-prom-1
24252a8a11d0   wordpress:latest       "docker-entrypoint.s…"   25 hours ago    Up 3 minutes   0.0.0.0:80->80/tcp, :::80->80/tcp           my_wordpress-wordpress-1
4f69af84c549   mariadb:10.6.4-focal   "docker-entrypoint.s…"   25 hours ago    Up 3 minutes   3306/tcp, 33060/tcp             my_wordpress-db-1
[root@docker1 ~]#
# 访问prometheus
http://192.168.1.136:9090
http://192.168.1.136:9090/metrics
b、源码安装
第1步:安装prometheus server
源码安装
1.上传下载的源码包到linux服务器
[root@sc-prom ~]# mkdir /prom
[root@sc-prom ~]# cd /prom
[root@sc-prom prom]# ls
prometheus-2.34.0.linux-amd64.tar.gz
[root@sc-prom prom]#
2.解压源码包
[root@sc-prom prom]# tar xf prometheus-2.34.0.linux-amd64.tar.gz
[root@sc-prom prom]# ls
prometheus-2.34.0.linux-amd64  prometheus-2.34.0.linux-amd64.tar.gz
[root@sc-prom prom]#
3.修改解压后的压缩包名字
[root@sc-prom prom]# mv prometheus-2.34.0.linux-amd64 prometheus
[root@sc-prom prom]# ls
prometheus  prometheus-2.34.0.linux-amd64.tar.gz
[root@sc-prom prom]#
# 临时和永久修改PATH变量,添加prometheus的路径
[root@sc-prom prometheus]# PATH=/prom/prometheus:$PATH
[root@sc-prom prometheus]# cat /root/.bashrc
# .bashrc

# User specific aliases and functions

alias rm='rm -i'
alias cp='cp -i'
alias mv='mv -i'

# Source global definitions
if [ -f /etc/bashrc ]; then
	. /etc/bashrc
fi
PATH=/prom/prometheus:$PATH   #添加
执行prometheus程序
[root@prometheus prometheus]# nohup prometheus  --config.file=/prom/prometheus/prometheus.yml &
[1] 8431
[root@prometheus prometheus]# nohup: 忽略输入并把输出追加到"nohup.out"

[root@prometheus prometheus]#
# 查看prometheus的进程
[root@prometheus prometheus]# ps aux|grep prome
root       8431  4.5  2.4 782084 46204 pts/0    Sl   11:21   0:00 prometheus --config.file=/prom/prometheus/prometheus.yml
root       8439  0.0  0.0 112824   980 pts/0    S+   11:21   0:00 grep --color=auto prome
[root@prometheus prometheus]#

# 查看prometheus监听的端口号
[root@prometheus prometheus]# netstat -anplut|grep prome
tcp6       0      0 :::9090                 :::*                    LISTEN      8431/prometheus
tcp6       0      0 ::1:9090                ::1:51738               ESTABLISHED 8431/prometheus
tcp6       0      0 ::1:51738               ::1:9090                ESTABLISHED 8431/prometheus
2、把Prometheus配置成一个服务
# 将源码二进制安装的prometheus,添加成一个service方式管理

[root@prometheus ~]# cat /usr/lib/systemd/system/prometheus.service
[Unit]
Description=prometheus
[Service]
ExecStart=/prom/prometheus/prometheus --config.file=/prom/prometheus/prometheus.yml
ExecReload=/bin/kill -HUP $MAINPID
KillMode=process
Restart=on-failure
[Install]
WantedBy=multi-user.target

[root@sc-prom prometheus]# systemctl daemon-reload  #让systemd加载prometheus的service文件
[root@sc-prom system]# service prometheus start
Redirecting to /bin/systemctl start prometheus.service
[root@sc-prom system]# ps aux|grep prom
root       5121 40.0  3.0 783588 56428 ?        Ssl  14:52   0:00 /prom/prometheus/prometheus --config.file=/prom/prometheusprometheus.yml
root       5129  0.0  0.0 112824   988 pts/1    S+   14:52   0:00 grep --color=auto prom
[root@sc-prom system]# service prometheus stop
Redirecting to /bin/systemctl stop prometheus.service
[root@sc-prom system]# ps aux|grep prom
root       5148  0.0  0.0 112824   988 pts/1    S+   14:52   0:00 grep --color=auto prom
[root@sc-prom system]#
3、访问测试
ip:9090默认端口号
二、安装和启动node-exporter
1、安装及启动
1.下载node_exporter-1.4.0-rc.0.linux-amd64.tar.gz源码,上传到节点服务器上
2.解压
[root@lb-1 ~]# ls
anaconda-ks.cfg  name_ip.txt                                  sanchuang1290
feng.txt         node_exporter-1.4.0-rc.0.linux-amd64.tar.gz  sanchuang1965
input.sh         onekey_install_changjinghu.sh                sanchuang{random.randint(1,10000)}
liang            sanchuang
[root@lb-1 ~]# tar xf node_exporter-1.4.0-rc.0.linux-amd64.tar.gz
[root@lb-1 ~]# ls
node_exporter-1.4.0-rc.0.linux-amd64
node_exporter-1.4.0-rc.0.linux-amd64.tar.gz
单独存放到/node_exporter文件夹
[root@lb-1 ~]# mv node_exporter-1.4.0-rc.0.linux-amd64 /node_exporter
[root@lb-1 ~]#
[root@lb-1 ~]# cd /node_exporter/
[root@lb-1 node_exporter]# ls
LICENSE  node_exporter  NOTICE
[root@lb-1 node_exporter]#

# 修改PATH变量
[root@lb-1 node_exporter]# PATH=/node_exporter/:$PATH
[root@lb-1 node_exporter]# vim /root/.bashrc
[root@lb-1 node_exporter]# tail -1 /root/.bashrc
PATH=/node_exporter/:$PATH

# 执行node exporter 代理程序agent
[root@lb-1 node_exporter]# nohup node_exporter --web.listen-address 0.0.0.0:8090  &
[root@lb-1 node_exporter]# ps aux | grep node_exporter
root      64281  0.0  2.1 717952 21868 pts/0    Sl   19:03   0:04 node_exporter --web.listen-address 0.0.0.0:8090
root      82787  0.0  0.0 112824   984 pts/0    S+   20:46   0:00 grep --color=auto node_exporter
[root@lb-1 node_exporter]# netstat -anplut | grep 8090
tcp6       0      0 :::8090                 :::*                    LISTEN      64281/node_exporter
tcp6       0      0 192.168.17.152:8090     192.168.17.156:43576    ESTABLISHED 64281/node_exporter
[root@lb-1 node_exporter]#
2、测试访问
# http://192.168.17.152:8090/metrics
三、在prometheus server里添加node节点
[root@prometheus prometheus]# pwd
/prom/prometheus
[root@prometheus prometheus]# cat prometheus.yml
# my global config
global:
  scrape_interval: 15s # Set the scrape interval to every 15 seconds. Default is every 1 minute.
  evaluation_interval: 15s # Evaluate rules every 15 seconds. The default is every 1 minute.
  # scrape_timeout is set to the global default (10s).

# Alertmanager configuration
alerting:
  alertmanagers:
    - static_configs:
        - targets:
          # - alertmanager:9093

# Load rules once and periodically evaluate them according to the global 'evaluation_interval'.
rule_files:
  # - "first_rules.yml"
  # - "second_rules.yml"

# A scrape configuration containing exactly one endpoint to scrape:
# Here it's Prometheus itself.
scrape_configs:
  # The job name is added as a label `job=` to any timeseries scraped from this config.
  - job_name: "prometheus"
    static_configs:
      - targets: ["localhost:9090"]
      # 添加下面的配置采集服务器的metrics
  - job_name: "LB-1"
    static_configs:
      - targets: ["192.168.17.152:8090"]
  - job_name: "LB-2"
    static_configs:
      - targets: ["192.168.17.151:8090"]
  - job_name: "NFS"
    static_configs:
      - targets: ["192.168.17.146:8090"]
# 重启Prometheus
[root@prometheus prometheus]# service prometheus restart
登录prometheus查看是否添加targets成功,若是如下图则表示添加成功
三、grafana安装
[root@prometheus yum.repos.d]# cd /grafana/
[root@prometheus grafana]# ls
grafana-enterprise-9.1.2-1.x86_64.rpm
[root@prometheus grafana]# yum install grafana-enterprise-9.1.2-1.x86_64.rpm -y
# 直接导入grafana安装包,用yum下载

# 重启grafana-server 默认监听的端口为3000
[root@prometheus grafana]# service grafana-server start
Starting grafana-server (via systemctl):                   [  确定  ]
[root@prometheus grafana]# netstat -anplut | grep grafana
tcp        0      0 192.168.17.156:55100    34.120.177.193:443      ESTABLISHED 12270/grafana-serve
tcp6       0      0 :::3000                 :::*                    LISTEN      12270/grafana-serve
直接访问,下面就是点点点的操作
默认用户名和密码都是admin
第二步,配置prometheus的数据源
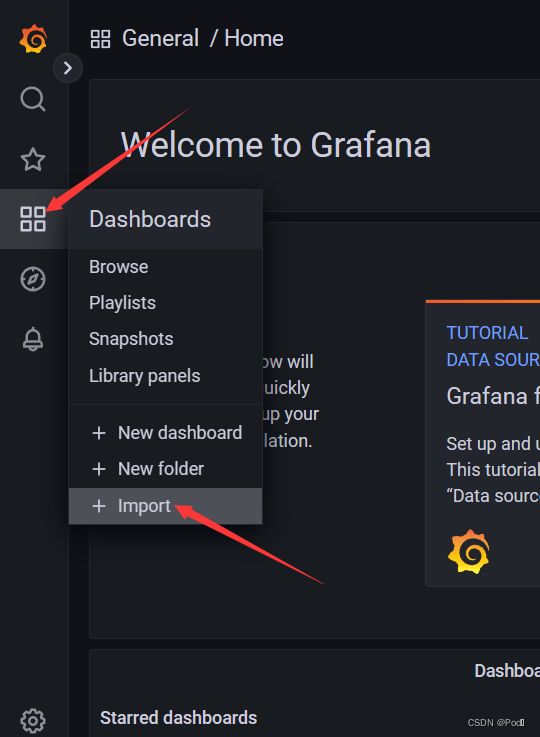
导入grafana的模板


