Centos7环境的Impala的安装和使用,以及负载均衡配置
Centos7环境的Impala的安装和使用
集群规划
| 节点名称 | impala-catalogd | impala-statestored | impala-server |
|---|---|---|---|
| node01 | √ | √ | √ |
| node02 | × | × | √ |
| node03 | × | × | √ |
配置本地yum源
1. 在node01节点上安装httpd服务器
#yum方式安装httpds服务器
[root@node01 ~]# yum install -y httpd
#启动httpd服务器
[root@node01 ~]# systemctl start httpd
#查看httpd转态是否启动
[root@node01 ~]# systemctl status httpd
2. 配置yum源
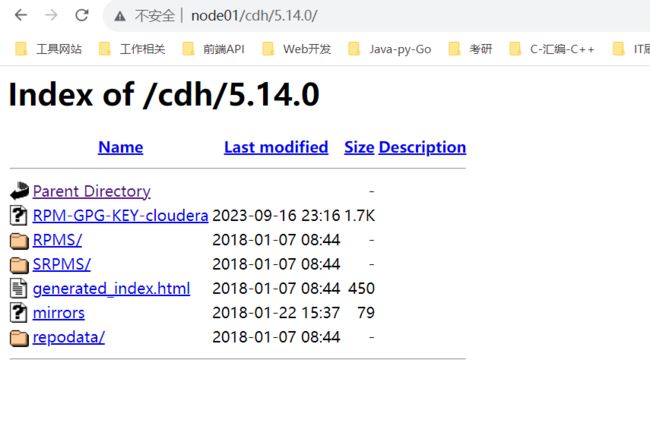
- 上传下载好的impala的压缩包cdh5.14.0-centos7.tar.gz到/var/www/html/目录
- 解压 tar -zxvf cdh5.14.0-centos7.tar.gz
- 配置yum源:cd /etc/yum.repo/
- vim local.repo
#需要与文件名保持一致
[local]
name=local_yum
#访问当前源的地址信息
baseurl=http://node01/cdh/5.14.0/
#为0不做gpg校验
gpgcheck=0
#当前源是否可用,为1则可用,为0则禁用
enabled=1
- 导入秘钥认证
-
防止后边安装失败(这里有个小坑),每个节点都执行
-
rpm --import /var/www/html/cdh/RPM-GPG-KEY-cloudera
-
安装impala
- node01节点安装 impala-catalogd、impala-statestored、 impala-server(impala-Deamon)
[root@node01 ~]# yum install -y impala impala-server impala-state-store impala-catalog impala-shell
- node02节点安装impala-server(impala-Deamon)
yum install -y impala-server impala-shell
3.node03节点安装impala-server(impala-Deamon)
yum install -y impala-server impala-shell
修改hive的配置
1.修改hive-site.xml配置
-
cd /opt/yjx/apache-hive-3.1.2-bin/
-
vim hive-site.xml
    hive.metastore.uris
    thrift://node01:9083


    hive.metastore.client.socket.timeout
    3600
2.分发hive安装目录到集群中其它节点
-
scp hdfs-site.xml node02:$PWD
scp hdfs-site.xml node03:$PWD
修改hadoop的配置
-
在所有节点创建一下这个目录mkdir -p /var/lib/hadoop-hdfs
-
cd /opt/yjx/hadoop-3.1.2/etc/hadoop/
-
vim hdfs-site.xml
-
dfs.client.read.shortcircuit true dfs.domain.socket.path /var/lib/hadoop-hdfs/dn_socket dfs.datanode.hdfs-blocks-metadata.enabled true dfs.client.file-block-storage-locations.timeout 30000 -
分发到其他节点
-
scp hdfs-site.xml node02:$PWD
scp hdfs-site.xml node03:$PWD
创建impala配置的软连接
impala中跟Hadoop,Hive相关的配置使用Yum方式安装Impala时默认的Impala配置文件目录为/etc/impala/conf目录,Impala的使用要依赖Hadoop,Hive框架,所以需要把HDFS,Hive的配置文件告知Impala,执行下面的命令,把HDFS和Hive的配置文件软链接到/etc/impala/conf下(所有节点执行)
-
所有节点均执行
-
ln -s /opt/yjx/hadoop-3.1.2/etc/hadoop/core-site.xml /etc/impala/conf/core-site.xml
ln -s /opt/yjx/hadoop-3.1.2/etc/hadoop/hdfs-site.xml /etc/impala/conf/hdfs-site.xml
ln -s /opt/yjx/apache-hive-3.1.2-bin/conf/hive-site.xml /etc/impala/conf/hive-site.xml
impala的自身配置(所有节点)
-
创建日志目录mkdir -p /var/logs/impala/
-
chown impala:impala /var/logs/impala/
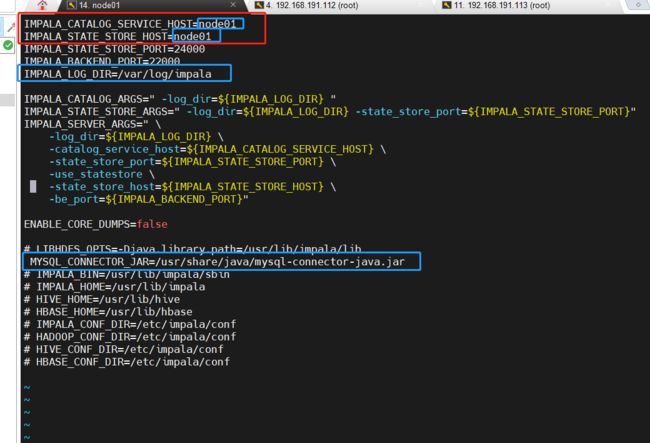
修改配置
-
cd /etc/default/
scp impala node02:$PWD
scp impala node03:$PWD
-
创建目录用于存放mysql的连接驱动mkdir -p /usr/share/java/
-
创建软连接
ln -s /opt/yjx/apache-hive-3.1.2-bin/lib/mysql-connector-java-5.1.32-bin.jar /usr/share/java/mysql-connector-java.jar
修改bigtop的JAVA_HOME路径
#修改bigtop的JAVA_HOME路径
[root@node01 ~]# vim /etc/default/bigtop-utils
[root@node02 ~]# vim /etc/default/bigtop-utils
[root@node03 ~]# vim /etc/default/bigtop-utils
#添加JAVA_HOME
export JAVA_HOME=/usr/java/jdk1.8.0_231-amd64
启动集群
-
启动zookeeper
-
zkServer.sh start -
启动Hadoop
-
start-all.sh -
启动Hive
-
# 启动元数据服务 nohup hive --service metastore > /dev/null 2>&1 & #启动hiveServer2 nohup hiveserver2 > /dev/null 2>&1 & #客户端测试 -
启动impala
-
[root@node01 ~]# service impala-state-store start [root@node01 ~]# service impala-catalog start [root@node01 ~]# service impala-server start -
[root@node02 ~]# service impala-catalog start -
[root@node03 ~]# service impala-server start -
验证Impala是否启动
-
ps -ef | grep impala -
浏览器Web界面验证
-
#访问impalad管理界面
http://node01:25000/
说明: 如果进程数启动不对,web页面打不开,去指定的日志目录。
-
jps时出现空白的进程或者process information unavailable
-
解决办法
-
#解决办法(注意只删除后缀为impala的即可)
[root@node01 bin]# rm -rf /tmp/hsperfdata_impala*
[root@node02 bin]# rm -rf /tmp/hsperfdata_impala*
[root@node03 bin]# rm -rf /tmp/hsperfdata_impala*
-
Impala的负载均衡
Impala主要有三个组件,分别是statestore,catalog和impalad,对于Impalad节点,每一个节点都可以接收客户端的查询请求,并且对于连接到该Impalad的查询还要作为Coordinator节点(需要消耗一定的内存和CPU)存在,为了保证每一个节点的资源开销的平衡需要对于集群中Impalad节点做一下负载均衡。
Cloudera官方推荐的代理方案是HAProxy,这里我们也使用这种方式实现负载均衡。实际生产中建议选择一个非Impala节点作为HAProxy安装节点。
1.选择一台机器安装haProxy,这里选择node01安装
-
yum install -y haproxy
- 修改haproxy.cfg配置文件,在配置文件中增加如下内容
-
vim /etc/haproxy/haproxy.cfg
-
#---------------------------------------------------------------------
# Global settings
#---------------------------------------------------------------------
global
    # to have these messages end up in /var/log/haproxy.log you will
    # need to:
    #
    # 1) configure syslog to accept network log events.  This is done
    #    by adding the '-r' option to the SYSLOGD_OPTIONS in
    #    /etc/sysconfig/syslog
    #
    # 2) configure local2 events to go to the /var/log/haproxy.log
    #   file. A line like the following can be added to
    #   /etc/sysconfig/syslog
    #
    #    local2.*                       /var/log/haproxy.log
    #
    log         127.0.0.1 local2

    chroot      /var/lib/haproxy
    pidfile     /var/run/haproxy.pid
    maxconn     4000
    user        haproxy
    group       haproxy
    daemon

    # turn on stats unix socket
    stats socket /var/lib/haproxy/stats

#---------------------------------------------------------------------
# common defaults that all the 'listen' and 'backend' sections will
# use if not designated in their block
#---------------------------------------------------------------------
defaults
    mode                    http
    log                     global
    option                  httplog
    option                  dontlognull
    option http-server-close
    option forwardfor       except 127.0.0.0/8
    option                  redispatch
    retries                 3
    timeout http-request    10s
    timeout queue           3m
    timeout connect         5000s
    timeout client          3600s
    timeout server          3600s
    timeout http-keep-alive 10s
    #健康检查时间
    timeout check           10s
    maxconn                 3000

#---------------------------------------------------------------------
# main frontend which proxys to the backends
#---------------------------------------------------------------------
frontend  main *:5000
    acl url_static       path_beg       -i /static /images /javascript /stylesheets
    acl url_static       path_end       -i .jpg .gif .png .css .js

    use_backend static          if url_static
    default_backend             app

#---------------------------------------------------------------------
# static backend for serving up images, stylesheets and such
#---------------------------------------------------------------------
backend static
    balance     roundrobin
    server      static 127.0.0.1:4331 check
#---------------------------------------------------------------------
# round robin balancing between the various backends
#---------------------------------------------------------------------
backend app
    balance     roundrobin
    server   app1 127.0.0.1:5001 check
    server   app1 127.0.0.1:5002 check

#--------------配置 impala-jdbc -------------------------------------------------------
listen impala :25001
    balance roundrobin
    option tcplog
    mode tcp
    #bind 0.0.0.0:21051
    #listen impalajdbc
    server impala_jdbc_01 node02:21050 check
    server impala_jdbc_02 node03:21050 check

#--------------配置impala-shell-------------------------------------------------------
listen impala :25002
    balance leastconn
    option tcplog
    mode tcp
    #listen impalashell
    server impala_shell_01 node01:21000 check
    server impala_shell_02 node02:21000 check
    server impala_shell_03 node03:21000 check
#--------------配置 impala-hue -------------------------------------------------------
#listen impala :25003
    #balance source
    #option tcplog
    #mode tcp
    #server impala_hue_01 host01:21050 check
    #server impala_hue_02 host02:21050 check
#-----web ui----------------------------------------------------------------
listen stats :1080
    balance
    stats  uri /stats
    stats refresh 30s
#管理界面访问IP和端口
    #bind 0.0.0.0:1080
    mode http
    #定义管理界面
    #listen status
3.检查配置是否正确
/usr/sbin/haproxy -f /etc/haproxy/haproxy.cfg
-
开启HAProxy代理服务
开启: systemctl start haproxy.service 查看状态: systemctl status haproxy.service 关闭: systemctl stop haproxy.service 重启: systemctl restart haproxy.service 开机自启动: chkconfig haproxy on -
访问监控页面
http://node01:1080/stats
- impala安装包链接: 提取码: k877


