Spring Bean的生命周期及三级缓存流程
Spring Bean 的生命周期说起来其实就三个大块:实例化Bean -> 设置属性(注入和装配) -> 初始化 -> 使用Bean -> 销毁Bean
这个很好理解,但是内部是怎么样注入,初始化以及销毁?经历怎么样的过程呢?追随这些问题来参考这篇文章。
我们先从 三级缓存 -> 实例化... 顺序逐步理解
一、三级缓存
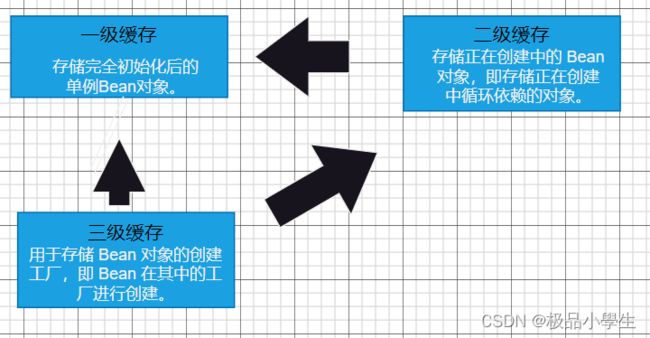
一级缓存 (singletonObjects) :
作用:存储完全初始化后的单例Bean对象。
说明:当一个单例 Bean 被完全初始化之后会被放入到一级缓存中,并且确保其在容器中是唯一的。
二级缓存 (earlySingletonObjects) :
作用:存储正在创建中的 Bean 对象,即存储正在创建中循环依赖的对象。
说明:当一个循环依赖的对象在三级缓存中被检测到会进入到二级缓存中进行对象的创建。
三级缓存 (singletonFactories) :
作用:用于存储 Bean 对象的创建工厂,即 Bean 在其中的工厂进行创建。
说明:当对象创建好之后会进入 一级缓存。如果检测出存在循环依赖问题则会放入到二级缓存中进行创建。
理解了三级缓存,我们就清楚了初始化及完成后的 Bean 会存放在哪里了。
二、实例化(为 Bean 分配空间)
实例化在初始化之前,是需要给字节码中的这些对象分配空间出来,也就是为 Bean 分配内存空间。
三、设置属性 (Bean 注入和装配)
容器将所需要的属性值(依赖)注入到该 Bean 中的过程,这样 Bean 就可以在后续操作中使用这些属性了。
属性注入和装配的常见三种方式:
1.属性注入
使用 @Autowired、@Resource 配合 @Controller、@Service、@Repository、@Configuration、@Compoent 进行注入。
2.setter注入
在设置 set 方法的上面加上 @Autowired 注解。
例:
@Controller
public class UserController {

    // 注入 Setter
    private User user;

    @Autowired
    public void setUser(User user) {
        this.user = user;
    }
}
3.构造器注入
在构造方法中进行注入
例:
@Controller
public class UserController {

    // 构造方法注入
    private User user;

    @Autowired
    public UserController(User user) {
        this.user = user;
    }
}
当只有一个构造方法的时候可以省略 @Autowired。
经历这个阶段后 Bean 对象的属性会被注入进去。
四、初始化
- 通过各种通知 Aware 方法,如 BeanNameAware 可以让对象在当前容器中的名称,BeanFactoryAware 可以获取工厂来获取其他对象,ApplicationContextAware 拥有比 BeanNameAware 更多的功能。
- 执行 BeanPostProcessor 初始化前置方法,执行 postProcessBeforeInitialzation 方法。
- 执行 PostConstruct 初始化方法,如果 Bean 上标记了
@PostConstruct注解,那么在依赖注入完成后,会调用被标记的方法。这个注解表示该方法是在 Bean 初始化的最后阶段执行的,用于执行特定的初始化逻辑。 - 执行自己指定的 init-method 方法,在配置 xml 文件中,这个方法会在依赖注入和
@PostConstruct 方法执行后被调用。 - 执行 BeanPostProcessor 初始化后置方法,执行 postProcessAfterInitialization 方法。
代码实例:
BeanLifeComponent
//                        BeanLifeComponent

package com.controller;

import com.Student.Student;
import org.springframework.beans.BeansException;
import org.springframework.beans.factory.BeanFactory;
import org.springframework.beans.factory.BeanFactoryAware;
import org.springframework.beans.factory.BeanNameAware;
import org.springframework.beans.factory.config.BeanPostProcessor;
import org.springframework.stereotype.Component;

import javax.annotation.PostConstruct;
import javax.annotation.PreDestroy;

@Component
public class BeanLifeComponent implements BeanNameAware, BeanFactoryAware, BeanPostProcessor {

    private String beanName;
    private BeanFactory beanFactory;

    @Override
    public void setBeanName(String name) {
        this.beanName = name;
        System.out.println("执行了BeanNameAware的通知,这个方法可以让Bean知道容器的名称。 此时 bean 容器名称是 " + beanName);
    }

    @Override
    public void setBeanFactory(BeanFactory beanFactory) throws BeansException {
        this.beanFactory = beanFactory;
        System.out.println("执行了 setBeanFactory 获取到容器这样可以手动获取其他的Bean对象");
    }

    @PostConstruct
    public void postConstruct() {
        System.out.println("执行了@PostConstruct初始化方法。");
    }

    public void init() {
        System.out.println("执行了xml的 init-method 指定初始化方法");
    }

    @PreDestroy
    public void preDestroy() {
        System.out.println("执行了PreDestory销毁方法");
    }


    public void doSomething() {
        Student student = beanFactory.getBean(Student.class);
        System.out.println("通过 beanFactory 获取到 student,信息为: " + student);
    }

}
Application 类:
//                                  Application
import com.controller.BeanLifeComponent;
import org.springframework.context.support.ClassPathXmlApplicationContext;

public class Application {
    public static void main(String[] args) {
        // ClassPathXmlApplicationtext 是 ApplicaitonContext的子类,拥有销毁的方法
        ClassPathXmlApplicationContext context = new ClassPathXmlApplicationContext("spring-config.xml");

        BeanLifeComponent beanLifeComponent = context.getBean("myComponent",BeanLifeComponent.class);

        System.out.println("使用Bean");
        // 销毁 Bean
        beanLifeComponent.doSomething();
        context.destroy();
        System.out.println("销毁了Bean");
    }
}
运行结果如下:
执行了BeanNameAware的通知,这个方法可以让Bean知道容器的名称。 此时 bean 容器名称是 myComponent
执行了 setBeanFactory 获取到容器这样可以手动获取其他的Bean对象
执行了@PostConstruct初始化方法。
执行了xml的 init-method 指定初始化方法
使用Bean
通过 beanFactory 获取到 student,信息为: Student(name=张三, age=18)
执行了PreDestory销毁方法
销毁了BeanProcess finished with exit code 0
这个实例证明了上述的初始化过程。
接下来这个实例证明一下 @PostConstruct 方法和 @BeanPostProcessor 的顺序:
package com.Test;

import javafx.application.Application;
import org.springframework.beans.factory.annotation.Autowired;
import org.springframework.beans.factory.config.BeanPostProcessor;
import org.springframework.context.ApplicationContext;
import org.springframework.context.ApplicationContextException;
import org.springframework.context.annotation.AnnotationConfigApplicationContext;
import org.springframework.context.support.ClassPathXmlApplicationContext;
import org.springframework.stereotype.Component;

import javax.annotation.PostConstruct;

@Component
class MyComponent {
    public MyComponent() {
        System.out.println("MyComponent constructor");
    }

    @PostConstruct
    public void postConstruct() {
        System.out.println("MyComponent @PostConstruct");
    }
}

@Component
class MyBeanPostProcessor implements BeanPostProcessor {
    public Object postProcessBeforeInitialization(Object bean, String beanName) {
        System.out.println("Before Initialization: " + beanName);
        return bean;
    }

    public Object postProcessAfterInitialization(Object bean, String beanName) {
        System.out.println("After Initialization: " + beanName);
        return bean;
    }
}

public class Main {
    public static void main(String[] args) {
//        AnnotationConfigApplicationContext context = new AnnotationConfigApplicationContext("spring-config.xml");
        ApplicationContext context = new ClassPathXmlApplicationContext("spring-config.xml");
        MyComponent myComponent = context.getBean(MyComponent.class);
        System.out.println("Main class: Bean retrieved");
    }
}
运行结果如下:
MyComponent constructor
Before Initialization: myComponent
MyComponent @PostConstruct
After Initialization: myComponent
Main class: Bean retrievedProcess finished with exit code 0
五、使用 Bean
正常使用 Bean 实现业务逻辑实现
六、销毁 Bean
销毁 Bean 是指在关闭容器的时候,Spring 会执行一些清理工作,以释放资源或者执行必要的关闭操作。如果不显式定义销毁方法可能不会释放比如数据库连接等资源。他只会尝试在容器中释放单例 Bean 的资源。但是对于原型(prototype)的 Bean ,Spring 不自动执行销毁方法,因为原型 Bean 的生命周期不受 Spring 容器管理。
一、@PreDestory注解
@Component
public class MyBean {
    @PreDestroy
    public void preDestroy() {
        // 执行销毁前的逻辑
    }
}
二、实现 DisposableBean 接口
@Component
public class MyBean implements DisposableBean {
    @Override
    public void destory() throws Exception {
        // 执行销毁方法
    }
}
三、在配置文件中指定 destory-method
在 XML 配置文件中,通过 destroy-method 属性来指定 Bean 的销毁方法。
这时,需要在 MyBean 类中定义一个 customDestoryMethod 的方法。
这就是完整的 Bean 生命周期
