PyTorch实战-实现神经网络图像分类基础Tensor最全操作详解(二)
前言
PyTorch可以说是三大主流框架中最适合初学者学习的了,相较于其他主流框架,PyTorch的简单易用性使其成为初学者们的首选。这样我想要强调的一点是,框架可以类比为编程语言,仅为我们实现项目效果的工具,也就是我们造车使用的轮子,我们重点需要的是理解如何使用Torch去实现功能而不要过度在意轮子是要怎么做出来的,那样会牵扯我们太多学习时间。以后就出一系列专门细解深度学习框架的文章,但是那是较后期我们对深度学习的理论知识和实践操作都比较熟悉才好开始学习,现阶段我们最需要的是学会如何使用这些工具。
深度学习的内容不是那么好掌握的,包含大量的数学理论知识以及大量的计算公式原理需要推理。且如果不进行实际操作很难够理解我们写的代码究极在神经网络计算框架中代表什么作用。不过我会尽可能将知识简化,转换为我们比较熟悉的内容,我将尽力让大家了解并熟悉神经网络框架,保证能够理解通畅以及推演顺利的条件之下,尽量不使用过多的数学公式和专业理论知识。以一篇文章快速了解并实现该算法,以效率最高的方式熟练这些知识。
博主专注数据建模四年,参与过大大小小数十来次数学建模,理解各类模型原理以及每种模型的建模流程和各类题目分析方法。此专栏的目的就是为了让零基础快速使用各类数学模型、机器学习和深度学习以及代码,每一篇文章都包含实战项目以及可运行代码。博主紧跟各类数模比赛,每场数模竞赛博主都会将最新的思路和代码写进此专栏以及详细思路和完全代码。希望有需求的小伙伴不要错过笔者精心打造的专栏。
一文速学-数学建模常用模型
本文接上篇文章,内容太多了分开细写:PyTorch实战-实现神经网络图像分类基础Tensor最全操作详解(一)_fanstuck的博客-CSDN博客
PyTorch数据结构-Tensor
五、Tensor数学运算
先创建两个展示的Tensor方便我们观察运算规则:
import torch

# 创建一个张量
tensor_a = torch.tensor([[1, 2], [3, 4]])
tensor_b = torch.tensor([[5, 6], [7, 8]])
1.张量的加减法
# 张量的加法
tensor_sum = tensor_a + tensor_b
tensor_sum
tensor([[ 6,  8],
        [10, 12]])
# 张量的减法
tensor_diff = tensor_a - tensor_b
tensor_diff
tensor([[-4, -4],
        [-4, -4]])
行列对应相加减。
2.张量的乘除法
# 张量的乘法
tensor_product = tensor_a * tensor_b
tensor_product
tensor([[ 5, 12],
        [21, 32]])
# 张量的除法
tensor_div = tensor_a / tensor_b
tensor_div
tensor([[0.2000, 0.3333],
        [0.4286, 0.5000]])
行列对应相乘除。
3.张量的开平方
# 张量的平方
tensor_square = torch.square(tensor_a)
tensor_square
tensor([[ 1,  4],
        [ 9, 16]])
# 张量的开方
tensor_sqrt = torch.sqrt(tensor_a)
tensor_sqrt
tensor([[1.0000, 1.4142],
        [1.7321, 2.0000]])
行列对应相开平方。
4.张量的指数运算
# 张量的指数运算
tensor_exp = torch.exp(tensor_a)
tensor_exp
tensor([[ 2.7183,  7.3891],
        [20.0855, 54.5981]])
5.张量的对数运算
# 张量的对数运算
tensor_log = torch.log(tensor_a)
tensor_log
tensor([[0.0000, 0.6931],
        [1.0986, 1.3863]])
6.张量逐元素相乘
# 张量逐元素相乘
tensor_mul=torch.mul(tensor_a, tensor_b)
tensor_mul
tensor([[ 5, 12],
        [21, 32]])
和乘法是一致的。
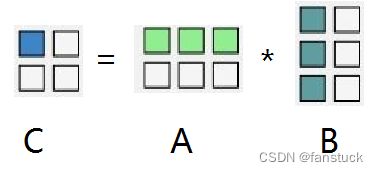
7.张量矩阵乘法
#矩阵乘法
tensor_mm=torch.mm(tensor_a, tensor_b)
tensor_mm
tensor([[19, 22],
        [43, 50]])
六、广播原则(Broadcasting)
当在 PyTorch 中进行张量操作时,如果两个张量的形状不匹配,PyTorch 将尝试通过广播来使它们的形状相容。
import torch

# 创建一个3x2的张量
tensor_a = torch.tensor([[1, 2], [3, 4], [5, 6]])

# 创建一个1x2的张量
tensor_b = torch.tensor([[10, 20]])

# 进行相加操作
result = tensor_a + tensor_b

# 输出结果
print(result)
tensor_b 的形状是 (1, 2),与 tensor_a 的形状 (3, 2) 匹配,PyTorch会自动将 tensor_b 在需要的维度上进行复制以匹配 tensor_a 的形状,然后进行相加操作。
tensor([[11, 22],
        [13, 24],
        [15, 26]])
七、Tensor聚合操作
1.求和(sum)
import torch

# 创建一个张量
tensor = torch.tensor([[1, 2], [3, 4], [5, 6]])

# 对所有元素求和
result_sum = torch.sum(tensor)
print(result_sum)
tensor(21)
2.均值(Mean)
import torch

# 创建一个张量,数据类型为浮点数
tensor = torch.tensor([[1, 2], [3, 4], [5, 6]], dtype=torch.float32)

# 计算所有元素的平均值
result_mean = torch.mean(tensor)
print(result_mean)
tensor(3.5000)
3.最大值(Max)和最小值(Min)
最大值:
import torch

# 创建一个张量
tensor = torch.tensor([[1, 2], [3, 4], [5, 6]])

# 找到所有元素中的最大值
result_max = torch.max(tensor)
print(result_max)
tensor(6)
最小值:
import torch

# 创建一个张量
tensor = torch.tensor([[1, 2], [3, 4], [5, 6]])

# 找到所有元素中的最小值
result_min = torch.min(tensor)
print(result_min)
tensor(1)
4.指定维度上的聚合操作
import torch

# 创建一个张量
tensor = torch.tensor([[1, 2], [3, 4], [5, 6]])

# 沿着行的方向对列进行求和(第0维)
result_row_sum = torch.sum(tensor, dim=0)
print(result_row_sum)
tensor([ 9, 12])
八、矩阵操作
矩阵乘法上述已经给出操作,这里更全面介绍一下矩阵的常用操作:
1.矩阵转置
import torch

# 创建一个矩阵
A = torch.tensor([[1, 2], [3, 4], [5, 6]])

# 矩阵转置
result = torch.transpose(A, 0, 1)
print(result)
2.计算矩阵的逆
import torch

# 创建一个可逆矩阵
A = torch.tensor([[1.0, 2.0], [3.0, 4.0]], dtype=torch.float32)

# 计算逆矩阵
result = torch.inverse(A)
print(result)
tensor([[-2.0000,  1.0000],
        [ 1.5000, -0.5000]])
3.矩阵求迹
import torch

# 创建一个可逆矩阵
A = torch.tensor([[1.0, 2.0], [3.0, 4.0]], dtype=torch.float32)

# 计算逆矩阵
result = torch.inverse(A)
print(result)
tensor(5)
那么到这里学习的Tensor基本操作已经够支撑我们使用PyTorch了,接下需要我们再学习一下Variable就可以开始实战项目了。
点关注,防走丢,如有纰漏之处,请留言指教,非常感谢
以上就是本期全部内容。我是fanstuck ,有问题大家随时留言讨论 ,我们下期见。


