生产者-消费者模型
目录
阻塞队列
生产者-消费者模型
实现了发送方和接收方之间的“解耦合”
“削峰填谷”,保证系统的稳定性
队列
定时器
MyTimer
编辑
在了解生产者-消费者模型前,我们需要知道什么是阻塞队列。
阻塞队列
阻塞队列,是优先级队列的一种。虽然也是先进先出的,但是带有特殊的功能。
1.如果队列为空,执行出队列操作,就会阻塞,阻塞到另一个线程往队列里添加元素(直到队列不空)为止
2.如果队列满了,执行入队列操作,也会阻塞,阻塞到另一个线程从队列取走元素位置(队列不满)
基于这样的队列,可以实现“生产者-消费者模型”
过年包饺子,有两种操作模式
1.每个人都分别进行擀饺子皮+包饺子操作:大家会竞争擀面杖,产生阻塞等待,影响效率
2.一个人专门负责擀饺子皮,另外三个人负责包,我每次擀好一个皮,就到桌子上,他们每次都从盖帘上取一个皮进行包。
哪种方式更科学?
此时,我负责擀饺子皮,我就是生产者,他们负责包,他们就是消费者。桌子就是阻塞队列,如果我擀的太慢了,他们就需要等我。如果我擀的太快了,我就等一会。
生产者-消费者模型
两大好处:
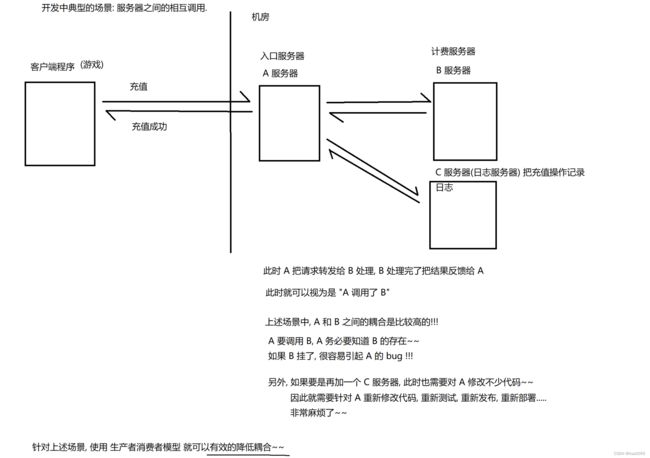
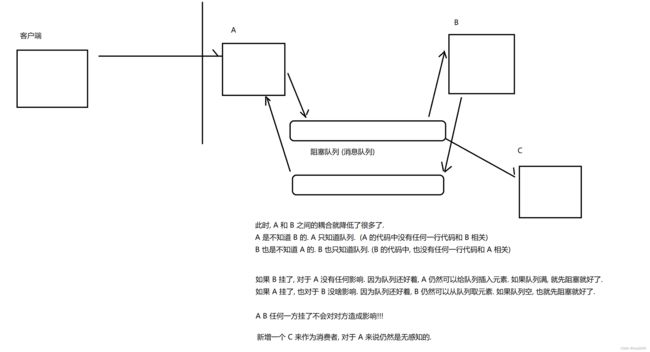
实现了发送方和接收方之间的“解耦合”
通过上述解耦合的操作,能够降低我们在这个任务上的工作成本~
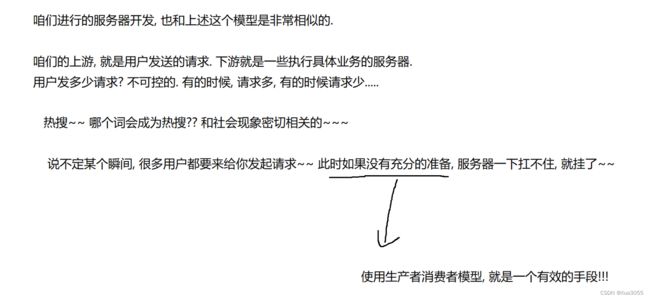
“削峰填谷”,保证系统的稳定性
队列
要实现一个阻塞队列,先要实现一个普通的队列。这个队列可以基于数组,也可以基于链表。
我们在这里通过数组的方式来实现普通队列。
class MyblockingQueue{
    private int[] items = new int[1000];
    private int head = 0;
    private int tail = 0;
    private int size = 0;

    public void put(int value){
        if(size == items.length){
            return;
        }
        items[tail] = value;
        tail++;
        if(tail >= items.length){
            tail = 0;
        }
        size++;
    }

    public Integer take(){
        int result = 0;
        if(size == 0){
            return null;
        }
        result = items[head];
        head++;
        if(head >= items.length){
            head = 0;
        }
        size--;
        return result;

    }
}
实现的代码有了入队列和出队列的操作,但是还没有加上阻塞功能。加上阻塞功能意味着线程要在多线程环境下使用。保证线程安全,我们先加上锁,再用wait和notify让其该阻塞时阻塞。
这两个线程中的wait是否可能会同时触发?(如果同时触发了,那么就不能相互唤醒了)
在当前并不会,但是最好的办法是wait返回之后再判定一下,看此时的条件是不是具备了~
     class MyblockingQueue{
    private int[] items = new int[1000];
    private int head = 0;
    private int tail = 0;
    private int size = 0;

    public void put(int value) throws InterruptedException {
        synchronized (this) {
            while (size == items.length) {
                this.wait();
            }
            items[tail] = value;
            tail++;
            if (tail >= items.length) {
                tail = 0;
            }
            size++;
            this.notify();
        }
    }

    public Integer take() throws InterruptedException {
        int result = 0;
        synchronized (this) {
            while (size == 0) {
                this.wait();
            }

            result = items[head];
            head++;
            if (head >= items.length) {
                head = 0;
            }
            size--;
            this.notify();
        }
        return result;

    }
}
把每个条件判断的地方从if改成while,这样每次wait过后被唤醒时,要求的是队列不满,但是wait之后一定是队列不满的吗?显然不一定,所以把if改成while来循环判定。
定时器
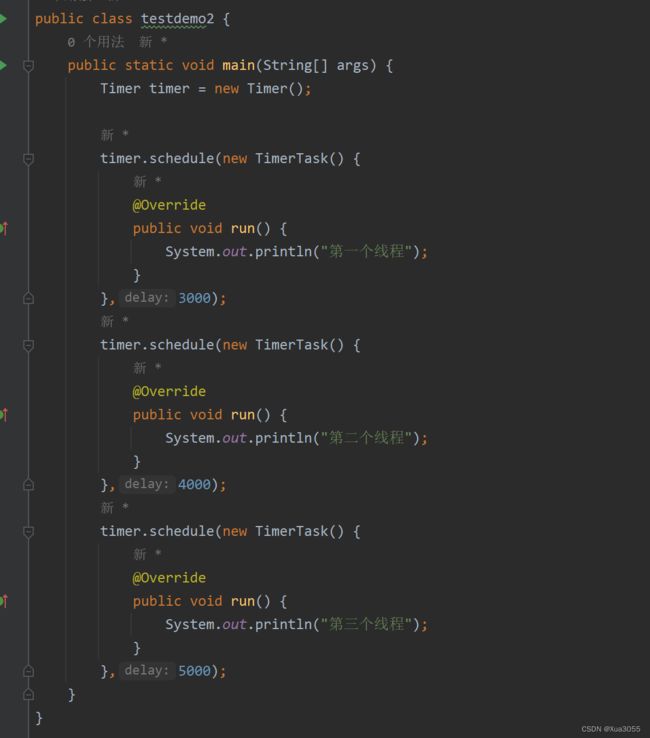
这里的定时器,不是提醒,而是执行一个实现准备好的方法/代码。
尤其是网络编程中的时候,很容易出现“卡了”“连不上”,就可以使用计时器来进行止损,和阻塞队列类似,标准库中也给我们提供了定时器。
timer.schedule(new TimerTask() {
    @Override
    public void run() {
        System.out.println("第一个线程");
    }
},3000);
这个定时器其实就是一个Runnable,中间的程序可以最后设置一个延迟执行的时间再执行。
我们自己也可以动手写一个定时器:
1.让被注册的任务,能够在指定时间被执行:
单独在定时器内部搞个线程,让这个线程周期性的扫描,判定任务是否到时间了~
2.一个定时器可以是注册N个任务的,N个任务会按照最初约定的时间按顺序执行:
这N个任务需要用数据结构来保存,使用的数据结构是优先级队列。
使用优先级队列的原因是:扫描线程只需要扫一下队首元素即可,不必遍历整个队列~(如果队首元素还没到执行时间,那么后续元素更不可能到时间)
MyTimer
定时器真正麻烦的部分,在扫描线程的工作上:
1.取出队首元素,检查看看队首元素任务是否到时间了
2.如果时间没到,就把任务塞回到队列里去
3.如果时间到了,就把任务进行执行
 public MyTimer(){
        t = new Thread(() ->{
            while(true){
                MyTask myTask = null;
                try {
                    myTask = queue.take();取出队首元素
                    long curTime = System.currentTimeMillis();
                    if(curTime < myTask.getTime()){ 比较当前时间和程序执行时间
                        queue.put(myTask);
                    }else{
                        myTask.run();
                    }
                } catch (InterruptedException e) {
                    throw new RuntimeException(e);
                }
            }
        });
    }
但是写到现在,还有两个很严重的问题:
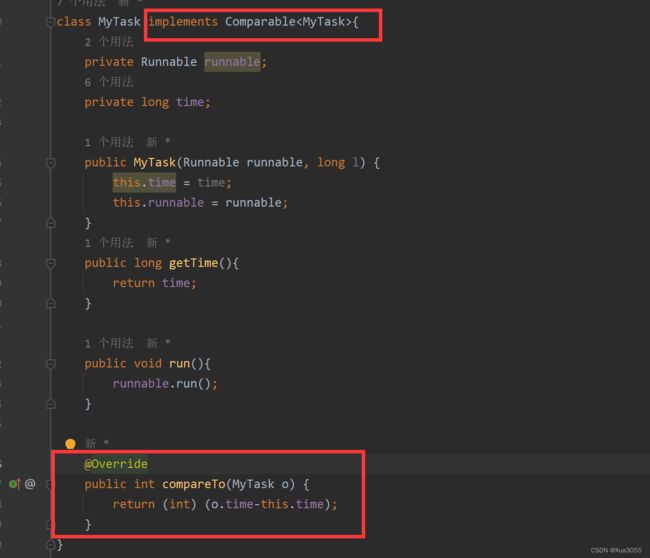
1.还没指定MyTask怎么比较优先级
我们通过重写一个compareTo方法来完成比较
2.时间没到就会一直重复做取出来塞回去的操作(盲等)
put会触发优先级调整,调整之后,myTask又回到队首了,下次循环取出来的还是这个任务。
这样会浪费大量的cpu资源~
我们的解决办法就是,让上述代码不要进行盲等,而是阻塞式等待。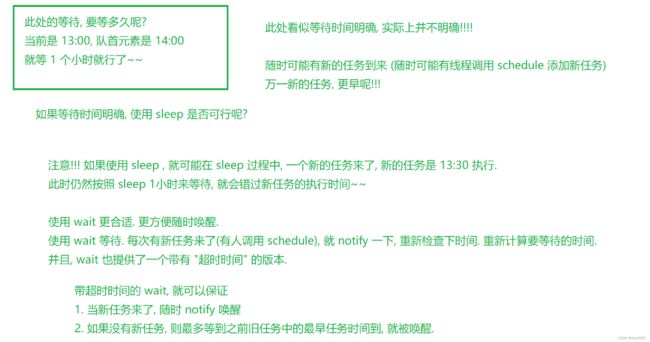
在扫描线程中加入改动
在schedule中加入改动
这样就会进行一个合理的等待,而不是一直占用cpu资源盲等。
但是我们还需要考虑一个极端情况:
总结下来,是因为当前的take和wait操作不是原子的,如果在take和wait之间加上锁,就能确保在这个过程中不会有新的任务过来,问题就自然解决了。
class MyTask implements Comparable{
    private Runnable runnable;
    private long time;

    public MyTask(Runnable runnable, long l) {
        this.time = time;
        this.runnable = runnable;
    }
    public long getTime(){
        return time;
    }

    public void run(){
        runnable.run();
    }

    @Override
    public int compareTo(MyTask o) {
        return (int) (o.time-this.time);
    }
}
class MyTimer{
    private Thread t = null;

    private PriorityBlockingQueue queue = new PriorityBlockingQueue<>();

    public void schedule(Runnable runnable,long after){
        MyTask task = new MyTask(runnable,System.currentTimeMillis() + after);
        queue.put(task);
        synchronized (this){
            this.notify();
        }
    }

    public MyTimer(){
        t = new Thread(() ->{
            while(true){
                synchronized (this) {
                    try {
                        MyTask myTask = queue.take();
                        long curTime = System.currentTimeMillis();
                        if (curTime < myTask.getTime()) {
                            queue.put(myTask);
                            this.wait(myTask.getTime() - curTime);
                        } else {
                            myTask.run();
                        }

                    } catch (InterruptedException e) {
                        throw new RuntimeException(e);
                    }
                }
            }
        });
    }
} 